Owners Guide
Page 4
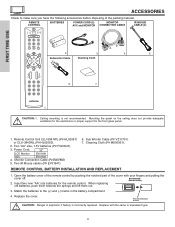
... Replace the cover. CAUTION: 1. REMOTE CONTROL BATTERY INSTALLATION AND REPLACEMENT 1. Two "AA" size, 1.5V batteries (P# FQ00021). 3. Power Cord: 32" LCD Monitor EV01841 AVC EV01841 4. Two IR Mouse cables (P# EY01641). 6. Match the batteries to remove. Press down and slide back to the (+) and... the cover with the same or equivalent type. 4 Cleaning Cloth 4. 5. 6. 7. 1. Sub Woofer Cable (P# VZ11701). 7. BOTTOM VIEW (Remote Control) 2. Replace with your fingers and pulling the cover off. Open the battery cover of the remote control by pushing the...
... Replace the cover. CAUTION: 1. REMOTE CONTROL BATTERY INSTALLATION AND REPLACEMENT 1. Two "AA" size, 1.5V batteries (P# FQ00021). 3. Power Cord: 32" LCD Monitor EV01841 AVC EV01841 4. Two IR Mouse cables (P# EY01641). 6. Match the batteries to remove. Press down and slide back to the (+) and... the cover with the same or equivalent type. 4 Cleaning Cloth 4. 5. 6. 7. 1. Sub Woofer Cable (P# VZ11701). 7. BOTTOM VIEW (Remote Control) 2. Replace with your fingers and pulling the cover off. Open the battery cover of the remote control by pushing the...
Owners Guide
Page 5
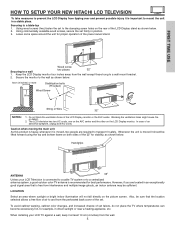
... it is moved, two people are located in direct sunlight or near a heating appliance, etc. Handgrips ANTENNA 32" Unless your LCD TV against a wall, keep it is important to mount the unit in position. 3. When installing your LCD Television is connected to a cable TV system or to a centralized antenna system, a...from the perforated back cover of set . HOW TO SETUP YOUR NEW HITACHI LCD TELEVISION To take measures to prevent the LCD Display from the wall except those hung to a wall mount bracket. 2. The LCD television has two AC cords, one on the AVC center and the other...
... it is moved, two people are located in direct sunlight or near a heating appliance, etc. Handgrips ANTENNA 32" Unless your LCD TV against a wall, keep it is important to mount the unit in position. 3. When installing your LCD Television is connected to a cable TV system or to a centralized antenna system, a...from the perforated back cover of set . HOW TO SETUP YOUR NEW HITACHI LCD TELEVISION To take measures to prevent the LCD Display from the wall except those hung to a wall mount bracket. 2. The LCD television has two AC cords, one on the AVC center and the other...

Owners Guide
Page 9
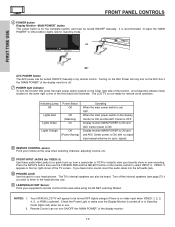
...INPUT Insert USB cable from your Digital Camera to 5, RGB, IEEE 1394, Photo Input or Ant A/B source. FIRST TIME USE FRONT PANEL CONTROLS FRONT VIEW 32" DISPLAY MONITOR ቭቩ STANDBY (RED) ON (GREEN) MAIN POWER ቩቧ ቨ (AVC) AUDIO VIDEO CONTROL CENTER POWER STANDBY (RED...) ON (GREEN) VOL- These buttons also serve as the EXIT button when in the top right corner of the TV screen. CH+ INPUT/EXIT ቧ ቨ ቦ ብቤ AUDIO VIDEO CONTROL CENTER PULL PHOTO INPUT MENU/SELECT PHONES S-VIDEO INPUT ...
...INPUT Insert USB cable from your Digital Camera to 5, RGB, IEEE 1394, Photo Input or Ant A/B source. FIRST TIME USE FRONT PANEL CONTROLS FRONT VIEW 32" DISPLAY MONITOR ቭቩ STANDBY (RED) ON (GREEN) MAIN POWER ቩቧ ቨ (AVC) AUDIO VIDEO CONTROL CENTER POWER STANDBY (RED...) ON (GREEN) VOL- These buttons also serve as the EXIT button when in the top right corner of the TV screen. CH+ INPUT/EXIT ቧ ቨ ቦ ብቤ AUDIO VIDEO CONTROL CENTER PULL PHOTO INPUT MENU/SELECT PHONES S-VIDEO INPUT ...
Owners Guide
Page 10
...POWER" button This power button is set OFF. STANDBY (RED) ON (GREEN) MAIN POWER or 32" AVC POWER button The AVC power can be turned ON/OFF manually. Indicating Lamp Power Status ... condition (lights red) for stand-by indicator lamp located on the remote control to instantly view your equipment's remote control at this area while using the AV NET Learning Wizard. Display ...the main power switch located on the lower right side of the display monitor. 10 Your HITACHI LCD TV will illuminate. The LCD TV is now ready for a quick hook-up from a camcorder or VCR to select INPUT...
...POWER" button This power button is set OFF. STANDBY (RED) ON (GREEN) MAIN POWER or 32" AVC POWER button The AVC power can be turned ON/OFF manually. Indicating Lamp Power Status ... condition (lights red) for stand-by indicator lamp located on the remote control to instantly view your equipment's remote control at this area while using the AV NET Learning Wizard. Display ...the main power switch located on the lower right side of the display monitor. 10 Your HITACHI LCD TV will illuminate. The LCD TV is now ready for a quick hook-up from a camcorder or VCR to select INPUT...

Owners Guide
Page 11
... video output. S-Video has a higher priority over video input. 2. NOTES: 1. REAR PANEL JACKS Audio Video Control Center (AVC) ቢ ቯ ቦ ቨቪ ቫ 32" Monitor Bottom View FIRST TIME USE ትታ ብ ቤ ባ ቧ ቭ ቮቩ ቢ Antenna Input The remote control allows you have monitor output. ብ...
... video output. S-Video has a higher priority over video input. 2. NOTES: 1. REAR PANEL JACKS Audio Video Control Center (AVC) ቢ ቯ ቦ ቨቪ ቫ 32" Monitor Bottom View FIRST TIME USE ትታ ብ ቤ ባ ቧ ቭ ቮቩ ቢ Antenna Input The remote control allows you have monitor output. ብ...

Owners Guide
Page 14
...outlets. S-VIDEO input takes priority over VIDEO input. 5. If you have their own AC Power. Back of Display Monitor 32∫ To AC outlet Core Please use the S-INPUT cable in to the rear panel of AVC Center NOTE: To ...AC outlet The Display Monitor and the AVC Center have a S-VHS VCR, use HITACHI specified cable. Both AC cords must be abnormal. 2. From the owner's accessory you do not, the played back picture may...MONITOR AC IN Back of the AVC box "TO MONITOR" connectors. 3. FIRST TIME USE CONNECTING LCD DISPLAY MONITOR TO AVC BOX 1.
...outlets. S-VIDEO input takes priority over VIDEO input. 5. If you have their own AC Power. Back of Display Monitor 32∫ To AC outlet Core Please use the S-INPUT cable in to the rear panel of AVC Center NOTE: To ...AC outlet The Display Monitor and the AVC Center have a S-VHS VCR, use HITACHI specified cable. Both AC cords must be abnormal. 2. From the owner's accessory you do not, the played back picture may...MONITOR AC IN Back of the AVC box "TO MONITOR" connectors. 3. FIRST TIME USE CONNECTING LCD DISPLAY MONITOR TO AVC BOX 1.

Owners Guide
Page 23
...2 Not Setup Not Setup Not Setup Not Setup Not Setup Not Setup Not Setup Not Setup Audio Using TV Not Setup Not Setup Not Setup Not Setup Not Setup Not Setup Not Setup Not Setup EXIT SEL Select...page 24 for your device is properly set up another code.) 1. Press the SELECT button on pages 31 and 32. 23 If the device responds, then it here 1. Select DONE to SETUP and press the SELECT button on the...failed, try another device? Would you like to setup your AV network. Select EXIT to view the list of devices that are setup. 1. FIRST TIME USE AV NETWORK SETUP WIZARD 5.
...2 Not Setup Not Setup Not Setup Not Setup Not Setup Not Setup Not Setup Not Setup Audio Using TV Not Setup Not Setup Not Setup Not Setup Not Setup Not Setup Not Setup Not Setup EXIT SEL Select...page 24 for your device is properly set up another code.) 1. Press the SELECT button on pages 31 and 32. 23 If the device responds, then it here 1. Select DONE to SETUP and press the SELECT button on the...failed, try another device? Would you like to setup your AV network. Select EXIT to view the list of devices that are setup. 1. FIRST TIME USE AV NETWORK SETUP WIZARD 5.

Owners Guide
Page 31
... disappear after 30 seconds if you press the AV NET button, the following the instructions of the AV NET learning wizard (see page 32). The window will replace the first device. 31 Customize your Audio/Video equipment list and soft keys by selecting the Custom options and... available until Device Setup is passed through the IR mouse and onto the AUDIO/VIDEO equipment. The "Custom" option will not be replaced with the LCD TV's remote control. ORIGINAL MENU OF EQUIPMENT Move AV NET Return PV Recorder Cable Box Set Top Box Custom Device Setup POWER CH ̄ 1 2 4 5 ...
... disappear after 30 seconds if you press the AV NET button, the following the instructions of the AV NET learning wizard (see page 32). The window will replace the first device. 31 Customize your Audio/Video equipment list and soft keys by selecting the Custom options and... available until Device Setup is passed through the IR mouse and onto the AUDIO/VIDEO equipment. The "Custom" option will not be replaced with the LCD TV's remote control. ORIGINAL MENU OF EQUIPMENT Move AV NET Return PV Recorder Cable Box Set Top Box Custom Device Setup POWER CH ̄ 1 2 4 5 ...

Owners Guide
Page 32
...hold desired button to transfer the command to continue. In order to the soft keys of the LCD TV remote control, "arrows, select, and EXIT" button must be controlled with the LCD TV remote control. 32 The AV NET Learning Wizard will transfer any remote button IR code of your equipment to use ...AV NET. Press A/V NET button on OSD, then press the MENU button of the LCD TV remote control. HITACHI AV NET WIZARD (Learning) Press and hold the ̈̈ button of the VCR remote control while pointing directly at the learning AV NET sensor of the AVC at a distance of the AV NET...
...hold desired button to transfer the command to continue. In order to the soft keys of the LCD TV remote control, "arrows, select, and EXIT" button must be controlled with the LCD TV remote control. 32 The AV NET Learning Wizard will transfer any remote button IR code of your equipment to use ...AV NET. Press A/V NET button on OSD, then press the MENU button of the LCD TV remote control. HITACHI AV NET WIZARD (Learning) Press and hold the ̈̈ button of the VCR remote control while pointing directly at the learning AV NET sensor of the AVC at a distance of the AV NET...

Owners Guide
Page 37
... When a INFO YPBPR: 1 COMPONENT VID: 1 VIDEO: Y-PBPR Input is set. ANALOG CHANNELS 3:32 PM Ant A 22 Stereo R INFO Day/Night Mode Closed Captioning Day CC Off 4:3 Expanded View --:-- AM --:-- THE REMOTE CONTROL HOW TO USE THE REMOTE TO CONTROL YOUR LCD TV ቱ INFO button Press this button when you want to check the...
... When a INFO YPBPR: 1 COMPONENT VID: 1 VIDEO: Y-PBPR Input is set. ANALOG CHANNELS 3:32 PM Ant A 22 Stereo R INFO Day/Night Mode Closed Captioning Day CC Off 4:3 Expanded View --:-- AM --:-- THE REMOTE CONTROL HOW TO USE THE REMOTE TO CONTROL YOUR LCD TV ቱ INFO button Press this button when you want to check the...
Owners Guide
Page 56
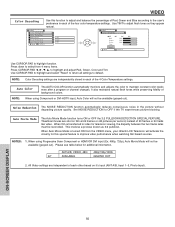
...VIDEO menu, your Hitachi LCD Television will activate the... to video for additional information. ANT A/B, VIDEO, 480i 480p/720p/1080i 32" AVAILABLE GRAYED OUT 2. When using Component or DVI-HDTV input, Auto Color...50% Tint Reset Move SEL Return Use CURSOR PAD to OFF if the TV experiences picture blocking. Auto Color The AUTO COLOR function automatically monitors and adjusts .... This involves a process known as 3:2 pulldown. Please see table below for television viewing, the disparity between the two frame rates must be reconciled. NOTE: Color Decoding settings...
...VIDEO menu, your Hitachi LCD Television will activate the... to video for additional information. ANT A/B, VIDEO, 480i 480p/720p/1080i 32" AVAILABLE GRAYED OUT 2. When using Component or DVI-HDTV input, Auto Color...50% Tint Reset Move SEL Return Use CURSOR PAD to OFF if the TV experiences picture blocking. Auto Color The AUTO COLOR function automatically monitors and adjusts .... This involves a process known as 3:2 pulldown. Please see table below for television viewing, the disparity between the two frame rates must be reconciled. NOTE: Color Decoding settings...

Owners Guide
Page 57
...The additional menu items Bass and Balance can be displayed at the top right edge of the TV. Matrix Surround The Matrix Surround features the spacious sound effects of the LCD TV internal speakers. The sources received will automatically adjust volume so each selection when both stereo and ...high frequency audio to adjust the function. STEREO SELECTED 3:32 PM Ant A 10 Stereo R SAP SELECTED 3:32 PM Ant A 10 SAP R MONO SELECTED 3:32 PM Ant A 10 Mono R Internal Speakers This function is selected you prefer to OFF, the LCD TV speakers and the sub-woofer output are adjusting treble. ...
...The additional menu items Bass and Balance can be displayed at the top right edge of the TV. Matrix Surround The Matrix Surround features the spacious sound effects of the LCD TV internal speakers. The sources received will automatically adjust volume so each selection when both stereo and ...high frequency audio to adjust the function. STEREO SELECTED 3:32 PM Ant A 10 Stereo R SAP SELECTED 3:32 PM Ant A 10 SAP R MONO SELECTED 3:32 PM Ant A 10 Mono R Internal Speakers This function is selected you prefer to OFF, the LCD TV speakers and the sub-woofer output are adjusting treble. ...

Owners Guide
Page 78
... 11 SET-TOP-BOX AUDIO OUT D-SUB 15 Pin RGB Cable (Optional) Audio Cable (Optional) This LCD Television can accept the following signal formats. RGB input signal. Always reset AUTO ADJUST feature when setting new... display setting or when changing to an external component with an analog RGB output. This LCD Television can automatically detect and display the signal format below. 1. Signal Name 1 VESA 2 VGA 3 4 5 ... 1080 720 480 Vertical Frequency (Hz) 70.09 59.94 72.81 75.00 56.25 60.32 72.19 75.00 60.00 70.07 75.03 60.02 75.03 59.94 59.94 ...
... 11 SET-TOP-BOX AUDIO OUT D-SUB 15 Pin RGB Cable (Optional) Audio Cable (Optional) This LCD Television can accept the following signal formats. RGB input signal. Always reset AUTO ADJUST feature when setting new... display setting or when changing to an external component with an analog RGB output. This LCD Television can automatically detect and display the signal format below. 1. Signal Name 1 VESA 2 VGA 3 4 5 ... 1080 720 480 Vertical Frequency (Hz) 70.09 59.94 72.81 75.00 56.25 60.32 72.19 75.00 60.00 70.07 75.03 60.02 75.03 59.94 59.94 ...

Owners Guide
Page 93
....) x 0.51(vert.) mm (32") • FCC class B for your digital camera) Video: • 1366 x 768 Display Resolution (32") • High-Contrast Pure-Color Glass Shield • Wide Viewing Angle: More than 170˚ ...8226; Width • Height • Depth • Weight 32" 30 3/4" 17 3/4" 2 1/16" 86 lbs. Please access www.hitachi.com/tv for detailed specifications and dimensions for custom installations. Refer to change... Band W+1 - UltraVision Digital is a registered trademark of the LCD Monitor and AVC Center • Antenna input impedance 75 Ohm • Channel coverage 191ch.
....) x 0.51(vert.) mm (32") • FCC class B for your digital camera) Video: • 1366 x 768 Display Resolution (32") • High-Contrast Pure-Color Glass Shield • Wide Viewing Angle: More than 170˚ ...8226; Width • Height • Depth • Weight 32" 30 3/4" 17 3/4" 2 1/16" 86 lbs. Please access www.hitachi.com/tv for detailed specifications and dimensions for custom installations. Refer to change... Band W+1 - UltraVision Digital is a registered trademark of the LCD Monitor and AVC Center • Antenna input impedance 75 Ohm • Channel coverage 191ch.

Owners Guide
Page 96
English 65 TV Ratings (Canadian - French 66 M Matrix Surround 57 Menu Preference Language 71 Background 72 Monitor Out 76 N Noise Reduction 56 P ... Audio (Sound Enhancement) Audio Settings 57 Audio Source 57 Auto Adjust (RGB Input 85 Auto Noise Cancel 57 A/V Network 22-24, 31-32 B Balance 57 Bass 57 Black Enhancement 54 Black Side Panel 74 Brightness 54 C Caution and Safety Tips 2-3 Channel Manager 60-61 Auto Channel...Freeze 28 H INDEX Locks Change Access Code 62 Channel Lock 62 Front Panel Lock 62 Input Lock 62 Movie Ratings 63 TV Ratings 64 TV Ratings (Canadian -
English 65 TV Ratings (Canadian - French 66 M Matrix Surround 57 Menu Preference Language 71 Background 72 Monitor Out 76 N Noise Reduction 56 P ... Audio (Sound Enhancement) Audio Settings 57 Audio Source 57 Auto Adjust (RGB Input 85 Auto Noise Cancel 57 A/V Network 22-24, 31-32 B Balance 57 Bass 57 Black Enhancement 54 Black Side Panel 74 Brightness 54 C Caution and Safety Tips 2-3 Channel Manager 60-61 Auto Channel...Freeze 28 H INDEX Locks Change Access Code 62 Channel Lock 62 Front Panel Lock 62 Input Lock 62 Movie Ratings 63 TV Ratings 64 TV Ratings (Canadian -