Safety and Regulatory Information Desktops, Thin Clients, and Personal Workstations
Page 28
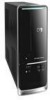
... 2-2 Toxic and Hazardous Substances and Elements Part Name Lead (Pb) Mercury (Hg) Cadmium (Cd) Hexavalent Chromium (Cr(VI)) Polybrominated biphenyls (PBB) Polybrominated diphenyl ethers (PBDE) Motherboard, processor and heat sink X O O O O O 22 Chapter 2 Regulatory Agency Notices ENWW
... 2-2 Toxic and Hazardous Substances and Elements Part Name Lead (Pb) Mercury (Hg) Cadmium (Cd) Hexavalent Chromium (Cr(VI)) Polybrominated biphenyls (PBB) Polybrominated diphenyl ethers (PBDE) Motherboard, processor and heat sink X O O O O O 22 Chapter 2 Regulatory Agency Notices ENWW

Warranty
Page 1
... a fee for quicker help when you during the first year of the three-year warranty. this warranty (as well as described in the following parts: motherboard, processor, memory, hard disk drive, graphics card, power supply, and LCD monitor. In years two and three, the parts warranty is always best to you... need it. You must be repaired or to have parts replaced, the HP Customer Care Center will make arrangements to fix your new PC. Parts (Limited): Hardware - You can register your PC on the Web at: http://...
... a fee for quicker help when you during the first year of the three-year warranty. this warranty (as well as described in the following parts: motherboard, processor, memory, hard disk drive, graphics card, power supply, and LCD monitor. In years two and three, the parts warranty is always best to you... need it. You must be repaired or to have parts replaced, the HP Customer Care Center will make arrangements to fix your new PC. Parts (Limited): Hardware - You can register your PC on the Web at: http://...
Getting Started
Page 13
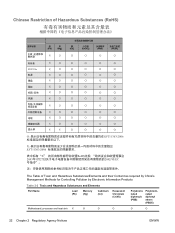
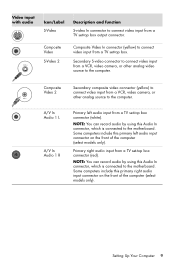
... front of the computer (select models only). Some computers include this Audio In connector, which is connected to the motherboard. Some computers include this Audio In connector, which is connected to the motherboard. Composite Video 2 Secondary composite video connector (yellow) to connect video input from a TV set-top box connector (white). Setting...
... front of the computer (select models only). Some computers include this Audio In connector, which is connected to the motherboard. Some computers include this Audio In connector, which is connected to the motherboard. Composite Video 2 Secondary composite video connector (yellow) to connect video input from a TV set-top box connector (white). Setting...
Getting Started
Page 14
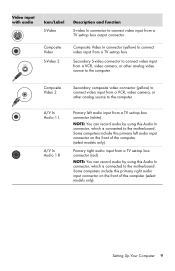
... CATV NTSC TV In connector for TV cable or antenna, to receive NTSC (National Television System Committee) channels, which is connected to the motherboard and located on the back of the computer, to record audio only (select models only). TV In connector for TV cable or antenna, to... receive ATSC (Advanced Television System Committee) channels, which is connected to the motherboard and located on the back of the computer, to record audio only (select models only). You must use the Audio In connector, which are...
... CATV NTSC TV In connector for TV cable or antenna, to receive NTSC (National Television System Committee) channels, which is connected to the motherboard and located on the back of the computer, to record audio only (select models only). TV In connector for TV cable or antenna, to... receive ATSC (Advanced Television System Committee) channels, which is connected to the motherboard and located on the back of the computer, to record audio only (select models only). You must use the Audio In connector, which are...
Getting Started
Page 89
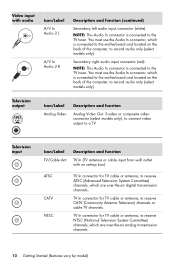
...yellow) to connect video input from a TV set-top box connector (red). Some computers include this Audio In connector, which is connected to the motherboard. Setting Up Your Computer 9 NOTE: You can record audio by using this primary left audio input from a TV set-top box output connector. ...connector on the front of the computer (select models only). Some computers include this Audio In connector, which is connected to the motherboard. NOTE: You can record audio by using this primary right audio input connector on the front of the computer (select models only).
...yellow) to connect video input from a TV set-top box connector (red). Some computers include this Audio In connector, which is connected to the motherboard. Setting Up Your Computer 9 NOTE: You can record audio by using this primary left audio input from a TV set-top box output connector. ...connector on the front of the computer (select models only). Some computers include this Audio In connector, which is connected to the motherboard. NOTE: You can record audio by using this primary right audio input connector on the front of the computer (select models only).

Getting Started
Page 90
...TV In connector for TV cable or antenna, to record audio only (select models only). NOTE: This Audio In connector is connected to the motherboard and located on the back of the computer, to receive NTSC (National Television System Committee) channels, which are over -the-air digital transmission ...to record audio only (select models only). Video input with no set-top box). NOTE: This Audio In connector is connected to the motherboard and located on the back of the computer, to receive CATV (Community Antenna Television) channels or cable TV channels. ATSC CATV NTSC TV ...
...TV In connector for TV cable or antenna, to record audio only (select models only). NOTE: This Audio In connector is connected to the motherboard and located on the back of the computer, to receive NTSC (National Television System Committee) channels, which are over -the-air digital transmission ...to record audio only (select models only). Video input with no set-top box). NOTE: This Audio In connector is connected to the motherboard and located on the back of the computer, to receive CATV (Community Antenna Television) channels or cable TV channels. ATSC CATV NTSC TV ...

Upgrade and Service
Page 42
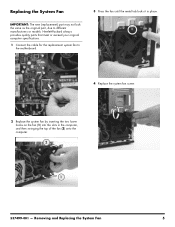
... new fan. For this procedure, you remove the system fan directly below the drive cage (shown in the rectangle), not the processor fan to the motherboard, disconnect it was connected so you have that information when you correctly install the replacement fan. 2 1 4 537499-001 - CAUTION: Note there are two fans in...
... new fan. For this procedure, you remove the system fan directly below the drive cage (shown in the rectangle), not the processor fan to the motherboard, disconnect it was connected so you have that information when you correctly install the replacement fan. 2 1 4 537499-001 - CAUTION: Note there are two fans in...
Upgrade and Service
Page 43
... Replacing the System Fan 5 Replacing the System Fan IMPORTANT: The new (replacement) part may not look the same as the original part, due to the motherboard. 3 Press the fan until the metal tab locks it in place. 4 Replace the system fan screw. 2 Replace the system fan by inserting the two lower...
... Replacing the System Fan 5 Replacing the System Fan IMPORTANT: The new (replacement) part may not look the same as the original part, due to the motherboard. 3 Press the fan until the metal tab locks it in place. 4 Replace the system fan screw. 2 Replace the system fan by inserting the two lower...
Upgrade and Service
Page 51
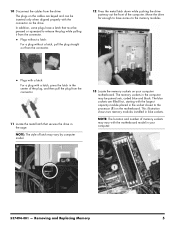
... on the cables are filled first, starting with the largest capacity module placed in the computer may be inserted only when aligned properly with the motherboard model in blue sockets. Plugs with a latch: For a plug with a latch, press the latch in the cage. Removing and Replacing Memory 5... to have a latch that secures the drive in the center of latch may vary by computer model. 13 Locate the memory sockets on the motherboard. Plugs without a latch: For a plug without a latch, pull the plug straight out from the connector. This illustration shows two memory modules...
... on the cables are filled first, starting with the largest capacity module placed in the computer may be inserted only when aligned properly with the motherboard model in blue sockets. Plugs with a latch: For a plug with a latch, press the latch in the cage. Removing and Replacing Memory 5... to have a latch that secures the drive in the center of latch may vary by computer model. 13 Locate the memory sockets on the motherboard. Plugs without a latch: For a plug without a latch, pull the plug straight out from the connector. This illustration shows two memory modules...

Upgrade and Service
Page 52
... computer specifications. Replacing a Memory Module IMPORTANT: The new (replacement) part may not look the same as the original part, due to the processor on the motherboard. 1 Touching only the top edge of the memory module, locate the notch on each end of the memory socket to release the memory module. 15...
... computer specifications. Replacing a Memory Module IMPORTANT: The new (replacement) part may not look the same as the original part, due to the processor on the motherboard. 1 Touching only the top edge of the memory module, locate the notch on each end of the memory socket to release the memory module. 15...


