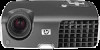

User's Guide
Page 3
...handheld organizer 17 Connecting a video source 18 Turning the projector on and off 21 Removing the lens cover 21 Turning the projector on 22 Turning the projector off 23 Moving the projector 23 Making basic adjustments 24 Aiming the projector 24 Adjusting the focus and zoom 25 Using the ...control 26 2 Showing Presentations Showing a computer screen 29 Selecting a different source 29 Hiding or showing the picture 29 3 Adjusting the Projector Adjusting the picture 31 Choosing the best picture mode 31 Adjusting the shape of the picture 32 Adjusting a slanted picture 33 Adjusting ...
...handheld organizer 17 Connecting a video source 18 Turning the projector on and off 21 Removing the lens cover 21 Turning the projector on 22 Turning the projector off 23 Moving the projector 23 Making basic adjustments 24 Aiming the projector 24 Adjusting the focus and zoom 25 Using the ...control 26 2 Showing Presentations Showing a computer screen 29 Selecting a different source 29 Hiding or showing the picture 29 3 Adjusting the Projector Adjusting the picture 31 Choosing the best picture mode 31 Adjusting the shape of the picture 32 Adjusting a slanted picture 33 Adjusting ...
User's Guide
Page 4
...menu 37 Input menu 37 Picture menu 38 Setup menu 39 Help menu 39 4 Maintaining the Projector Performing routine maintenance 41 Getting the projector status 41 Cleaning the projector and lens 41 Replacing the lamp module 42 Replacing the battery in the remote control 44 ...49 Warning light problems 49 Start-up problems 50 Picture problems 50 Interruption problems 53 Remote control problems 53 Testing the projector 54 Running the projector diagnostics 54 7 Reference Specifications 55 Safety information 58 LED safety 58 Mercury safety 58 Regulatory information 59 U.S.A 59 ...
...menu 37 Input menu 37 Picture menu 38 Setup menu 39 Help menu 39 4 Maintaining the Projector Performing routine maintenance 41 Getting the projector status 41 Cleaning the projector and lens 41 Replacing the lamp module 42 Replacing the battery in the remote control 44 ...49 Warning light problems 49 Start-up problems 50 Picture problems 50 Interruption problems 53 Remote control problems 53 Testing the projector 54 Running the projector diagnostics 54 7 Reference Specifications 55 Safety information 58 LED safety 58 Mercury safety 58 Regulatory information 59 U.S.A 59 ...
User's Guide
Page 5
... they are not located where people can step on them or trip on them. • Place the projector flat on . • Do not expose the projector to rain or moisture, and do not use it near any way, contact HP for assistance. Use a soft, dry cloth to reduce the risk of the... projector. Do not place the projector near water. • Keep paper, plastic, and combustible material at least 0.5 m (2 ft) away from the projector lens and exhaust vents. • Do not allow liquid...
... they are not located where people can step on them or trip on them. • Place the projector flat on . • Do not expose the projector to rain or moisture, and do not use it near any way, contact HP for assistance. Use a soft, dry cloth to reduce the risk of the... projector. Do not place the projector near water. • Keep paper, plastic, and combustible material at least 0.5 m (2 ft) away from the projector lens and exhaust vents. • Do not allow liquid...
User's Guide
Page 6
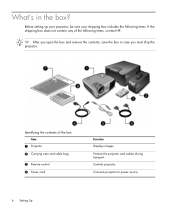
TIP: After you open the box and remove the contents, save the box in the box? Identifying the contents of the following items. If the shipping box does not contain any of the box Item 1 Projector 2 Carrying case and cable bag 3 Remote control 4 Power cord Function Displays images. Protects the projector and cables during transport. Connects projector to power source. 6 Setting Up Controls projector. What's in case you must ship the projector. Before setting up your projector, be sure your shipping box includes the following items, contact HP.
TIP: After you open the box and remove the contents, save the box in the box? Identifying the contents of the following items. If the shipping box does not contain any of the box Item 1 Projector 2 Carrying case and cable bag 3 Remote control 4 Power cord Function Displays images. Protects the projector and cables during transport. Connects projector to power source. 6 Setting Up Controls projector. What's in case you must ship the projector. Before setting up your projector, be sure your shipping box includes the following items, contact HP.

User's Guide
Page 7
Identifying the contents of the box (continued) Item 5 USB cable Function Connects projector USB output to a computer. 6 VGA cable Connects computer video output to the projector. 7 Quick Setup Guide Provides instructions to help get started. 8 Literature package Contains documentation for the setup and use of the projector, plus support and warranty information. What's in the box? 7
Identifying the contents of the box (continued) Item 5 USB cable Function Connects projector USB output to a computer. 6 VGA cable Connects computer video output to the projector. 7 Quick Setup Guide Provides instructions to help get started. 8 Literature package Contains documentation for the setup and use of the projector, plus support and warranty information. What's in the box? 7

User's Guide
Page 8
Projects the image. Protects the lens. Enlarges picture size from the remote control. Receives signals from 100% to 33 ft). Adjusts the height of 1.5 to 10 m (5 to 115%. Identifying common features Projector at distance of the picture. Focuses at a glance Identifying major components Item 1 Button panel 2 Zoom ring 3 Focus ring 4 Infrared port 5 Lens 6 Height adjustment button 7 Lens cover 8 Setting Up Function Contains control buttons and indicator lights.
Projects the image. Protects the lens. Enlarges picture size from the remote control. Receives signals from 100% to 33 ft). Adjusts the height of 1.5 to 10 m (5 to 115%. Identifying common features Projector at distance of the picture. Focuses at a glance Identifying major components Item 1 Button panel 2 Zoom ring 3 Focus ring 4 Infrared port 5 Lens 6 Height adjustment button 7 Lens cover 8 Setting Up Function Contains control buttons and indicator lights.

User's Guide
Page 9
can be customized. Warns if the projector is bad. Displays picture from a computer. Resynchronizes the projector to the input signal from the next input port. Scroll up and Page-down through pages on a connected computer. Change settings ...using the on-screen menu. Identifying common features 9 Warns if the lamp is too hot. Selects the next picture and color combination- Projector buttons and lights Identifying the projector buttons and lights Item 1 Power button 2 Page-up and down buttons 3 Lamp warning light 4 Temperature warning light 5 Source button 6 ...
can be customized. Warns if the projector is bad. Displays picture from a computer. Resynchronizes the projector to the input signal from the next input port. Scroll up and Page-down through pages on a connected computer. Change settings ...using the on-screen menu. Identifying common features 9 Warns if the lamp is too hot. Selects the next picture and color combination- Projector buttons and lights Identifying the projector buttons and lights Item 1 Power button 2 Page-up and down buttons 3 Lamp warning light 4 Temperature warning light 5 Source button 6 ...
User's Guide
Page 10
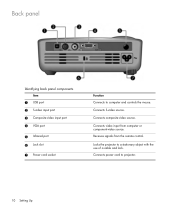
Receives signals from computer or component-video source. Connects video input from the remote control. Locks the projector to projector. 10 Setting Up Connects power cord to a stationary object with the use of a cable and lock. Connects composite-video source. Connects S-video source. Back panel 1I2dentifying back panel components Item 1 USB port 2 S-video input port 3 Composite-video input port 4 VGA port 5 Infrared port 6 Lock slot 7 Power cord socket Function Connects to computer and controls the mouse.
Receives signals from computer or component-video source. Connects video input from the remote control. Locks the projector to projector. 10 Setting Up Connects power cord to a stationary object with the use of a cable and lock. Connects composite-video source. Connects S-video source. Back panel 1I2dentifying back panel components Item 1 USB port 2 S-video input port 3 Composite-video input port 4 VGA port 5 Infrared port 6 Lock slot 7 Power cord socket Function Connects to computer and controls the mouse.

User's Guide
Page 11
Turns the projector on a connected computer. Requires USB cable. Requires USB cable. Scroll up and Page-down through pages on a connected computer. Identifying common features 11 Remote control ...
Turns the projector on a connected computer. Requires USB cable. Requires USB cable. Scroll up and Page-down through pages on a connected computer. Identifying common features 11 Remote control ...

User's Guide
Page 12
... are easy to carry and set up to connect all audio-video equipment. • HP replacement lamp-brings your presentations with HP projector accessories. Accessories Get more from your projector up anywhere, and fixed screens for even greater convenience. • HP premium remote control-allows you to control every aspect of the remote control (continued...
... are easy to carry and set up to connect all audio-video equipment. • HP replacement lamp-brings your presentations with HP projector accessories. Accessories Get more from your projector up anywhere, and fixed screens for even greater convenience. • HP premium remote control-allows you to control every aspect of the remote control (continued...

User's Guide
Page 13
TIP: For best picture quality, place the projector 1.5 to 5 m (5 to the screen. Setting up the projector Positioning the projector The following tables show you where to position the projector in relation to 16 ft) from the screen Setting up the projector 13
TIP: For best picture quality, place the projector 1.5 to 5 m (5 to the screen. Setting up the projector Positioning the projector The following tables show you where to position the projector in relation to 16 ft) from the screen Setting up the projector 13

User's Guide
Page 14
Image size relative to distance from screen = B width of screen = 0.8 × diagonal of screen (for 3:4 screen) projector lens below bottom of screen = C × width of screen minimum and maximum distance from the screen Image size (diagonal) Image size (width) (inches) (...' 0" 9.8 to 10.0 If you do not want to use the distance table, you can use the following equations to help determine where to install the projector relative to 0.50 14 Setting Up Calculating projection distances distance from lens to screen = A × width of screen (for 4:3 screen) A = 2.0 to 2.3 B = 1.5 to 10...
Image size relative to distance from screen = B width of screen = 0.8 × diagonal of screen (for 3:4 screen) projector lens below bottom of screen = C × width of screen minimum and maximum distance from the screen Image size (diagonal) Image size (width) (inches) (...' 0" 9.8 to 10.0 If you do not want to use the distance table, you can use the following equations to help determine where to install the projector relative to 0.50 14 Setting Up Calculating projection distances distance from lens to screen = A × width of screen (for 4:3 screen) A = 2.0 to 2.3 B = 1.5 to 10...
User's Guide
Page 15
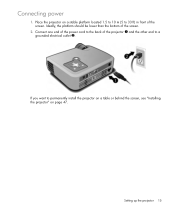
Place the projector on page 47. If you want to permanently install the projector on a table or behind the screen, see "Installing the projector" on a stable platform located 1.5 to 10 m (5 to 33 ft) in front of the screen. Connect one end of the power cord to a grounded electrical outlet 2. Setting up the projector 15 Ideally, the platform should be lower than the bottom of the projector 1 and the other end to the back of the screen. 2. Connecting power 1.
Place the projector on page 47. If you want to permanently install the projector on a table or behind the screen, see "Installing the projector" on a stable platform located 1.5 to 10 m (5 to 33 ft) in front of the screen. Connect one end of the power cord to a grounded electrical outlet 2. Setting up the projector 15 Ideally, the platform should be lower than the bottom of the projector 1 and the other end to the back of the screen. 2. Connecting power 1.

User's Guide
Page 16
TIP: If the computer display does not appear on the projector, you might have to press a combination of keys on the computer to turn on some computers you to the user documentation provided with your computer. ...
TIP: If the computer display does not appear on the projector, you might have to press a combination of keys on the computer to turn on some computers you to the user documentation provided with your computer. ...

User's Guide
Page 17
Requires: • VGA cable 1 • VGA-out accessory card 2 (in some cases) Setting up the projector 17 If necessary, install a VGA-out accessory card into the organizer. For example, an iPAQ Pocket PC may require a VGA-out PC Card with VGA-out ports. Connecting a handheld organizer Not all handhelds come with 15-pin connector.
Requires: • VGA cable 1 • VGA-out accessory card 2 (in some cases) Setting up the projector 17 If necessary, install a VGA-out accessory card into the organizer. For example, an iPAQ Pocket PC may require a VGA-out PC Card with VGA-out ports. Connecting a handheld organizer Not all handhelds come with 15-pin connector.

User's Guide
Page 18
If you want to connect a SCART video device to the projector, you connect the device to the projector, choose the connection that provides the best picture quality. When you will need a SCART adapter (available from HP. This list shows video connections in order with highest picture quality at the top: Highest quality Component-video S-video Standard quality Composite-video Most video and audio cables shown in the following sections are available from HP). 18 Setting Up Connecting a video source Many video devices have more than one type of output port-see the list below.
If you want to connect a SCART video device to the projector, you connect the device to the projector, choose the connection that provides the best picture quality. When you will need a SCART adapter (available from HP. This list shows video connections in order with highest picture quality at the top: Highest quality Component-video S-video Standard quality Composite-video Most video and audio cables shown in the following sections are available from HP). 18 Setting Up Connecting a video source Many video devices have more than one type of output port-see the list below.

User's Guide
Page 19
Setting up the projector 19 For additional information, refer to -VGA cable TIP: Many DVD players and other high-quality video devices provide component video output. Connecting a component-video source Examples: Cable boxes, DVD players, satellite receivers, and audio-video receivers Requires: • Component-to the user documentation provided with the video source. The three RCA connectors might be labeled YPbPr or YCbCr. If possible, configure the video source to use progressive scan output, such as 480p, 575p, or 720p.
Setting up the projector 19 For additional information, refer to -VGA cable TIP: Many DVD players and other high-quality video devices provide component video output. Connecting a component-video source Examples: Cable boxes, DVD players, satellite receivers, and audio-video receivers Requires: • Component-to the user documentation provided with the video source. The three RCA connectors might be labeled YPbPr or YCbCr. If possible, configure the video source to use progressive scan output, such as 480p, 575p, or 720p.

User's Guide
Page 21
Turning the projector on and off the lens. Turning the projector on and off Removing the lens cover • Pull the lens cover off 21
Turning the projector on and off the lens. Turning the projector on and off Removing the lens cover • Pull the lens cover off 21
User's Guide
Page 22
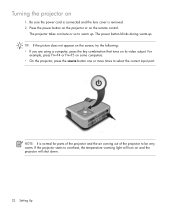
... screen, try the following: • If you are using a computer, press the key combination that turns on the remote control. Turning the projector on some computers. • On the projector, press the source button one or more times to select the correct input port. For example, press FN+F4 or FN+F5... on 1. The power button blinks during warm-up . NOTE: It is removed. 2. The projector takes a minute or so to warm up . If the projector starts to be very warm. Be sure the power cord is connected and the lens cover is normal for parts of...
... screen, try the following: • If you are using a computer, press the key combination that turns on the remote control. Turning the projector on some computers. • On the projector, press the source button one or more times to select the correct input port. For example, press FN+F4 or FN+F5... on 1. The power button blinks during warm-up . NOTE: It is removed. 2. The projector takes a minute or so to warm up . If the projector starts to be very warm. Be sure the power cord is connected and the lens cover is normal for parts of...
User's Guide
Page 23
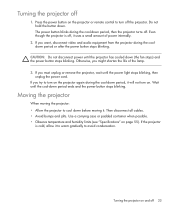
... stops blinking. Wait until the power light stops blinking, then unplug the power cord. If the projector is off, it will not turn off 23 If you must unplug or remove the projector, wait until the cool-down period, it uses a small amount of the lamp. 3. Use ...before moving it to warm gradually to turn on the projector or remote control to avoid condensation. Even though the projector is cold, allow it . Moving the projector When moving the projector: • Allow the projector to cool down period, then the projector turns off 1. Then disconnect all cables. • Avoid...
... stops blinking. Wait until the power light stops blinking, then unplug the power cord. If the projector is off, it will not turn off 23 If you must unplug or remove the projector, wait until the cool-down period, it uses a small amount of the lamp. 3. Use ...before moving it to warm gradually to turn on the projector or remote control to avoid condensation. Even though the projector is cold, allow it . Moving the projector When moving the projector: • Allow the projector to cool down period, then the projector turns off 1. Then disconnect all cables. • Avoid...


