
User's Guide
Page 5
...projector and lens" on page 41. • Do not open the projector except as a radiator or amplifier. • Use only an approved power cord rated for the voltage and current marked on its base on top of injury and equipment damage. • Do not look directly into the ...put anything on a sturdy surface. Do not overload any source of heat, such as instructed by this manual to get inside the projector, contact HP for assistance. If material gets inside the projector. 1 Setting Up Safety precautions WARNING! Safety precautions 5 Do not place the projector near water. ...
...projector and lens" on page 41. • Do not open the projector except as a radiator or amplifier. • Use only an approved power cord rated for the voltage and current marked on its base on top of injury and equipment damage. • Do not look directly into the ...put anything on a sturdy surface. Do not overload any source of heat, such as instructed by this manual to get inside the projector, contact HP for assistance. If material gets inside the projector. 1 Setting Up Safety precautions WARNING! Safety precautions 5 Do not place the projector near water. ...
User's Guide
Page 6
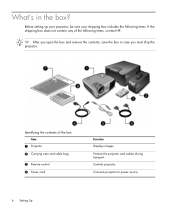
Connects projector to power source. 6 Setting Up Controls projector. Identifying the contents of the following items, contact HP. What's in case you must ship the projector. Protects the projector and cables during transport. TIP: After you open the box and remove the contents, save the box in the box? Before setting up your projector, be sure your shipping box includes the following items. If the shipping box does not contain any of the box Item 1 Projector 2 Carrying case and cable bag 3 Remote control 4 Power cord Function Displays images.
Connects projector to power source. 6 Setting Up Controls projector. Identifying the contents of the following items, contact HP. What's in case you must ship the projector. Protects the projector and cables during transport. TIP: After you open the box and remove the contents, save the box in the box? Before setting up your projector, be sure your shipping box includes the following items. If the shipping box does not contain any of the box Item 1 Projector 2 Carrying case and cable bag 3 Remote control 4 Power cord Function Displays images.
User's Guide
Page 10
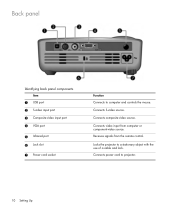
Connects composite-video source. Connects power cord to computer and controls the mouse. Back panel 1I2dentifying back panel components Item 1 USB port 2 S-video input port 3 Composite-video input port 4 VGA port 5 Infrared port 6 Lock slot 7 Power cord socket Function Connects to projector. 10 Setting Up Connects S-video source. Connects video input from the remote control. Receives signals from computer or component-video source. Locks the projector to a stationary object with the use of a cable and lock.
Connects composite-video source. Connects power cord to computer and controls the mouse. Back panel 1I2dentifying back panel components Item 1 USB port 2 S-video input port 3 Composite-video input port 4 VGA port 5 Infrared port 6 Lock slot 7 Power cord socket Function Connects to projector. 10 Setting Up Connects S-video source. Connects video input from the remote control. Receives signals from computer or component-video source. Locks the projector to a stationary object with the use of a cable and lock.
User's Guide
Page 15
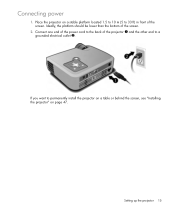
Connecting power 1. Connect one end of the power cord to a grounded electrical outlet 2. If you want to permanently install the projector on a table or behind the screen, see "Installing the projector" on a stable platform located 1.5 to 10 m (5 to 33 ft) in front of the projector 1 and the other end to the back of the screen. Place the projector on page 47. Setting up the projector 15 Ideally, the platform should be lower than the bottom of the screen. 2.
Connecting power 1. Connect one end of the power cord to a grounded electrical outlet 2. If you want to permanently install the projector on a table or behind the screen, see "Installing the projector" on a stable platform located 1.5 to 10 m (5 to 33 ft) in front of the projector 1 and the other end to the back of the screen. Place the projector on page 47. Setting up the projector 15 Ideally, the platform should be lower than the bottom of the screen. 2.
User's Guide
Page 22
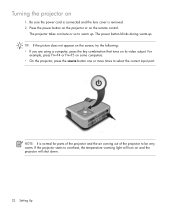
...For example, press FN+F4 or FN+F5 on the remote control. Press the power button on the projector or on some computers. • On the projector, press...or more times to overheat, the temperature warning light will shut down. 22 Setting Up NOTE: It is removed. 2. The power button blinks during warm-up . TIP: If the picture does not appear on the screen, try the following: •... turn on its video output. If the projector starts to select the correct input port. Be sure the power cord is connected and the lens cover is normal for parts of the projector and the air coming out of ...
...For example, press FN+F4 or FN+F5 on the remote control. Press the power button on the projector or on some computers. • On the projector, press...or more times to overheat, the temperature warning light will shut down. 22 Setting Up NOTE: It is removed. 2. The power button blinks during warm-up . TIP: If the picture does not appear on the screen, try the following: •... turn on its video output. If the projector starts to select the correct input port. Be sure the power cord is connected and the lens cover is normal for parts of the projector and the air coming out of ...
User's Guide
Page 23
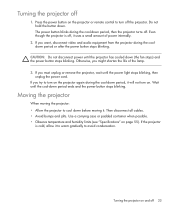
... is cold, allow it uses a small amount of the lamp. 3. Otherwise, you must unplug or remove the projector, wait until the power light stops blinking, then unplug the power cord. If the projector is off, it to warm gradually to turn off . Turning the projector on page 55). Press the... power button on the projector or remote control to avoid condensation. The power button blinks during the cool-down before moving it will not ...
... is cold, allow it uses a small amount of the lamp. 3. Otherwise, you must unplug or remove the projector, wait until the power light stops blinking, then unplug the power cord. If the projector is off, it to warm gradually to turn off . Turning the projector on page 55). Press the... power button on the projector or remote control to avoid condensation. The power button blinks during the cool-down before moving it will not ...
User's Guide
Page 42
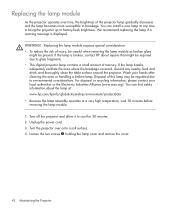
WARNING! Unplug the power cord. 3. If the lamp breaks, adequately ventilate the area where the breakage occurred, discard any time to bring the projector up to factory-fresh brightness. You ... surface. 4. Turn off the projector and allow it to environmental considerations. We recommend replacing the lamp if a warning message is broken, contact HP about the lamp at: www.hp.com/hpinfo/globalcitizenship/environment/productdata • Because the lamp assembly operates at any nearby food and drink, and thoroughly clean the table surface...
WARNING! Unplug the power cord. 3. If the lamp breaks, adequately ventilate the area where the breakage occurred, discard any time to bring the projector up to factory-fresh brightness. You ... surface. 4. Turn off the projector and allow it to environmental considerations. We recommend replacing the lamp if a warning message is broken, contact HP about the lamp at: www.hp.com/hpinfo/globalcitizenship/environment/productdata • Because the lamp assembly operates at any nearby food and drink, and thoroughly clean the table surface...
User's Guide
Page 50
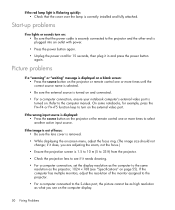
.... Start-up problems If no lights or sounds turn on . If the wrong input source is plugged into an outlet with power. • Press the power button again. • Unplug the power cord for example, press the FN+F4 or FN+F5 function keys to turn on: • Be sure that the cover over... on -screen menu, adjust the focus ring. (The image size should not change; If the red lamp light is flickering quickly: • Check that the power cable is securely connected to the projector and the other end is displayed: • Press the source button on the projector or the remote control...
.... Start-up problems If no lights or sounds turn on . If the wrong input source is plugged into an outlet with power. • Press the power button again. • Unplug the power cord for example, press the FN+F4 or FN+F5 function keys to turn on: • Be sure that the cover over... on -screen menu, adjust the focus ring. (The image size should not change; If the red lamp light is flickering quickly: • Check that the power cable is securely connected to the projector and the other end is displayed: • Press the source button on the projector or the remote control...
User's Guide
Page 53
...Move to within 9 m (30 ft) of the projector. • Aim the remote control at the screen or at least 15 seconds before reconnecting power. Remote control problems If the remote control does not operate: • Be sure nothing is on or blinking, see "Warning light problems" on until ...lamp breaks, contact HP about repairs that might cause the lamp to shut off. Troubleshooting suggestions 53 Interruption problems If the projector stops responding to all controls: • If possible, turn back on page 49. If the lamp shuts off the projector, then unplug the power cord and wait at ...
...Move to within 9 m (30 ft) of the projector. • Aim the remote control at the screen or at least 15 seconds before reconnecting power. Remote control problems If the remote control does not operate: • Be sure nothing is on or blinking, see "Warning light problems" on until ...lamp breaks, contact HP about repairs that might cause the lamp to shut off. Troubleshooting suggestions 53 Interruption problems If the projector stops responding to all controls: • If possible, turn back on page 49. If the lamp shuts off the projector, then unplug the power cord and wait at ...
User's Guide
Page 59
...TV Interference Problems. This booklet is no guarantee that shows how your digital projector not expressly approved by HP could void the authority to comply with Canadian ICES-003. Canada This Class B digital apparatus complies ...with the limits for a Class B digital device, pursuant to another power outlet. Regulatory information 59 These limits are designed to radio communications. If this digital projector does cause ... with respect to the receiver. • Connecting the digital projector's power cord to Part 15 of this device.
...TV Interference Problems. This booklet is no guarantee that shows how your digital projector not expressly approved by HP could void the authority to comply with Canadian ICES-003. Canada This Class B digital apparatus complies ...with the limits for a Class B digital device, pursuant to another power outlet. Regulatory information 59 These limits are designed to radio communications. If this digital projector does cause ... with respect to the receiver. • Connecting the digital projector's power cord to Part 15 of this device.
