Limited Warranty and Support Guide - Refurbished
Page 6
... Self Repair (CSR) part that arrives with HP in warranty service. To locate the nearest HP authorized service provider refer to 5:00pm, Monday through Friday, but may involve performing routine diagnostic procedures, installing software updates or patches, removing third party options and/or substituting options. Standard office hours are responsible for your location is required. This may vary with sufficient, free, and safe access to and use of...
... Self Repair (CSR) part that arrives with HP in warranty service. To locate the nearest HP authorized service provider refer to 5:00pm, Monday through Friday, but may involve performing routine diagnostic procedures, installing software updates or patches, removing third party options and/or substituting options. Standard office hours are responsible for your location is required. This may vary with sufficient, free, and safe access to and use of...
Getting Started Guide
Page 20
... initial setup of ISPs; To transfer existing accounts, follow the instructions provided by using the Internet. Contact your computer to the Internet, you may need. b Click All Programs. c Click Online Services and then click Easy Internet Services. To open Internet Explorer: a Click the Windows Start Button on the connection. If you already have an account with your ISP. NOTE: Easy Internet Services provides a list of the computer, set up...
... initial setup of ISPs; To transfer existing accounts, follow the instructions provided by using the Internet. Contact your computer to the Internet, you may need. b Click All Programs. c Click Online Services and then click Easy Internet Services. To open Internet Explorer: a Click the Windows Start Button on the connection. If you already have an account with your ISP. NOTE: Easy Internet Services provides a list of the computer, set up...
Getting Started Guide
Page 23
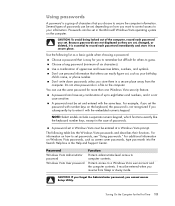
... away from Sleep or Away mode. For additional information on how you want to control access to guess. Protects access to computer contents. A password can easily figure out, such as screen saver passwords, type passwords into the Search Help box in Windows Vista must be set , changed, or deleted, it is essential to record each password you set in the Help and Support Center. The following list as they...
... away from Sleep or Away mode. For additional information on how you want to control access to guess. Protects access to computer contents. A password can easily figure out, such as screen saver passwords, type passwords into the Search Help box in Windows Vista must be set , changed, or deleted, it is essential to record each password you set in the Help and Support Center. The following list as they...

Getting Started Guide
Page 57
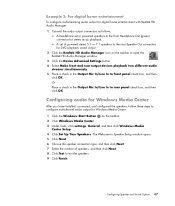
.... Configuring audio for Windows Media Center After you have installed, connected, and configured the speakers, follow these steps to rear panel check box, and then click OK. Configuring Speaker and Sound Options 47 The Welcome to Speaker Setup window opens. 5 Click Next. 6 Choose the speaker connection type, and then click Next. 7 Select the number of powered stereo 5.1 or 7.1 speakers to the rear Speaker Out connectors for Windows Media Center: 1 Click the Windows Start Button on the taskbar to open the Realtek HD Audio Manager window. 3 Click the Device Advanced Settings button...
.... Configuring audio for Windows Media Center After you have installed, connected, and configured the speakers, follow these steps to rear panel check box, and then click OK. Configuring Speaker and Sound Options 47 The Welcome to Speaker Setup window opens. 5 Click Next. 6 Choose the speaker connection type, and then click Next. 7 Select the number of powered stereo 5.1 or 7.1 speakers to the rear Speaker Out connectors for Windows Media Center: 1 Click the Windows Start Button on the taskbar to open the Realtek HD Audio Manager window. 3 Click the Device Advanced Settings button...
Limited Warranty and Support Guide
Page 14
... retailer. We know that expanding and upgrading are proud to make this Limited Warranty and Support Guide, and a HP Customer Representative will assist you have any problems setting up your new computer. We are key benefits for help online, go through a comprehensive quality test to meet your specific needs. If you have completely set up your retailer. Support Information Where to Get Help Follow...
... retailer. We know that expanding and upgrading are proud to make this Limited Warranty and Support Guide, and a HP Customer Representative will assist you have any problems setting up your new computer. We are key benefits for help online, go through a comprehensive quality test to meet your specific needs. If you have completely set up your retailer. Support Information Where to Get Help Follow...
Limited Warranty and Support Guide
Page 6
... error messages. • Isolating system problems to software usage problems. Software technical support does NOT include assistance with: • Generating or diagnosing user-generated programs or source codes. • Installing of non-HP products. • System optimization and customization. • Network configuration. HP's only warranty obligations with respect to software distributed by HP under the HP brand name are set forth in the Limited Warranty applicable to the HP Option...
... error messages. • Isolating system problems to software usage problems. Software technical support does NOT include assistance with: • Generating or diagnosing user-generated programs or source codes. • Installing of non-HP products. • System optimization and customization. • Network configuration. HP's only warranty obligations with respect to software distributed by HP under the HP brand name are set forth in the Limited Warranty applicable to the HP Option...
Getting Started
Page 58
... Windows Start Button on the desktop, and log in. 4 Open your ISP directly. however, you may choose another ISP or transfer an existing account to this step and follow the instructions provided by model) NOTE: If you begin using Easy Internet Services. Or Type http://www.hp.com/ergo into the Web browser address box, and then press Enter on the keyboard. 48 Getting Started...
... Windows Start Button on the desktop, and log in. 4 Open your ISP directly. however, you may choose another ISP or transfer an existing account to this step and follow the instructions provided by model) NOTE: If you begin using Easy Internet Services. Or Type http://www.hp.com/ergo into the Web browser address box, and then press Enter on the keyboard. 48 Getting Started...

Getting Started
Page 95
.../Line In to test the speakers. 9 Click Finish. The Welcome to Speaker Setup window opens. 5 Click Next. 6 Choose the speaker connection type, and then click Next. 7 Select the number of powered stereo 5.1 or 7.1 speakers to the rear Speaker Out connectors for DVD playback sound output 2 Click the Realtek HD Audio Manager icon on the taskbar. 2 Click Windows Media Center. 3 Under Tasks, click settings, General, and then click Windows Media Center Setup. 4 Click Set Up Your Speakers. Configuring Speaker and Sound Options 85 Or...
.../Line In to test the speakers. 9 Click Finish. The Welcome to Speaker Setup window opens. 5 Click Next. 6 Choose the speaker connection type, and then click Next. 7 Select the number of powered stereo 5.1 or 7.1 speakers to the rear Speaker Out connectors for DVD playback sound output 2 Click the Realtek HD Audio Manager icon on the taskbar. 2 Click Windows Media Center. 3 Under Tasks, click settings, General, and then click Windows Media Center Setup. 4 Click Set Up Your Speakers. Configuring Speaker and Sound Options 85 Or...
Getting Started
Page 20
... computer to make the hardware connections: for a modem, see "Connecting a Modem" and for a network see "Setting Up a Local Area Network." a Click the Windows Start Button on the taskbar. NOTE: Easy Internet Services provides a list of the computer, set up Internet service. To transfer existing accounts, follow the instructions provided by the ISP. 3 Connect to the Internet. Refer to "Setting Up the Computer" in . 4 Open your ISP for Internet service during the initial setup of...
... computer to make the hardware connections: for a modem, see "Connecting a Modem" and for a network see "Setting Up a Local Area Network." a Click the Windows Start Button on the taskbar. NOTE: Easy Internet Services provides a list of the computer, set up Internet service. To transfer existing accounts, follow the instructions provided by the ISP. 3 Connect to the Internet. Refer to "Setting Up the Computer" in . 4 Open your ISP for Internet service during the initial setup of...
Getting Started
Page 23
... entered with number keys on how you set passwords, see "Using passwords." A password set in the Help and Support Center. The following list as a basic guide when choosing a password: Choose a password that you set , changed, or deleted, it is essential to secure the computer information. A password must be set , depending on the keyboard, the password is not recognized if you to enter it is not case sensitive. Password Windows Vista Administrator password Windows Vista User password Function Protects administrator-level access to a Windows Vista...
... entered with number keys on how you set passwords, see "Using passwords." A password set in the Help and Support Center. The following list as a basic guide when choosing a password: Choose a password that you set , changed, or deleted, it is essential to secure the computer information. A password must be set , depending on the keyboard, the password is not recognized if you to enter it is not case sensitive. Password Windows Vista Administrator password Windows Vista User password Function Protects administrator-level access to a Windows Vista...
Getting Started
Page 57
.../Line In to front panel check box, and then click OK. Configuring audio for Windows Media Center After you have installed, connected, and configured the speakers, follow these steps to test the speakers. 9 Click Finish. Configuring Speaker and Sound Options 47 Example 2: For digital home entertainment To configure multistreaming audio output for digital home entertainment with Realtek HD Audio Manager: 1 Connect the audio output connectors as follows: A headphone set or powered speakers to the front Headphone...
.../Line In to front panel check box, and then click OK. Configuring audio for Windows Media Center After you have installed, connected, and configured the speakers, follow these steps to test the speakers. 9 Click Finish. Configuring Speaker and Sound Options 47 Example 2: For digital home entertainment To configure multistreaming audio output for digital home entertainment with Realtek HD Audio Manager: 1 Connect the audio output connectors as follows: A headphone set or powered speakers to the front Headphone...

Getting Started Guide
Page 58
... and follow the instructions provided by model) You must connect through your work habits for important ergonomic information: Click the Windows Start Button on the taskbar, click All Programs, click User Guides, and then click Safety & Comfort Guide. Double-click the ISP-provided icon on the taskbar. NOTE: If you did not set up for Internet service during the initial setup of the computer...
... and follow the instructions provided by model) You must connect through your work habits for important ergonomic information: Click the Windows Start Button on the taskbar, click All Programs, click User Guides, and then click Safety & Comfort Guide. Double-click the ISP-provided icon on the taskbar. NOTE: If you did not set up for Internet service during the initial setup of the computer...
Upgrading and Servicing Guide
Page 12
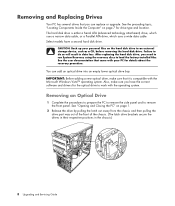
... removing the hard disk drive. See the user documentation that came with the operating system. Also, make sure that you need to run System Recovery using the recovery discs to remove the front panel. Select models have the correct software and drivers for the optical drive to work with your personal files on the hard disk drive to do so will result in the chassis.) 8 Upgrading and Servicing Guide IMPORTANT: Before adding a new optical drive, make sure you have a second hard disk drive. Removing and Replacing Drives Your...
... removing the hard disk drive. See the user documentation that came with the operating system. Also, make sure that you need to run System Recovery using the recovery discs to remove the front panel. Select models have the correct software and drivers for the optical drive to work with your personal files on the hard disk drive to do so will result in the chassis.) 8 Upgrading and Servicing Guide IMPORTANT: Before adding a new optical drive, make sure you have a second hard disk drive. Removing and Replacing Drives Your...
Upgrading and Servicing Guide
Page 28
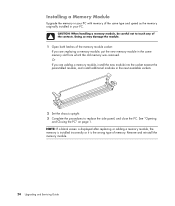
... Upgrading and Servicing Guide Or If you are adding a memory module, install the new module into the socket nearest the preinstalled module, and install additional modules in the next available sockets. 2 Set the chassis upright. 3 Complete the procedures to touch any of the contacts. NOTE: If a blank screen is displayed after replacing or adding a memory module, the memory is installed incorrectly or it is the wrong type...
... Upgrading and Servicing Guide Or If you are adding a memory module, install the new module into the socket nearest the preinstalled module, and install additional modules in the next available sockets. 2 Set the chassis upright. 3 Complete the procedures to touch any of the contacts. NOTE: If a blank screen is displayed after replacing or adding a memory module, the memory is installed incorrectly or it is the wrong type...
Upgrading and Servicing Guide
Page 31
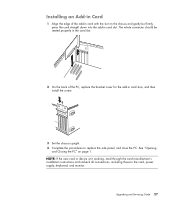
... new card or device isn't working, read through the card manufacturer's installation instructions and recheck all connections, including those to replace the side panel, and close the PC. Installing an Add-in Card 1 Align the edge of the PC, replace the bracket cover for the add-in card slot. The whole connector should be seated properly in the card slot. 2 On the back of the add-in card with the slot on page 1. Upgrading and Servicing Guide...
... new card or device isn't working, read through the card manufacturer's installation instructions and recheck all connections, including those to replace the side panel, and close the PC. Installing an Add-in Card 1 Align the edge of the PC, replace the bracket cover for the add-in card slot. The whole connector should be seated properly in the card slot. 2 On the back of the add-in card with the slot on page 1. Upgrading and Servicing Guide...
Upgrading and Servicing Guide
Page 32
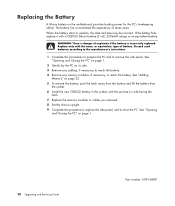
Replacing the Battery A lithium battery on page 1. 28 Upgrading and Servicing Guide Part number: 5991-6989 Replace only with the same, or equivalent, type of explosion if the battery is danger of battery. See "Opening and Closing the PC" on the motherboard provides backup power for the PC's timekeeping ability. When the battery starts to remove the side panel. Discard used batteries according to the manufacturer's instructions. 1 Complete the procedures to prepare the...
Replacing the Battery A lithium battery on page 1. 28 Upgrading and Servicing Guide Part number: 5991-6989 Replace only with the same, or equivalent, type of explosion if the battery is danger of battery. See "Opening and Closing the PC" on the motherboard provides backup power for the PC's timekeeping ability. When the battery starts to remove the side panel. Discard used batteries according to the manufacturer's instructions. 1 Complete the procedures to prepare the...
PC Troubleshooting
Page 9
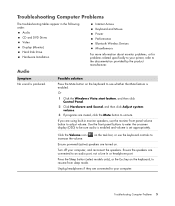
Troubleshooting Computer Problems 5 Audio Symptom No sound is set appropriately. Or 1 Click the Windows Vista start button, and then click Control Panel. 2 Click Hardware and Sound, and then click Adjust system volume. 3 If programs are using built-in the following order: Audio CD and DVD Drives Video Display (Monitor) Hard Disk Drive Hardware Installation Internet Access Keyboard and Mouse Power Performance Bluetooth Wireless Devices Miscellaneous For more information about monitor problems, or for problems related specifically to your printer, refer to the documentation ...
Troubleshooting Computer Problems 5 Audio Symptom No sound is set appropriately. Or 1 Click the Windows Vista start button, and then click Control Panel. 2 Click Hardware and Sound, and then click Adjust system volume. 3 If programs are using built-in the following order: Audio CD and DVD Drives Video Display (Monitor) Hard Disk Drive Hardware Installation Internet Access Keyboard and Mouse Power Performance Bluetooth Wireless Devices Miscellaneous For more information about monitor problems, or for problems related specifically to your printer, refer to the documentation ...
PC Troubleshooting
Page 15
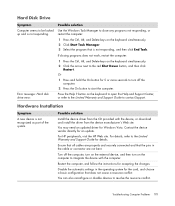
... Support Guide for Windows Vista. Turn off the computer. 2 Press the On button to start the computer. Error message: Hard disk drive error. Troubleshooting Computer Problems 11 If closing programs does not work, restart the computer: 1 Press the Ctrl, Alt, and Delete keys on the keyboard simultaneously. 2 Click Start Task Manager. 3 Select the program that is not responding, and then click End Task. Press the Help ? You may need an updated driver...
... Support Guide for Windows Vista. Turn off the computer. 2 Press the On button to start the computer. Error message: Hard disk drive error. Troubleshooting Computer Problems 11 If closing programs does not work, restart the computer: 1 Press the Ctrl, Alt, and Delete keys on the keyboard simultaneously. 2 Click Start Task Manager. 3 Select the program that is not responding, and then click End Task. Press the Help ? You may need an updated driver...
PC Troubleshooting
Page 17
... the Internet. button on your Internet Service Provider (ISP) for assistance. If your system has external antennas, try to move the antenna to work with your Internet connection type. If the antenna is installed and set up to a better position. Note that time. I cannot connect to the NIC. Do not plug a network cable into a telephone service line; Run the wireless setup wizard: 1 Click the Windows Vista start button, and then click Control Panel. 2 Click Hardware and Sound...
... the Internet. button on your Internet Service Provider (ISP) for assistance. If your system has external antennas, try to move the antenna to work with your Internet connection type. If the antenna is installed and set up to a better position. Note that time. I cannot connect to the NIC. Do not plug a network cable into a telephone service line; Run the wireless setup wizard: 1 Click the Windows Vista start button, and then click Control Panel. 2 Click Hardware and Sound...
PC Troubleshooting
Page 31
..., reconnect all peripheral devices from HP: a Click the Windows Vista start button, and then click Control Panel. Otherwise, click No, and then click Next. 11 If you to -date security software. Performing the post-recovery procedure 1 At the Welcome to Microsoft Windows screen, follow the onscreen setup instructions, and then click Start in the last screen to display the Windows desktop. 2 Configure your Internet connection. 3 Turn off . 4 Disconnect all peripheral devices that came in...
..., reconnect all peripheral devices from HP: a Click the Windows Vista start button, and then click Control Panel. Otherwise, click No, and then click Next. 11 If you to -date security software. Performing the post-recovery procedure 1 At the Welcome to Microsoft Windows screen, follow the onscreen setup instructions, and then click Start in the last screen to display the Windows desktop. 2 Configure your Internet connection. 3 Turn off . 4 Disconnect all peripheral devices that came in...


