Limited Warranty and Support Guide - Refurbished
Page 13
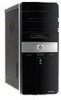
...and the power cord supplied with your own safety, before using headsets or earphones, always reset the volume. Changes or modifications not expressly approved by turning the equipment off and on a circuit different from the receiver. • Consult the dealer or an experienced radio/TV technician for a Class B...the FCC Rules. In order to reduce the risk of damage to hearing, one should only be done with caution. • If one HP product number includes a computer along with a headset or earphone, this unit. 13 The system RFI and Radiated Immunity tests were conducted with supported...
...and the power cord supplied with your own safety, before using headsets or earphones, always reset the volume. Changes or modifications not expressly approved by turning the equipment off and on a circuit different from the receiver. • Consult the dealer or an experienced radio/TV technician for a Class B...the FCC Rules. In order to reduce the risk of damage to hearing, one should only be done with caution. • If one HP product number includes a computer along with a headset or earphone, this unit. 13 The system RFI and Radiated Immunity tests were conducted with supported...
Safety and Regulatory Information Desktops, Thin Clients, and Personal Workstations
Page 18
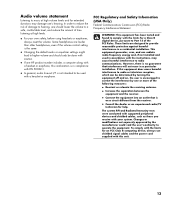
.... Cables Connections to this equipment does cause harmful interference to radio or television reception, which provides guidelines for help. If you turn it before you are uncertain of the policy that applies to the use of wireless devices may be restricted. and region-specific .... Electromagnetic Compatibility Notices This guide provides country- In some environments, the use it on . These limits are not expressly approved by turning the equipment off and on a circuit different from that to radio communications. Note to CATV System Installer This reminder is no guarantee ...
.... Cables Connections to this equipment does cause harmful interference to radio or television reception, which provides guidelines for help. If you turn it before you are uncertain of the policy that applies to the use of wireless devices may be restricted. and region-specific .... Electromagnetic Compatibility Notices This guide provides country- In some environments, the use it on . These limits are not expressly approved by turning the equipment off and on a circuit different from that to radio communications. Note to CATV System Installer This reminder is no guarantee ...

Advanced Setup Guide
Page 14
To connect a digital photo camera or a digital video camera: 1 Turn on the computer, and wait for the Microsoft® Windows Vista® operating system to use. 8 Advanced Setup Guide (features vary by model) When installation ...
To connect a digital photo camera or a digital video camera: 1 Turn on the computer, and wait for the Microsoft® Windows Vista® operating system to use. 8 Advanced Setup Guide (features vary by model) When installation ...
Advanced Setup Guide
Page 19
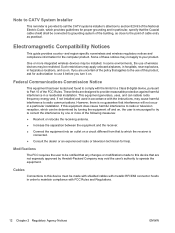
... (A) on , check the indicator lights (B) next to the Ethernet connector for the status: ACTIVITY - A Ethernet connector (RJ-45 port) B Ethernet indicator lights 2 With the computer turned on the back of wires. Integrated Wireless Devices Wireless technology transfers data across radio waves instead of the computer, and to the network router or...
... (A) on , check the indicator lights (B) next to the Ethernet connector for the status: ACTIVITY - A Ethernet connector (RJ-45 port) B Ethernet indicator lights 2 With the computer turned on the back of wires. Integrated Wireless Devices Wireless technology transfers data across radio waves instead of the computer, and to the network router or...
Advanced Setup Guide
Page 28
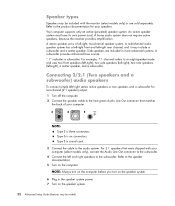
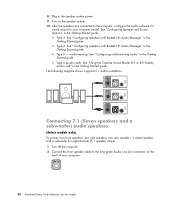
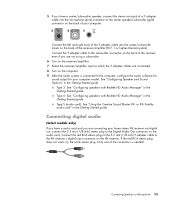
...back of your computer. 3 6 S NOTE: Type 3 is six connectors. Refer to the product documentation for two-channel (2.1 speaker) output: 1 Turn off the computer. 2 Connect the speaker cable to the audio system. Your computer supports only an active (powered) speaker system. A stereo speaker set ...speakers or two speakers and a subwoofer for your computer (select models only), connect the Audio Line Out connector to the speaker documentation. 5 Turn on the speaker system. 22 Advanced Setup Guide (features vary by model) Type 6 is three connectors. Refer to the subwoofer. 4 Connect...
...back of your computer. 3 6 S NOTE: Type 3 is six connectors. Refer to the product documentation for two-channel (2.1 speaker) output: 1 Turn off the computer. 2 Connect the speaker cable to the audio system. Your computer supports only an active (powered) speaker system. A stereo speaker set ...speakers or two speakers and a subwoofer for your computer (select models only), connect the Audio Line Out connector to the speaker documentation. 5 Turn on the speaker system. 22 Advanced Setup Guide (features vary by model) Type 6 is three connectors. Refer to the subwoofer. 4 Connect...
Advanced Setup Guide
Page 29
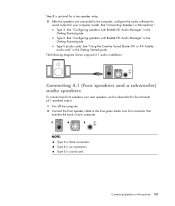
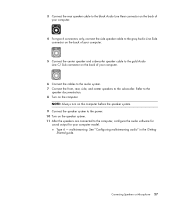
... a typical 2.1 audio installation: Connecting 4.1 (Four speakers and a subwoofer) audio speakers To connect two front speakers, two rear speakers, and a subwoofer for four-channel (4.1 speaker) output: 1 Turn off the computer. 2 Connect the front speaker cable to the computer, configure the audio software for sound output for a two-speaker setup. 8 After the speakers...
... a typical 2.1 audio installation: Connecting 4.1 (Four speakers and a subwoofer) audio speakers To connect two front speakers, two rear speakers, and a subwoofer for four-channel (4.1 speaker) output: 1 Turn off the computer. 2 Connect the front speaker cable to the computer, configure the audio software for sound output for a two-speaker setup. 8 After the speakers...
Advanced Setup Guide
Page 30
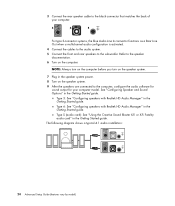
...audio card" in the Getting Started guide. See "Configuring Speaker and Sound Options" in the Getting Started guide. Refer to the speaker documentation. 6 Turn on the speaker system. 9 After the speakers are connected to the computer, configure the audio software for sound output for your computer. 3 6...(features vary by model) 3 Connect the rear speaker cable to the subwoofer. NOTE: Always turn on the computer before you turn on the speaker system. 7 Plug in the speaker system power. 8 Turn on the computer. Type 3: See "Configuring speakers with Realtek HD Audio Manager" in the ...
...audio card" in the Getting Started guide. See "Configuring Speaker and Sound Options" in the Getting Started guide. Refer to the speaker documentation. 6 Turn on the speaker system. 9 After the speakers are connected to the computer, configure the audio software for sound output for your computer. 3 6...(features vary by model) 3 Connect the rear speaker cable to the subwoofer. NOTE: Always turn on the computer before you turn on the speaker system. 7 Plug in the speaker system power. 8 Turn on the computer. Type 3: See "Configuring speakers with Realtek HD Audio Manager" in the ...
Advanced Setup Guide
Page 31
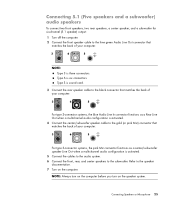
...or pink Mic) connector that matches the back of your computer. 3 6 S NOTE: Type 3 is three connectors. NOTE: Always turn on the computer before you turn on the computer. Connecting 5.1 (Five speakers and a subwoofer) audio speakers To connect two front speakers, two rear speakers, a center... speaker, and a subwoofer for six-channel (5.1 speaker) output: 1 Turn off the computer. 2 Connect the front speaker cable to the lime green Audio Line Out connector that matches the back of your computer. 3 6 ...
...or pink Mic) connector that matches the back of your computer. 3 6 S NOTE: Type 3 is three connectors. NOTE: Always turn on the computer before you turn on the computer. Connecting 5.1 (Five speakers and a subwoofer) audio speakers To connect two front speakers, two rear speakers, a center... speaker, and a subwoofer for six-channel (5.1 speaker) output: 1 Turn off the computer. 2 Connect the front speaker cable to the lime green Audio Line Out connector that matches the back of your computer. 3 6 ...
Advanced Setup Guide
Page 32
...only) To connect two front speakers, two side speakers, two rear speakers, a center speaker, and a subwoofer for eight-channel (7.1 speaker) output: 1 Turn off the computer. 2 Connect the front speaker cable to the computer, configure the audio software for sound output for your computer. 26 Advanced Setup Guide...the Getting Started guide. See "Configuring Speaker and Sound Options" in the Getting Started guide. 8 Plug in the speaker system power. 9 Turn on the speaker system. 10 After the speakers are connected to the lime green Audio Line Out connector on the back of your computer ...
...only) To connect two front speakers, two side speakers, two rear speakers, a center speaker, and a subwoofer for eight-channel (7.1 speaker) output: 1 Turn off the computer. 2 Connect the front speaker cable to the computer, configure the audio software for sound output for your computer. 26 Advanced Setup Guide...the Getting Started guide. See "Configuring Speaker and Sound Options" in the Getting Started guide. 8 Plug in the speaker system power. 9 Turn on the speaker system. 10 After the speakers are connected to the lime green Audio Line Out connector on the back of your computer ...
Advanced Setup Guide
Page 33
..., configure the audio software for sound output for your computer model. NOTE: Always turn on the computer before the speaker system. 9 Connect the speaker system to the power. 10 Turn on the computer. Refer to the speaker documentation. 8 Turn on the speaker system. 11 After the speakers are connected to the subwoofer. multistreaming...
..., configure the audio software for sound output for your computer model. NOTE: Always turn on the computer before the speaker system. 9 Connect the speaker system to the power. 10 Turn on the computer. Refer to the speaker documentation. 8 Turn on the speaker system. 11 After the speakers are connected to the subwoofer. multistreaming...
Advanced Setup Guide
Page 37
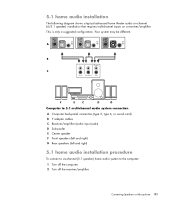
... (left and right) G Rear speakers (left and right) 5.1 home audio installation procedure To connect a six-channel (5.1 speaker) home audio system to the computer: 1 Turn off the computer. 2 Turn off the receiver/amplifier. 5.1 home audio installation The following diagram shows a typical advanced home theater audio six-channel (6/5.1 speaker) installation that requires multichannel inputs...
... (left and right) G Rear speakers (left and right) 5.1 home audio installation procedure To connect a six-channel (5.1 speaker) home audio system to the computer: 1 Turn off the computer. 2 Turn off the receiver/amplifier. 5.1 home audio installation The following diagram shows a typical advanced home theater audio six-channel (6/5.1 speaker) installation that requires multichannel inputs...
Advanced Setup Guide
Page 38
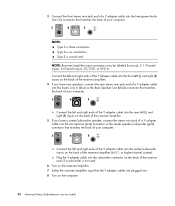
Plug the Y adapter cable into the subwoofer connector on the back of the receiver even if a subwoofer is not used. 6 Turn on the receiver/amplifier. 7 Select the receiver/amplifier input that the Y adapter cables are plugged into the lime green Audio Line Out connector that ...connectors may be labeled Surround, 5.1 Channel inputs, 6 Channel inputs, CD, DVD, or DVD In. 3 Connect the front stereo mini-jack end of a Y adapter cable into . 8 Turn on the computer. 32 Advanced Setup Guide (features vary by model) Type 6 is sound card. Connect the left and right ends of the Y adapter cable...
Plug the Y adapter cable into the subwoofer connector on the back of the receiver even if a subwoofer is not used. 6 Turn on the receiver/amplifier. 7 Select the receiver/amplifier input that the Y adapter cables are plugged into the lime green Audio Line Out connector that ...connectors may be labeled Surround, 5.1 Channel inputs, 6 Channel inputs, CD, DVD, or DVD In. 3 Connect the front stereo mini-jack end of a Y adapter cable into . 8 Turn on the computer. 32 Advanced Setup Guide (features vary by model) Type 6 is sound card. Connect the left and right ends of the Y adapter cable...

Advanced Setup Guide
Page 40
... 6 has six connectors. Type S has audio card. 7.1 home audio installation procedure To connect an eight-channel (7.1 speaker) home audio system to the computer: 1 Turn off the computer. 2 Turn off the receiver/amplifier. 3 Connect the front stereo mini-jack end of a Y adapter cable into the lime green Audio Line Out connector on the...
... 6 has six connectors. Type S has audio card. 7.1 home audio installation procedure To connect an eight-channel (7.1 speaker) home audio system to the computer: 1 Turn off the computer. 2 Turn off the receiver/amplifier. 3 Connect the front stereo mini-jack end of a Y adapter cable into the lime green Audio Line Out connector on the...
Advanced Setup Guide
Page 41
5 If you have a audio card and you are connected. 8 Turn on the audio card. Only one of the receiver/amplifier (8/7.1 or higher-channel system). Type 3: See "Configuring speakers with Realtek HD Audio Manager" in the ... Sound Blaster X-Fi or X-Fi Fatality audio card" in the Getting Started guide. Connecting digital audio (Select models only) If you are not using a subwoofer. 6 Turn on the receiver/amplifier. 7 Select the receiver/amplifier input to which the Y adapter cables are connecting your computer model. Connect the red RCA stereo plug...
5 If you have a audio card and you are connected. 8 Turn on the audio card. Only one of the receiver/amplifier (8/7.1 or higher-channel system). Type 3: See "Configuring speakers with Realtek HD Audio Manager" in the ... Sound Blaster X-Fi or X-Fi Fatality audio card" in the Getting Started guide. Connecting digital audio (Select models only) If you are not using a subwoofer. 6 Turn on the receiver/amplifier. 7 Select the receiver/amplifier input to which the Y adapter cables are connecting your computer model. Connect the red RCA stereo plug...
Advanced Setup Guide
Page 42
...you connect the digital output. Follow the instructions to the digital input (S/PDIF) on the digital speakers or a digital audio system. 3 Turn on the back panel of your computer model. Audio card with digital output and type 3 connectors: See "Configuring speakers with Realtek HD Audio... Manager" in the Getting Started guide. By default, digital audio output is already enabled. To connect digital audio speakers: 1 Turn off the computer. 2 Connect the orange Digital Audio Out connector on the computer. Follow the instructions to the computer, configure the audio ...
...you connect the digital output. Follow the instructions to the digital input (S/PDIF) on the digital speakers or a digital audio system. 3 Turn on the back panel of your computer model. Audio card with digital output and type 3 connectors: See "Configuring speakers with Realtek HD Audio... Manager" in the Getting Started guide. By default, digital audio output is already enabled. To connect digital audio speakers: 1 Turn off the computer. 2 Connect the orange Digital Audio Out connector on the computer. Follow the instructions to the computer, configure the audio ...

Advanced Setup Guide
Page 44
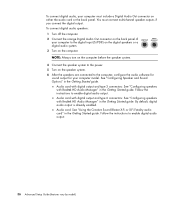
... speakers: 1 Use the audio connection table to connect your audio system to connect digital speakers as your output device, you want to the sound card. 2 Turn on the computer. 3 Plug in and turn on the speaker system power.
... speakers: 1 Use the audio connection table to connect your audio system to connect digital speakers as your output device, you want to the sound card. 2 Turn on the computer. 3 Plug in and turn on the speaker system power.
Advanced Setup Guide
Page 47
... In connector on the computer to tighten it. use an S-video cable to connect the TV-out on the back of the computer, and then turn the connector to the TV. RCA stereo RCA red and white ends. Your computer may want to TV. See "Connecting the Remote Sensor." NOTE: The...
... In connector on the computer to tighten it. use an S-video cable to connect the TV-out on the back of the computer, and then turn the connector to the TV. RCA stereo RCA red and white ends. Your computer may want to TV. See "Connecting the Remote Sensor." NOTE: The...

Advanced Setup Guide
Page 54
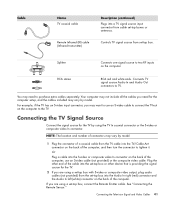
If the TV has a composite video connector, you need a video cable and an audio cable. Connecting the computer to a TV 1 Turn off the computer. 2 Connect the TV cable by model) TV-out connectors are an optional feature. The type of the computer, you may also need ...
If the TV has a composite video connector, you need a video cable and an audio cable. Connecting the computer to a TV 1 Turn off the computer. 2 Connect the TV cable by model) TV-out connectors are an optional feature. The type of the computer, you may also need ...
Advanced Setup Guide
Page 55
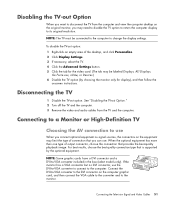
... necessary, select the monitor or TV. 4 Click the Advanced button. 5 Click the tab for the TV set. 5 Turn on the computer. Viewing the computer desktop on a TV screen The type of the computer. 4 Turn on the TV, and then select the TV In video source. Connecting more information, refer to the computer...
... necessary, select the monitor or TV. 4 Click the Advanced button. 5 Click the tab for the TV set. 5 Turn on the computer. Viewing the computer desktop on a TV screen The type of the computer. 4 Turn on the TV, and then select the TV In video source. Connecting more information, refer to the computer...
Advanced Setup Guide
Page 57
Disconnecting the TV 1 Disable the TV-out option. See "Disabling the TV-out Option." 2 Turn off the TV and the computer. 3 Remove the video and audio cables from the computer and view the computer desktop on the original monitor, you ...
Disconnecting the TV 1 Disable the TV-out option. See "Disabling the TV-out Option." 2 Turn off the TV and the computer. 3 Remove the video and audio cables from the computer and view the computer desktop on the original monitor, you ...


