Safety and Regulatory Information Desktops, Thin Clients, and Personal Workstations
Page 27
...Chemical Substances HP is necessary... may contain the following material that might require special handling at http://www.hp.com/go/reach. ENWW Environmental Agency Notices 21 If it is committed to... For disposal or recycling information, please contact your computer, select Start > Control Panel, and then double-click Power Options. ENERGY STAR is not supported on Linux workstations... reset the ENERGY STAR settings (if applicable) after the restore. Mercury Statement This HP product may require special handling when recycled or disposed of environmental considerations. See http...
...Chemical Substances HP is necessary... may contain the following material that might require special handling at http://www.hp.com/go/reach. ENWW Environmental Agency Notices 21 If it is committed to... For disposal or recycling information, please contact your computer, select Start > Control Panel, and then double-click Power Options. ENERGY STAR is not supported on Linux workstations... reset the ENERGY STAR settings (if applicable) after the restore. Mercury Statement This HP product may require special handling when recycled or disposed of environmental considerations. See http...
Getting Started
Page 19
.... ✎ Connecting the computer to update the RTC date and time). Cannot remove computer cover or access panel. Getting Started Solving General Problems (Continued) Problem Cause Solution Computer date and time display is available from HP. Unlock the Smart Cover Lock using the arrow keys on installing a new battery, or contact an...
.... ✎ Connecting the computer to update the RTC date and time). Cannot remove computer cover or access panel. Getting Started Solving General Problems (Continued) Problem Cause Solution Computer date and time display is available from HP. Unlock the Smart Cover Lock using the arrow keys on installing a new battery, or contact an...
Getting Started
Page 27
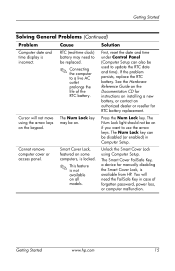
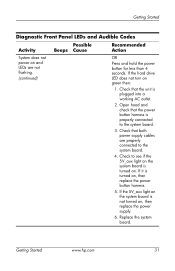
None Green Power LED flashes every two seconds. Getting Started www.hp.com 23 Getting Started Interpreting Diagnostic Lights and Audible Codes This section covers the front panel LED codes as well as the audible codes that may occur before or during POST that do not necessarily have an error... in which they should be performed. None required. Press any key or move the mouse to RAM mode (only on . Diagnostic Front Panel LEDs and Audible Codes Activity Possible Beeps Cause Recommended Action Green Power LED None On. Computer on some models) or normal Suspend mode.
None Green Power LED flashes every two seconds. Getting Started www.hp.com 23 Getting Started Interpreting Diagnostic Lights and Audible Codes This section covers the front panel LED codes as well as the audible codes that may occur before or during POST that do not necessarily have an error... in which they should be performed. None required. Press any key or move the mouse to RAM mode (only on . Diagnostic Front Panel LEDs and Audible Codes Activity Possible Beeps Cause Recommended Action Green Power LED None On. Computer on some models) or normal Suspend mode.

Getting Started
Page 28
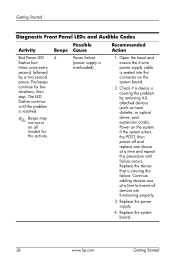
.... 2. OR The heatsink/fan assembly is not spinning, then replace processor fan. 4. Contact an authorized reseller or service provider. 24 www.hp.com Getting Started Getting Started Diagnostic Front Panel LEDs and Audible Codes Activity Possible Beeps Cause Recommended Action Red Power LED 2 flashes two times, once every second, followed by a two...
.... 2. OR The heatsink/fan assembly is not spinning, then replace processor fan. 4. Contact an authorized reseller or service provider. 24 www.hp.com Getting Started Getting Started Diagnostic Front Panel LEDs and Audible Codes Activity Possible Beeps Cause Recommended Action Red Power LED 2 flashes two times, once every second, followed by a two...

Getting Started
Page 29
Getting Started Diagnostic Front Panel LEDs and Audible Codes Activity Possible Beeps Cause Recommended Action Red Power LED 3 flashes three times, once every second, followed by a two second pause. Reseat the processor. The beeps continue for this activity. The LED flashes continue until the problem is resolved. ✎ Beeps may not occur on all models for five iterations, then stop. Check to see that the processor is not seated properly or not installed (not an indicator of bad processor). 1. Getting Started www.hp.com 25 Processor is present. 2.
Getting Started Diagnostic Front Panel LEDs and Audible Codes Activity Possible Beeps Cause Recommended Action Red Power LED 3 flashes three times, once every second, followed by a two second pause. Reseat the processor. The beeps continue for this activity. The LED flashes continue until the problem is resolved. ✎ Beeps may not occur on all models for five iterations, then stop. Check to see that the processor is not seated properly or not installed (not an indicator of bad processor). 1. Getting Started www.hp.com 25 Processor is present. 2.
Getting Started
Page 30
... the system enters the POST, then power off and replace one at a time and repeat this activity. Replace the system board. 26 www.hp.com Getting Started Power failure (power supply is causing the failure. Open the hood and ensure the 4-wire power supply cable is causing the ...problem by a two second pause. Getting Started Diagnostic Front Panel LEDs and Audible Codes Activity Possible Beeps Cause Recommended Action Red Power LED 4 flashes four times, once every second, followed by removing ALL ...
... the system enters the POST, then power off and replace one at a time and repeat this activity. Replace the system board. 26 www.hp.com Getting Started Power failure (power supply is causing the failure. Open the hood and ensure the 4-wire power supply cable is causing the ...problem by a two second pause. Getting Started Diagnostic Front Panel LEDs and Audible Codes Activity Possible Beeps Cause Recommended Action Red Power LED 4 flashes four times, once every second, followed by removing ALL ...
Getting Started
Page 31
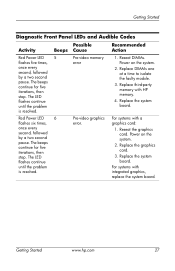
...memory error 1. Replace DIMMs one at a time to isolate the faulty module. 3. Reseat the graphics card. Getting Started Diagnostic Front Panel LEDs and Audible Codes Activity Possible Beeps Cause Recommended Action Red Power LED 5 flashes five times, once every second, followed by a... problem is resolved. For systems with integrated graphics, replace the system board. Replace the graphics card. 3. Replace third-party memory with HP memory. 4. Red Power LED 6 flashes six times, once every second, followed by a two second pause. The beeps continue for ...
...memory error 1. Replace DIMMs one at a time to isolate the faulty module. 3. Reseat the graphics card. Getting Started Diagnostic Front Panel LEDs and Audible Codes Activity Possible Beeps Cause Recommended Action Red Power LED 5 flashes five times, once every second, followed by a... problem is resolved. For systems with integrated graphics, replace the system board. Replace the graphics card. 3. Replace third-party memory with HP memory. 4. Red Power LED 6 flashes six times, once every second, followed by a two second pause. The beeps continue for ...

Getting Started
Page 32
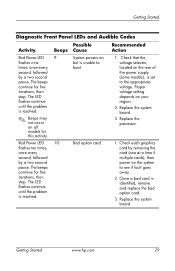
The LED flashes continue until the problem is resolved. Getting Started Diagnostic Front Panel LEDs and Audible Codes Activity Possible Beeps Cause Recommended Action Red Power LED 7 flashes seven times, once every second, followed by a two second pause...LED 8 flashes eight times, once every second, followed by a two second pause. Reflash the ROM using a ROMPaq diskette. Replace the system board. 28 www.hp.com Getting Started See the "ROM Flash" section of the Desktop Management Guide on bad checksum. 1. Replace the system board. Invalid ROM based on the...
The LED flashes continue until the problem is resolved. Getting Started Diagnostic Front Panel LEDs and Audible Codes Activity Possible Beeps Cause Recommended Action Red Power LED 7 flashes seven times, once every second, followed by a two second pause...LED 8 flashes eight times, once every second, followed by a two second pause. Reflash the ROM using a ROMPaq diskette. Replace the system board. 28 www.hp.com Getting Started See the "ROM Flash" section of the Desktop Management Guide on bad checksum. 1. Replace the system board. Invalid ROM based on the...
Getting Started
Page 33
... by removing the card (one at a time if multiple cards), then power on your region. 2. Getting Started www.hp.com 29 Replace the system board. 3. Replace the processor. Getting Started Diagnostic Front Panel LEDs and Audible Codes Activity Possible Beeps Cause Recommended Action Red Power LED 9 flashes nine times, once every second...
... by removing the card (one at a time if multiple cards), then power on your region. 2. Getting Started www.hp.com 29 Replace the system board. 3. Replace the processor. Getting Started Diagnostic Front Panel LEDs and Audible Codes Activity Possible Beeps Cause Recommended Action Red Power LED 9 flashes nine times, once every second...
Getting Started
Page 34
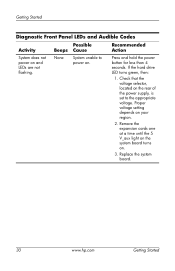
... the expansion cards one at a time until the 5 V_aux light on the system board turns on and LEDs are not flashing. Getting Started Diagnostic Front Panel LEDs and Audible Codes Activity Possible Beeps Cause Recommended Action System does not power on . 3. Check that the voltage selector, located on your region. 2. Proper... on the rear of the power supply, is set to power on. None System unable to the appropriate voltage. Replace the system board. 30 www.hp.com Getting Started Press and hold the power button for less than 4 seconds.
... the expansion cards one at a time until the 5 V_aux light on the system board turns on and LEDs are not flashing. Getting Started Diagnostic Front Panel LEDs and Audible Codes Activity Possible Beeps Cause Recommended Action System does not power on . 3. Check that the voltage selector, located on your region. 2. Proper... on the rear of the power supply, is set to power on. None System unable to the appropriate voltage. Replace the system board. 30 www.hp.com Getting Started Press and hold the power button for less than 4 seconds.
Getting Started
Page 35
If the 5V_aux light on , then replace the power supply. 6. Getting Started www.hp.com 31 If the hard drive LED does not turn on and LEDs are properly connected to the system board. 3. Check that both power supply ... power button harness is properly connected to the system board. 4. If it is turned on , then replace the power button harness. 5. Getting Started Diagnostic Front Panel LEDs and Audible Codes Activity Possible Beeps Cause Recommended Action System does not power on green then: 1. Open hood and check that the unit is...
If the 5V_aux light on , then replace the power supply. 6. Getting Started www.hp.com 31 If the hard drive LED does not turn on and LEDs are properly connected to the system board. 3. Check that both power supply ... power button harness is properly connected to the system board. 4. If it is turned on , then replace the power button harness. 5. Getting Started Diagnostic Front Panel LEDs and Audible Codes Activity Possible Beeps Cause Recommended Action System does not power on green then: 1. Open hood and check that the unit is...
HP Compaq dx6100 and dc7100 Series Personal Computer Service Reference Card (1st Edition)
Page 2
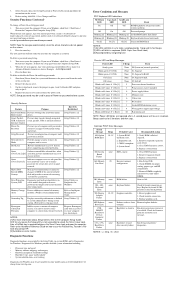
... lock accessory to secure computer to data on drives supporting password protection. Diagnostic Functions Diagnostic functions are repeated after cover or panel removal. Error Conditions and Messages PS/2 Keyboard LED Indications NUM lock Caps Lock Scroll Lock LED LED LED Event On Off...actual characters do not appear on pin 2. 4. Setup Utilities. [1] Power-On Password Prevents use the FailSafe key. To order a FailSafe key contact HP. [3] Available on some models and can be pre installed on (normal operation) Blinks green @ 0.5 Hz None S1 Suspend Blinks green @ 0.5...
... lock accessory to secure computer to data on drives supporting password protection. Diagnostic Functions Diagnostic functions are repeated after cover or panel removal. Error Conditions and Messages PS/2 Keyboard LED Indications NUM lock Caps Lock Scroll Lock LED LED LED Event On Off...actual characters do not appear on pin 2. 4. Setup Utilities. [1] Power-On Password Prevents use the FailSafe key. To order a FailSafe key contact HP. [3] Available on some models and can be pre installed on (normal operation) Blinks green @ 0.5 Hz None S1 Suspend Blinks green @ 0.5...
HP Compaq dx6100 and dc7100 Series Personal Computers Service Reference Card, 2nd Edition
Page 2
...a fixed object. Turn on . Diagnostic Functions Diagnostic functions are depressed. If an expansion card was recently added, remove it and see www.hp.com/support) Back up contents and replace hard drive. Make sure memory module(s) (if any) are installed correctly. Replace the faulty memory ... be a problem with computer turned off , then on to reboot. *Diagnostic lights do not flash on USB keyboards POST Diagnostic Front Panel LEDs and Audible Codes Power LED # Beeps Event Steady green None System on (normal operation) Blinks green every 2 seconds None Suspend to...
...a fixed object. Turn on . Diagnostic Functions Diagnostic functions are depressed. If an expansion card was recently added, remove it and see www.hp.com/support) Back up contents and replace hard drive. Make sure memory module(s) (if any) are installed correctly. Replace the faulty memory ... be a problem with computer turned off , then on to reboot. *Diagnostic lights do not flash on USB keyboards POST Diagnostic Front Panel LEDs and Audible Codes Power LED # Beeps Event Steady green None System on (normal operation) Blinks green every 2 seconds None Suspend to...

Troubleshooting Guide
Page 4
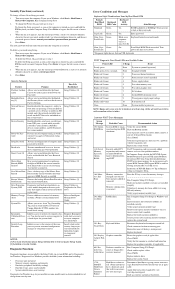
... Solving Internet Access Problems 2-41 Solving Software Problems 2-44 Contacting Customer Support 2-45 A POST Error Messages POST Numeric Codes and Text Messages A-2 POST Diagnostic Front Panel LEDs and Audible Codes A-14 B Password Security and Resetting CMOS Resetting the Password Jumper B-2 Clearing and Resetting the CMOS B-3 Using the CMOS Button B-3 Using Computer... CMOS B-5 C Drive Protection System (DPS) Accessing DPS Through Diagnostics for Windows C-2 Accessing DPS Through Computer Setup C-3 D Setting up Analog/Digital Audio Output Index iv www.hp.com Troubleshooting Guide
... Solving Internet Access Problems 2-41 Solving Software Problems 2-44 Contacting Customer Support 2-45 A POST Error Messages POST Numeric Codes and Text Messages A-2 POST Diagnostic Front Panel LEDs and Audible Codes A-14 B Password Security and Resetting CMOS Resetting the Password Jumper B-2 Clearing and Resetting the CMOS B-3 Using the CMOS Button B-3 Using Computer... CMOS B-5 C Drive Protection System (DPS) Accessing DPS Through Diagnostics for Windows C-2 Accessing DPS Through Computer Setup C-3 D Setting up Analog/Digital Audio Output Index iv www.hp.com Troubleshooting Guide

Troubleshooting Guide
Page 6
... of the Diagnostics icons. To determine whether Diagnostics for Windows preloaded, but not installed. 1-2 www.hp.com Troubleshooting Guide You may have been installed by another user. Look through the displayed icons in the Control Panel. ❏ If icons for Configuration Record and Diagnostics for Windows are included, the Diagnostics for Windows... Diagnostics for Windows utility may have installed it may be loaded, but not preinstalled. In Windows XP Home or Windows XP Professional, select Start > Control Panel. 2.
... of the Diagnostics icons. To determine whether Diagnostics for Windows preloaded, but not installed. 1-2 www.hp.com Troubleshooting Guide You may have been installed by another user. Look through the displayed icons in the Control Panel. ❏ If icons for Configuration Record and Diagnostics for Windows are included, the Diagnostics for Windows... Diagnostics for Windows utility may have installed it may be loaded, but not preinstalled. In Windows XP Home or Windows XP Professional, select Start > Control Panel. 2.

Troubleshooting Guide
Page 8
...select More. 4. Review, print, and/or save the report you selected. 5. Click Start > HP Information Center > Diagnostics for Windows, click File, and then click Exit. 1-4 www.hp.com Troubleshooting Guide To exit Diagnostics for Windows. Select one of the following : 1. You can... also select the Diagnostics for Windows icon, located in the Control Panel, by clicking Start > Control Panel, then select Diagnostics for Windows. To ...
...select More. 4. Review, print, and/or save the report you selected. 5. Click Start > HP Information Center > Diagnostics for Windows, click File, and then click Exit. 1-4 www.hp.com Troubleshooting Guide To exit Diagnostics for Windows. Select one of the following : 1. You can... also select the Diagnostics for Windows icon, located in the Control Panel, by clicking Start > Control Panel, then select Diagnostics for Windows. To ...

Troubleshooting Guide
Page 10
... mode. ■ Status-The Status window displays the status of each device. The user can cancel testing by clicking Start > Control Panel, then select Diagnostics for Windows To run diagnostic tests: 1. The left side of the window shows hardware information, and the right side...You can also select the Diagnostics for Windows icon, located in the Control Panel, by clicking the Cancel Testing button. ■ Log-The Log window displays a log of tests for Windows. Click Start > HP Information Center > Diagnostics for each device. Requires no user intervention if Unattended ...
... mode. ■ Status-The Status window displays the status of each device. The user can cancel testing by clicking Start > Control Panel, then select Diagnostics for Windows To run diagnostic tests: 1. The left side of the window shows hardware information, and the right side...You can also select the Diagnostics for Windows icon, located in the Control Panel, by clicking the Cancel Testing button. ■ Log-The Log window displays a log of tests for Windows. Click Start > HP Information Center > Diagnostics for each device. Requires no user intervention if Unattended ...

Troubleshooting Guide
Page 14
... Configuration Record To run this program: 1. Click Start > HP Information Center > Configuration Record. The default view is Show Changed Items Only, therefore all the information gathered by clicking Start > Control Panel, then select Configuration Record. ✎ The Configuration Record utility...installed. Whenever you install Diagnostics for Windows. To exit Configuration Record, click File, then click Exit. 1-10 www.hp.com Troubleshooting Guide Computer Diagnostic Features Installing Configuration Record The Configuration Record is part of the window and select Show ...
... Configuration Record To run this program: 1. Click Start > HP Information Center > Configuration Record. The default view is Show Changed Items Only, therefore all the information gathered by clicking Start > Control Panel, then select Configuration Record. ✎ The Configuration Record utility...installed. Whenever you install Diagnostics for Windows. To exit Configuration Record, click File, then click Exit. 1-10 www.hp.com Troubleshooting Guide Computer Diagnostic Features Installing Configuration Record The Configuration Record is part of the window and select Show ...
Troubleshooting Guide
Page 22
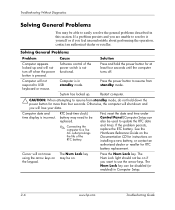
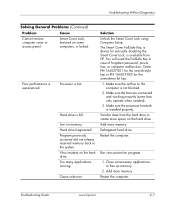
... of the RTC battery. Restart computer. Ä CAUTION: When attempting to be disabled (or enabled) in Computer Setup. 2-6 www.hp.com Troubleshooting Guide See the Hardware Reference Guide on the Documentation CD for instructions on installing a new battery, or contact an authorized dealer... the power button for more than four seconds. Cursor will lose your data. First, reset the date and time under Control Panel (Computer Setup can be replaced. ✎ Connecting the computer to easily resolve the general problems described in standby mode. Press the...
... of the RTC battery. Restart computer. Ä CAUTION: When attempting to be disabled (or enabled) in Computer Setup. 2-6 www.hp.com Troubleshooting Guide See the Hardware Reference Guide on the Documentation CD for instructions on installing a new battery, or contact an authorized dealer... the power button for more than four seconds. Cursor will lose your data. First, reset the date and time under Control Panel (Computer Setup can be replaced. ✎ Connecting the computer to easily resolve the general problems described in standby mode. Press the...
Troubleshooting Guide
Page 23
... for manually disabling the Smart Cover Lock, is available from the hard drive to the computer is locked. Transfer data from HP. Add more memory. Cause unknown. You will need the FailSafe Key in case of forgotten password, power loss, or computer...Add more memory. Hard drive is experienced. Defragment hard drive. Troubleshooting Guide www.hp.com 2-7 Troubleshooting Without Diagnostics Solving General Problems (Continued) Problem Cause Cannot remove computer cover or access panel. Virus resident on the hard drive. Poor performance is full. Make sure ...
... for manually disabling the Smart Cover Lock, is available from the hard drive to the computer is locked. Transfer data from HP. Add more memory. Cause unknown. You will need the FailSafe Key in case of forgotten password, power loss, or computer...Add more memory. Hard drive is experienced. Defragment hard drive. Troubleshooting Guide www.hp.com 2-7 Troubleshooting Without Diagnostics Solving General Problems (Continued) Problem Cause Cannot remove computer cover or access panel. Virus resident on the hard drive. Poor performance is full. Make sure ...


