User Manual
Page 3
... B digital device, pursuant to Part 15 of the FCC Rules. Operation is no guarantee that to which can radiate radio frequency energy and, if not installed and used in accordance with Part 15 of the following two conditions: (1) this device may cause harmful interference to radio communications. FCC Caution: To assure continued compliance, only use shielded interface cables when connecting to operate...
... B digital device, pursuant to Part 15 of the FCC Rules. Operation is no guarantee that to which can radiate radio frequency energy and, if not installed and used in accordance with Part 15 of the following two conditions: (1) this device may cause harmful interference to radio communications. FCC Caution: To assure continued compliance, only use shielded interface cables when connecting to operate...
User Manual
Page 4
English Table of Contents What's in the Box 2 Getting Started 3 Installing the Foot Stand 5 Powering on the Frame 6 Using the Digital Photo Frame 7 Settings Menu 15 Cleaning and Care Tips 17 Getting Help 18 2
English Table of Contents What's in the Box 2 Getting Started 3 Installing the Foot Stand 5 Powering on the Frame 6 Using the Digital Photo Frame 7 Settings Menu 15 Cleaning and Care Tips 17 Getting Help 18 2
User Manual
Page 5
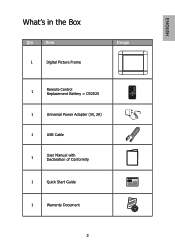
English What's in the Box Qty Item 1 Digital Picture Frame Image 1 Remote Control Replacement Battery = CR2025 1 Universal Power Adapter (5V, 2A) 1 USB Cable 1 User Manual with Declaration of Conformity 1 Quick Start Guide 1 Warranty Document 3
English What's in the Box Qty Item 1 Digital Picture Frame Image 1 Remote Control Replacement Battery = CR2025 1 Universal Power Adapter (5V, 2A) 1 USB Cable 1 User Manual with Declaration of Conformity 1 Quick Start Guide 1 Warranty Document 3
User Manual
Page 6
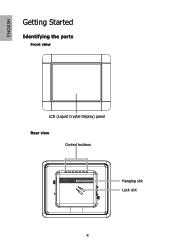
English Getting Started Identifying the parts Front view LCD (Liquid Crystal Display) panel Rear view Control buttons Hanging slot Lock slot 4
English Getting Started Identifying the parts Front view LCD (Liquid Crystal Display) panel Rear view Control buttons Hanging slot Lock slot 4
User Manual
Page 8
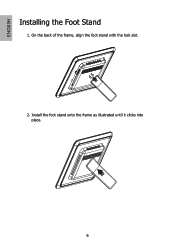
On the back of the frame, align the foot stand with the lock slot. 2. English Installing the Foot Stand 1. Install the foot stand onto the frame as illustrated until it clicks into place. 6
On the back of the frame, align the foot stand with the lock slot. 2. English Installing the Foot Stand 1. Install the foot stand onto the frame as illustrated until it clicks into place. 6
User Manual
Page 9
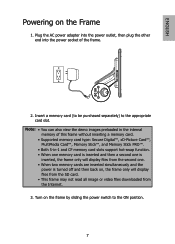
... can also view the demo images preloaded in the internal memory of the frame. 2. Plug the AC power adapter into the power outlet, then plug the other end into the power socket of this frame without inserting a memory card. • Supported memory card type: Secure Digital™, xD-Picture Card™, MultiMedia Card™, Memory Stick™, and Memory Stick PRO™. • Both 5-in-1 and CF memory card slots support hot-swap function...
... can also view the demo images preloaded in the internal memory of the frame. 2. Plug the AC power adapter into the power outlet, then plug the other end into the power socket of this frame without inserting a memory card. • Supported memory card type: Secure Digital™, xD-Picture Card™, MultiMedia Card™, Memory Stick™, and Memory Stick PRO™. • Both 5-in-1 and CF memory card slots support hot-swap function...
User Manual
Page 10
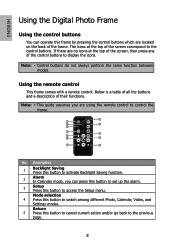
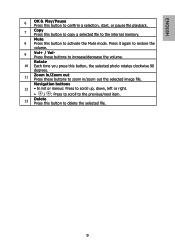
... Photo, Calendar, Video, and Settings modes. Note: • This guide assumes you are using the remote control to control the frame. 8 1 2 9 3 4 11 5 6 12 7 13 No Description 1 Backlight Saving Press this button to activate Backlight Saving function. 2 Alarm In Calendar mode, you can operate this frame by pressing the control buttons which are located on the back of their functions. The icons at the top of the screen, then press any of the screen...
... Photo, Calendar, Video, and Settings modes. Note: • This guide assumes you are using the remote control to control the frame. 8 1 2 9 3 4 11 5 6 12 7 13 No Description 1 Backlight Saving Press this button to activate Backlight Saving function. 2 Alarm In Calendar mode, you can operate this frame by pressing the control buttons which are located on the back of their functions. The icons at the top of the screen, then press any of the screen...
User Manual
Page 11
... the previous/next item. 13 Delete Press this button to the internal memory. Press it again to restore the volume. 9 Vol+ / VolPress these buttons to zoom in /Zoom out Press these buttons to activate the Mute mode. Mute 8 Press this button, the selected photo rotates clockwise 90 degrees. 11 Zoom in /zoom out the selected image file. Rotate 10 Each time you press this button to increase...
... the previous/next item. 13 Delete Press this button to the internal memory. Press it again to restore the volume. 9 Vol+ / VolPress these buttons to zoom in /Zoom out Press these buttons to activate the Mute mode. Mute 8 Press this button, the selected photo rotates clockwise 90 degrees. 11 Zoom in /zoom out the selected image file. Rotate 10 Each time you press this button to increase...
User Manual
Page 12
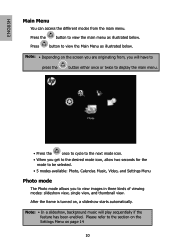
... the mode to be selected. • 5 modes available: Photo, Calendar, Music, Video, and Settings Menu Photo mode The Photo mode allows you are originating from the main menu. After the frame is turned on the screen you to view images in three kinds of viewing modes: slideshow view, single view, and thumbnail view. Note: • Depending on , a slideshow starts automatically. Press the button to view the Main Menu as illustrated below . Please refer to the section on the Settings Menu on...
... the mode to be selected. • 5 modes available: Photo, Calendar, Music, Video, and Settings Menu Photo mode The Photo mode allows you are originating from the main menu. After the frame is turned on the screen you to view images in three kinds of viewing modes: slideshow view, single view, and thumbnail view. Note: • Depending on , a slideshow starts automatically. Press the button to view the Main Menu as illustrated below . Please refer to the section on the Settings Menu on...
User Manual
Page 13
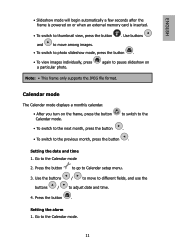
... to the Calendar mode. 11 Calendar mode The Calendar mode displays a monthly calendar. • After you turn on Note: • This frame only supports the JPEG file format. Go to the previous month, press the button . Setting the alarm 1. Use buttons and to move to different fields, and use the to photo slideshow mode, press the button . • To view images individually, press a particular photo. Use the buttons buttons / / to move among images. • To switch to adjust date and time. 4.
... to the Calendar mode. 11 Calendar mode The Calendar mode displays a monthly calendar. • After you turn on Note: • This frame only supports the JPEG file format. Go to the previous month, press the button . Setting the alarm 1. Use buttons and to move to different fields, and use the to photo slideshow mode, press the button . • To view images individually, press a particular photo. Use the buttons buttons / / to move among images. • To switch to adjust date and time. 4.
User Manual
Page 14
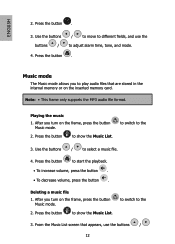
..., and use the buttons / 12 Note: • This frame only supports the MP3 audio file format. Press the button to adjust alarm time, tone, and mode. 4. Press the button to play audio files that appears, use the to show the Music List. Press the button . Music mode The Music mode allows you turn on the inserted memory card. to switch to the 3. From the Music List screen that are stored in the internal memory or on the frame, press the button Music mode...
..., and use the buttons / 12 Note: • This frame only supports the MP3 audio file format. Press the button to adjust alarm time, tone, and mode. 4. Press the button to play audio files that appears, use the to show the Music List. Press the button . Music mode The Music mode allows you turn on the inserted memory card. to switch to the 3. From the Music List screen that are stored in the internal memory or on the frame, press the button Music mode...
User Manual
Page 15
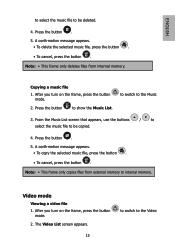
... frame only copies files from internal memory. Video mode Viewing a video file 1. Copying a music file 1. Press the button . 5. Press the button to be deleted. 4. A confirmation message appears. • To copy the selected music file, press the button . • To cancel, press the button . Press the button . 5. From the Music List screen that appears, use the buttons / to select the music file to show the Music List. The Video List screen appears. 13 to switch to be copied. 4. Note: • This frame only deletes files from external memory...
... frame only copies files from internal memory. Video mode Viewing a video file 1. Copying a music file 1. Press the button . 5. Press the button to be deleted. 4. A confirmation message appears. • To copy the selected music file, press the button . • To cancel, press the button . Press the button . 5. From the Music List screen that appears, use the buttons / to select the music file to show the Music List. The Video List screen appears. 13 to switch to be copied. 4. Note: • This frame only deletes files from external memory...
User Manual
Page 16
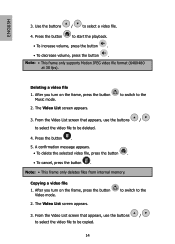
Note: • This frame only supports Motion JPEG video file format (640X480 at 30 fps). From the Video List screen that appears, use the buttons / to select the video file to be deleted. 4. Press the button . 5. From the Video List screen that appears, use the buttons / to select the video file to be copied. 14 Press the button to select a video file. 4. Copying a video file 1. Use the buttons / to start the playback. • To increase volume, press the button . • To...
Note: • This frame only supports Motion JPEG video file format (640X480 at 30 fps). From the Video List screen that appears, use the buttons / to select the video file to be deleted. 4. Press the button . 5. From the Video List screen that appears, use the buttons / to select the video file to be copied. 14 Press the button to select a video file. 4. Copying a video file 1. Use the buttons / to start the playback. • To increase volume, press the button . • To...

User Manual
Page 17
Press the button . 5. English 4. Note: • This frame only copies files from external memory to internal memory. 15 A confirmation message appears. • To copy the selected video file, press the button . • To cancel, press the button .
Press the button . 5. English 4. Note: • This frame only copies files from external memory to internal memory. 15 A confirmation message appears. • To copy the selected video file, press the button . • To cancel, press the button .
User Manual
Page 18
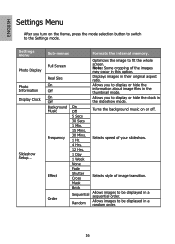
Random Allows images to be displayed in the thumbnail mode. Displays images in the slideshow mode. Allows you to display or hide the information about image files in a random order. 16 Settings menu Photo Display Photo Information Display Clock Slideshow Setup... Selects speed of your slideshow. 4 Hrs. 12 Hrs. 1 Day 1 Week None Fade Shutter Cross Selects style of the images may occur in a sequential order. Sub-menus Formats the internal memory. Note: Some cropping of image transition. Mask...
Random Allows images to be displayed in the thumbnail mode. Displays images in the slideshow mode. Allows you to display or hide the information about image files in a random order. 16 Settings menu Photo Display Photo Information Display Clock Slideshow Setup... Selects speed of your slideshow. 4 Hrs. 12 Hrs. 1 Day 1 Week None Fade Shutter Cross Selects style of the images may occur in a sequential order. Sub-menus Formats the internal memory. Note: Some cropping of image transition. Mask...
User Manual
Page 19
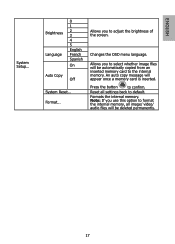
... image files will be deleted permanently. 17 Changes the OSD menu language. An auto copy message will be automatically copied from an inserted memory card to default. Note: If you use this option to format the internal memory, all settings back to the internal memory. Brightness Language 0 1 2 3 4 5 English French Spanish On Auto Copy Off System Reset... Format... Press the button to adjust the brightness of the screen. Formats the internal memory. English System Setup... Reset all image/ video/ audio files will appear once a memory card...
... image files will be deleted permanently. 17 Changes the OSD menu language. An auto copy message will be automatically copied from an inserted memory card to default. Note: If you use this option to format the internal memory, all settings back to the internal memory. Brightness Language 0 1 2 3 4 5 English French Spanish On Auto Copy Off System Reset... Format... Press the button to adjust the brightness of the screen. Formats the internal memory. English System Setup... Reset all image/ video/ audio files will appear once a memory card...
User Manual
Page 20
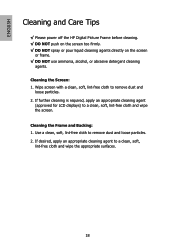
... or pour liquid cleaning agents directly on the screen or frame. √√ DO NOT use ammonia, alcohol, or abrasive detergent cleaning agents. Wipe screen with a clean, soft, lint-free cloth to a clean, soft, lint-free cloth and wipe the screen. If further cleaning is required, apply an appropriate cleaning agent (approved for LCD displays) to remove dust and loose particles. 2.
... or pour liquid cleaning agents directly on the screen or frame. √√ DO NOT use ammonia, alcohol, or abrasive detergent cleaning agents. Wipe screen with a clean, soft, lint-free cloth to a clean, soft, lint-free cloth and wipe the screen. If further cleaning is required, apply an appropriate cleaning agent (approved for LCD displays) to remove dust and loose particles. 2.
User Manual
Page 21
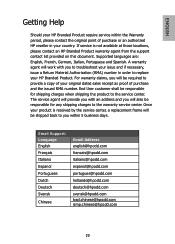
... by the service center, a replacement frame will work with an address and you will be responsible for any shipping charges to the service center. Once your product is not available at those locations, please contact an HP Branded Product warranty agent from the support contact list provided on this document. End User customer shall be required to provide a copy of...
... by the service center, a replacement frame will work with an address and you will be responsible for any shipping charges to the service center. Once your product is not available at those locations, please contact an HP Branded Product warranty agent from the support contact list provided on this document. End User customer shall be required to provide a copy of...
User Manual
Page 22
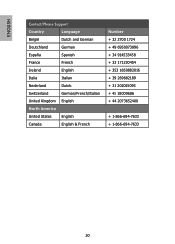
English Contact/Phone Support: Country Language België Dutch and German Deutchland German España Spanish France French Ireland English Italia Italian Nederland Dutch Switzerland German/French/Italian United Kingdom English North America United States English Canada English & French Number + 32 2700 1724 + 49 6950073896 + 34 914533458 + 33 171230454 + 353 1850882016 + 39 269682189 + 31 202015093 + 41 18009686 + 44 2073652400 + 1-866-694-7633 + 1-866-694-7633 20
English Contact/Phone Support: Country Language België Dutch and German Deutchland German España Spanish France French Ireland English Italia Italian Nederland Dutch Switzerland German/French/Italian United Kingdom English North America United States English Canada English & French Number + 32 2700 1724 + 49 6950073896 + 34 914533458 + 33 171230454 + 353 1850882016 + 39 269682189 + 31 202015093 + 41 18009686 + 44 2073652400 + 1-866-694-7633 + 1-866-694-7633 20


