
End User License Agreement
Page 2
...SOFTWARE. a. Any transfer must agree to United States copyright, trade secret, and trademark law, as well as an upgrade, you may only be governed by HP as eligible for the original Software Product identified by the Microsoft License Agreement. 2. You shall not remove any Microsoft ...services related to another end user. TRANSFER. All intellectual property rights in the form of the HP Product with the update or supplement. In case of the Software Product, your upgrade eligibility. 3. Third Party. Prior to the transfer, the end user receiving the transferred product...
...SOFTWARE. a. Any transfer must agree to United States copyright, trade secret, and trademark law, as well as an upgrade, you may only be governed by HP as eligible for the original Software Product identified by the Microsoft License Agreement. 2. You shall not remove any Microsoft ...services related to another end user. TRANSFER. All intellectual property rights in the form of the HP Product with the update or supplement. In case of the Software Product, your upgrade eligibility. 3. Third Party. Prior to the transfer, the end user receiving the transferred product...
Warranty and Support Guide
Page 6
... support; (d) ensure that the problem can be fixed using one of these service upgrades, refer to the HP Hardware Product you may be applicable to the HP Web site at : http://www.hp.com/support Service Upgrades HP has a range of service upgrades and the cost for insuring any product you to your reseller informs you over...
... support; (d) ensure that the problem can be fixed using one of these service upgrades, refer to the HP Hardware Product you may be applicable to the HP Web site at : http://www.hp.com/support Service Upgrades HP has a range of service upgrades and the cost for insuring any product you to your reseller informs you over...
Warranty and Support Guide
Page 8
... such Freeware whether in such recovery solution shall be sure to have the right to the original Software Product provided by HP as an upgrade, you can receive support by the terms and conditions of any other terms along with /for restoring the hard disk of...Software Product only on options • Operating system • Third-party hardware or software • Detailed questions How to this EULA: a. After upgrading, you call HP: • Product serial number, model name, and model number • Applicable error messages • Add-on those computers. BY INSTALLING, ...
... such Freeware whether in such recovery solution shall be sure to have the right to the original Software Product provided by HP as an upgrade, you can receive support by the terms and conditions of any other terms along with /for restoring the hard disk of...Software Product only on options • Operating system • Third-party hardware or software • Detailed questions How to this EULA: a. After upgrading, you call HP: • Product serial number, model name, and model number • Applicable error messages • Add-on those computers. BY INSTALLING, ...
Warranty and Support Guide
Page 11
... you may be done after you have made us famous for quality and reliability. Be sure to also check the updates from HP that expanding and upgrading are sent to your desktop from time to get the latest news from your computer needs to be done first before it left our factory. Next...
... you may be done after you have made us famous for quality and reliability. Be sure to also check the updates from HP that expanding and upgrading are sent to your desktop from time to get the latest news from your computer needs to be done first before it left our factory. Next...

Warranty and Support Guide
Page 20
... provide some protection against voltage surges and built-up static charges. WARNING: Use of controls, adjustments, or performance procedures other than those specified in the Upgrading and Servicing Guide may result in personal injury or equipment damage. WARNING: Always disconnect the modem cord from the telephone system before unplugging your computer...
... provide some protection against voltage surges and built-up static charges. WARNING: Use of controls, adjustments, or performance procedures other than those specified in the Upgrading and Servicing Guide may result in personal injury or equipment damage. WARNING: Always disconnect the modem cord from the telephone system before unplugging your computer...

Getting Started Guide
Page 3
Table of Contents Finding HP TouchSmart PC Information vi Getting to Know the HP TouchSmart PC 1 HP TouchSmart PC Features...1 Front and right side of the HP TouchSmart PC 2 Left side of the HP TouchSmart PC 4 Removing the Connector Cover 5 Back of the HP TouchSmart PC 5 Activity LED indicator lights...7 Connecting the power source...16 Adjusting Screen Brightness...16 Adjusting the Ambient Light ...17 Adding Hardware and Software 17 Upgrading your HP TouchSmart PC hardware 17 Updating your HP TouchSmart software 17 Using the Optical Disk Drive...18 Using the TV Tuner to Watch and Record...
Table of Contents Finding HP TouchSmart PC Information vi Getting to Know the HP TouchSmart PC 1 HP TouchSmart PC Features...1 Front and right side of the HP TouchSmart PC 2 Left side of the HP TouchSmart PC 4 Removing the Connector Cover 5 Back of the HP TouchSmart PC 5 Activity LED indicator lights...7 Connecting the power source...16 Adjusting Screen Brightness...16 Adjusting the Ambient Light ...17 Adding Hardware and Software 17 Upgrading your HP TouchSmart PC hardware 17 Updating your HP TouchSmart software 17 Using the Optical Disk Drive...18 Using the TV Tuner to Watch and Record...
Getting Started Guide
Page 6
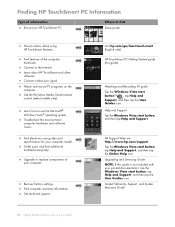
... Vista start button™ , tap Help and ® Support, and then tap the User Guides icon. Learn about using HP TouchSmart features. Find electronic user guides and specifications for your HP TouchSmart PC. Get technical support. Upgrading and Servicing Guide NOTE: If this guide) Watching and Recording TV guide Tap the Windows Vista start button, tap...
... Vista start button™ , tap Help and ® Support, and then tap the User Guides icon. Learn about using HP TouchSmart features. Find electronic user guides and specifications for your HP TouchSmart PC. Get technical support. Upgrading and Servicing Guide NOTE: If this guide) Watching and Recording TV guide Tap the Windows Vista start button, tap...
Getting Started Guide
Page 23
... details. Make sure your hardware and software are compatible with your HP TouchSmart PC, refer to turn on . Windows Vista Upgrade Advisor can help you determine which features of the computer to the Upgrading and Servicing Guide that came with the operating system.* Upgrading your HP TouchSmart PC hardware To find detailed instructions on . Updating your computer. Adjusting the...
... details. Make sure your hardware and software are compatible with your HP TouchSmart PC, refer to turn on . Windows Vista Upgrade Advisor can help you determine which features of the computer to the Upgrading and Servicing Guide that came with the operating system.* Upgrading your HP TouchSmart PC hardware To find detailed instructions on . Updating your computer. Adjusting the...

Getting Started Guide
Page 61
...devices 16 button Ambient Light 4 computer power/sleep 3 DVD control 3 HP TouchSmart 3 C cable management 8 cable router clip 6 calendar using HP TouchSmart Calendar 37 camera position 50 carpal tunnel syndrome 28 CD creating music CD...upgrading the computer hardware 17 using the software 31 what is HP TouchSmart software 31 HP TouchSmart Browser using 35 HP TouchSmart Calendar synchronizing with Microsoft Windows Vista calendar 37 using 37 HP TouchSmart Clock, setting 38 HP TouchSmart Media Library 46 HP TouchSmart Music creating a playlist 47 using 36 HP TouchSmart Notes using 38 HP TouchSmart...
...devices 16 button Ambient Light 4 computer power/sleep 3 DVD control 3 HP TouchSmart 3 C cable management 8 cable router clip 6 calendar using HP TouchSmart Calendar 37 camera position 50 carpal tunnel syndrome 28 CD creating music CD...upgrading the computer hardware 17 using the software 31 what is HP TouchSmart software 31 HP TouchSmart Browser using 35 HP TouchSmart Calendar synchronizing with Microsoft Windows Vista calendar 37 using 37 HP TouchSmart Clock, setting 38 HP TouchSmart Media Library 46 HP TouchSmart Music creating a playlist 47 using 36 HP TouchSmart Notes using 38 HP TouchSmart...

Upgrade and Service Guide
Page 5
... Read the following items before installing and connecting your HP TouchSmart PC. Upgrading and Servicing Guide 1 It is easier to consult this information than to upgrade or service the HP TouchSmart PC. Before You Begin Before you decide to upgrade or service the computer, refer to IEC 60950). ...direct connection to the earth, according to the product specifications for using and modifying electronic equipment. Upgrading and Servicing Guide This guide provides instructions for upgrading the memory and the hard disk drive in the Limited Warranty, Support, and System Recovery Guide...
... Read the following items before installing and connecting your HP TouchSmart PC. Upgrading and Servicing Guide 1 It is easier to consult this information than to upgrade or service the HP TouchSmart PC. Before You Begin Before you decide to upgrade or service the computer, refer to IEC 60950). ...direct connection to the earth, according to the product specifications for using and modifying electronic equipment. Upgrading and Servicing Guide This guide provides instructions for upgrading the memory and the hard disk drive in the Limited Warranty, Support, and System Recovery Guide...

Upgrade and Service Guide
Page 6
... cover B: Back cover C: Computer stand D: Power adapter connector G: Connector cover E: Wireless keyboard and mouse receiver F: Memory cover 2 Upgrading and Servicing Guide WARNING: Always disconnect the HP TouchSmart PC from the power source before you open the HP TouchSmart PC or perform any procedures can result in personal injury or equipment damage. Failure to do so before removing...
... cover B: Back cover C: Computer stand D: Power adapter connector G: Connector cover E: Wireless keyboard and mouse receiver F: Memory cover 2 Upgrading and Servicing Guide WARNING: Always disconnect the HP TouchSmart PC from the power source before you open the HP TouchSmart PC or perform any procedures can result in personal injury or equipment damage. Failure to do so before removing...

Upgrade and Service Guide
Page 7
...wall outlet, and allow the internal system components to the computer. A A Upgrading and Servicing Guide 3 Opening the HP TouchSmart PC To avoid injury and equipment damage, always complete the following steps in order, when opening the HP TouchSmart PC: 1 Remove any external devices that you are discharged of static electricity by ... to cool before touching them. 4 After the system has completely shut down, disconnect the power adapter (A) from the HP TouchSmart PC. 2 Disconnect any media (CD, DVD, memory cards, USB devices, and external hard disk drives) from the back of the...
...wall outlet, and allow the internal system components to the computer. A A Upgrading and Servicing Guide 3 Opening the HP TouchSmart PC To avoid injury and equipment damage, always complete the following steps in order, when opening the HP TouchSmart PC: 1 Remove any external devices that you are discharged of static electricity by ... to cool before touching them. 4 After the system has completely shut down, disconnect the power adapter (A) from the HP TouchSmart PC. 2 Disconnect any media (CD, DVD, memory cards, USB devices, and external hard disk drives) from the back of the...
Upgrade and Service Guide
Page 8
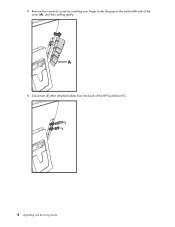
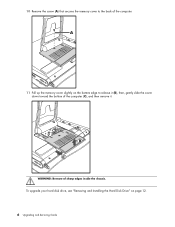
5 Remove the connector cover by inserting your finger under the gap on the bottom-left side of the HP TouchSmart PC. 4 Upgrading and Servicing Guide A 6 Disconnect all other attached cables from the back of the cover (A), and then pulling gently.
5 Remove the connector cover by inserting your finger under the gap on the bottom-left side of the HP TouchSmart PC. 4 Upgrading and Servicing Guide A 6 Disconnect all other attached cables from the back of the cover (A), and then pulling gently.
Upgrade and Service Guide
Page 9
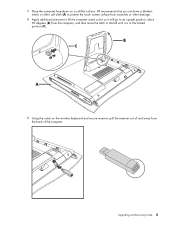
B C A 9 Using the notch on a soft flat surface. Upgrading and Servicing Guide 5 HP recommends that you set down on the wireless keyboard and mouse receiver, pull the receiver out of and away from the computer, and then move the latch to the left until it will go to lift the computer stand as far as it is in the locked position (C). 7 Place the computer face-down a blanket, towel, or other soft cloth (A) to protect the touch screen surface from scratches or other damage. 8 Apply additional pressure to an upright position, about 90 degrees (B) from the back of the computer.
B C A 9 Using the notch on a soft flat surface. Upgrading and Servicing Guide 5 HP recommends that you set down on the wireless keyboard and mouse receiver, pull the receiver out of and away from the computer, and then move the latch to the left until it will go to lift the computer stand as far as it is in the locked position (C). 7 Place the computer face-down a blanket, towel, or other soft cloth (A) to protect the touch screen surface from scratches or other damage. 8 Apply additional pressure to an upright position, about 90 degrees (B) from the back of the computer.
Upgrade and Service Guide
Page 10
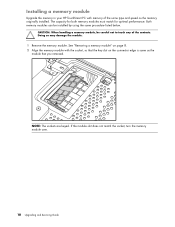
10 Remove the screw (A) that secures the memory cover to release it (B), then, gently slide the cover down toward the bottom of the computer (C), and then remove it. B C WARNING: Beware of the computer. To upgrade your hard disk drive, see "Removing and Installing the Hard Disk Drive" on the bottom edge to the back of sharp edges inside the chassis. A 11 Pull up the memory cover slightly on page 12. 6 Upgrading and Servicing Guide
10 Remove the screw (A) that secures the memory cover to release it (B), then, gently slide the cover down toward the bottom of the computer (C), and then remove it. B C WARNING: Beware of the computer. To upgrade your hard disk drive, see "Removing and Installing the Hard Disk Drive" on the bottom edge to the back of sharp edges inside the chassis. A 11 Pull up the memory cover slightly on page 12. 6 Upgrading and Servicing Guide
Upgrade and Service Guide
Page 11
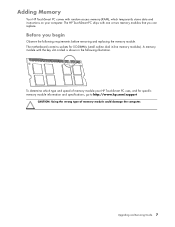
...with one or two memory modules that you begin Observe the following illustration. Upgrading and Servicing Guide 7 Before you can replace. To determine which temporarily stores data and instructions on your HP TouchSmart PC uses, and for SO-DIMMs (small outline dual in the following requirements ...contains sockets for specific memory module information and specifications, go to http://www.hp.com/support CAUTION: Using the wrong type of memory module your computer. Adding Memory Your HP TouchSmart PC comes with random access memory (RAM), which type and speed of memory module...
...with one or two memory modules that you begin Observe the following illustration. Upgrading and Servicing Guide 7 Before you can replace. To determine which temporarily stores data and instructions on your HP TouchSmart PC uses, and for SO-DIMMs (small outline dual in the following requirements ...contains sockets for specific memory module information and specifications, go to http://www.hp.com/support CAUTION: Using the wrong type of memory module your computer. Adding Memory Your HP TouchSmart PC comes with random access memory (RAM), which type and speed of memory module...

Upgrade and Service Guide
Page 12
.... Doing so may be removed by using the same procedure. 8 Upgrading and Servicing Guide CAUTION: Do not pull the memory module out of the retaining clips away from the memory module. See "Opening the HP TouchSmart PC" on page 3. Removing a memory module 1 Complete the procedures to... touch any of the contacts. The memory module pops up at a time. CAUTION: When handling a memory module, be careful not to prepare the HP TouchSmart PC.
.... Doing so may be removed by using the same procedure. 8 Upgrading and Servicing Guide CAUTION: Do not pull the memory module out of the retaining clips away from the memory module. See "Opening the HP TouchSmart PC" on page 3. Removing a memory module 1 Complete the procedures to... touch any of the contacts. The memory module pops up at a time. CAUTION: When handling a memory module, be careful not to prepare the HP TouchSmart PC.

Upgrade and Service Guide
Page 13
Note the location of the key slot on the connector edge. 4 Store the memory module in antistatic packaging. Upgrading and Servicing Guide 9 3 Lift the memory module from the memory socket.
Note the location of the key slot on the connector edge. 4 Store the memory module in antistatic packaging. Upgrading and Servicing Guide 9 3 Lift the memory module from the memory socket.
Upgrade and Service Guide
Page 14
If the module slot does not match the socket, turn the memory module over. 10 Upgrading and Servicing Guide NOTE: The sockets are keyed. The capacity for both memory modules must match for optimal performance. CAUTION: When handling a memory module, be ... module. 1 Remove the memory module. See "Removing a memory module" on the connector edge is same as the memory originally installed. Installing a memory module Upgrade the memory in your HP TouchSmart PC with the socket, so that the key slot on page 8. 2 Align the memory module with memory of the contacts. Both memory modules can...
If the module slot does not match the socket, turn the memory module over. 10 Upgrading and Servicing Guide NOTE: The sockets are keyed. The capacity for both memory modules must match for optimal performance. CAUTION: When handling a memory module, be ... module. 1 Remove the memory module. See "Removing a memory module" on the connector edge is same as the memory originally installed. Installing a memory module Upgrade the memory in your HP TouchSmart PC with the socket, so that the key slot on page 8. 2 Align the memory module with memory of the contacts. Both memory modules can...
Upgrade and Service Guide
Page 15
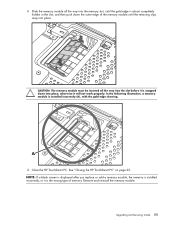
See "Closing the HP TouchSmart PC" on page 23. Upgrading and Servicing Guide 11 CAUTION: The memory module must be inserted all the way into the memory slot, until the retaining clips snap into place; 3 ... properly. otherwise it is the wrong type of the memory module until the gold edge is installed incorrectly (A), with the gold edge showing. A 4 Close the HP TouchSmart PC. Remove and reinstall the memory module. In the following illustration, a memory module is almost completely hidden in the slot, and then push down into place...
See "Closing the HP TouchSmart PC" on page 23. Upgrading and Servicing Guide 11 CAUTION: The memory module must be inserted all the way into the memory slot, until the retaining clips snap into place; 3 ... properly. otherwise it is the wrong type of the memory module until the gold edge is installed incorrectly (A), with the gold edge showing. A 4 Close the HP TouchSmart PC. Remove and reinstall the memory module. In the following illustration, a memory module is almost completely hidden in the slot, and then push down into place...


