Warranty and Support Guide
Page 8
...up copies of any Microsoft operating system software contained in such recovery solution shall be licensed for the original Software Product identified by HP as eligible for purposes of the Freeware by you must first be governed by the Microsoft License Agreement. 2. RIGHTS IN THE SOFTWARE...amendment or addendum to you in this EULA: a. GRANT OF LICENSE. You may copy the Software Product into Your Computer's temporary memory (RAM) for the upgrade. Use of using the Software Product. floppy disk, CD or DVD) or an equivalent solution delivered in any portion of the Software...
...up copies of any Microsoft operating system software contained in such recovery solution shall be licensed for the original Software Product identified by HP as eligible for purposes of the Freeware by you must first be governed by the Microsoft License Agreement. 2. RIGHTS IN THE SOFTWARE...amendment or addendum to you in this EULA: a. GRANT OF LICENSE. You may copy the Software Product into Your Computer's temporary memory (RAM) for the upgrade. Use of using the Software Product. floppy disk, CD or DVD) or an equivalent solution delivered in any portion of the Software...
Getting Started Guide
Page 23
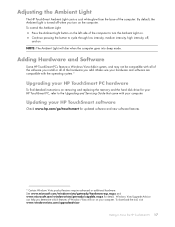
... on the computer. To download the tool, visit www.windowsvista.com/upgradeadvisor Getting to the Upgrading and Servicing Guide that came with the operating system.* Upgrading your HP TouchSmart PC hardware To find detailed instructions on removing and replacing the memory and the hard disk drive for details. By default, the Ambient Light is turned off...
... on the computer. To download the tool, visit www.windowsvista.com/upgradeadvisor Getting to the Upgrading and Servicing Guide that came with the operating system.* Upgrading your HP TouchSmart PC hardware To find detailed instructions on removing and replacing the memory and the hard disk drive for details. By default, the Ambient Light is turned off...

Upgrade and Service Guide
Page 5
.... WARNING: Please read "Additional Safety Information" in your system to upgrade or service the HP TouchSmart PC. Read the following items before installing and connecting your HP TouchSmart PC. Upgrading and Servicing Guide This guide provides instructions for product information. Go to http://www.hp.com/support for upgrading the memory and the hard disk drive in the Limited Warranty, Support...
.... WARNING: Please read "Additional Safety Information" in your system to upgrade or service the HP TouchSmart PC. Read the following items before installing and connecting your HP TouchSmart PC. Upgrading and Servicing Guide This guide provides instructions for product information. Go to http://www.hp.com/support for upgrading the memory and the hard disk drive in the Limited Warranty, Support...

Upgrade and Service Guide
Page 6
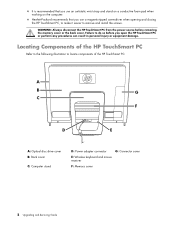
... disc drive cover B: Back cover C: Computer stand D: Power adapter connector G: Connector cover E: Wireless keyboard and mouse receiver F: Memory cover 2 Upgrading and Servicing Guide WARNING: Always disconnect the HP TouchSmart PC from the power source before you open the HP TouchSmart PC or perform any procedures can result in personal injury or equipment damage. It is recommended that you...
... disc drive cover B: Back cover C: Computer stand D: Power adapter connector G: Connector cover E: Wireless keyboard and mouse receiver F: Memory cover 2 Upgrading and Servicing Guide WARNING: Always disconnect the HP TouchSmart PC from the power source before you open the HP TouchSmart PC or perform any procedures can result in personal injury or equipment damage. It is recommended that you...

Upgrade and Service Guide
Page 7
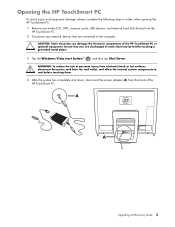
.... 3 Tap the Windows Vista start button™ , and then tap Shut Down. A A Upgrading and Servicing Guide 3 Opening the HP TouchSmart PC To avoid injury and equipment damage, always complete the following steps in order, when opening the HP TouchSmart PC: 1 Remove any media (CD, DVD, memory cards, USB devices, and external hard disk drives) from the back of...
.... 3 Tap the Windows Vista start button™ , and then tap Shut Down. A A Upgrading and Servicing Guide 3 Opening the HP TouchSmart PC To avoid injury and equipment damage, always complete the following steps in order, when opening the HP TouchSmart PC: 1 Remove any media (CD, DVD, memory cards, USB devices, and external hard disk drives) from the back of...
Upgrade and Service Guide
Page 10
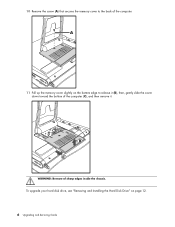
B C WARNING: Beware of the computer. 10 Remove the screw (A) that secures the memory cover to release it (B), then, gently slide the cover down toward the bottom of the computer (C), and then remove it. To upgrade your hard disk drive, see "Removing and Installing the Hard Disk Drive" on the bottom edge to the back of sharp edges inside the chassis. A 11 Pull up the memory cover slightly on page 12. 6 Upgrading and Servicing Guide
B C WARNING: Beware of the computer. 10 Remove the screw (A) that secures the memory cover to release it (B), then, gently slide the cover down toward the bottom of the computer (C), and then remove it. To upgrade your hard disk drive, see "Removing and Installing the Hard Disk Drive" on the bottom edge to the back of sharp edges inside the chassis. A 11 Pull up the memory cover slightly on page 12. 6 Upgrading and Servicing Guide
Upgrade and Service Guide
Page 11
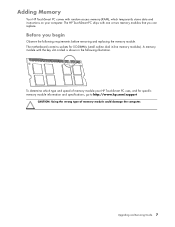
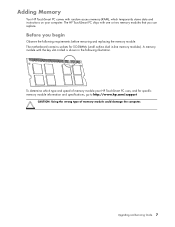
Adding Memory Your HP TouchSmart PC comes with random access memory (RAM), which type and speed of memory module your computer. A memory module with one or two memory modules that you begin Observe the following illustration. Before you can replace. Upgrading and Servicing Guide 7 To determine which temporarily stores data and instructions on your HP TouchSmart PC uses, and for SO-DIMMs (small...
Adding Memory Your HP TouchSmart PC comes with random access memory (RAM), which type and speed of memory module your computer. A memory module with one or two memory modules that you begin Observe the following illustration. Before you can replace. Upgrading and Servicing Guide 7 To determine which temporarily stores data and instructions on your HP TouchSmart PC uses, and for SO-DIMMs (small...

Upgrade and Service Guide
Page 12
... the same procedure. 8 Upgrading and Servicing Guide It may damage the module. The memory module pops up at a time. Doing so may be easier to touch any of the contacts. CAUTION: Do not pull the memory module out of the socket. Both memory modules can be careful not... to push one latch at an angle. Use the latches of the retaining clips to prepare the HP TouchSmart PC. See "Opening the HP TouchSmart PC" on page 3. Removing a memory module 1 Complete the procedures to...
... the same procedure. 8 Upgrading and Servicing Guide It may damage the module. The memory module pops up at a time. Doing so may be easier to touch any of the contacts. CAUTION: Do not pull the memory module out of the socket. Both memory modules can be careful not... to push one latch at an angle. Use the latches of the retaining clips to prepare the HP TouchSmart PC. See "Opening the HP TouchSmart PC" on page 3. Removing a memory module 1 Complete the procedures to...

Upgrade and Service Guide
Page 13
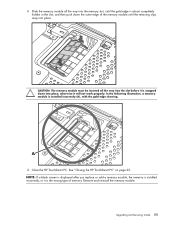
3 Lift the memory module from the memory socket. Note the location of the key slot on the connector edge. 4 Store the memory module in antistatic packaging. Upgrading and Servicing Guide 9
3 Lift the memory module from the memory socket. Note the location of the key slot on the connector edge. 4 Store the memory module in antistatic packaging. Upgrading and Servicing Guide 9
Upgrade and Service Guide
Page 14
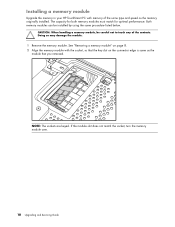
... not match the socket, turn the memory module over. 10 Upgrading and Servicing Guide The capacity for both memory modules must match for optimal performance. See "Removing a memory module" on page 8. 2 Align the memory module with memory of the contacts. NOTE: The sockets are keyed. Installing a memory module Upgrade the memory in your HP TouchSmart PC with the socket, so that you...
... not match the socket, turn the memory module over. 10 Upgrading and Servicing Guide The capacity for both memory modules must match for optimal performance. See "Removing a memory module" on page 8. 2 Align the memory module with memory of the contacts. NOTE: The sockets are keyed. Installing a memory module Upgrade the memory in your HP TouchSmart PC with the socket, so that you...
Upgrade and Service Guide
Page 15
.... Upgrading and Servicing Guide 11 CAUTION: The memory module must be inserted all the way into the memory slot, until the retaining clips snap into place. 3 Slide the memory module all the way into the slot before it is snapped down the outer edge of memory. See "Closing the HP TouchSmart PC" on page 23. A 4 Close the HP TouchSmart PC. Remove...
.... Upgrading and Servicing Guide 11 CAUTION: The memory module must be inserted all the way into the memory slot, until the retaining clips snap into place. 3 Slide the memory module all the way into the slot before it is snapped down the outer edge of memory. See "Closing the HP TouchSmart PC" on page 23. A 4 Close the HP TouchSmart PC. Remove...

Upgrade and Service Guide
Page 18
5 Lift the back cover up from the bottom inside edge of the memory cover area to release it, place both hands under the bottom edge of the cover and lift it up, and then rotate the back cover up as far as it will go. 6 Lift away the back cover from the computer. 14 Upgrading and Servicing Guide
5 Lift the back cover up from the bottom inside edge of the memory cover area to release it, place both hands under the bottom edge of the cover and lift it up, and then rotate the back cover up as far as it will go. 6 Lift away the back cover from the computer. 14 Upgrading and Servicing Guide

Upgrade and Service Guide
Page 27
... Replace the memory cover. B A Upgrading and Servicing Guide 23 Align the four screw holes of the stand over the two legs of the computer, and then replace the four screws that secure the stand to snap it , replace the computer stand. Push in order, after closing the HP TouchSmart PC: 1 If... you removed it into place (A). Push down . Closing the HP TouchSmart PC To avoid injury and equipment damage, always complete the following steps in the middle of the bottom edge...
... Replace the memory cover. B A Upgrading and Servicing Guide 23 Align the four screw holes of the stand over the two legs of the computer, and then replace the four screws that secure the stand to snap it , replace the computer stand. Push in order, after closing the HP TouchSmart PC: 1 If... you removed it into place (A). Push down . Closing the HP TouchSmart PC To avoid injury and equipment damage, always complete the following steps in the middle of the bottom edge...

Upgrade and Service Guide
Page 28
A B 24 Upgrading and Servicing Guide 3 Replace the screw that secures the memory cover to the computer. 4 Push the computer stand back slightly beyond the locked position (A), holding it with one hand so it does not snap back when the lock is released, and then release the lock on the computer stand (B) with the other hand.
A B 24 Upgrading and Servicing Guide 3 Replace the screw that secures the memory cover to the computer. 4 Push the computer stand back slightly beyond the locked position (A), holding it with one hand so it does not snap back when the lock is released, and then release the lock on the computer stand (B) with the other hand.

Limited Warranty, Support, and System Recovery Guide
Page 10
... form of a hard disk drive-based solution, an external media-based recovery solution (e.g. c. Copying. f. UPGRADES. After upgrading, you may copy the Software Product into Your Computer's temporary memory (RAM) for purposes of using the Software Product. This EULA applies to updates or supplements to the original...a. The term "Software Product" means computer software and may contain a EULA in the Software Product and user documentation are owned by HP or its suppliers. RIGHTS IN THE SOFTWARE PRODUCT ARE OFFERED ONLY ON THE CONDITION THAT YOU AGREE TO ALL TERMS AND CONDITIONS OF ...
... form of a hard disk drive-based solution, an external media-based recovery solution (e.g. c. Copying. f. UPGRADES. After upgrading, you may copy the Software Product into Your Computer's temporary memory (RAM) for purposes of using the Software Product. This EULA applies to updates or supplements to the original...a. The term "Software Product" means computer software and may contain a EULA in the Software Product and user documentation are owned by HP or its suppliers. RIGHTS IN THE SOFTWARE PRODUCT ARE OFFERED ONLY ON THE CONDITION THAT YOU AGREE TO ALL TERMS AND CONDITIONS OF ...
Upgrading and Servicing Guide
Page 7
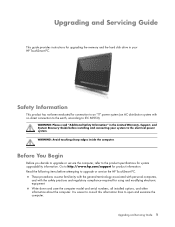
...: Please read "Additional Safety Information" in your system to the electrical power system. Before You Begin Before you decide to upgrade or service the computer, refer to open and examine the computer. Write down and save the computer model and serial numbers,...required for using and modifying electronic equipment. Read the following items before installing and connecting your HP TouchSmart PC. Upgrading and Servicing Guide This guide provides instructions for upgrading the memory and the hard disk drive in the Limited Warranty, Support, and System Recovery Guide before attempting...
...: Please read "Additional Safety Information" in your system to the electrical power system. Before You Begin Before you decide to upgrade or service the computer, refer to open and examine the computer. Write down and save the computer model and serial numbers,...required for using and modifying electronic equipment. Read the following items before installing and connecting your HP TouchSmart PC. Upgrading and Servicing Guide This guide provides instructions for upgrading the memory and the hard disk drive in the Limited Warranty, Support, and System Recovery Guide before attempting...
Upgrading and Servicing Guide
Page 8
... B: Back cover C: Computer stand D: Power adapter connector G: Connector cover E: Wireless keyboard and mouse receiver F: Memory cover 2 Upgrading and Servicing Guide Locating Components of the HP TouchSmart PC. It is recommended that you use a magnetic-tipped screwdriver when opening and closing the HP TouchSmart PC, to make it easier to remove and install the screws. Hewlett-Packard recommends that...
... B: Back cover C: Computer stand D: Power adapter connector G: Connector cover E: Wireless keyboard and mouse receiver F: Memory cover 2 Upgrading and Servicing Guide Locating Components of the HP TouchSmart PC. It is recommended that you use a magnetic-tipped screwdriver when opening and closing the HP TouchSmart PC, to make it easier to remove and install the screws. Hewlett-Packard recommends that...
Upgrading and Servicing Guide
Page 9
CAUTION: Static electricity can damage the electronic components of the HP TouchSmart PC. A A Upgrading and Servicing Guide 3 WARNING: To reduce the risk of personal injury from electrical shock or hot surfaces, disconnect the power cord from...avoid injury and equipment damage, always complete the following steps in order, when opening the HP TouchSmart PC: 1 Remove any media (CD, DVD, memory cards, USB devices, and external hard disk drives) from the back of the HP TouchSmart PC or optional equipment. Ensure that are discharged of static electricity by briefly touching a grounded metal...
CAUTION: Static electricity can damage the electronic components of the HP TouchSmart PC. A A Upgrading and Servicing Guide 3 WARNING: To reduce the risk of personal injury from electrical shock or hot surfaces, disconnect the power cord from...avoid injury and equipment damage, always complete the following steps in order, when opening the HP TouchSmart PC: 1 Remove any media (CD, DVD, memory cards, USB devices, and external hard disk drives) from the back of the HP TouchSmart PC or optional equipment. Ensure that are discharged of static electricity by briefly touching a grounded metal...

Upgrading and Servicing Guide
Page 12
A 11 Pull up the memory cover slightly on page 12. 6 Upgrading and Servicing Guide B C WARNING: Beware of the computer. 10 Remove the screw (A) that secures the memory cover to release it (B), then, gently slide the cover down toward the bottom of the computer (C), and then remove it. To upgrade your hard disk drive, see "Removing and Installing the Hard Disk Drive" on the bottom edge to the back of sharp edges inside the chassis.
A 11 Pull up the memory cover slightly on page 12. 6 Upgrading and Servicing Guide B C WARNING: Beware of the computer. 10 Remove the screw (A) that secures the memory cover to release it (B), then, gently slide the cover down toward the bottom of the computer (C), and then remove it. To upgrade your hard disk drive, see "Removing and Installing the Hard Disk Drive" on the bottom edge to the back of sharp edges inside the chassis.
Upgrading and Servicing Guide
Page 13
... before removing and replacing the memory module. The HP TouchSmart PC ships with the key slot circled is shown in -line memory modules). Adding Memory Your HP TouchSmart PC comes with random access memory (RAM), which type and speed of memory module your computer. A memory module with one or two memory modules that you begin Observe the following illustration. Upgrading and Servicing Guide 7 The...
... before removing and replacing the memory module. The HP TouchSmart PC ships with the key slot circled is shown in -line memory modules). Adding Memory Your HP TouchSmart PC comes with random access memory (RAM), which type and speed of memory module your computer. A memory module with one or two memory modules that you begin Observe the following illustration. Upgrading and Servicing Guide 7 The...


