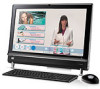
End User License Agreement
Page 1
... the Software PRODUCT ARE OFFERED ONLY Product. You do not have Software Product into Your Computer's AGREE TO ALL TERMS AND temporary memory (RAM) for back-up copies of the Software Product, provided the copy contains all terms and conditions of the Freeware by you...1. You may load the Software ON THE CONDITION THAT YOU Product into the local memory or storage device of the Software Product which constitutes non-proprietary HP software or software provided under public license by HP for use the Software Product only on a single computer ("Your Computer"). The term...
Safety and Regulatory Information Desktops, Thin Clients, and Personal Workstations
Page 29
... requirement in SJ/T11363-2006. Table 2-2 Toxic and Hazardous Substances and Elements (continued) Part Name Lead (Pb) Mercury (Hg) Cadmium (Cd) Hexavalent Chromium (Cr(VI)) Memory X O O O I/O PCAs X O O O Power supply X O O O Keyboard X O O O Mouse X O O O Chassis/Other X O O O Fans X O O O Internal/External Media Reading X O O O Devices External Control Devices X O O O Cable X O O O Hard Disk Drive X O O O Display X X O O Polybrominated biphenyls (PBB) Polybrominated...
Resources for Developing Touch-Friendly Applications for HP Business Touch-Enabled Desktops
Page 18
... = pInputs[i]; //do something with each touch input entry } bHandled = TRUE; }else{ /* handle the error here */ } delete [] pInputs; }else{ /* handle the error here, probably out of memory */ } 18 break; if (pInputs){ if (GetTouchInputInfo((HTOUCHINPUT)lParam, cInputs, pInputs, sizeof(TOUCHINPUT))){ for (UINT i=0; i < cInputs; HDC hdc; Handle the messages: LRESULT OnTouch(HWND hWnd, WPARAM...
Resources for Developing Touch-Friendly Applications for HP Business Touch-Enabled Desktops
Page 28
... tiles or hosted applications are explained below to make a volume button on the side of HP TouchSmart 9100 to hibernate the system for a few minutes for a configurable period. This operating style only consumes system memory when needed and works well for more details. It requires the system has at least ...or Wake On Ring may interfere with large icons. HP TouchSmart Software Ultimate Style The "ultimate" style of HP TouchSmart software runs all the hosted applications in the top row as soon as part of the maintenance of system memory and cannot run in the top row with the ...
Maintenance and Service Guide: HP TouchSmart 9100 Business PC
Page 5
... Adapters ...9 Keyboards and Mice ...9 Misc Parts ...10 4 Removal and Replacement Procedures ...11 Preparing to disassemble the HP TouchSmart PC 11 Hard drive/memory cover ...12 I/O cover ...13 Feet ...14 Stand ...15 Adding Memory ...16 Before you begin ...16 Removing a memory module 16 Removing the hard drive ...19 Back cover ...20 Graphics card ...22 WLAN module ...24...
Maintenance and Service Guide: HP TouchSmart 9100 Business PC
Page 9
...+/-R dual layer (DL), DVDVideo, and Video CD. 13 B-CAS card slot (select Insert your HP TouchSmart HP TouchSmart button software. controls 8 HP TouchSmart button Turn your HP TouchSmart 9100 Business PC on and open the HP TouchSmart software for use with friends and family.* To adjust the viewing angle of the background. * Internet...of the camera, creating a close-up to one-half meter (2 feet) away from a memory card. 3 Built-in wireless LAN Use the built-in wireless LAN to connect to the Internet through your HP TouchSmart 9100 Business PC, or to put it into Sleep mode.
Maintenance and Service Guide: HP TouchSmart 9100 Business PC
Page 12
... from the wireless keyboard and mouse. 10 IR emitter (blaster) Adhere to your TV set -top box. The LED is working with your memory card. Indicates the power state; When the LED is inserted with select models only. 11 USB 2.0 ports (2) Connect USB devices (USB 2.0)... keyboard and mouse. Indicates that a card is flashing, do not use . 6 Chapter 2 Components A remote control is included with no card is memory card activity, and that a card has read or write capacity. A flashing LED indicates that there is inserted. Indicates Optical Disc Drive is not required...
Maintenance and Service Guide: HP TouchSmart 9100 Business PC
Page 14
... with LightScribe Spare Part Number 595170-001 505914-001 595171-001 581057-001 586721-001 583093-001 583092-001 Memory Description SODIMM, 4 GB, PC10600, DDR3-1333 SODIMM, 2 GB, PC10600, DDR3-1333 Spare Part Number 593896-001 593895-001 8 Chapter 3 Spare Parts 3 Spare Parts See the following available spare parts for the HP TouchSmart PC.
Maintenance and Service Guide: HP TouchSmart 9100 Business PC
Page 18
... you set down a blanket, towel, or other damage. 8. Beware of and away from scratches or other soft cloth to disassemble the HP TouchSmart PC on a soft flat surface. Prepare the computer for disassembly (see Removing the hard drive on the stand flip cover. 12 Chapter 4 Removal and ... face down on page 11). 2. Using the notch on a soft, flat surface. 3. Lift the stand and pull up on page 19. Hard drive/memory cover 1. To upgrade your hard disk drive, see Preparing to protect the touch screen surface from the back of the computer. WARNING! 7. Place the computer...
Maintenance and Service Guide: HP TouchSmart 9100 Business PC
Page 19
4. To install the hard drive/memory cover, reverse the removal procedures. I/O cover ▲ Remove the connector cover on the back of the computer by inserting your finger under the gap on the bottom-left side of the cover away from the computer. I /O cover, reverse the removal procedures. A B To install the I /O cover 13 Remove the screw that secures the hard drive/memory cover to the computer, and then pull the bottom edge of the cover (A), and then pulling straight out gently (B).
Maintenance and Service Guide: HP TouchSmart 9100 Business PC
Page 21
Prepare the computer for disassembly (see Hard drive/memory cover on page 12). 4. Remove the hard drive/memory cover (see Preparing to the computer. Stand 1. Remove the four screws that secure the stand to disassemble the HP TouchSmart PC on a soft, flat surface. 3. Stand 15 Place the computer face down on page 11). 2.
Maintenance and Service Guide: HP TouchSmart 9100 Business PC
Page 22
... the slots in -line memory modules). The HP TouchSmart PC ships with random access memory (RAM), which type and speed of memory module your computer. To determine which temporarily stores data and instructions on your HP TouchSmart PC uses, and for specific memory module information and specifications, go to disassemble the HP TouchSmart PC on the back of memory module could damage the computer...
Maintenance and Service Guide: HP TouchSmart 9100 Business PC
Page 23
Push the two latches of the retaining clips away from the memory module (1). Adding Memory 17 The memory module pops up at an angle. 4. Lift the cover off the memory module slot. 5.
Maintenance and Service Guide: HP TouchSmart 9100 Business PC
Page 24
Store the memory module in antistatic packaging. To reinstall memory, reverse the removal procedure. 18 Chapter 4 Removal and Replacement Procedures NOTE: Memory modules are designed with a notch (3) to prevent incorrect insertion into the memory module slot. 7. Lift the memory module from the memory socket by pulling the module away from the slot at an angle (2). 6.
Maintenance and Service Guide: HP TouchSmart 9100 Business PC
Page 25
Remove the hard drive from the hard drive cage: 1. Removing the hard drive 19 Remove the hard drive/memory cover (see Preparing to the computer. 6. Pull up on the handle (2) of the hard drive assembly, and the pull the assembly partially out of the ... remove the hard drive from the computer. Prepare the computer for disassembly (see Hard drive/memory cover on page 11). 2. Remove the four screws, two on each side, that secures the hard drive to disassemble the HP TouchSmart PC on page 12). 4. Lift the cage off the hard drive. Remove the power/data cable...
Maintenance and Service Guide: HP TouchSmart 9100 Business PC
Page 26
Remove the stand (see Preparing to disassemble the HP TouchSmart PC on page 15). 5. Prepare the computer for disassembly (see Stand on page 11). 2. Remove the hard drive/memory cover (see I/O cover on page 12). 4. Squeeze the larger of the two pegs (1) holding the I /O cover (see Hard drive/memory cover on page 13). 6. Remove the I /O cable clip in place and pull the clip off the pegs (2). 20 Chapter 4 Removal and Replacement Procedures Remove the feet (see Feet on a soft, flat surface. 3. Place the computer face down on page 14). 7. Back cover 1.
Maintenance and Service Guide: HP TouchSmart 9100 Business PC
Page 28
... 12. Remove the 13 screws that the back cover has several tabs at the bottom of the computer. Remove the back cover (see Hard drive/memory cover on a soft, flat surface. 3. Lift the back cover off the computer. Place the computer face down on page 12). 4. Remove the hard... drive/memory cover (see Back cover on page 13). 6. Remove the feet (see Stand on page 14). 7. Remove the stand (see Feet on page 15). 5. When installing the back cover, note that secure the back cover to disassemble the HP TouchSmart PC on page 11). 2. If the computer...
Maintenance and Service Guide: HP TouchSmart 9100 Business PC
Page 30
... 12. Lift the thermal kit off the system board. Remove the I /O cover on page 15). 5. Remove the back cover (see Hard drive/memory cover on the heat sink. 11. Disconnect the fan connector from the slot at an angle. The graphics card is correctly installed. When installing a new...to the computer, and then loosen the four captive screws (3) that secure the graphics card to disassemble the HP TouchSmart PC on page 20). 24 Chapter 4 Removal and Replacement Procedures Remove the hard drive/memory cover (see Back cover on page 11). 2. 10. Remove the feet (see Preparing to the system ...
Maintenance and Service Guide: HP TouchSmart 9100 Business PC
Page 32
... Place the computer face down on page 20). 26 Chapter 4 Removal and Replacement Procedures Remove the hard drive/memory cover (see Stand on page 15). 5. Remove the stand (see Hard drive/memory cover on page 13). 6. 11. To install the WLAN module, reverse the removal procedures. WLAN modules include ... (see Preparing to a 45 degree angle, and then remove it from the slot at an angle. Lift the module up to disassemble the HP TouchSmart PC on page 14). 7. Remove the back cover (see Feet on page 11). 2. Remove the feet (see Back cover on a soft, flat surface. 3.
Maintenance and Service Guide: HP TouchSmart 9100 Business PC
Page 35
... (see Stand on page 12). 4. Remove the stand (see Hard drive/memory cover on page 15). 5. Place the computer face down on page 20). 9. Remove the I/O cover (see Feet on page 13). 6. Remove the feet (see I/O cover ... cover (see Back cover on a soft, flat surface. 3. Remove the frame support by removing the three screws that secure the frame support to disassemble the HP TouchSmart PC on page 19). 8. System board 1.