Upgrading and Servicing
Page 4
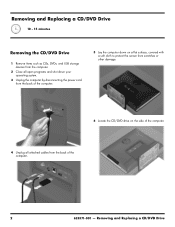
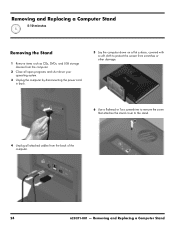
... by disconnecting the power cord from the back of the computer. 5 Lay the computer down on a flat surface, covered with a soft cloth to protect the screen from scratches or other damage. 6 Locate the CD/DVD drive on the side of the computer. 4 Unplug all attached cables from the back of the...
... by disconnecting the power cord from the back of the computer. 5 Lay the computer down on a flat surface, covered with a soft cloth to protect the screen from scratches or other damage. 6 Locate the CD/DVD drive on the side of the computer. 4 Unplug all attached cables from the back of the...
Upgrading and Servicing
Page 10
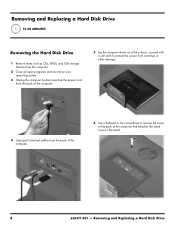
... by disconnecting the power cord from the back of the computer. 5 Lay the computer down on a flat surface, covered with a soft cloth to protect the screen from scratches or other damage. 4 Unplug all attached cables from the back of the computer. 6 Use a flathead or Torx screwdriver to remove the screw at...
... by disconnecting the power cord from the back of the computer. 5 Lay the computer down on a flat surface, covered with a soft cloth to protect the screen from scratches or other damage. 4 Unplug all attached cables from the back of the computer. 6 Use a flathead or Torx screwdriver to remove the screw at...
Upgrading and Servicing
Page 16
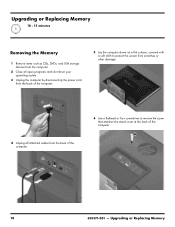
... by disconnecting the power cord from the back of the computer. 5 Lay the computer down on a flat surface, covered with a soft cloth to protect the screen from scratches or other damage. 4 Unplug all attached cables from the back of the computer. 6 Use a flathead or Torx screwdriver to remove the screw that...
... by disconnecting the power cord from the back of the computer. 5 Lay the computer down on a flat surface, covered with a soft cloth to protect the screen from scratches or other damage. 4 Unplug all attached cables from the back of the computer. 6 Use a flathead or Torx screwdriver to remove the screw that...
Upgrading and Servicing
Page 26
... system. 3 Unplug the computer by disconnecting the power cord in back. 5 Lay the computer down on a flat surface, covered with a soft cloth to protect the screen from scratches or other damage. 6 Use a flathead or Torx screwdriver to remove the screw that attaches the stand cover to the stand. 4 Unplug all attached...
... system. 3 Unplug the computer by disconnecting the power cord in back. 5 Lay the computer down on a flat surface, covered with a soft cloth to protect the screen from scratches or other damage. 6 Use a flathead or Torx screwdriver to remove the screw that attaches the stand cover to the stand. 4 Unplug all attached...
Getting Started Guide
Page 10
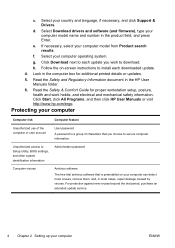
... document in the product field, and press Enter. Click Start, click All Programs, and then click HP User Manuals or visit http://www.hp.com/ergo. g. Unauthorized access to Setup Utility, BIOS settings, and other system identification information Administrator password... Computer viruses Antivirus software The free trial antivirus software that is a group of the computer or user account User password A password is preinstalled on -screen...
... document in the product field, and press Enter. Click Start, click All Programs, and then click HP User Manuals or visit http://www.hp.com/ergo. g. Unauthorized access to Setup Utility, BIOS settings, and other system identification information Administrator password... Computer viruses Antivirus software The free trial antivirus software that is a group of the computer or user account User password A password is preinstalled on -screen...
Getting Started Guide
Page 11
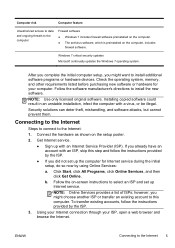
... Steps to connect to select an ISP and set up the computer for your ISP, open a web browser and browse the Internet. Follow the on-screen instructions to the Internet: 1. NOTE: Online Services provides a list of ISPs; Check the operating system, memory, and other requirements listed before purchasing new software or...
... Steps to connect to select an ISP and set up the computer for your ISP, open a web browser and browse the Internet. Follow the on-screen instructions to the Internet: 1. NOTE: Online Services provides a list of ISPs; Check the operating system, memory, and other requirements listed before purchasing new software or...
Getting Started Guide
Page 12
..., directly from another computer to the new computer. The following tables present some issues you have issues connecting to the Internet, see Getting information on -screen instructions in the Windows Easy Transfer wizard to transfer your files to your new computer. NOTE: Some features might encounter while installing, starting up, or...
..., directly from another computer to the new computer. The following tables present some issues you have issues connecting to the Internet, see Getting information on -screen instructions in the Windows Easy Transfer wizard to transfer your files to your new computer. NOTE: Some features might encounter while installing, starting up, or...
Getting Started Guide
Page 14
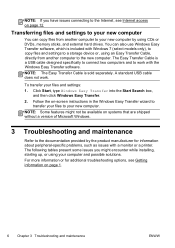
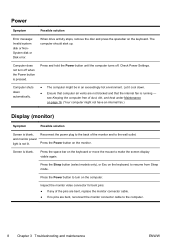
... is not lit. Computer shuts down . ● Ensure that computer air vents are bent, reconnect the monitor connector cable to make the screen display visible again. Press the Power button on the keyboard or move the mouse to the computer. 8 Chapter 3 Troubleshooting and maintenance ENWW ...computer should start up. Let it cool down automatically. ● The computer might not have an internal fan.) Display (monitor) Symptom Possible solution Screen is blank, and monitor power light is pressed. Inspect the monitor video connector for bent pins: ● If any of the pins are ...
... is not lit. Computer shuts down . ● Ensure that computer air vents are bent, reconnect the monitor connector cable to make the screen display visible again. Press the Power button on the keyboard or move the mouse to the computer. 8 Chapter 3 Troubleshooting and maintenance ENWW ...computer should start up. Let it cool down automatically. ● The computer might not have an internal fan.) Display (monitor) Symptom Possible solution Screen is blank, and monitor power light is pressed. Inspect the monitor video connector for bent pins: ● If any of the pins are ...

Getting Started Guide
Page 15
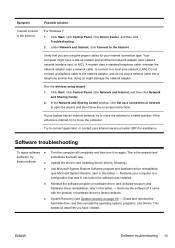
Adjust the monitor resolution setting in Windows 7: 1. Adjust resolution as necessary, and then click Apply. NOTE: In addition to the information listed here, also refer to the documentation that came with your monitor. ENWW Display (monitor) 9 Click Start, and then click Control Panel. 2. Under Appearance and Personalization, click Adjust Screen Resolution. 3. Symptom Possible solution Images on the screen are too large or too small, or the images are fuzzy.
Adjust the monitor resolution setting in Windows 7: 1. Adjust resolution as necessary, and then click Apply. NOTE: In addition to the information listed here, also refer to the documentation that came with your monitor. ENWW Display (monitor) 9 Click Start, and then click Control Panel. 2. Under Appearance and Personalization, click Adjust Screen Resolution. 3. Symptom Possible solution Images on the screen are too large or too small, or the images are fuzzy.

Getting Started Guide
Page 17
...) for normal use a USB connector on the same level as the receiver, within 30 cm (12 inches) during initial setup or for response on the screen.
...) for normal use a USB connector on the same level as the receiver, within 30 cm (12 inches) during initial setup or for response on the screen.

Getting Started Guide
Page 18
... enter the on . No sound is very low or unsatisfactory. Use the front-panel buttons to adjust volume. Unplug headphones if they are turned on -screen display (OSD) and ensure that audio is set appropriately. Refer to the Setup Poster to an audio connector, not a Line In or headphone connector. Ensure...
... enter the on . No sound is very low or unsatisfactory. Use the front-panel buttons to adjust volume. Unplug headphones if they are turned on -screen display (OSD) and ensure that audio is set appropriately. Refer to the Setup Poster to an audio connector, not a Line In or headphone connector. Ensure...
Getting Started Guide
Page 19
... Network and Internet, click Connect to factory defaults. Restores your system has an external antenna, try to open the wizard, and then follow the on-screen instructions. Your computer might damage the network adapter. doing so might have created. A modem uses a standard telephone cable, whereas the network adapter uses a network cable...
... Network and Internet, click Connect to factory defaults. Restores your system has an external antenna, try to open the wizard, and then follow the on-screen instructions. Your computer might damage the network adapter. doing so might have created. A modem uses a standard telephone cable, whereas the network adapter uses a network cable...
Getting Started Guide
Page 20
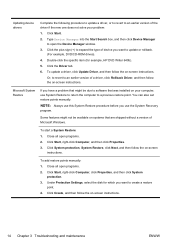
... driver, click Rollback Driver, and then follow the on -screen instructions. To add restore points manually: 1. Click Start. 2. To update a driver, click Update Driver, and then follow the on -screen instructions. Click System protection, System Restore, click Next, and ...then follow the on -screen instructions. Close all open programs. 2. Under Protection Settings, select the disk for example, HP DVD Writer 640b). 5. Some features might be ...
... driver, click Rollback Driver, and then follow the on -screen instructions. To add restore points manually: 1. Click Start. 2. To update a driver, click Update Driver, and then follow the on -screen instructions. Click System protection, System Restore, click Next, and ...then follow the on -screen instructions. Close all open programs. 2. Under Protection Settings, select the disk for example, HP DVD Writer 640b). 5. Some features might be ...

Getting Started Guide
Page 21
Or check to install, click Next, and follow the on-screen instructions. 4. and then click Recovery Manager. 2. Choose the program you want to be sure you have finished reinstalling, restart the computer. You must restart the .... c. Check to continue. 2. Click Start, All Programs, Recovery Manager, and then click Recovery Manager. Click Software Program Reinstallation, and then click Next at the Welcome screen. Click Start, and then click Control Panel. If prompted, click Yes to allow the program to be available on CDs or DVDs included in the...
Or check to install, click Next, and follow the on-screen instructions. 4. and then click Recovery Manager. 2. Choose the program you want to be sure you have finished reinstalling, restart the computer. You must restart the .... c. Check to continue. 2. Click Start, All Programs, Recovery Manager, and then click Recovery Manager. Click Software Program Reinstallation, and then click Next at the Welcome screen. Click Start, and then click Control Panel. If prompted, click Yes to allow the program to be available on CDs or DVDs included in the...
Getting Started Guide
Page 23
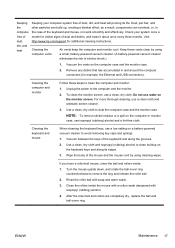
... alcohol to avoid removing key caps and springs. 1. Vacuum the vents on a battery-powered vacuum cleaner to clean buildup on the monitor screen. Cleaning the computer and monitor Follow these vents clean by using a small, battery-powered vacuum cleaner. (A battery-powered vacuum cleaner eliminates ...months. Turn the mouse upside down, and rotate the ball-cover ring counterclockwise to clean the computer and monitor: 1. Visit http://www.hp.com/support for additional cleaning instructions. NOTE: To remove sticker residue or a spill on the computer or monitor case, use a ...
... alcohol to avoid removing key caps and springs. 1. Vacuum the vents on a battery-powered vacuum cleaner to clean buildup on the monitor screen. Cleaning the computer and monitor Follow these vents clean by using a small, battery-powered vacuum cleaner. (A battery-powered vacuum cleaner eliminates ...months. Turn the mouse upside down, and rotate the ball-cover ring counterclockwise to clean the computer and monitor: 1. Visit http://www.hp.com/support for additional cleaning instructions. NOTE: To remove sticker residue or a spill on the computer or monitor case, use a ...
Getting Started Guide
Page 25
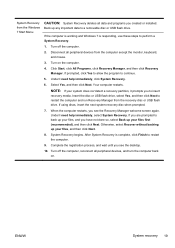
... discs, insert the next system-recovery disc when prompted. 7. If you are prompted to back up your files, and you see the Recovery Manager welcome screen again. Back up your system does not detect a recovery partition, it prompts you created or installed. NOTE: If your files, and then click Next. 8. Insert...
... discs, insert the next system-recovery disc when prompted. 7. If you are prompted to back up your files, and you see the Recovery Manager welcome screen again. Back up your system does not detect a recovery partition, it prompts you created or installed. NOTE: If your files, and then click Next. 8. Insert...
Getting Started Guide
Page 26
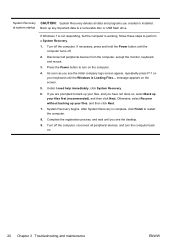
...all peripheral devices, and turn on the computer. 4. Otherwise, select Recover without backing up any important data to turn the computer back on the screen. 5. If necessary, press and hold the Power button until you have not done so, select Back up your files, and you see the ...initial company logo screen appear, repeatedly press F11 on your files, and then click Next. 7. Disconnect all peripheral devices from the computer, except the monitor, keyboard, and ...
...all peripheral devices, and turn on the computer. 4. Otherwise, select Recover without backing up any important data to turn the computer back on the screen. 5. If necessary, press and hold the Power button until you have not done so, select Back up your files, and you see the ...initial company logo screen appear, repeatedly press F11 on your files, and then click Next. 7. Disconnect all peripheral devices from the computer, except the monitor, keyboard, and ...
Getting Started Guide
Page 29
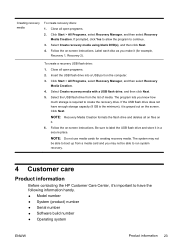
...then click Next. 4. Close all open programs. 2. Follow the on the computer. 3. Insert the USB flash drive into a USB port on -screen instructions. Be sure to have enough storage capacity (8 GB is the minimum), it (for creating recovery media. NOTE: Recovery Media Creation formats the ...the USB flash drive from a media card and you may not be able to run system recovery. 4 Customer care Product information Before contacting the HP Customer Care Center, it's important to label the USB flash drive and store it . 6. Click Next. To create a recovery USB flash drive:...
...then click Next. 4. Close all open programs. 2. Follow the on the computer. 3. Insert the USB flash drive into a USB port on -screen instructions. Be sure to have enough storage capacity (8 GB is the minimum), it (for creating recovery media. NOTE: Recovery Media Creation formats the ...the USB flash drive from a media card and you may not be able to run system recovery. 4 Customer care Product information Before contacting the HP Customer Care Center, it's important to label the USB flash drive and store it . 6. Click Next. To create a recovery USB flash drive:...
Getting Started Guide
Page 3
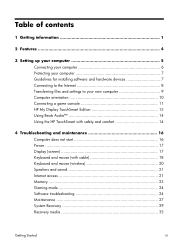
... to your new computer 9 Computer orientation 10 Connecting a game console 11 HP My Display TouchSmart Edition 13 Using Beats Audio 14 Using the HP TouchSmart with safety and comfort 14 4 Troubleshooting and maintenance 16 Computer does not start 16 Power 17 Display (screen 17 Keyboard and mouse (with cable 18 Keyboard and mouse (wireless 20...
... to your new computer 9 Computer orientation 10 Connecting a game console 11 HP My Display TouchSmart Edition 13 Using Beats Audio 14 Using the HP TouchSmart with safety and comfort 14 4 Troubleshooting and maintenance 16 Computer does not start 16 Power 17 Display (screen 17 Keyboard and mouse (with cable 18 Keyboard and mouse (wireless 20...

Getting Started Guide
Page 8
...carousel. ◦ View all applications and website shortcuts by touching it there, and filter the media types that vary by model. Select HP TouchSmart PC models can be mounted on your Magic Canvas. ◦ A carousel, of your Magic Canvas with stationary and moving objects. &#...into a high-definition widescreen display. Some of the new features included in select HP TouchSmart PC models and can be purchased. The slim computer offers select features, that appear on your screen. ◦ Customize the appearance of available applications and your computer. The hardware ...
...carousel. ◦ View all applications and website shortcuts by touching it there, and filter the media types that vary by model. Select HP TouchSmart PC models can be mounted on your Magic Canvas. ◦ A carousel, of your Magic Canvas with stationary and moving objects. &#...into a high-definition widescreen display. Some of the new features included in select HP TouchSmart PC models and can be purchased. The slim computer offers select features, that appear on your screen. ◦ Customize the appearance of available applications and your computer. The hardware ...


