Maintenance and Service Guide
Page 7
... ...17 Packaging and transporting guidelines 18 Workstation guidelines 18 Equipment guidelines ...19 5 Removal and replacement procedures ...20 Component replacement procedures ...20 Display panel assembly ...20 Battery ...23 Solid-state drive ...24 WWAN module ...25 Display panel cable ...27 vii
... ...17 Packaging and transporting guidelines 18 Workstation guidelines 18 Equipment guidelines ...19 5 Removal and replacement procedures ...20 Component replacement procedures ...20 Display panel assembly ...20 Battery ...23 Solid-state drive ...24 WWAN module ...25 Display panel cable ...27 vii

Maintenance and Service Guide
Page 12
... Windows modern trackpad gestures ● Taps enabled as default Support for 45-W HP Smart AC adapter (non-PFC, RC, USB Type-C) with 1.8-meter (6.0-feet) power cord Support for 3-cell, 42-Wh, 3.69-Ah, Li-ion battery ● Support for Intel AT-p Ready ● Support for Trusted Platfom... Module (TPM) 2.0 ● Support for HP SmartPass Preinstalled: Windows 10 End user replaceable part: AC adapter 2 Chapter 1 Product description
... Windows modern trackpad gestures ● Taps enabled as default Support for 45-W HP Smart AC adapter (non-PFC, RC, USB Type-C) with 1.8-meter (6.0-feet) power cord Support for 3-cell, 42-Wh, 3.69-Ah, Li-ion battery ● Support for Intel AT-p Ready ● Support for Trusted Platfom... Module (TPM) 2.0 ● Support for HP SmartPass Preinstalled: Windows 10 End user replaceable part: AC adapter 2 Chapter 1 Product description

Maintenance and Service Guide
Page 16
... icon in the taskbar search box, and then select the HP Support Assistant app. ‒ or - Select My PC, select the Specifications tab, and then select User Guides. Left side Item (1) (2) (3) (4) (5) (6) Component Kickstand release button USB Type-C (charging) port AC adapter and battery light Speaker Volume buttons Audio-out (headphone)/audio-in...
... icon in the taskbar search box, and then select the HP Support Assistant app. ‒ or - Select My PC, select the Specifications tab, and then select User Guides. Left side Item (1) (2) (3) (4) (5) (6) Component Kickstand release button USB Type-C (charging) port AC adapter and battery light Speaker Volume buttons Audio-out (headphone)/audio-in...

Maintenance and Service Guide
Page 17
... charged. ● Blinking white: The AC adapter is disconnected and the battery has reached a low battery level. ● Amber: The AC adapter is connected and the battery is charging. ● Off: The battery is not charging from this port. Right side Item (1) Component Memory card... reader slot (2) Micro SIM slot (select products only) (3) Speaker (4) AC adapter and battery light (5) USB Type-C (charging) port ...
... charged. ● Blinking white: The AC adapter is disconnected and the battery has reached a low battery level. ● Amber: The AC adapter is connected and the battery is charging. ● Off: The battery is not charging from this port. Right side Item (1) Component Memory card... reader slot (2) Micro SIM slot (select products only) (3) Speaker (4) AC adapter and battery light (5) USB Type-C (charging) port ...

Maintenance and Service Guide
Page 20
...period (4) Serial number (s/n) Function This number provides specific information about the product's hardware components. This is necessary to remove the battery to locate documents, drivers, and support for the slate. This is an alphanumeric identifier that is unique to determine what components ...and parts are needed. See Battery on the service tag. This number describes the duration of the warranty period for battery removal instructions. The part number helps a service technician to each product. 10 ...
...period (4) Serial number (s/n) Function This number provides specific information about the product's hardware components. This is necessary to remove the battery to locate documents, drivers, and support for the slate. This is an alphanumeric identifier that is unique to determine what components ...and parts are needed. See Battery on the service tag. This number describes the duration of the warranty period for battery removal instructions. The part number helps a service technician to each product. 10 ...
Maintenance and Service Guide
Page 21
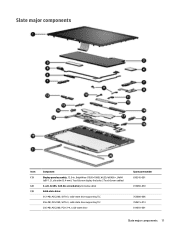
Slate major components Item Component (1) Display panel assembly, 12.0-in, BrightView (1920×1080), WLED, WUXGA+, UWVA (eDP 1.3), ultraslim (2.4-mm), TouchScreen display (includes 2 TouchScreen cables) (2) 3-cell, 42-Wh, 3.69-Ah, Li-ion battery (includes cable) (3) Solid-state drive: 512-MB, M2.2280, SATA-3, solid-state drive supporting TLC 256-MB, M2.2280, SATA-3, solid-state drive supporting TLC 256-MB, M2.2280, PCIe-2×4, solid-state drive Spare part number 830345-001 814060-850 763008-006 760615-014 814693-001 Slate major components 11
Slate major components Item Component (1) Display panel assembly, 12.0-in, BrightView (1920×1080), WLED, WUXGA+, UWVA (eDP 1.3), ultraslim (2.4-mm), TouchScreen display (includes 2 TouchScreen cables) (2) 3-cell, 42-Wh, 3.69-Ah, Li-ion battery (includes cable) (3) Solid-state drive: 512-MB, M2.2280, SATA-3, solid-state drive supporting TLC 256-MB, M2.2280, SATA-3, solid-state drive supporting TLC 256-MB, M2.2280, PCIe-2×4, solid-state drive Spare part number 830345-001 814060-850 763008-006 760615-014 814693-001 Slate major components 11

Maintenance and Service Guide
Page 32
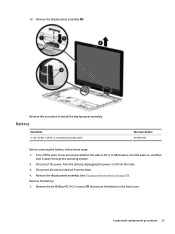
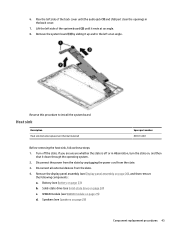
Release the two zero insertion force (ZIF) connectors (3) to the display panel assembly. 10. Disconnect the display panel cable (2) from the system board. 22 Chapter 5 Removal and replacement procedures Release the adhesive strip (1) that secures the display panel cable to which the two TouchScreen cables are attached, and then disconnect the TouchScreen cables from the display panel assembly. 11. 8. Disconnect the battery cable from the system board. 9.
Release the two zero insertion force (ZIF) connectors (3) to the display panel assembly. 10. Disconnect the display panel cable (2) from the system board. 22 Chapter 5 Removal and replacement procedures Release the adhesive strip (1) that secures the display panel cable to which the two TouchScreen cables are attached, and then disconnect the TouchScreen cables from the display panel assembly. 11. 8. Disconnect the battery cable from the system board. 9.
Maintenance and Service Guide
Page 33
... , and then shut it down through the operating system. 2. Remove the six Phillips M2.0×3.5 screws (1) that secure the battery to install the display panel assembly. Remove the display panel assembly (4). Reverse this procedure to the back cover. Disconnect the power from...the slate. 4. Disconnect all external devices from the slate. 3. Remove the battery: 1. Battery Description 3-cell, 42-Wh, 3.69-Ah, Li-ion battery (includes cable) Spare part number 814060-850 Before removing the battery, follow these steps: 1. Component replacement procedures 23 If you are unsure ...
... , and then shut it down through the operating system. 2. Remove the six Phillips M2.0×3.5 screws (1) that secure the battery to install the display panel assembly. Remove the display panel assembly (4). Reverse this procedure to the back cover. Disconnect the power from...the slate. 4. Disconnect all external devices from the slate. 3. Remove the battery: 1. Battery Description 3-cell, 42-Wh, 3.69-Ah, Li-ion battery (includes cable) Spare part number 814060-850 Before removing the battery, follow these steps: 1. Component replacement procedures 23 If you are unsure ...

Maintenance and Service Guide
Page 34
...cord from the slate. 4. Remove the solid-state drive: 1. Remove the Phillips PM2.0×2.5 screw (1) that secures the solid-state drive to install the battery. Turn off or in Hibernation, turn the slate on page 20). Solid-state drive Description 512-MB, M2.2280, SATA-3, solid-state drive supporting TLC... part number 763008-006 760615-014 814693-001 759848-011 827560-008 Before removing the solid-state drive, follow these steps: 1. 2. Remove the battery (2). Remove the display panel assembly (see Display panel assembly on , and then shut it down through the operating system. 2.
...cord from the slate. 4. Remove the solid-state drive: 1. Remove the Phillips PM2.0×2.5 screw (1) that secures the solid-state drive to install the battery. Turn off or in Hibernation, turn the slate on page 20). Solid-state drive Description 512-MB, M2.2280, SATA-3, solid-state drive supporting TLC... part number 763008-006 760615-014 814693-001 759848-011 827560-008 Before removing the solid-state drive, follow these steps: 1. 2. Remove the battery (2). Remove the display panel assembly (see Display panel assembly on , and then shut it down through the operating system. 2.

Maintenance and Service Guide
Page 37
... Hibernation, turn the slate on page 20). Disconnect the power from the slate by unplugging the power cord from the retention clips (4) built into the battery. 5. Remove the display panel assembly (see Display panel assembly on , and then shut it down through the operating system. 2. Release the display panel cable from...
... Hibernation, turn the slate on page 20). Disconnect the power from the slate by unplugging the power cord from the retention clips (4) built into the battery. 5. Remove the display panel assembly (see Display panel assembly on , and then shut it down through the operating system. 2. Release the display panel cable from...

Maintenance and Service Guide
Page 38
... display panel cable is off the slate. Disconnect the power from the slate by unplugging the power cord from the retention clips (4) built into the battery. 5. Remove the POGO pin docking cable: 1. Remove the POGO pin docking cable (5). Release the POGO pin docking cable from the slate. 3. POGO pin docking cable...
... display panel cable is off the slate. Disconnect the power from the slate by unplugging the power cord from the retention clips (4) built into the battery. 5. Remove the POGO pin docking cable: 1. Remove the POGO pin docking cable (5). Release the POGO pin docking cable from the slate. 3. POGO pin docking cable...

Maintenance and Service Guide
Page 51
... is connected to the WLAN module "Main" terminal. See Heat sink on page 23) b. The WLAN "Aux/#2"antenna cable is removed from the slate. 4. Battery (see Battery on page 43for more information. Speakers (see Speakers on page 29) e. 3D camera board (see WWAN module on , and then shut it down through the...
... is connected to the WLAN module "Main" terminal. See Heat sink on page 23) b. The WLAN "Aux/#2"antenna cable is removed from the slate. 4. Battery (see Battery on page 43for more information. Speakers (see Speakers on page 29) e. 3D camera board (see WWAN module on , and then shut it down through the...
Maintenance and Service Guide
Page 53
Reverse this procedure to the left at an angle. 8. Battery (see Battery on page 24) c. Remove the system board (3) by unplugging the power cord from the slate. 4. If you are unsure whether the slate is off the ...
Reverse this procedure to the left at an angle. 8. Battery (see Battery on page 24) c. Remove the system board (3) by unplugging the power cord from the slate. 4. If you are unsure whether the slate is off the ...

Maintenance and Service Guide
Page 56
...messages. 3. At the download area, follow these steps: a. Click the question mark icon in the taskbar search box, and then select the HP Support Assistant app. ‒ or - Click Updates, and then click Check for later BIOS versions, see Starting Setup Utility (BIOS) on ... Downloading a BIOS update on -screen instructions. Identify the most recent BIOS update and compare it to the BIOS version currently installed on battery power, docked in an optional docking device, or connected to a network, consult the network administrator before installing any device, cable, or...
...messages. 3. At the download area, follow these steps: a. Click the question mark icon in the taskbar search box, and then select the HP Support Assistant app. ‒ or - Click Updates, and then click Check for later BIOS versions, see Starting Setup Utility (BIOS) on ... Downloading a BIOS update on -screen instructions. Identify the most recent BIOS update and compare it to the BIOS version currently installed on battery power, docked in an optional docking device, or connected to a network, consult the network administrator before installing any device, cable, or...

Maintenance and Service Guide
Page 57
... keyboard, when you are ready to AC power. Synchronizing a slate and keyboard (select products only) 47 You will synchronize ONLY if the slate or keyboard battery is more than 50% charged, or if your hard drive where the BIOS update is complete. Type file in the taskbar search box, and then...
... keyboard, when you are ready to AC power. Synchronizing a slate and keyboard (select products only) 47 You will synchronize ONLY if the slate or keyboard battery is more than 50% charged, or if your hard drive where the BIOS update is complete. Type file in the taskbar search box, and then...

Maintenance and Service Guide
Page 61
...most products. ● Creating recovery media and backups ● Restoring and recovering your system For additional information, refer to create HP Recovery media after you will be performing recovery procedures on the computer. This step creates a backup of personal information. Creating recovery...a slate with a detachable keyboard, connect the keyboard to create system restore points and create backups of the HP Recovery partition on a slate, the slate battery must be used to reinstall the original operating system in the taskbar. For information on creating recovery media, see...
...most products. ● Creating recovery media and backups ● Restoring and recovering your system For additional information, refer to create HP Recovery media after you will be performing recovery procedures on the computer. This step creates a backup of personal information. Creating recovery...a slate with a detachable keyboard, connect the keyboard to create system restore points and create backups of the HP Recovery partition on a slate, the slate battery must be used to reinstall the original operating system in the taskbar. For information on creating recovery media, see...

Maintenance and Service Guide
Page 69
Follow the local laws and regulations in general household waste. For more information about recycling programs, see the HP Web site at http://www.hp.com/ recycle. 59 11 Recycling When a non-rechargeable or rechargeable battery has reached the end of its useful life, do not dispose of the battery in your area for battery disposal. HP encourages customers to recycle used electronic hardware, HP original print cartridges, and rechargeable batteries.
Follow the local laws and regulations in general household waste. For more information about recycling programs, see the HP Web site at http://www.hp.com/ recycle. 59 11 Recycling When a non-rechargeable or rechargeable battery has reached the end of its useful life, do not dispose of the battery in your area for battery disposal. HP encourages customers to recycle used electronic hardware, HP original print cartridges, and rechargeable batteries.

Maintenance and Service Guide
Page 70
..., product description 1 audio-in jack 6 audio-out jack 6 B back components 8 back cover, spare part numbers 13 battery removal 23 spare part number 11, 23 battery light 6, 7 bottom edge components 9 button components 5 buttons power 5 volume 6 C card reader board removal 30 spare ...38 kickstand release button 6 kickstand retention assembly removal 39 spare part number 12, 39 L left-side components 6 lights 3D camera 8 AC adapter 6, 7 battery 6, 7 webcam 4 locating information hardware 3 software 3 M memory card reader slot 7 memory card tray, spare part number 12 memory, product description 1 ...
..., product description 1 audio-in jack 6 audio-out jack 6 B back components 8 back cover, spare part numbers 13 battery removal 23 spare part number 11, 23 battery light 6, 7 bottom edge components 9 button components 5 buttons power 5 volume 6 C card reader board removal 30 spare ...38 kickstand release button 6 kickstand retention assembly removal 39 spare part number 12, 39 L left-side components 6 lights 3D camera 8 AC adapter 6, 7 battery 6, 7 webcam 4 locating information hardware 3 software 3 M memory card reader slot 7 memory card tray, spare part number 12 memory, product description 1 ...

User Guide
Page 6
... Broadband (select products only 23 Using HP DataPass (select products only 24 Using GPS (select products only) ...24 Using Bluetooth wireless devices (select products only 24 Sharing data and drives and accessing ... ...33 Manually initiating and exiting Sleep 34 Setting password protection on wakeup (exiting Sleep 34 Using the power meter and power settings ...34 Running on battery power ...35 Factory-sealed battery ...35 Finding battery information ...35 Conserving battery power ...35 Identifying low battery levels ...36 vi
... Broadband (select products only 23 Using HP DataPass (select products only 24 Using GPS (select products only) ...24 Using Bluetooth wireless devices (select products only 24 Sharing data and drives and accessing ... ...33 Manually initiating and exiting Sleep 34 Setting password protection on wakeup (exiting Sleep 34 Using the power meter and power settings ...34 Running on battery power ...35 Factory-sealed battery ...35 Finding battery information ...35 Conserving battery power ...35 Identifying low battery levels ...36 vi

User Guide
Page 7
... battery level when no power source is available 36 Running on AC power ...36 Troubleshooting power problems ...37 Shutting down (turning off) the computer ...37 8 Maintaining your computer ...39 Improving performance ...39 Using Disk Defragmenter ...39 Using Disk Cleanup ...39 Using HP ... passwords 44 Using Internet security software ...44 Using antivirus software ...44 Using firewall software ...45 Installing software updates ...45 Using HP Touchpoint Manager (select products only 45 Securing your wireless network ...45 Backing up your software applications and information 46 10 Using ...
... battery level when no power source is available 36 Running on AC power ...36 Troubleshooting power problems ...37 Shutting down (turning off) the computer ...37 8 Maintaining your computer ...39 Improving performance ...39 Using Disk Defragmenter ...39 Using Disk Cleanup ...39 Using HP ... passwords 44 Using Internet security software ...44 Using antivirus software ...44 Using firewall software ...45 Installing software updates ...45 Using HP Touchpoint Manager (select products only 45 Securing your wireless network ...45 Backing up your software applications and information 46 10 Using ...


