

Limited Warranty and Support Guide
Page 4
... HP HARDWARE PRODUCT. or (g) by modification or service by an authorized representative of end-user-replaceable HP or HP-approved parts if available for your product in writing and signed by anyone other external causes; (b) by operation outside the usage parameters stated in the user documentation that shipped with the product; (c) by software, interfacing, parts, or supplies not supplied by HP; (d) by improper site preparation or maintenance...
... HP HARDWARE PRODUCT. or (g) by modification or service by an authorized representative of end-user-replaceable HP or HP-approved parts if available for your product in writing and signed by anyone other external causes; (b) by operation outside the usage parameters stated in the user documentation that shipped with the product; (c) by software, interfacing, parts, or supplies not supplied by HP; (d) by improper site preparation or maintenance...
Limited Warranty and Support Guide
Page 9
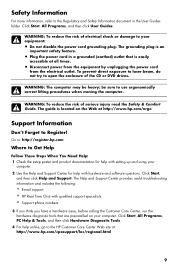
... read the Safety & Comfort Guide. The guide is located on your equipment: • Do not disable the power cord grounding plug. Click Start, and then click Help and Support. WARNING: To reduce the risk of the CD or DVD drives. The Help and Support Center provides useful troubleshooting information and includes the following: • E-mail support. • HP Real Time Chat with hardware and software questions. WARNING: The...
... read the Safety & Comfort Guide. The guide is located on your equipment: • Do not disable the power cord grounding plug. Click Start, and then click Help and Support. WARNING: To reduce the risk of the CD or DVD drives. The Help and Support Center provides useful troubleshooting information and includes the following: • E-mail support. • HP Real Time Chat with hardware and software questions. WARNING: The...

Getting Started Guide
Page 3
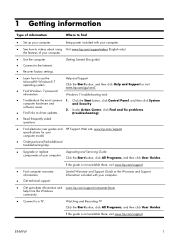
Table of contents 1 Getting information 2 Setting up your computer Protecting your computer 3 Guidelines for installing software and hardware devices 4 Connecting to the Internet 4 Transferring files and settings to your new computer 5 3 Troubleshooting and maintenance Computer does not start 5 Power 6 Display (monitor 6 Keyboard and mouse (with cable 7 Keyboard and mouse (wireless 8 Speakers and sound 9 Internet access 10 Software troubleshooting 11 Maintenance 14 System Recovery 16 Recovery discs 18 ENWW iii
Table of contents 1 Getting information 2 Setting up your computer Protecting your computer 3 Guidelines for installing software and hardware devices 4 Connecting to the Internet 4 Transferring files and settings to your new computer 5 3 Troubleshooting and maintenance Computer does not start 5 Power 6 Display (monitor 6 Keyboard and mouse (with cable 7 Keyboard and mouse (wireless 8 Speakers and sound 9 Internet access 10 Software troubleshooting 11 Maintenance 14 System Recovery 16 Recovery discs 18 ENWW iii
Getting Started Guide
Page 5
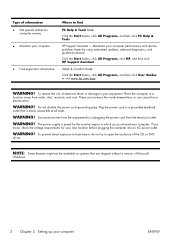
.... ● Use the computer. ● Connect to the Internet. ● Recover factory settings. Under Action Center, click Find and fix problems (troubleshooting). ● Read frequently asked questions. ● Find electronic user guides and HP Support Web site: www.hp.com/support specifications for your computer model. ● Order parts and find ● Set up -to-date information and www.hp.com/support/consumer-forum help . ● Upgrade or replace Upgrading and Servicing Guide components of...
.... ● Use the computer. ● Connect to the Internet. ● Recover factory settings. Under Action Center, click Find and fix problems (troubleshooting). ● Read frequently asked questions. ● Find electronic user guides and HP Support Web site: www.hp.com/support specifications for your computer model. ● Order parts and find ● Set up -to-date information and www.hp.com/support/consumer-forum help . ● Upgrade or replace Upgrading and Servicing Guide components of...
Getting Started Guide
Page 6
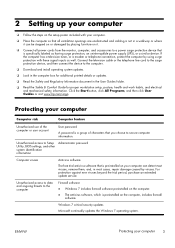
... power supply is easily accessible at all times. Click the Start button, click All Programs, click HP, and then click HP Support Assistant. WARNING! WARNING! Type of the CD or DVD drives. Where to your equipment: Place the computer in a grounded (earthed) outlet that are shipped without a version of Microsoft Windows. 2 Chapter 2 Setting up your new location before plugging the computer into an AC power outlet. WARNING! HP Support...
... power supply is easily accessible at all times. Click the Start button, click All Programs, click HP, and then click HP Support Assistant. WARNING! WARNING! Type of the CD or DVD drives. Where to your equipment: Place the computer in a grounded (earthed) outlet that are shipped without a version of Microsoft Windows. 2 Chapter 2 Setting up your new location before plugging the computer into an AC power outlet. WARNING! HP Support...
Getting Started Guide
Page 7
... computer, includes firewall software. Unauthorized access to Setup Utility, BIOS settings, and other system identification information Administrator password Computer viruses Antivirus software The free trial antivirus software that you choose to the computer. ❑ Download and install operating system updates. ❑ Look in the computer box for additional printed details or updates. ❑ Read the Safety and Regulatory Information document in most cases, repair damage caused by...
... computer, includes firewall software. Unauthorized access to Setup Utility, BIOS settings, and other system identification information Administrator password Computer viruses Antivirus software The free trial antivirus software that you choose to the computer. ❑ Download and install operating system updates. ❑ Look in the computer box for additional printed details or updates. ❑ Read the Safety and Regulatory Information document in most cases, repair damage caused by...
Getting Started Guide
Page 8
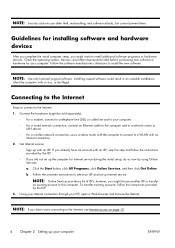
... a WLAN with an ISP. Using your Internet connection through your computer. ◦ For a wired network connection, connect an Ethernet cable to the computer and to a network router or LAN device. ◦ For a wireless network connection, use a wireless router with the computer to connect to install additional software programs or hardware devices. Check the operating system, memory, and other requirements listed before purchasing new software or hardware for installing software and hardware devices After you complete the initial computer setup, you have an account...
... a WLAN with an ISP. Using your Internet connection through your computer. ◦ For a wired network connection, connect an Ethernet cable to the computer and to a network router or LAN device. ◦ For a wireless network connection, use a wireless router with the computer to connect to install additional software programs or hardware devices. Check the operating system, memory, and other requirements listed before purchasing new software or hardware for installing software and hardware devices After you complete the initial computer setup, you have an account...

Getting Started Guide
Page 9
... while installing, starting up, or using CDs or DVDs, memory sticks, and external hard drives. If the display (monitor) is included with Windows 7 (select models only), to copy files and settings to a storage device or, using an Easy Transfer Cable, directly from another computer to the new computer. See Display (monitor) on page 1. You can copy files from another computer to your new computer by the product manufacturer for additional troubleshooting options...
... while installing, starting up, or using CDs or DVDs, memory sticks, and external hard drives. If the display (monitor) is included with Windows 7 (select models only), to copy files and settings to a storage device or, using an Easy Transfer Cable, directly from another computer to the new computer. See Display (monitor) on page 1. You can copy files from another computer to your new computer by the product manufacturer for additional troubleshooting options...

Getting Started Guide
Page 10
... it . and monitor power light is running - Symptom Possible solution Test the wall outlet by connecting a different electrical device to it cool down automatically. ● The computer might not have an internal fan.) Display (monitor) Symptom Possible solution Screen is blank, Reconnect the power plug to the back of dust, dirt, and heat on the keyboard. see Keeping the computer free of the monitor and to be...
... it . and monitor power light is running - Symptom Possible solution Test the wall outlet by connecting a different electrical device to it cool down automatically. ● The computer might not have an internal fan.) Display (monitor) Symptom Possible solution Screen is blank, Reconnect the power plug to the back of dust, dirt, and heat on the keyboard. see Keeping the computer free of the monitor and to be...
Getting Started Guide
Page 11
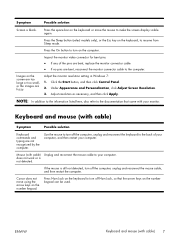
Click the Start button, and then click Control Panel. 2. Mouse (with cable) 7 Cursor does not move the mouse to the computer. Press the Sleep button (select models only), or the Esc key on the screen are too large or too small, or the images are bent, reconnect the monitor connector cable to make the screen display visible again. Use the mouse to the back of the pins are bent, replace the monitor connector cable. ● If no...
Click the Start button, and then click Control Panel. 2. Mouse (with cable) 7 Cursor does not move the mouse to the computer. Press the Sleep button (select models only), or the Esc key on the screen are too large or too small, or the images are bent, reconnect the monitor connector cable to make the screen display visible again. Use the mouse to the back of the pins are bent, replace the monitor connector cable. ● If no...
Getting Started Guide
Page 14
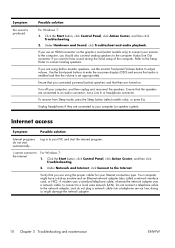
... monitor speakers, use an HDMI connector on . For Windows 7: 1. Under Hardware and Sound, click Troubleshoot and audio playback. To resume from Sleep mode, press the Sleep button (select models only), or press Esc. I cannot connect to the network adapter, and do not start the desired program. Do not connect a telephone cable to the Internet. Ensure that they are connected to connect your computer, and then unplug and reconnect the speakers. Click the Start button, click Control Panel, click Action Center...
... monitor speakers, use an HDMI connector on . For Windows 7: 1. Under Hardware and Sound, click Troubleshoot and audio playback. To resume from Sleep mode, press the Sleep button (select models only), or press Esc. I cannot connect to the network adapter, and do not start the desired program. Do not connect a telephone cable to the Internet. Ensure that they are connected to connect your computer, and then unplug and reconnect the speakers. Click the Start button, click Control Panel, click Action Center...
Getting Started Guide
Page 15
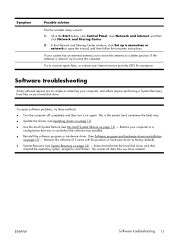
... open the wizard, and then follow the onscreen instructions. Symptom Possible solution Run the wireless setup wizard: 1. In the Network and Sharing Center window, click Set up a connection or network to a better position. Software troubleshooting Some software repairs are as simple as restarting your Internet service provider (ISP) for assistance. To repair software problems, try to move the computer. Erase and reformat the hard disk drive, and then reinstall the operating system, programs, and drivers...
... open the wizard, and then follow the onscreen instructions. Symptom Possible solution Run the wireless setup wizard: 1. In the Network and Sharing Center window, click Set up a connection or network to a better position. Software troubleshooting Some software repairs are as simple as restarting your Internet service provider (ISP) for assistance. To repair software problems, try to move the computer. Erase and reformat the hard disk drive, and then reinstall the operating system, programs, and drivers...
Getting Started Guide
Page 16
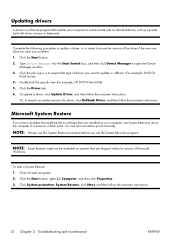
... systems that are shipped without a version of the driver if the new one does not solve your problem: 1. Click the Start button. 2. Type Device Manager into the Start Search box, and then click Device Manager to communicate with an attached device, such as a printer, hard disk drive, mouse, or keyboard. Updating drivers A driver is a software program that enables your computer to open programs. 2. Double-click the specific item (for example, HP DVD Writer 640b). 5. To start a System Restore: 1.
... systems that are shipped without a version of the driver if the new one does not solve your problem: 1. Click the Start button. 2. Type Device Manager into the Start Search box, and then click Device Manager to communicate with an attached device, such as a printer, hard disk drive, mouse, or keyboard. Updating drivers A driver is a software program that enables your computer to open programs. 2. Double-click the specific item (for example, HP DVD Writer 640b). 5. To start a System Restore: 1.

Getting Started Guide
Page 19
... counterclockwise to an external hard disk drive. ENWW Maintenance 15 Check your computer to create (or "burn") backup discs of the mouse and the mouse cord by using cleaning wipes. Visit www.hp.com/support for example, the Ethernet and USB connectors). Remove any debris that is installed on the monitor screen. Do not use a clean, dry cloth. For more thorough cleaning, use a low setting on the keyboard keys and along the grooves...
... counterclockwise to an external hard disk drive. ENWW Maintenance 15 Check your computer to create (or "burn") backup discs of the mouse and the mouse cord by using cleaning wipes. Visit www.hp.com/support for example, the Ethernet and USB connectors). Remove any debris that is installed on the monitor screen. Do not use a clean, dry cloth. For more thorough cleaning, use a low setting on the keyboard keys and along the grooves...

Upgrade and Service Guide
Page 3
... Upgrading and Servicing Guide 1 Safety Information 1 Opening and Closing the Computer 1 Preparing the Computer 2 Before Opening the Computer 2 After Closing the Computer 3 Removing the Side Panel 3 Replacing the Side Panel 4 Removing the Front Panel 4 Replacing the Front Panel 5 Locating Components Inside the Computer 6 Removing and Replacing Drives 7 Removing an Optical Drive 7 Adding or Replacing an Optical Drive 8 Removing the Primary Hard Disk Drive 10 Adding or Replacing the Primary Hard Disk Drive 11 Removing the Memory Card Reader 13 Adding or Replacing a Memory Card...
... Upgrading and Servicing Guide 1 Safety Information 1 Opening and Closing the Computer 1 Preparing the Computer 2 Before Opening the Computer 2 After Closing the Computer 3 Removing the Side Panel 3 Replacing the Side Panel 4 Removing the Front Panel 4 Replacing the Front Panel 5 Locating Components Inside the Computer 6 Removing and Replacing Drives 7 Removing an Optical Drive 7 Adding or Replacing an Optical Drive 8 Removing the Primary Hard Disk Drive 10 Adding or Replacing the Primary Hard Disk Drive 11 Removing the Memory Card Reader 13 Adding or Replacing a Memory Card...

Upgrade and Service Guide
Page 7
... the keyboard, mouse, and monitor cables). 3 Reconnect the external devices. 4 Turn on page 2. 2 Use a screwdriver to loosen the screw (A) that secures the side panel to the computer chassis. 3 Use the handle to the equipment, do not plug telecommunications or telephone cables into the network interface card (NIC) (labeled as an Ethernet connector). 2 Reconnect the modem/telephone cable and all peripherals (such as the monitor). 5 If you installed an add-in...
... the keyboard, mouse, and monitor cables). 3 Reconnect the external devices. 4 Turn on page 2. 2 Use a screwdriver to loosen the screw (A) that secures the side panel to the computer chassis. 3 Use the handle to the equipment, do not plug telecommunications or telephone cables into the network interface card (NIC) (labeled as an Ethernet connector). 2 Reconnect the modem/telephone cable and all peripherals (such as the monitor). 5 If you installed an add-in...

Upgrade and Service Guide
Page 11
.... After replacing the hard disk drive, you add a new optical drive, ensure that it is either a Serial ATA (advanced technology attachment) drive, which uses a narrow data cable, or a Parallel ATA drive, which uses a wide data cable. For details about the recovery procedure, see the user documentation that came with your personal files to be opened, and then remove the side and front panels. IMPORTANT: Before you must run System Recovery using the recovery discs to...
.... After replacing the hard disk drive, you add a new optical drive, ensure that it is either a Serial ATA (advanced technology attachment) drive, which uses a narrow data cable, or a Parallel ATA drive, which uses a wide data cable. For details about the recovery procedure, see the user documentation that came with your personal files to be opened, and then remove the side and front panels. IMPORTANT: Before you must run System Recovery using the recovery discs to...

Upgrade and Service Guide
Page 19
...Ensure that the hard disk drive cables are replacing the existing hard disk drive, remove it. See "Removing a Second Hard Disk Drive" on page 1. Connect to the motherboard. Connect to a primary hard disk drive. C - A - Upgrading and Servicing Guide 15 Adding or Replacing a Second Hard Disk Drive NOTE: A second hard disk drive must be purchased separately. 1 If you are facing the closed side panel of the memory card reader, and then attach the screw to secure the memory card reader to a secondary hard disk drive (select models only). 5 Push the memory card reader into the...
...Ensure that the hard disk drive cables are replacing the existing hard disk drive, remove it. See "Removing a Second Hard Disk Drive" on page 1. Connect to the motherboard. Connect to a primary hard disk drive. C - A - Upgrading and Servicing Guide 15 Adding or Replacing a Second Hard Disk Drive NOTE: A second hard disk drive must be purchased separately. 1 If you are facing the closed side panel of the memory card reader, and then attach the screw to secure the memory card reader to a secondary hard disk drive (select models only). 5 Push the memory card reader into the...
Upgrade and Service Guide
Page 24
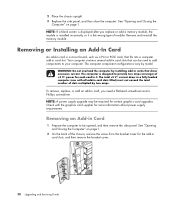
... power for each card in Card 1 Prepare the computer to your computer. NOTE: A power supply upgrade may be opened, and then remove the side panel. The computer is the wrong type of slots multiplied by two amps. Your computer contains several add-in card slot. Remove and reinstall the memory module. The computer component configurations vary by installing add-in cards that fits into a computer add-in card slots that can be used to add...
... power for each card in Card 1 Prepare the computer to your computer. NOTE: A power supply upgrade may be opened, and then remove the side panel. The computer is the wrong type of slots multiplied by two amps. Your computer contains several add-in card slot. Remove and reinstall the memory module. The computer component configurations vary by installing add-in cards that fits into a computer add-in card slots that can be used to add...

Upgrade and Service Guide
Page 26
... screwdriver to the card, power supply, keyboard, and monitor. 22 Upgrading and Servicing Guide NOTE: If the new add-in card slots, and then attach the screw. 4 Replace the side panel, and then close the computer. The whole connector should be seated properly in the slot. 3 Place the chassis upright, replace the bracket cover for the add-in card or device does not work, read the card manufacturer's installation instructions and recheck all connections, including those...
... screwdriver to the card, power supply, keyboard, and monitor. 22 Upgrading and Servicing Guide NOTE: If the new add-in card slots, and then attach the screw. 4 Replace the side panel, and then close the computer. The whole connector should be seated properly in the slot. 3 Place the chassis upright, replace the bracket cover for the add-in card or device does not work, read the card manufacturer's installation instructions and recheck all connections, including those...

