
Worldwide Limited Warranty and Technical Support - (1 Year)
Page 6
... whether your product in the servicing country or region. Battery life is your purchase price or lease payments (less interest) instead of a replacement. Limited Warranty Period of the HP Hardware Product they are replacing or in which the serial number has been removed or... other than (i) HP, (ii) an HP authorized service provider, or (iii) your own installation of end-user replaceable HP or HP approved parts if available for defective products. This is not warranted and will decrease with all batteries, the maximum capacity of HP. The battery warranty does not ...
... whether your product in the servicing country or region. Battery life is your purchase price or lease payments (less interest) instead of a replacement. Limited Warranty Period of the HP Hardware Product they are replacing or in which the serial number has been removed or... other than (i) HP, (ii) an HP authorized service provider, or (iii) your own installation of end-user replaceable HP or HP approved parts if available for defective products. This is not warranted and will decrease with all batteries, the maximum capacity of HP. The battery warranty does not ...
Worldwide Limited Warranty and Technical Support - (3 Year)
Page 6
..., improper or inadequate maintenance or calibration or other than (i) HP, (ii) an HP authorized service provider, or (iii) your own installation of end-user replaceable HP or HP approved parts if available for defective products. As with all batteries, the maximum capacity of the battery included in the HP Product will decrease with the product; (c) by software, interfacing...
..., improper or inadequate maintenance or calibration or other than (i) HP, (ii) an HP authorized service provider, or (iii) your own installation of end-user replaceable HP or HP approved parts if available for defective products. As with all batteries, the maximum capacity of the battery included in the HP Product will decrease with the product; (c) by software, interfacing...
HP ProBook User Guide - Windows 7
Page 8
... 76 Conserving battery power 76 Storing a battery ...77 Disposing of a used battery 77 Replacing the battery ...77 Testing an AC adapter ...78 Shutting down the computer ...78 6 Drives Identifying installed drives ...80 Handling drives ...80 Improving hard drive performance ...82 Using Disk Defragmenter 82 Using Disk Cleanup ...82 Using HP 3D DriveGuard ...83 Identifying HP 3D DriveGuard...
... 76 Conserving battery power 76 Storing a battery ...77 Disposing of a used battery 77 Replacing the battery ...77 Testing an AC adapter ...78 Shutting down the computer ...78 6 Drives Identifying installed drives ...80 Handling drives ...80 Improving hard drive performance ...82 Using Disk Defragmenter 82 Using Disk Cleanup ...82 Using HP 3D DriveGuard ...83 Identifying HP 3D DriveGuard...

HP ProBook User Guide - Windows 7
Page 39
... seated. 8. Shut down the computer through the operating system. 2. Using HP Mobile Broadband (select models only) 29 Then shut down the computer. Unplug the power cord from the AC outlet. 5. Remove the battery. Remove the battery. 7. Removing a SIM To remove a SIM: 1. Replace the battery. 6. Turn the computer right-side up, and then reconnect external power...
... seated. 8. Shut down the computer through the operating system. 2. Using HP Mobile Broadband (select models only) 29 Then shut down the computer. Unplug the power cord from the AC outlet. 5. Remove the battery. Remove the battery. 7. Removing a SIM To remove a SIM: 1. Replace the battery. 6. Turn the computer right-side up, and then reconnect external power...

HP ProBook User Guide - Windows 7
Page 40
Press in on the computer. 30 Chapter 2 Wireless, modem, and local area network Turn on the SIM (1), and then remove it from the slot (2). 8. Replace the battery. 9. 7. Turn the computer right-side up, and then reconnect external power and external devices. 10.
Press in on the computer. 30 Chapter 2 Wireless, modem, and local area network Turn on the SIM (1), and then remove it from the slot (2). 8. Replace the battery. 9. 7. Turn the computer right-side up, and then reconnect external power and external devices. 10.
HP ProBook User Guide - Windows 7
Page 77
... External AC power is running: ▲ Select Start > All Programs > HP > HP Power Assistant. - Do not charge the computer battery while you are onboard aircraft. ● When you are charging or calibrating a battery ● When you are installing or modifying system software ● When you...information to optimize your computer's power consumption and battery charge. For more information about computer use only the AC adapter provided with the computer, a replacement AC adapter provided by HP, or a compatible AC adapter purchased from HP. ● Approved AC adapter ● Optional ...
... External AC power is running: ▲ Select Start > All Programs > HP > HP Power Assistant. - Do not charge the computer battery while you are onboard aircraft. ● When you are charging or calibrating a battery ● When you are installing or modifying system software ● When you...information to optimize your computer's power consumption and battery charge. For more information about computer use only the AC adapter provided with the computer, a replacement AC adapter provided by HP, or a compatible AC adapter purchased from HP. ● Approved AC adapter ● Optional ...

HP ProBook User Guide - Windows 7
Page 79
... > Help and Support > Learn > Power Plans: Frequently Asked Questions. To increase display brightness, use only the battery provided with the computer, a replacement battery provided by HP, or a compatible battery purchased from external power. Connect the AC adapter to maximize battery life ● Information on the status of the examination. NOTE: The computer must be connected to...
... > Help and Support > Learn > Power Plans: Frequently Asked Questions. To increase display brightness, use only the battery provided with the computer, a replacement battery provided by HP, or a compatible battery purchased from external power. Connect the AC adapter to maximize battery life ● Information on the status of the examination. NOTE: The computer must be connected to...

HP ProBook User Guide - Windows 7
Page 87
... to the HP Web site for extended periods of in fire or water. do not disassemble, crush, or puncture; Battery Check notifies you need it in Help and Support. Using battery power 77 Storing a battery CAUTION: To prevent damage to a battery, do not expose it to high temperatures for more information about ordering a replacement battery. These notices...
... to the HP Web site for extended periods of in fire or water. do not disassemble, crush, or puncture; Battery Check notifies you need it in Help and Support. Using battery power 77 Storing a battery CAUTION: To prevent damage to a battery, do not expose it to high temperatures for more information about ordering a replacement battery. These notices...

HP ProBook User Guide - Windows 7
Page 88
...: ● The computer will be unused and disconnected from the computer. 2. To test the AC adapter: 1. Remove the battery from external power for information on obtaining a replacement AC power adapter. Shutting down command. Save your work and close all open programs. 2. Click Start. 3. Select Start >...Testing an AC adapter Test the AC adapter if the computer exhibits any of the following conditions: ● When you need to replace the battery or access components inside the computer ● When you are off , the AC adapter is not functioning and should be lost when...
...: ● The computer will be unused and disconnected from the computer. 2. To test the AC adapter: 1. Remove the battery from external power for information on obtaining a replacement AC power adapter. Shutting down command. Save your work and close all open programs. 2. Click Start. 3. Select Start >...Testing an AC adapter Test the AC adapter if the computer exhibits any of the following conditions: ● When you need to replace the battery or access components inside the computer ● When you are off , the AC adapter is not functioning and should be lost when...
HP ProBook User Guide - Windows 7
Page 95
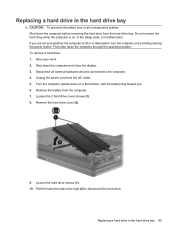
...(2) to the computer. 4. Then shut down on a flat surface, with the battery bay toward you are not sure whether the computer is on by briefly pressing the power button. Loosen the hard drive screws (1). 10. Replacing a hard drive in Hibernation, turn the computer on , in the Sleep state,...1. Unplug the power cord from the computer. 7. If you . 6. Shut down the computer before removing the hard drive from the hard drive bay. Replacing a hard drive in the hard drive bay CAUTION: To prevent information loss or an unresponsive system: Shut down the computer and close the display. 3....
...(2) to the computer. 4. Then shut down on a flat surface, with the battery bay toward you are not sure whether the computer is on by briefly pressing the power button. Loosen the hard drive screws (1). 10. Replacing a hard drive in Hibernation, turn the computer on , in the Sleep state,...1. Unplug the power cord from the computer. 7. If you . 6. Shut down the computer before removing the hard drive from the hard drive bay. Replacing a hard drive in the hard drive bay CAUTION: To prevent information loss or an unresponsive system: Shut down the computer and close the display. 3....
HP ProBook User Guide - Windows 7
Page 97
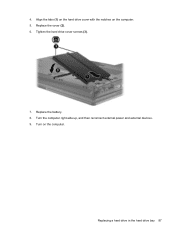
Align the tabs (1) on the hard drive cover with the notches on the computer. Replace the cover (2). 6. Turn on the computer. 5. Replacing a hard drive in the hard drive bay 87 Tighten the hard drive cover screws (3). 7. Replace the battery. 8. Turn the computer right-side up, and then reconnect external power and external devices. 9. 4.
Align the tabs (1) on the hard drive cover with the notches on the computer. Replace the cover (2). 6. Turn on the computer. 5. Replacing a hard drive in the hard drive bay 87 Tighten the hard drive cover screws (3). 7. Replace the battery. 8. Turn the computer right-side up, and then reconnect external power and external devices. 9. 4.

HP ProBook User Guide - Windows 7
Page 99
Remove the battery from the upgrade bay: 1. Save your work. 2. Remove the protective screw caps (1), and then remove the 4 hard drive screws (2). 8. Turn the computer upside down the computer and close the display. 3. To remove a hard drive from the computer. 7. Loosen the upgrade bay screw (1). Replacing a drive in the upgrade bay 89 Shut down on a flat surface, with the upgrade bay toward you. 6. Unplug the power cord from the AC outlet. 5. Disconnect all external hardware devices connected to the computer. 4.
Remove the battery from the upgrade bay: 1. Save your work. 2. Remove the protective screw caps (1), and then remove the 4 hard drive screws (2). 8. Turn the computer upside down the computer and close the display. 3. To remove a hard drive from the computer. 7. Loosen the upgrade bay screw (1). Replacing a drive in the upgrade bay 89 Shut down on a flat surface, with the upgrade bay toward you. 6. Unplug the power cord from the AC outlet. 5. Disconnect all external hardware devices connected to the computer. 4.
HP ProBook User Guide - Windows 7
Page 102
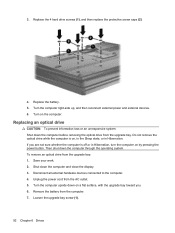
... and close the display. 3. Disconnect all external hardware devices connected to the computer. 4. Loosen the upgrade bay screw (1). 92 Chapter 6 Drives Replace the battery. 5. Save your work. 2. Do not remove the optical drive while the computer is off or in Hibernation. Turn the computer right-side up..., and then reconnect external power and external devices. 6. Remove the battery from the upgrade bay. Replacing an optical drive CAUTION: To prevent information loss or an unresponsive system: Shut down on the computer.
... and close the display. 3. Disconnect all external hardware devices connected to the computer. 4. Loosen the upgrade bay screw (1). 92 Chapter 6 Drives Replace the battery. 5. Save your work. 2. Do not remove the optical drive while the computer is off or in Hibernation. Turn the computer right-side up..., and then reconnect external power and external devices. 6. Remove the battery from the upgrade bay. Replacing an optical drive CAUTION: To prevent information loss or an unresponsive system: Shut down on the computer.

HP ProBook User Guide - Windows 7
Page 104
Tighten the upgrade bay screw. 3. Replace the battery. 4. To install an optical drive in the upgrade bay: 1. Turn the computer right-side up, and then reconnect external power and external devices. 5. Turn on the computer. 94 Chapter 6 Drives Insert the optical drive into the upgrade bay. 2.
Tighten the upgrade bay screw. 3. Replace the battery. 4. To install an optical drive in the upgrade bay: 1. Turn the computer right-side up, and then reconnect external power and external devices. 5. Turn on the computer. 94 Chapter 6 Drives Insert the optical drive into the upgrade bay. 2.

HP ProBook User Guide - Windows 7
Page 119
... module in the expansion memory module slot To add or replace a memory module in the expansion memory module slot 109 Shut down the computer through the operating system. 3. Disconnect all batteries from the computer. 7. Loosen the memory module compartment cover screw (1). 8. CAUTION: To prevent damage to the memory module, hold the memory...
... module in the expansion memory module slot To add or replace a memory module in the expansion memory module slot 109 Shut down the computer through the operating system. 3. Disconnect all batteries from the computer. 7. Loosen the memory module compartment cover screw (1). 8. CAUTION: To prevent damage to the memory module, hold the memory...

HP ProBook User Guide - Windows 7
Page 121
Close the cover (2). 13. c. Tighten the memory module compartment cover screw (3). 14. Turn on the computer. 12. Adding or replacing a memory module in the expansion memory module slot 111 Replace the batteries. 15. Turn the computer right-side up, and then reconnect external power and external devices. 16. Gently press the memory module (3) down, applying pressure to both the left and right edges of the memory module, until the retention clips snap into place. 11. Align the tabs (1) on the memory module compartment cover with the notches on the computer.
Close the cover (2). 13. c. Tighten the memory module compartment cover screw (3). 14. Turn on the computer. 12. Adding or replacing a memory module in the expansion memory module slot 111 Replace the batteries. 15. Turn the computer right-side up, and then reconnect external power and external devices. 16. Gently press the memory module (3) down, applying pressure to both the left and right edges of the memory module, until the retention clips snap into place. 11. Align the tabs (1) on the memory module compartment cover with the notches on the computer.
HP ProBook User Guide - Windows Vista
Page 78
... power, the computer runs on how you disconnect AC power. To increase display brightness, use only the battery provided with the computer, a replacement battery provided by HP, or a compatible battery purchased from the computer. You can keep a battery in the computer or in Help and Support Help and Support provides the following tools and information about...
... power, the computer runs on how you disconnect AC power. To increase display brightness, use only the battery provided with the computer, a replacement battery provided by HP, or a compatible battery purchased from the computer. You can keep a battery in the computer or in Help and Support Help and Support provides the following tools and information about...

HP ProBook User Guide - Windows Vista
Page 85
... need it to storage. Using battery power 75 Calibrate a battery before returning it , HP recommends purchasing a new battery when the storage capacity indicator turns green-yellow. If the capacity is less than 2 weeks, remove the battery and store it has been stored for one month or more information about ordering a replacement battery. These notices are located in...
... need it to storage. Using battery power 75 Calibrate a battery before returning it , HP recommends purchasing a new battery when the storage capacity indicator turns green-yellow. If the capacity is less than 2 weeks, remove the battery and store it has been stored for one month or more information about ordering a replacement battery. These notices are located in...

HP ProBook User Guide - Windows XP
Page 78
... your work and initiate Hibernation or shut down on a flat surface, with the computer, a replacement battery provided by HP, or a compatible battery purchased from HP. To prevent loss of information, save battery life when you work in case of information. Keeping the battery in the computer whenever the computer is charging, a lightning bolt icon may be superimposed...
... your work and initiate Hibernation or shut down on a flat surface, with the computer, a replacement battery provided by HP, or a compatible battery purchased from HP. To prevent loss of information, save battery life when you work in case of information. Keeping the battery in the computer whenever the computer is charging, a lightning bolt icon may be superimposed...

HP ProBook User Guide - Windows XP
Page 85
... site for battery disposal information. Replacing the battery Computer battery life varies, depending on the power management settings, programs running on the computer, display brightness, external devices connected to replace the battery when an internal cell is possibly covered by an HP warranty, instructions include a warranty ID. Battery Check notifies you need it, HP recommends purchasing a new battery when the...
... site for battery disposal information. Replacing the battery Computer battery life varies, depending on the power management settings, programs running on the computer, display brightness, external devices connected to replace the battery when an internal cell is possibly covered by an HP warranty, instructions include a warranty ID. Battery Check notifies you need it, HP recommends purchasing a new battery when the...


