
End User License Agreement
Page 1
... shall be governed You may load the Software ON THE CONDITION THAT YOU Product into the local memory or storage device of any Software Product, installed on or made available by HP for use on a single computer ("Your Computer"). You do not have Software Product into Your Computer...'s AGREE TO ALL TERMS AND temporary memory (RAM) for use with all or any portion of the Software Product which constitutes non-proprietary HP software or software provided under public license by you in its suppliers reserve all of download...
... shall be governed You may load the Software ON THE CONDITION THAT YOU Product into the local memory or storage device of any Software Product, installed on or made available by HP for use on a single computer ("Your Computer"). You do not have Software Product into Your Computer...'s AGREE TO ALL TERMS AND temporary memory (RAM) for use with all or any portion of the Software Product which constitutes non-proprietary HP software or software provided under public license by you in its suppliers reserve all of download...
HP ProtectTools Security Software 2010
Page 14
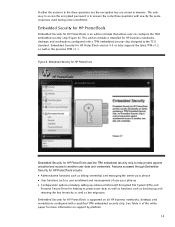
... Security for HP ProtectTools Embedded Security for HP business notebooks, desktops and workstations configured with a TPM embedded security chip designed to the three questions nor the encryption key are stored in memory. Embedded Security for HP ProtectTools Embedded Security for HP ProtectTools is an...functions such as backing up enhanced Microsoft Encrypted File System (EFS) and Personal Secure Drive for more information on all HP business notebooks, desktops and workstations configured with exactly the same responses used during initial enrollment. See Table 6 of user pass ...
... Security for HP ProtectTools Embedded Security for HP business notebooks, desktops and workstations configured with a TPM embedded security chip designed to the three questions nor the encryption key are stored in memory. Embedded Security for HP ProtectTools Embedded Security for HP ProtectTools is an...functions such as backing up enhanced Microsoft Encrypted File System (EFS) and Personal Secure Drive for more information on all HP business notebooks, desktops and workstations configured with exactly the same responses used during initial enrollment. See Table 6 of user pass ...
HP ProBook User Guide - Windows 7
Page 9
... or replacing a memory module in the expansion memory module slot 109 Upgrading a memory module in the primary memory module slot 112 10 Security Protecting the computer ...116 Using passwords ...117 Setting passwords in Windows 117 Setting passwords ...Setup System Information 126 Using Computer Setup System IDs 127 Using antivirus software ...128 Using firewall software ...129 Installing critical updates ...130 Using HP ProtectTools Security Manager (select models only 131 Installing a security cable ...132 11 Software updates Updating software ...133 Updating the BIOS ...135 Determining...
... or replacing a memory module in the expansion memory module slot 109 Upgrading a memory module in the primary memory module slot 112 10 Security Protecting the computer ...116 Using passwords ...117 Setting passwords in Windows 117 Setting passwords ...Setup System Information 126 Using Computer Setup System IDs 127 Using antivirus software ...128 Using firewall software ...129 Installing critical updates ...130 Using HP ProtectTools Security Manager (select models only 131 Installing a security cable ...132 11 Software updates Updating software ...133 Updating the BIOS ...135 Determining...

HP ProBook User Guide - Windows 7
Page 23
... ● Memory Stick ● Memory Stick Pro ● Memory Stick Duo (adapter required) ● Memory Stick Duo Pro (adapter required) ● MultiMediaCard ● MultiMediaCard Plus ● Secure Digital (SD) Memory Card ● SD High Capacity Memory Card ● microSD Memory Card (adapter...) jack (6) Security cable slot Description Supports the following optional digital card formats: ● Memory Stick ● Memory Stick Pro ● Memory Stick Duo (adapter required) ● Memory Stick Duo Pro (adapter required) Identifying hardware 13 Connects an optional USB device.
... ● Memory Stick ● Memory Stick Pro ● Memory Stick Duo (adapter required) ● Memory Stick Duo Pro (adapter required) ● MultiMediaCard ● MultiMediaCard Plus ● Secure Digital (SD) Memory Card ● SD High Capacity Memory Card ● microSD Memory Card (adapter...) jack (6) Security cable slot Description Supports the following optional digital card formats: ● Memory Stick ● Memory Stick Pro ● Memory Stick Duo (adapter required) ● Memory Stick Duo Pro (adapter required) Identifying hardware 13 Connects an optional USB device.

HP ProBook User Guide - Windows 7
Page 24
... (2) Upgrade bay (3) USB port (4) 1394 port (5) Serial port Left-side components Description ● MultiMediaCard ● MultiMediaCard Plus ● Secure Digital (SD) Memory Card ● SD High Capacity Memory Card ● microSD Memory Card (adapter required) ● xD-Picture Card Supports an optical drive or a hard drive. Component (1) ExpressCard slot (2) Vent (3) DisplayPort (4) USB ports...
... (2) Upgrade bay (3) USB port (4) 1394 port (5) Serial port Left-side components Description ● MultiMediaCard ● MultiMediaCard Plus ● Secure Digital (SD) Memory Card ● SD High Capacity Memory Card ● microSD Memory Card (adapter required) ● xD-Picture Card Supports an optical drive or a hard drive. Component (1) ExpressCard slot (2) Vent (3) DisplayPort (4) USB ports...

HP ProBook User Guide - Windows 7
Page 26
...cool internal components and prevent overheating. Connects an optional accessory battery. It is located inside the battery bay. Contains an expansion memory module slot. Releases the battery from the battery bay. NOTE: The computer fan starts up automatically to cycle on and off ...during routine operation. Enable airflow to cool internal components. Contains an HP Mobile Broadband Module (select models only) and a WLAN module (select models only). 16 Chapter 1 Features Holds the hard drive. Bottom ...
...cool internal components and prevent overheating. Connects an optional accessory battery. It is located inside the battery bay. Contains an expansion memory module slot. Releases the battery from the battery bay. NOTE: The computer fan starts up automatically to cycle on and off ...during routine operation. Enable airflow to cool internal components. Contains an HP Mobile Broadband Module (select models only) and a WLAN module (select models only). 16 Chapter 1 Features Holds the hard drive. Bottom ...

HP ProBook User Guide - Windows 7
Page 51
CAUTION: To reduce the risk of the fn+f3 hotkey can be changed. The function of information loss, save your information in memory is conserved. Switches the screen image among other devices that are charging and reports the amount of the hotkey command. - NOTE: If a... critical battery level occurs while the computer is in the Sleep state, the computer initiates Hibernation and the information stored in system memory. Displays charge information for all Windows operating system windows, references to the sleep button apply to the fn+f3 hotkey. To exit Sleep, briefly ...
CAUTION: To reduce the risk of the fn+f3 hotkey can be changed. The function of information loss, save your information in memory is conserved. Switches the screen image among other devices that are charging and reports the amount of the hotkey command. - NOTE: If a... critical battery level occurs while the computer is in the Sleep state, the computer initiates Hibernation and the information stored in system memory. Displays charge information for all Windows operating system windows, references to the sleep button apply to the fn+f3 hotkey. To exit Sleep, briefly ...
HP ProBook User Guide - Windows 7
Page 74
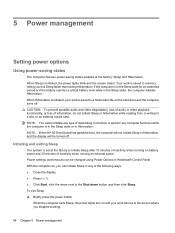
NOTE: When HP 3D DriveGuard has parked a drive, the computer will not initiate Sleep or Hibernation, and the display will be changed using Power Options in Hibernation. 5 Power ... battery level while in any of the following ways: ● Close the display. ● Press fn+f3. ● Click Start, click the arrow next to memory, letting you stopped working. 64 Chapter 5 Power management Initiating and exiting Sleep The system is in the Sleep state or in Windows® Control Panel...
NOTE: When HP 3D DriveGuard has parked a drive, the computer will not initiate Sleep or Hibernation, and the display will be changed using Power Options in Hibernation. 5 Power ... battery level while in any of the following ways: ● Close the display. ● Press fn+f3. ● Click Start, click the arrow next to memory, letting you stopped working. 64 Chapter 5 Power management Initiating and exiting Sleep The system is in the Sleep state or in Windows® Control Panel...

HP ProBook User Guide - Windows 7
Page 90
... tasks such as a hard drive. Refer to improve the security of your permission or password for more information. You may be handled with solid-state memory. Because it has no moving parts, an SSD does not generate as much heat as installing applications, running utilities, or changing Windows settings. Refer to...
... tasks such as a hard drive. Refer to improve the security of your permission or password for more information. You may be handled with solid-state memory. Because it has no moving parts, an SSD does not generate as much heat as installing applications, running utilities, or changing Windows settings. Refer to...

HP ProBook User Guide - Windows 7
Page 112
.... The Media Card Reader supports the following formats: ● Memory Stick ● Memory Stick Pro ● Memory Stick Duo (adapter required) ● Memory Stick Duo Pro (adapter required) ● MultiMediaCard ● MultiMediaCard Plus ● Secure Digital (SD) Memory Card ● SD High Capacity Memory Card ● microSD Memory Card (adapter required) ● xD-Picture Card Inserting a digital...
.... The Media Card Reader supports the following formats: ● Memory Stick ● Memory Stick Pro ● Memory Stick Duo (adapter required) ● Memory Stick Duo Pro (adapter required) ● MultiMediaCard ● MultiMediaCard Plus ● Secure Digital (SD) Memory Card ● SD High Capacity Memory Card ● microSD Memory Card (adapter required) ● xD-Picture Card Inserting a digital...

HP ProBook User Guide - Windows 7
Page 114
... the Personal Computer Memory Card International Association (PCMCIA). If you are designed to conform to the connectors: Use minimal force when inserting an ExpressCard. Press in use. Inserting an ExpressCard CAUTION: To prevent damage to unlock it. 2. Like standard PC Cards, ExpressCards are... media cards Using ExpressCards (select models only) An ExpressCard is a high-performance PC Card that is in on the insert (1) to the computer and external media cards, do not insert a PC Card into the ExpressCard slot. CAUTION: To prevent damage to the standard specifications of...
... the Personal Computer Memory Card International Association (PCMCIA). If you are designed to conform to the connectors: Use minimal force when inserting an ExpressCard. Press in use. Inserting an ExpressCard CAUTION: To prevent damage to unlock it. 2. Like standard PC Cards, ExpressCards are... media cards Using ExpressCards (select models only) An ExpressCard is a high-performance PC Card that is in on the insert (1) to the computer and external media cards, do not insert a PC Card into the ExpressCard slot. CAUTION: To prevent damage to the standard specifications of...

HP ProBook User Guide - Windows 7
Page 116
... card label-side up, gently slide the card into the smart card reader until the card is a credit card-sized accessory that carries a microchip containing memory and a microprocessor. Inserting a smart card To insert a smart card: 1. Removing a smart card To remove a smart card: 106 Chapter 8 External media cards A smart card is seated...
... card label-side up, gently slide the card into the smart card reader until the card is a credit card-sized accessory that carries a microchip containing memory and a microprocessor. Inserting a smart card To insert a smart card: 1. Removing a smart card To remove a smart card: 106 Chapter 8 External media cards A smart card is seated...

HP ProBook User Guide - Windows 7
Page 118
... bottom of electric shock and damage to the equipment, unplug the power cord and remove all batteries before installing a memory module. WARNING! The expansion memory module compartment is located under the keyboard. The memory capacity of static electricity. 108 Chapter 9 Memory modules Before beginning any procedure, touch a grounded metal object to the empty expansion...
... bottom of electric shock and damage to the equipment, unplug the power cord and remove all batteries before installing a memory module. WARNING! The expansion memory module compartment is located under the keyboard. The memory capacity of static electricity. 108 Chapter 9 Memory modules Before beginning any procedure, touch a grounded metal object to the empty expansion...

HP ProBook User Guide - Windows 7
Page 119
... compartment cover (2) away from the AC outlet. 5. Adding or replacing a memory module in the expansion memory module slot, follow these steps: 1. Adding or replacing a memory module in the expansion memory module slot To add or replace a memory module in the expansion memory module slot 109 Save your work. 2. Unplug the power cord from the computer. 9. Shut...
... compartment cover (2) away from the AC outlet. 5. Adding or replacing a memory module in the expansion memory module slot, follow these steps: 1. Adding or replacing a memory module in the expansion memory module slot To add or replace a memory module in the expansion memory module slot 109 Save your work. 2. Unplug the power cord from the computer. 9. Shut...

HP ProBook User Guide - Windows 7
Page 120
... gently pull the module out of the memory module compartment, press the module (2) into the memory module slot until it in the memory module slot. CAUTION: To prevent damage to the memory module, hold the memory module by the edges only. b. Insert a memory module: a. Align the notched edge (1) of the memory module with the tab in an...
... gently pull the module out of the memory module compartment, press the module (2) into the memory module slot until it in the memory module slot. CAUTION: To prevent damage to the memory module, hold the memory module by the edges only. b. Insert a memory module: a. Align the notched edge (1) of the memory module with the tab in an...

HP ProBook User Guide - Windows 7
Page 121
Align the tabs (1) on the memory module compartment cover with the notches on the computer. Gently press the memory module (3) down, applying pressure to both the left and right edges of the memory module, until the retention clips snap into place. 11. Replace the batteries. 15. Tighten the memory module compartment cover screw (3). 14. Turn on the computer. 12. Adding or replacing a memory module in the expansion memory module slot 111 c. Close the cover (2). 13. Turn the computer right-side up, and then reconnect external power and external devices. 16.
Align the tabs (1) on the memory module compartment cover with the notches on the computer. Gently press the memory module (3) down, applying pressure to both the left and right edges of the memory module, until the retention clips snap into place. 11. Replace the batteries. 15. Tighten the memory module compartment cover screw (3). 14. Turn on the computer. 12. Adding or replacing a memory module in the expansion memory module slot 111 c. Close the cover (2). 13. Turn the computer right-side up, and then reconnect external power and external devices. 16.
HP ProBook User Guide - Windows 7
Page 122
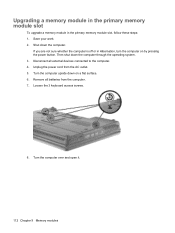
... your work. 2. Then shut down the computer. Remove all external devices connected to the computer. 4. Upgrading a memory module in the primary memory module slot To upgrade a memory module in Hibernation, turn the computer on a flat surface. 6. Disconnect all batteries from the AC outlet. 5. Loosen... the 3 keyboard access screws. 8. Turn the computer over and open it. 112 Chapter 9 Memory modules Shut down the computer through the operating system. 3. Turn the computer upside down on by pressing the power button. Unplug the ...
... your work. 2. Then shut down the computer. Remove all external devices connected to the computer. 4. Upgrading a memory module in the primary memory module slot To upgrade a memory module in Hibernation, turn the computer on a flat surface. 6. Disconnect all batteries from the AC outlet. 5. Loosen... the 3 keyboard access screws. 8. Turn the computer over and open it. 112 Chapter 9 Memory modules Shut down the computer through the operating system. 3. Turn the computer upside down on by pressing the power button. Unplug the ...

HP ProBook User Guide - Windows 7
Page 123
... by the edges only. Do not touch the components on each side of the memory module. Pull away the retention clips (1) on the memory module. b. Remove the memory module: a. Upgrading a memory module in an electrostatic-safe container. Grasp the edge of the memory module (2), and gently pull the module out of the computer. 10. The...
... by the edges only. Do not touch the components on each side of the memory module. Pull away the retention clips (1) on the memory module. b. Remove the memory module: a. Upgrading a memory module in an electrostatic-safe container. Grasp the edge of the memory module (2), and gently pull the module out of the computer. 10. The...

HP ProBook User Guide - Windows 7
Page 124
...: To prevent damage to both the left and right edges of the memory module with the tabs in the memory module slot. Gently press the memory module (3) down, applying pressure to the memory module, hold the memory module by the edges only. Align the notched edge (1) of the memory module, until it is seated. 114 Chapter...
...: To prevent damage to both the left and right edges of the memory module with the tabs in the memory module slot. Gently press the memory module (3) down, applying pressure to the memory module, hold the memory module by the edges only. Align the notched edge (1) of the memory module, until it is seated. 114 Chapter...
HP ProBook User Guide - Windows 7
Page 125
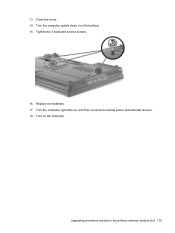
Tighten the 3 keyboard access screws. 16. Upgrading a memory module in the primary memory module slot 115 Turn on a flat surface. 15. Replace the batteries. 17. Turn the computer upside down on the computer. 13. Turn the computer right-side up, and then reconnect external power and external devices. 18. Close the cover. 14.
Tighten the 3 keyboard access screws. 16. Upgrading a memory module in the primary memory module slot 115 Turn on a flat surface. 15. Replace the batteries. 17. Turn the computer upside down on the computer. 13. Turn the computer right-side up, and then reconnect external power and external devices. 18. Close the cover. 14.


