HP Notebook Hard Drives & Solid State Drives Identifying, Preventing, Diagnosing and Recovering from Drive Failures Care and Mai
Page 4
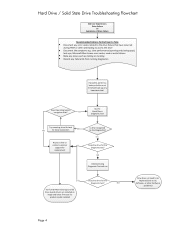
Hard Drive / Solid State Drive Troubleshooting Flowchart End User Experiences: Drive Failure Or Symptoms of drive or at minimum back up any error codes related to the drive failure that have occurred during POST or when attempting to access the drive Document the symptoms e.g. YES Run F2 Quick/Short Diagnostic Test Try reseating drive... & check NO for loose connectors NO Replace drive or contact customer...
Hard Drive / Solid State Drive Troubleshooting Flowchart End User Experiences: Drive Failure Or Symptoms of drive or at minimum back up any error codes related to the drive failure that have occurred during POST or when attempting to access the drive Document the symptoms e.g. YES Run F2 Quick/Short Diagnostic Test Try reseating drive... & check NO for loose connectors NO Replace drive or contact customer...

HP ProtectTools Getting Started
Page 13
... other confidential data) on your computer and periodically bleach the hard drive (write over data that has been previously deleted, but is reformatted or replaced. Device Access Manager for specific individuals or groups of the data more difficult). HP ProtectTools features 3 Embedded Security for HP ProtectTools (select models only) ● Uses a Trusted Platform Module (TPM...
... other confidential data) on your computer and periodically bleach the hard drive (write over data that has been previously deleted, but is reformatted or replaced. Device Access Manager for specific individuals or groups of the data more difficult). HP ProtectTools features 3 Embedded Security for HP ProtectTools (select models only) ● Uses a Trusted Platform Module (TPM...
HP ProtectTools Getting Started
Page 78
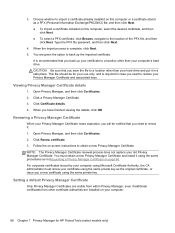
...certificate, click Browse, navigate to a location other than your Privacy Manager Certificate nears expiration, you will be for HP ProtectTools (select models only) CAUTION: Be sure that you need to a location other than your Privacy Manager Certificate...replace your computer. 68 Chapter 7 Privacy Manager for your use only, and is recommended that you a new certificate using the same private key as a PFX (Personal Information Exchange/PKCS#12) file, and then click Next. ● To import a certificate installed on -screen instructions to restore your computer's hard drive...
...certificate, click Browse, navigate to a location other than your Privacy Manager Certificate nears expiration, you will be for HP ProtectTools (select models only) CAUTION: Be sure that you need to a location other than your Privacy Manager Certificate...replace your computer. 68 Chapter 7 Privacy Manager for your use only, and is recommended that you a new certificate using the same private key as a PFX (Personal Information Exchange/PKCS#12) file, and then click Next. ● To import a certificate installed on -screen instructions to restore your computer's hard drive...
HP ProtectTools Getting Started
Page 111
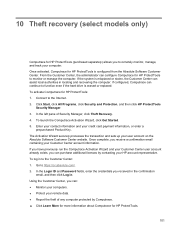
The Activation Wizard securely processes the transaction and sets up your HP account representative. Go to function even if the hard drive is erased or replaced. If configured, Computrace can continue to https://cc.absolute.com/. 2. In the left pane of any computer ...9679; Report the theft of Security Manager, click Theft Recovery. 4. Click Start, click All Programs, click Security and Protection, and then click HP ProtectTools Security Manager. 3. To launch the Computrace Activation Wizard, click Get Started. 5. If the system is configured from the Absolute Software Customer...
The Activation Wizard securely processes the transaction and sets up your HP account representative. Go to function even if the hard drive is erased or replaced. If configured, Computrace can continue to https://cc.absolute.com/. 2. In the left pane of any computer ...9679; Report the theft of Security Manager, click Theft Recovery. 4. Click Start, click All Programs, click Security and Protection, and then click HP ProtectTools Security Manager. 3. To launch the Computrace Activation Wizard, click Get Started. 5. If the system is configured from the Absolute Software Customer...
Getting Started HP Notebook
Page 6
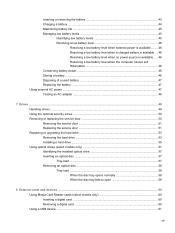
... replacing the service door 36 Removing the service door 36 Replacing the service door 37 Replacing or upgrading the hard drive 38 Removing the hard drive ...38 Installing a hard drive ...40 Adding or replacing ...memory modules 42 Updating programs and drivers ...45 Cleaning your computer ...45 Cleaning products ...45 Cleaning procedures ...45 Cleaning the display 45 Cleaning the sides and cover 46 Cleaning the TouchPad and keyboard 46 6 Backup and recovery ...47 Creating recovery media with HP...
... replacing the service door 36 Removing the service door 36 Replacing the service door 37 Replacing or upgrading the hard drive 38 Removing the hard drive ...38 Installing a hard drive ...40 Adding or replacing ...memory modules 42 Updating programs and drivers ...45 Cleaning your computer ...45 Cleaning products ...45 Cleaning procedures ...45 Cleaning the display 45 Cleaning the sides and cover 46 Cleaning the TouchPad and keyboard 46 6 Backup and recovery ...47 Creating recovery media with HP...
Getting Started HP Notebook
Page 10
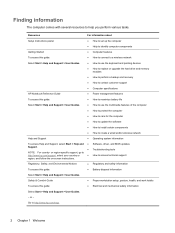
... How to use the keyboard and pointing devices ● How to replace or upgrade the hard drive and memory modules ● How to perform a backup and recovery ● How to contact customer support ● Computer specifications HP Notebook Reference Guide ● Power management features To access this guide:...with several resources to access technical support region, and follow the on-screen instructions. or region-specific support, go to http://www.hp.com/support, select your country or ● How to help you perform various tasks. or - Regulatory, Safety, and Environmental ...
... How to use the keyboard and pointing devices ● How to replace or upgrade the hard drive and memory modules ● How to perform a backup and recovery ● How to contact customer support ● Computer specifications HP Notebook Reference Guide ● Power management features To access this guide:...with several resources to access technical support region, and follow the on-screen instructions. or region-specific support, go to http://www.hp.com/support, select your country or ● How to help you perform various tasks. or - Regulatory, Safety, and Environmental ...
Getting Started HP Notebook
Page 27
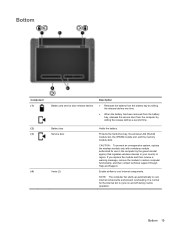
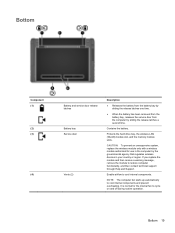
CAUTION: To prevent an unresponsive system, replace the wireless module only with a wireless module authorized for the internal fan to cool internal components and prevent overheating. Bottom 19 Bottom Component (1) (2) (3) (4) Battery and ... then contact technical support through Help and Support. If you replace the module and then receive a warning message, remove the module to cool internal components. NOTE: The computer fan starts up automatically to cycle on and off during routine operation. Protects the hard drive bay, the wireless LAN (WLAN) module slot, the WWAN...
CAUTION: To prevent an unresponsive system, replace the wireless module only with a wireless module authorized for the internal fan to cool internal components and prevent overheating. Bottom 19 Bottom Component (1) (2) (3) (4) Battery and ... then contact technical support through Help and Support. If you replace the module and then receive a warning message, remove the module to cool internal components. NOTE: The computer fan starts up automatically to cycle on and off during routine operation. Protects the hard drive bay, the wireless LAN (WLAN) module slot, the WWAN...

Getting Started HP Notebook
Page 44
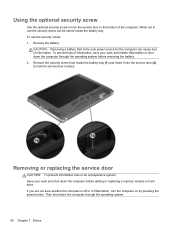
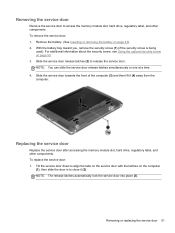
Then shut down the computer before adding or replacing a memory module or hard drive. Removing the service door Remove the service door to... screw is off or in Hibernation, turn the computer on by pressing the power button. Removing or replacing the service door CAUTION: To prevent information loss or an unresponsive system: Save your work and shut ...optional security screw on page 33). 2. Slide the service door release latches (2) to access the memory module slot, hard drive, regulatory label, and other components. To remove the service door: 1. If you can slide the service door ...
Then shut down the computer before adding or replacing a memory module or hard drive. Removing the service door Remove the service door to... screw is off or in Hibernation, turn the computer on by pressing the power button. Removing or replacing the service door CAUTION: To prevent information loss or an unresponsive system: Save your work and shut ...optional security screw on page 33). 2. Slide the service door release latches (2) to access the memory module slot, hard drive, regulatory label, and other components. To remove the service door: 1. If you can slide the service door ...
Getting Started HP Notebook
Page 45
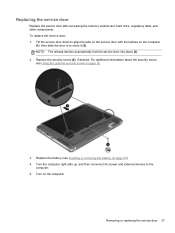
... battery (see Using the optional security screw on the computer. Removing or replacing the service door 37 To replace the service door: 1. Replacing the service door Replace the service door after accessing the memory module slot, hard drive, regulatory label, and other components. Replace the security screw (4), if desired. Turn on page 35. 3. NOTE: The release latches...
... battery (see Using the optional security screw on the computer. Removing or replacing the service door 37 To replace the service door: 1. Replacing the service door Replace the service door after accessing the memory module slot, hard drive, regulatory label, and other components. Replace the security screw (4), if desired. Turn on page 35. 3. NOTE: The release latches...
Getting Started HP Notebook
Page 46
... in Hibernation. Then shut down the computer. 2. Removing the hard drive 1. Disconnect AC power and external devices connected to the computer. 3. Replacing or upgrading the hard drive CAUTION: To prevent information loss or an unresponsive system: Shut down the computer before removing the hard drive from the hard drive. 38 Chapter 5 Maintenance Save your work and shut down the...
... in Hibernation. Then shut down the computer. 2. Removing the hard drive 1. Disconnect AC power and external devices connected to the computer. 3. Replacing or upgrading the hard drive CAUTION: To prevent information loss or an unresponsive system: Shut down the computer before removing the hard drive from the hard drive. 38 Chapter 5 Maintenance Save your work and shut down the...
Getting Started HP Notebook
Page 47
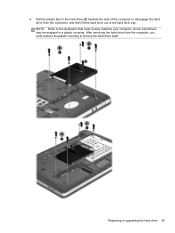
NOTE: Refer to access the hard drive itself. After removing the hard drive from the connector, and then lift the hard drive out of the computer to disengage the hard drive from the computer, you must remove the plastic covering to the illustration that most closely matches your computer. Pull the plastic tab on the hard drive (2) towards the side of the hard drive bay. Some hard drives may be wrapped in a plastic covering. Replacing or upgrading the hard drive 39 6.
NOTE: Refer to access the hard drive itself. After removing the hard drive from the connector, and then lift the hard drive out of the computer to disengage the hard drive from the computer, you must remove the plastic covering to the illustration that most closely matches your computer. Pull the plastic tab on the hard drive (2) towards the side of the hard drive bay. Some hard drives may be wrapped in a plastic covering. Replacing or upgrading the hard drive 39 6.
Getting Started HP Notebook
Page 49
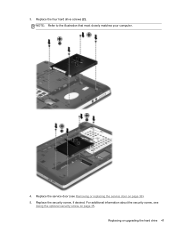
3. Replace the service door (see Using the optional security screw on page 36). 5. Replacing or upgrading the hard drive 41 Replace the four hard drive screws (2). For additional information about the security screw, see Removing or replacing the service door on page 35. NOTE: Refer to the illustration that most closely matches your computer. 4. Replace the security screw, if desired.
3. Replace the service door (see Using the optional security screw on page 36). 5. Replacing or upgrading the hard drive 41 Replace the four hard drive screws (2). For additional information about the security screw, see Removing or replacing the service door on page 35. NOTE: Refer to the illustration that most closely matches your computer. 4. Replace the security screw, if desired.
Getting Started HP Notebook
Page 65
... jack 12 audio-out (headphone) jack 12 B Backup and Restore 49 battery removing 33 replacing 33 battery bay 19 battery release latches 19 Bluetooth label 54 bottom part locations, identifying 20 buttons left TouchPad 4 optical drive eject 13, 14 power 7, 9 right TouchPad 4 TouchPad on/off 4 Web browser 8,... fingerprint reader, identifying 8, 9 fn key, identifying 10, 11, 26, 27 function keys identifying 10, 11 H hard drive installing 40 removing 38 hard drive bay, identifying 19 hard drive recovery 51 HDMI port, identifying 15, 16 hot keys adjusting volume 27 audio CD, DVD, or BD controls 27 ...
... jack 12 audio-out (headphone) jack 12 B Backup and Restore 49 battery removing 33 replacing 33 battery bay 19 battery release latches 19 Bluetooth label 54 bottom part locations, identifying 20 buttons left TouchPad 4 optical drive eject 13, 14 power 7, 9 right TouchPad 4 TouchPad on/off 4 Web browser 8,... fingerprint reader, identifying 8, 9 fn key, identifying 10, 11, 26, 27 function keys identifying 10, 11 H hard drive installing 40 removing 38 hard drive bay, identifying 19 hard drive recovery 51 HDMI port, identifying 15, 16 hot keys adjusting volume 27 audio CD, DVD, or BD controls 27 ...
Getting Started HP Notebook
Page 66
L labels Bluetooth 54 HP Mobile Broadband Module 54 Microsoft Certificate of Authenticity 54 regulatory 54 serial number 54 SIM 54 wireless certification 54 WLAN 54 lights AC adapter 13, 16 caps lock 5, 6 drive 12 optical drive 13, 14 power 5, 6 TouchPad 5, 6 Web browser 5, 6 webcam 17, 18 wireless 5, 6 M Media Card... the hard drive 51 RJ-45 (network) jack, identifying 15, 16 S screen brightness keys 26 screen image, switching 26 scrolling TouchPad gesture 32 security cable slot 15, 16 security screw 35 serial number 54 serial number, computer 54 service door 36, 54 removing 36 replacing 37 ...
L labels Bluetooth 54 HP Mobile Broadband Module 54 Microsoft Certificate of Authenticity 54 regulatory 54 serial number 54 SIM 54 wireless certification 54 WLAN 54 lights AC adapter 13, 16 caps lock 5, 6 drive 12 optical drive 13, 14 power 5, 6 TouchPad 5, 6 Web browser 5, 6 webcam 17, 18 wireless 5, 6 M Media Card... the hard drive 51 RJ-45 (network) jack, identifying 15, 16 S screen brightness keys 26 screen image, switching 26 scrolling TouchPad gesture 32 security cable slot 15, 16 security screw 35 serial number 54 serial number, computer 54 service door 36, 54 removing 36 replacing 37 ...
HP Notebook User Guide - Linux
Page 7
... power ...47 Testing an AC adapter ...48 7 Drives ...49 Handling drives ...49 Using the optional security screw ...50 Removing or replacing the service door 50 Removing the service door 51 Replacing the service door 51 Replacing or upgrading the hard drive 53 Removing the hard drive ...53 Installing a hard drive ...55 Using optical drives (select models only 57 Identifying the installed optical...
... power ...47 Testing an AC adapter ...48 7 Drives ...49 Handling drives ...49 Using the optional security screw ...50 Removing or replacing the service door 50 Removing the service door 51 Replacing the service door 51 Replacing or upgrading the hard drive 53 Removing the hard drive ...53 Installing a hard drive ...55 Using optical drives (select models only 57 Identifying the installed optical...
HP Notebook User Guide - Linux
Page 29
...fan starts up automatically to cycle on and off during routine operation. It is normal for use in your country or region. If you replace the module and then receive a warning message, remove the module to cool internal components. Bottom 19 Bottom Component (1) (2) (3) (4) ... the computer by the governmental agency that regulates wireless devices in the computer by sliding the release latches a second time. Protects the hard drive bay, the wireless LAN (WLAN) module slot, and the memory module slots. Contains the battery. Enable airflow to restore computer functionality...
...fan starts up automatically to cycle on and off during routine operation. It is normal for use in your country or region. If you replace the module and then receive a warning message, remove the module to cool internal components. Bottom 19 Bottom Component (1) (2) (3) (4) ... the computer by the governmental agency that regulates wireless devices in the computer by sliding the release latches a second time. Protects the hard drive bay, the wireless LAN (WLAN) module slot, and the memory module slots. Contains the battery. Enable airflow to restore computer functionality...
HP Notebook User Guide - Linux
Page 60
... CAUTION: To prevent information loss or an unresponsive system: Save your work and shut down the computer through the operating system before adding or replacing a memory module or hard drive. Then shut down the computer before removing the battery. 2. Remove the security screw from inside the battery bay. To use the security screw...
... CAUTION: To prevent information loss or an unresponsive system: Save your work and shut down the computer through the operating system before adding or replacing a memory module or hard drive. Then shut down the computer before removing the battery. 2. Remove the security screw from inside the battery bay. To use the security screw...
HP Notebook User Guide - Linux
Page 61
... the service door: 1. For additional information about the security screw, see Using the optional security screw on page 43). 2. Replacing the service door Replace the service door after accessing the memory module slot, hard drive, regulatory label, and other components. NOTE: The release latches automatically lock the service door into place (3). Removing the service...
... the service door: 1. For additional information about the security screw, see Using the optional security screw on page 43). 2. Replacing the service door Replace the service door after accessing the memory module slot, hard drive, regulatory label, and other components. NOTE: The release latches automatically lock the service door into place (3). Removing the service...

HP Notebook User Guide - Linux
Page 63
... the computer is on, in the Suspend state, or in Hibernation, turn the computer on page 50.) 5. Replacing or upgrading the hard drive 53 Then shut down the computer before removing the hard drive from the hard drive. Removing the hard drive 1. Disconnect AC power and external devices connected to the computer. 3. Remove the battery. (See Inserting or removing...
... the computer is on, in the Suspend state, or in Hibernation, turn the computer on page 50.) 5. Replacing or upgrading the hard drive 53 Then shut down the computer before removing the hard drive from the hard drive. Removing the hard drive 1. Disconnect AC power and external devices connected to the computer. 3. Remove the battery. (See Inserting or removing...

HP Notebook User Guide - Linux
Page 65
Replacing or upgrading the hard drive 55 Insert the hard drive into the hard drive bay. 2. Pull the plastic tab on the hard drive (1) towards the center of the computer to engage the hard drive with the connector. Installing a hard drive 1.
Replacing or upgrading the hard drive 55 Insert the hard drive into the hard drive bay. 2. Pull the plastic tab on the hard drive (1) towards the center of the computer to engage the hard drive with the connector. Installing a hard drive 1.


