
HP USB Digital Drive
Page 9
Gently unplug the Digital Drive from the USB port. ✎ If the USB connector cable is flashing. 1. Select the "Safely Remove Hardware" icon on its track for safe storage. 8 User Guide Select the Digital Drive and wait until the "Safe to remove the Digital Drive when the status light on your taskbar. A dialog box displays a list of connected devices. 2. Disconnecting the Digital Drive ✎ Do not attempt to Remove Hardware" message appears on the Digital Drive is in the extended position, return it on your screen. 3.
Gently unplug the Digital Drive from the USB port. ✎ If the USB connector cable is flashing. 1. Select the "Safely Remove Hardware" icon on its track for safe storage. 8 User Guide Select the Digital Drive and wait until the "Safe to remove the Digital Drive when the status light on your taskbar. A dialog box displays a list of connected devices. 2. Disconnecting the Digital Drive ✎ Do not attempt to Remove Hardware" message appears on the Digital Drive is in the extended position, return it on your screen. 3.
Using LightScribe (Select Models Only)
Page 10
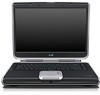
... PC while LightScribe is displayed, along with the appearance of the image. ✎ To remove an image from the label, click the image and then press Delete on Your Notebook Using LightScribe 12. The estimated time to and select an image file. 13. Click and drag the image to the desired area on -screen...
... PC while LightScribe is displayed, along with the appearance of the image. ✎ To remove an image from the label, click the image and then press Delete on Your Notebook Using LightScribe 12. The estimated time to and select an image file. 13. Click and drag the image to the desired area on -screen...
Hardware and Software Guide
Page 35
... an external device. ■ Do not insert or remove a CD, DVD, PC Card, ExpressCard, or digital memory card. Restoring from hibernation takes a little longer than resuming from standby but is a recommended precaution. When the notebook is running on the hard drive and then shuts down...it may not be possible to the screen. ■ If the notebook is turned off, Windows loads. Hibernation saves your work is returned to resume from hibernation, your place manually after 30 minutes of notebook inactivity or whenever the notebook reaches a critical low-battery condition. ...
... an external device. ■ Do not insert or remove a CD, DVD, PC Card, ExpressCard, or digital memory card. Restoring from hibernation takes a little longer than resuming from standby but is a recommended precaution. When the notebook is running on the hard drive and then shuts down...it may not be possible to the screen. ■ If the notebook is turned off, Windows loads. Hibernation saves your work is returned to resume from hibernation, your place manually after 30 minutes of notebook inactivity or whenever the notebook reaches a critical low-battery condition. ...
Hardware and Software Guide
Page 57
When you leave your work : ■ Run the notebook on external power instead of a battery pack whenever possible. ■ Prevent devices you are not plugged into an external power source. ❏ Stop, disable, or remove an inserted ◆ PC Card. ◆ Digital memory card (select models only). &#...that a battery pack can be adjusted with the volume buttons. ■ Minimize screen brightness. Volume can run the notebook from a single charge, use the internal speakers, minimize system volume. To increase screen brightness, press the fn+f8 hotkey. ■ If you use the following ...
When you leave your work : ■ Run the notebook on external power instead of a battery pack whenever possible. ■ Prevent devices you are not plugged into an external power source. ❏ Stop, disable, or remove an inserted ◆ PC Card. ◆ Digital memory card (select models only). &#...that a battery pack can be adjusted with the volume buttons. ■ Minimize screen brightness. Volume can run the notebook from a single charge, use the internal speakers, minimize system volume. To increase screen brightness, press the fn+f8 hotkey. ■ If you use the following ...

Hardware and Software Guide
Page 58
... month or more than 2 weeks, remove and store the battery pack. Power Selecting Power Conservation Settings To set the notebook to use . To select a screen saver and a screen saver wait time: Select Start > Control Panel > Appearance and Themes > Display > Screen Saver tab, and then follow the... instructions on the screen. ■ Select or create a power scheme ...
... month or more than 2 weeks, remove and store the battery pack. Power Selecting Power Conservation Settings To set the notebook to use . To select a screen saver and a screen saver wait time: Select Start > Control Panel > Appearance and Themes > Display > Screen Saver tab, and then follow the... instructions on the screen. ■ Select or create a power scheme ...

Hardware and Software Guide
Page 69
...+f7 hotkey decreases the brightness of the notebook screen. The longer you hold down the fn+f8 hotkey, the more the screen dims. Decreasing screen brightness conserves power. Increasing Screen Brightness (fn+f8) The fn+f8 hotkey increases the brightness of the notebook screen. To control the play of an audio... down the fn+f7 hotkey, the more the screen brightens. Using the Media Activity Hotkeys (fn+f9 through fn+f12) The following 4 media activity hotkeys can remove it from the optical drive. For more information about inserting or removing a CD or DVD, refer to pause the ...
...+f7 hotkey decreases the brightness of the notebook screen. The longer you hold down the fn+f8 hotkey, the more the screen dims. Decreasing screen brightness conserves power. Increasing Screen Brightness (fn+f8) The fn+f8 hotkey increases the brightness of the notebook screen. To control the play of an audio... down the fn+f7 hotkey, the more the screen brightens. Using the Media Activity Hotkeys (fn+f9 through fn+f12) The following 4 media activity hotkeys can remove it from the optical drive. For more information about inserting or removing a CD or DVD, refer to pause the ...

Hardware and Software Guide
Page 96
...of the folders and files on the screen. Do you want to display a slide show of the pictures on a CD containing digital photographs, begin playing or the AutoPlay pop-up window is the operating system feature that determines how the notebook responds when you can be changed. ...open applications before playing a CD or a DVD. ■ Dock or undock the notebook from an optional docking device before or after playing a disc, not while playing a disc. For example, you access files on a removable storage device such as instructed on a CD containing data files. If the AutoPlay pop...
...of the folders and files on the screen. Do you want to display a slide show of the pictures on a CD containing digital photographs, begin playing or the AutoPlay pop-up window is the operating system feature that determines how the notebook responds when you can be changed. ...open applications before playing a CD or a DVD. ■ Dock or undock the notebook from an optional docking device before or after playing a disc, not while playing a disc. For example, you access files on a removable storage device such as instructed on a CD containing data files. If the AutoPlay pop...
Hardware and Software Guide
Page 170
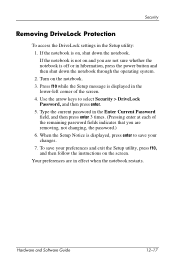
Security Removing DriveLock Protection To access the DriveLock settings in the lower-left corner of the remaining password fields indicates that you are not sure whether the notebook is displayed, press enter to select Security > DriveLock Password, and then press enter. 5. To... at each of the screen. 4. Type the current password in effect when the notebook restarts. Press f10 while the Setup message is on the screen. If the notebook is not on the notebook. 3. If the notebook is displayed in the Setup utility: 1. Your preferences are removing, not changing, the ...
Security Removing DriveLock Protection To access the DriveLock settings in the lower-left corner of the remaining password fields indicates that you are not sure whether the notebook is displayed, press enter to select Security > DriveLock Password, and then press enter. 5. To... at each of the screen. 4. Type the current password in effect when the notebook restarts. Press f10 while the Setup message is on the screen. If the notebook is not on the notebook. 3. If the notebook is displayed in the Setup utility: 1. Your preferences are removing, not changing, the ...
Hardware and Software Guide
Page 173
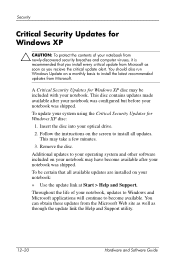
...and other software included on your notebook may take a few minutes. 3. Insert the disc into your notebook: » Use the update link at Start > Help and Support. Follow the instructions on your optical drive. 2. A Critical Security Updates for Windows XP disc: 1. Remove the disc. You can obtain ...these updates from the Microsoft Web site as well as you install every critical update from Microsoft. You should also run Windows Update on a monthly basis to install all available updates are installed on the screen to install the...
...and other software included on your notebook may take a few minutes. 3. Insert the disc into your notebook: » Use the update link at Start > Help and Support. Follow the instructions on your optical drive. 2. A Critical Security Updates for Windows XP disc: 1. Remove the disc. You can obtain ...these updates from the Microsoft Web site as well as you install every critical update from Microsoft. You should also run Windows Update on a monthly basis to install all available updates are installed on the screen to install the...

Hardware and Software Guide
Page 190
...you can delete the downloaded file from external power. ■ Do not shut down the notebook or initiate standby or hibernation. ■ Do not insert, remove, connect, or disconnect any device, cable, or cord. 14-8 Hardware and Software Guide To... complete the installation, follow the instructions on the screen. ✎ After a message on the screen reports a successful installation, you have downloaded. 8. In the folder containing your download, select the name or number of notebook...
...you can delete the downloaded file from external power. ■ Do not shut down the notebook or initiate standby or hibernation. ■ Do not insert, remove, connect, or disconnect any device, cable, or cord. 14-8 Hardware and Software Guide To... complete the installation, follow the instructions on the screen. ✎ After a message on the screen reports a successful installation, you have downloaded. 8. In the folder containing your download, select the name or number of notebook...

Hardware and Software Guide
Page 205
...remove smudges and lint, frequently clean your display with a damp cloth. To clean an external mouse that resembles the mouse in the following illustrations: 15-4 Hardware and Software Guide If the screen requires additional cleaning, use an antistatic screen cleaning product or premoistened antistatic wipes. Notebook... Care Display Ä CAUTION: To prevent permanent damage to your notebook, do not spray water, cleaning...
...remove smudges and lint, frequently clean your display with a damp cloth. To clean an external mouse that resembles the mouse in the following illustrations: 15-4 Hardware and Software Guide If the screen requires additional cleaning, use an antistatic screen cleaning product or premoistened antistatic wipes. Notebook... Care Display Ä CAUTION: To prevent permanent damage to your notebook, do not spray water, cleaning...
Hardware and Software Guide
Page 218
...passwords hub, USB 9-1 humidity specifications 17-1 I icons hotkey 3-4 multimedia 4-9 on the screen 3-15 identifying 1-7, 3-4 procedures 3-5 Quick Reference 3-4 using with external keyboard 3-11 HP administrator password. Index hibernation avoiding when using discs, diskettes 2-9, 4-17, 5-6 defined ...3-6 Quick Reference 3-4 switch image 3-7 hotkeys displaying functions on function keys 3-4 Power Meter 2-4, 2-14 Quick Launch Buttons 3-13 Safely Remove Hardware 6-4, 6-8 IDE drive light 1-2, 5-2 identifying components additional included hardware 1-17 bottom 1-14, 1-19 front 1-8 left-side 1-...
...passwords hub, USB 9-1 humidity specifications 17-1 I icons hotkey 3-4 multimedia 4-9 on the screen 3-15 identifying 1-7, 3-4 procedures 3-5 Quick Reference 3-4 using with external keyboard 3-11 HP administrator password. Index hibernation avoiding when using discs, diskettes 2-9, 4-17, 5-6 defined ...3-6 Quick Reference 3-4 switch image 3-7 hotkeys displaying functions on function keys 3-4 Power Meter 2-4, 2-14 Quick Launch Buttons 3-13 Safely Remove Hardware 6-4, 6-8 IDE drive light 1-2, 5-2 identifying components additional included hardware 1-17 bottom 1-14, 1-19 front 1-8 left-side 1-...


