
End User License Agreement
Page 2
... provided with the update or supplement. After upgrading, you must first be used for restoring the hard disk of a hard disk drive-based solution, an external media-based recovery solution (e.g. You shall not remove any term or condition of Authenticity. This EULA will prevail. 4. f. Recovery Solution. floppy disk... terminate upon conditions set forth elsewhere in this EULA or if you provide in the Software Product and user documentation are owned by HP or its affiliates may collect and use of a conflict between such terms, the other form, may not be governed by the ...
... provided with the update or supplement. After upgrading, you must first be used for restoring the hard disk of a hard disk drive-based solution, an external media-based recovery solution (e.g. You shall not remove any term or condition of Authenticity. This EULA will prevail. 4. f. Recovery Solution. floppy disk... terminate upon conditions set forth elsewhere in this EULA or if you provide in the Software Product and user documentation are owned by HP or its affiliates may collect and use of a conflict between such terms, the other form, may not be governed by the ...

Maintenance and Service Guide
Page 3
... PCI Card 2-7 Removing the Hard Disk Drive...2-9 Recovering the Factory Software...2-11 Replacing Small Parts ...2-12 Removing the Keyboard Cover...2-13 Removing the Speaker Assembly ...2-15 Removing the Keyboard ...2-16 Removing the Switchboard PCA ...2-19 Removing the CD/DVD Drive...2-20 Removing the Display Assembly...2-23 Removing the Top Case ...2-26 Removing the Floppy Drive...2-32 Removing the Infrared (I/R) PCA...2-36 Removing the Audio PCA...
... PCI Card 2-7 Removing the Hard Disk Drive...2-9 Recovering the Factory Software...2-11 Replacing Small Parts ...2-12 Removing the Keyboard Cover...2-13 Removing the Speaker Assembly ...2-15 Removing the Keyboard ...2-16 Removing the Switchboard PCA ...2-19 Removing the CD/DVD Drive...2-20 Removing the Display Assembly...2-23 Removing the Top Case ...2-26 Removing the Floppy Drive...2-32 Removing the Infrared (I/R) PCA...2-36 Removing the Audio PCA...
Maintenance and Service Guide
Page 4
... 2-39 Figure 2-33. Resetting the Notebook ...1-17 Figure 1-8. Disassembly Flow...2-3 Figure 2-2. Removing the Floppy Drive 2-33 Figure 2-23. Removing the Floppy Drive 2-35 Figure 2-24. Removing the Heat Sink (with Fan 2-41 Figure 2-27. AMD CPU Module Release 2-47 Figure 2-30. Removing the Mini PCI Card 2-8 Figure 2-7. Removing the Hard Disk Drive Tray 2-10 Figure 2-9. Removing the Switchboard PCA 2-18 Figure...
... 2-39 Figure 2-33. Resetting the Notebook ...1-17 Figure 1-8. Disassembly Flow...2-3 Figure 2-2. Removing the Floppy Drive 2-33 Figure 2-23. Removing the Floppy Drive 2-35 Figure 2-24. Removing the Heat Sink (with Fan 2-41 Figure 2-27. AMD CPU Module Release 2-47 Figure 2-30. Removing the Mini PCI Card 2-8 Figure 2-7. Removing the Hard Disk Drive Tray 2-10 Figure 2-9. Removing the Switchboard PCA 2-18 Figure...
Maintenance and Service Guide
Page 26
..., 8x DVD, CD-RW, or CD-RW/DVD drive (or higher) At least 128 MB SDRAM preinstalled HP Pavilion ze5x00, ze4x00, HP Compaq nx9010, nx9008, nx9005, Compaq Evo N1050v, Compaq Presario 2500, and Compaq Presario 2100: 2 slots for PC2100 DDR-266 SDRAM modules Up to 60-GB removable hard drive with 101/102 key emulation. to 1 GB...
..., 8x DVD, CD-RW, or CD-RW/DVD drive (or higher) At least 128 MB SDRAM preinstalled HP Pavilion ze5x00, ze4x00, HP Compaq nx9010, nx9008, nx9005, Compaq Evo N1050v, Compaq Presario 2500, and Compaq Presario 2100: 2 slots for PC2100 DDR-266 SDRAM modules Up to 60-GB removable hard drive with 101/102 key emulation. to 1 GB...
Maintenance and Service Guide
Page 31
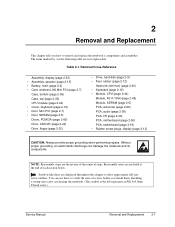
..., keyboard (page 2-16) • Door, Mini PCI (page 2-7) • Door, SDRAM (page 2-5) Doors, PCMCIA (page 2-60) Drive, CD/DVD (page 2-20) Drive, floppy (page 2-32) • Drive, hard disk (page 2-9) • Feet, rubber (page 2-12) Heat sink (with fan) (page 2-40) • Keyboard (page 2-16... performing repairs. Symbols like these to verify the sizes of the removal steps. Service Manual Removal and Replacement 2-1 Reassembly notes are displayed throughout this chapter to remove and replace the notebook's components and assemblies. The items marked by • in the...
..., keyboard (page 2-16) • Door, Mini PCI (page 2-7) • Door, SDRAM (page 2-5) Doors, PCMCIA (page 2-60) Drive, CD/DVD (page 2-20) Drive, floppy (page 2-32) • Drive, hard disk (page 2-9) • Feet, rubber (page 2-12) Heat sink (with fan) (page 2-40) • Keyboard (page 2-16... performing repairs. Symbols like these to verify the sizes of the removal steps. Service Manual Removal and Replacement 2-1 Reassembly notes are displayed throughout this chapter to remove and replace the notebook's components and assemblies. The items marked by • in the...
Maintenance and Service Guide
Page 39
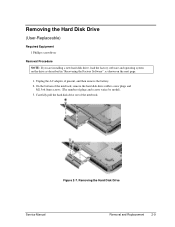
... model). 3. Figure 2-7. On the bottom of the notebook, remove the hard disk drive rubber screw plugs and M2.5×6.0mm screws. (The number of the notebook. Removing the Hard Disk Drive Service Manual Removal and Replacement 2-9 Removing the Hard Disk Drive (User-Replaceable) Required Equipment 1 Phillips screwdriver Removal Procedure NOTE: If you are installing a new hard disk drive, load the factory software and operating system...
... model). 3. Figure 2-7. On the bottom of the notebook, remove the hard disk drive rubber screw plugs and M2.5×6.0mm screws. (The number of the notebook. Removing the Hard Disk Drive Service Manual Removal and Replacement 2-9 Removing the Hard Disk Drive (User-Replaceable) Required Equipment 1 Phillips screwdriver Removal Procedure NOTE: If you are installing a new hard disk drive, load the factory software and operating system...
Maintenance and Service Guide
Page 40
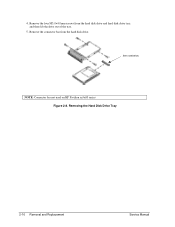
Remove the four M3.0×4.0mm screws from the hard disk drive. See note below NOTE: Connector bar not used on HP Pavilion ze5x00 series Figure 2-8. Remove the connector bar from the hard disk drive and hard disk drive tray, and then lift the drive out of the tray. 5. Removing the Hard Disk Drive Tray 2-10 Removal and Replacement Service Manual 4.
Remove the four M3.0×4.0mm screws from the hard disk drive. See note below NOTE: Connector bar not used on HP Pavilion ze5x00 series Figure 2-8. Remove the connector bar from the hard disk drive and hard disk drive tray, and then lift the drive out of the tray. 5. Removing the Hard Disk Drive Tray 2-10 Removal and Replacement Service Manual 4.
Maintenance and Service Guide
Page 41
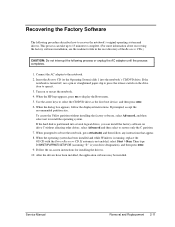
...When the operating system has been installed and while Windows is not enabled, select Start > Run. If the hard disk is partitioned into the notebook's CD/DVD drive. If autorun is running, replace the OS CD with the Driver Recovery CD. After the drivers have been ...Removal and Replacement 2-11 Recovering the Factory Software The following process or unplug the AC adapter until the process completes. 1. select Advanced and then select to the notebook. 2. Connect the AC adapter to restore only the C partition. 7. When the HP logo appears, press esc to select the CD/DVD drive...
...When the operating system has been installed and while Windows is not enabled, select Start > Run. If the hard disk is partitioned into the notebook's CD/DVD drive. If autorun is running, replace the OS CD with the Driver Recovery CD. After the drivers have been ...Removal and Replacement 2-11 Recovering the Factory Software The following process or unplug the AC adapter until the process completes. 1. select Advanced and then select to the notebook. 2. Connect the AC adapter to restore only the C partition. 7. When the HP logo appears, press esc to select the CD/DVD drive...
Maintenance and Service Guide
Page 54
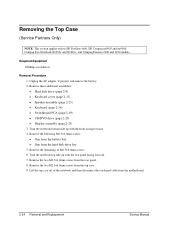
... One from the rear panel. 8. Remove the two M2.5×4.0mm screws from the hard disk drive bay 5. Remove the two M2.5×6.0mm screws from the motherboard. 2-24 Removal and Replacement Service Manual Lift the top case off of the notebook and then disconnect the touch pad cable...facing forward. 7. Turn the notebook bottom side up with the front facing forward. 4. Remove the remaining 14 M2.5×6.0mm screws. 6. Removing the Top Case (Service Partners Only) NOTE: This section applies only to HP Pavilion 4x00, HP Compaq nx9005 and nx9000, Compaq Evo Notebook N1050v and N1010v, and ...
... One from the rear panel. 8. Remove the two M2.5×4.0mm screws from the hard disk drive bay 5. Remove the two M2.5×6.0mm screws from the motherboard. 2-24 Removal and Replacement Service Manual Lift the top case off of the notebook and then disconnect the touch pad cable...facing forward. 7. Turn the notebook bottom side up with the front facing forward. 4. Remove the remaining 14 M2.5×6.0mm screws. 6. Removing the Top Case (Service Partners Only) NOTE: This section applies only to HP Pavilion 4x00, HP Compaq nx9005 and nx9000, Compaq Evo Notebook N1050v and N1010v, and ...
Maintenance and Service Guide
Page 56
...;7.0mm screws on the rear edge of the notebook CAUTION: The 16 screws removed in damage to follow this caution can result in step 4 are 3 different lengths. Be sure to HP Pavilion 5x00, HP Compaq nx9010 and HP nx9008, and Compaq Presario 2500 models. Remove these additional assemblies: • Hard disk drive (page 2-9) • Keyboard cover (page 2-13) •...
...;7.0mm screws on the rear edge of the notebook CAUTION: The 16 screws removed in damage to follow this caution can result in step 4 are 3 different lengths. Be sure to HP Pavilion 5x00, HP Compaq nx9010 and HP nx9008, and Compaq Presario 2500 models. Remove these additional assemblies: • Hard disk drive (page 2-9) • Keyboard cover (page 2-13) •...
Maintenance and Service Guide
Page 59
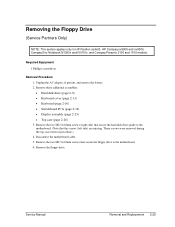
... screws (right side) that secure the hard disk drive guide to the motherboard. (Note that secure the floppy drive to HP Pavilion ze4x00, HP Compaq nx9005 and nx9000, Compaq Evo Notebook N1050v and N1010v, and Compaq Presario 2100 and 1100 models. Remove the floppy drive. These screws were removed during the top case removal procedure.) 4. Remove the two M2.5×4.0mm screws...
... screws (right side) that secure the hard disk drive guide to the motherboard. (Note that secure the floppy drive to HP Pavilion ze4x00, HP Compaq nx9005 and nx9000, Compaq Evo Notebook N1050v and N1010v, and Compaq Presario 2100 and 1100 models. Remove the floppy drive. These screws were removed during the top case removal procedure.) 4. Remove the two M2.5×4.0mm screws...
Maintenance and Service Guide
Page 100
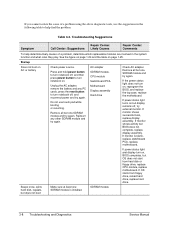
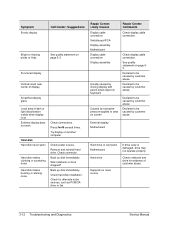
... start from floppy drive, reload hard drive, replace hard drive. 3-8 Troubleshooting and Diagnostics Service Manual Reinsert any PC cards, press the reset button to turn notebook off , try again. If monitor is installed. Troubleshooting Suggestions Symptom Call Center: Suggestions Repair Center: Likely Causes Repair Center: Comments To help find the problem. Unplug the AC adapter, remove the battery...
... start from floppy drive, reload hard drive, replace hard drive. 3-8 Troubleshooting and Diagnostics Service Manual Reinsert any PC cards, press the reset button to turn notebook off , try again. If monitor is installed. Troubleshooting Suggestions Symptom Call Center: Suggestions Repair Center: Likely Causes Repair Center: Comments To help find the problem. Unplug the AC adapter, remove the battery...
Maintenance and Service Guide
Page 101
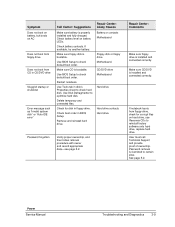
...: Likely Causes Battery or contacts Motherboard Floppy disk or floppy drive Motherboard. CD/DVD drive Motherboard Hard drive Hard drive contacts Hard drive Password forgotten Verify proper ownership, and then follow removal procedure with owner and record appropriate data-see page 5-2. If notebook boots from CD in BIOS Setup. Password removal is properly installed and fully charged. Make sure floppy disk...
...: Likely Causes Battery or contacts Motherboard Floppy disk or floppy drive Motherboard. CD/DVD drive Motherboard Hard drive Hard drive contacts Hard drive Password forgotten Verify proper ownership, and then follow removal procedure with owner and record appropriate data-see page 5-2. If notebook boots from CD in BIOS Setup. Password removal is properly installed and fully charged. Make sure floppy disk...
Maintenance and Service Guide
Page 104
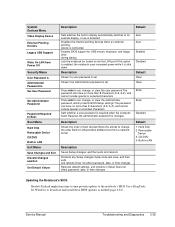
... caused by customer abuse. Check for evidence of display. Remove and reinstall hard drive. Declared to be caused by customer abuse. Press Fn+F5 several times. External display Motherboard Hard drive or connector Motherboard Hard drive Depends on noise source If drive case is on page 5-3. Was notebook or drive dropped? See quality statement on External display does not work...
... caused by customer abuse. Check for evidence of display. Remove and reinstall hard drive. Declared to be caused by customer abuse. Press Fn+F5 several times. External display Motherboard Hard drive or connector Motherboard Hard drive Depends on noise source If drive case is on page 5-3. Was notebook or drive dropped? See quality statement on External display does not work...
Maintenance and Service Guide
Page 127
...from Power Off Security Menu User Password is Administrator Password is Set User Password Set Administrator Password Password Required to Boot Boot Menu Hard Disk Removable Device CD/DVD Built-in LAN Exit Menu Save Changes and Exit Discard Changes and Exit Get Default Values Description Default Sets ...an external pointing device is connected Enables BIOS support for USB mouse, keyboard, and floppy drive during startup Lets the notebook be turned on via the LAN port If this option is enabled, the notebook uses increased power while it is shut down Description Shows if a user password is ...
...from Power Off Security Menu User Password is Administrator Password is Set User Password Set Administrator Password Password Required to Boot Boot Menu Hard Disk Removable Device CD/DVD Built-in LAN Exit Menu Save Changes and Exit Discard Changes and Exit Get Default Values Description Default Sets ...an external pointing device is connected Enables BIOS support for USB mouse, keyboard, and floppy drive during startup Lets the notebook be turned on via the LAN port If this option is enabled, the notebook uses increased power while it is shut down Description Shows if a user password is ...
Hard Drive White Paper
Page 3
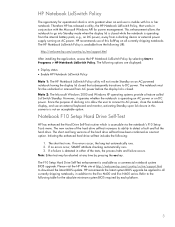
... or removed from AC power before the display lid is available as one test option. Note 2: The Microsoft Windows 2000 and Windows XP operating systems provide a feature called Lid Switch Standby. Initiating the enhanced hard drive self-test includes the following options are displayed: • Display status • Enable HP Notebook LidSwitch Policy Note 1: The HP Notebook...
... or removed from AC power before the display lid is available as one test option. Note 2: The Microsoft Windows 2000 and Windows XP operating systems provide a feature called Lid Switch Standby. Initiating the enhanced hard drive self-test includes the following options are displayed: • Display status • Enable HP Notebook LidSwitch Policy Note 1: The HP Notebook...
Hard Drive White Paper
Page 4
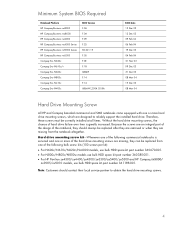
... HP Pavilion ze4300/ze4400/ze4500/ze5300/ze5400/ze5500 and HP Compaq nx9000/ nx9005/nx9010 models, use bulk HDD spare kit part number 361188-001. Note: Customers should always be replaced after they are removed or when they are missing from one of the following commercial notebooks is greatly increased. Without the hard drive mounting screws, the chance of hard drive...
... HP Pavilion ze4300/ze4400/ze4500/ze5300/ze5400/ze5500 and HP Compaq nx9000/ nx9005/nx9010 models, use bulk HDD spare kit part number 361188-001. Note: Customers should always be replaced after they are removed or when they are missing from one of the following commercial notebooks is greatly increased. Without the hard drive mounting screws, the chance of hard drive...
Hard Drive White Paper
Page 5
... to removable media. • Regularly check the HP Web site for information on how to the following Microsoft Knowledge Base articles for system BIOS and driver enhancements. 5 Please refer to the hard drive. Windows XP command line: http://support.microsoft.com/default.aspx?scid=kb;EN-US;283080 - HP Recommendations for Notebook Users • Install HP Notebook LidSwitch...
... to removable media. • Regularly check the HP Web site for information on how to the following Microsoft Knowledge Base articles for system BIOS and driver enhancements. 5 Please refer to the hard drive. Windows XP command line: http://support.microsoft.com/default.aspx?scid=kb;EN-US;283080 - HP Recommendations for Notebook Users • Install HP Notebook LidSwitch...
HP Pavilion ze4x00, ze5x00 and specific xt notebook series - Startup Guide
Page 4
... YOU DO NOT AGREE WITH THE TERMS OF THE LICENSE AGREEMENT, YOU MUST NOW EITHER REMOVE THE SOFTWARE FROM YOUR HARD DRIVE AND DESTROY THE MASTER DISKETTES, OR RETURN THE COMPLETE HP PRODUCT AND SOFTWARE FOR A FULL REFUND. For a PC supplied with a Microsoft operating system: When you under the Microsoft License Agreement contained in no...
... YOU DO NOT AGREE WITH THE TERMS OF THE LICENSE AGREEMENT, YOU MUST NOW EITHER REMOVE THE SOFTWARE FROM YOUR HARD DRIVE AND DESTROY THE MASTER DISKETTES, OR RETURN THE COMPLETE HP PRODUCT AND SOFTWARE FOR A FULL REFUND. For a PC supplied with a Microsoft operating system: When you under the Microsoft License Agreement contained in no...
HP Pavilion ze4x00, ze5x00 and specific xt notebook series - Startup Guide
Page 36
..., you want to scan, select File > Properties, then select the Check Now box under the Error-checking section of the notebook. • Remove and reinsert the hard drive. Select Start > Turn Off Computer > Restart. If the pointer is connected, the built-in or external devices. If files... are disabled. If this setting with your notebook. You can format the hard drive and reinstall the original factory software using the...
..., you want to scan, select File > Properties, then select the Check Now box under the Error-checking section of the notebook. • Remove and reinsert the hard drive. Select Start > Turn Off Computer > Restart. If the pointer is connected, the built-in or external devices. If files... are disabled. If this setting with your notebook. You can format the hard drive and reinstall the original factory software using the...


