HP Notebook Series - Maintenance, Shipping and Travel Guide
Page 7
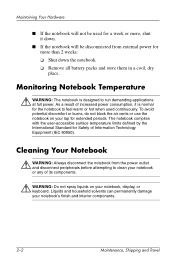
... increased power consumption, it down the notebook. ❏ Remove all battery packs and store them in a cool, dry place. The notebook complies with the user-accessible surface temperature limits defined by the International Standard for extended periods. Monitoring Notebook Temperature Å WARNING: The notebook is normal for the notebook to feel warm or hot when used...
... increased power consumption, it down the notebook. ❏ Remove all battery packs and store them in a cool, dry place. The notebook complies with the user-accessible surface temperature limits defined by the International Standard for extended periods. Monitoring Notebook Temperature Å WARNING: The notebook is normal for the notebook to feel warm or hot when used...
HP Notebook Series - Maintenance, Shipping and Travel Guide
Page 13
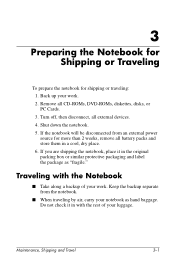
...packaging and label the package as hand baggage. Back up your notebook as "fragile." Remove all external devices. 4. 3 Preparing the Notebook for Shipping or Traveling To prepare the notebook for more than 2 weeks, remove all battery packs and store them in a cool, dry place. 6. Turn... off, then disconnect, all CD-ROMs, DVD-ROMs, diskettes, disks, or PC Cards. 3. If the notebook will be disconnected from the notebook. &#...
...packaging and label the package as hand baggage. Back up your notebook as "fragile." Remove all external devices. 4. 3 Preparing the Notebook for Shipping or Traveling To prepare the notebook for more than 2 weeks, remove all battery packs and store them in a cool, dry place. 6. Turn... off, then disconnect, all CD-ROMs, DVD-ROMs, diskettes, disks, or PC Cards. 3. If the notebook will be disconnected from the notebook. &#...
Reference Guide
Page 3
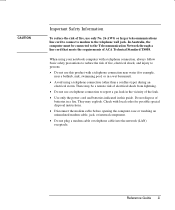
..., use a telephone connection to report a gas leak in the vicinity of the leak. • Use only the power cord and batteries indicated in this product with a telephone connection near water (for possible special disposal instructions. • Disconnect the modem cable before opening ... wall jack. They may be connected to the Telecommunication Network through a line cord that meets the requirements of batteries in a wet basement). • Avoid using your notebook computer with a telephone connection, always follow basic safety precautions to reduce the risk of fire, electrical shock, ...
..., use a telephone connection to report a gas leak in the vicinity of the leak. • Use only the power cord and batteries indicated in this product with a telephone connection near water (for possible special disposal instructions. • Disconnect the modem cable before opening ... wall jack. They may be connected to the Telecommunication Network through a line cord that meets the requirements of batteries in a wet basement). • Avoid using your notebook computer with a telephone connection, always follow basic safety precautions to reduce the risk of fire, electrical shock, ...

Reference Guide
Page 7
... components 6 Status lights...8 Setting Up Your Notebook 10 Step 1: Insert the battery 10 Step 2: Connect AC power 11 Step 3: Connect a phone line 12 Step 4: Turn on the notebook 13 Step 5: Set up Windows 13 Basic Operation ...15 Operating Your Notebook 16 Default power settings 16 To reset the notebook 17 To change the boot device...
... components 6 Status lights...8 Setting Up Your Notebook 10 Step 1: Insert the battery 10 Step 2: Connect AC power 11 Step 3: Connect a phone line 12 Step 4: Turn on the notebook 13 Step 5: Set up Windows 13 Basic Operation ...15 Operating Your Notebook 16 Default power settings 16 To reset the notebook 17 To change the boot device...

Reference Guide
Page 8
... 28 To clean your notebook 28 Batteries and Power Management 29 Managing Power Consumption 30 How the notebook manages power automatically 30 Using Battery Power 32 To check battery status 32 To respond to a low-battery warning 33 To recharge the battery 33 To get the most from your batteries 34 Modem and Network ...44 To prepare for Bluetooth connections 45 To send or receive files using Bluetooth 46 Add-On Devices ...47 Connecting PC Cards 48 To insert or remove a PC Card 48 Connecting External Devices 50 To connect an audio device 50 To use an external monitor 52 To connect an...
... 28 To clean your notebook 28 Batteries and Power Management 29 Managing Power Consumption 30 How the notebook manages power automatically 30 Using Battery Power 32 To check battery status 32 To respond to a low-battery warning 33 To recharge the battery 33 To get the most from your batteries 34 Modem and Network ...44 To prepare for Bluetooth connections 45 To send or receive files using Bluetooth 46 Add-On Devices ...47 Connecting PC Cards 48 To insert or remove a PC Card 48 Connecting External Devices 50 To connect an audio device 50 To use an external monitor 52 To connect an...
Reference Guide
Page 9
... area network (LAN) problems 72 Memory problems 73 Modem problems 73 PC Card problems 76 Performance problems 76 Power and battery problems 77 Printing problems 79 Serial, parallel, and USB problems 80 Startup problems 81 Wireless problems 82 Configuring Your Notebook 84 To run the BIOS Setup utility 84 To change video memory...
... area network (LAN) problems 72 Memory problems 73 Modem problems 73 PC Card problems 76 Performance problems 76 Power and battery problems 77 Printing problems 79 Serial, parallel, and USB problems 80 Startup problems 81 Wireless problems 82 Configuring Your Notebook 84 To run the BIOS Setup utility 84 To change video memory...
Reference Guide
Page 12
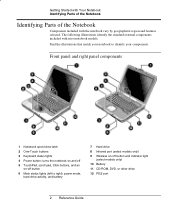
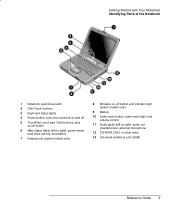
.../close latch 2 One-Touch buttons 3 Keyboard status lights 4 Power button: turns the notebook on and off 5 TouchPad, scroll pad, Click buttons, and an on -off button and indicator light (select models only) 10 Battery 11 CD-ROM, DVD, or other drive 12 PS/2 port 2 Reference Guide Find ...the illustrations that match your notebook to right): power mode, hard drive activity, and battery 7 Hard drive 8 Infrared port (select models only) 9 Wireless on -off button 6 Main status lights (left to identify your components. The ...
.../close latch 2 One-Touch buttons 3 Keyboard status lights 4 Power button: turns the notebook on and off 5 TouchPad, scroll pad, Click buttons, and an on -off button and indicator light (select models only) 10 Battery 11 CD-ROM, DVD, or other drive 12 PS/2 port 2 Reference Guide Find ...the illustrations that match your notebook to right): power mode, hard drive activity, and battery 7 Hard drive 8 Infrared port (select models only) 9 Wireless on -off button 6 Main status lights (left to identify your components. The ...
Reference Guide
Page 13
...2 One-Touch buttons 3 Keyboard status lights 4 Power button: turns the notebook on and off 5 TouchPad, scroll pad, Click buttons, plus on-off button 6 Main status lights (left to right): power mode, hard drive activity, and battery 7 Infrared port (select models only) 8 Wireless on-off button and ...indicator light (select models only) 9 Battery 10 Audio mute button, audio mute light, and volume control 11 Audio jacks (left to right...
...2 One-Touch buttons 3 Keyboard status lights 4 Power button: turns the notebook on and off 5 TouchPad, scroll pad, Click buttons, plus on-off button 6 Main status lights (left to right): power mode, hard drive activity, and battery 7 Infrared port (select models only) 8 Wireless on-off button and ...indicator light (select models only) 9 Battery 10 Audio mute button, audio mute light, and volume control 11 Audio jacks (left to right...
Reference Guide
Page 16
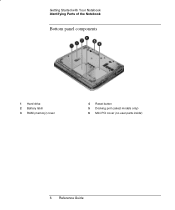
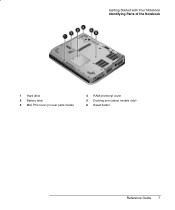
Getting Started with Your Notebook Identifying Parts of the Notebook Bottom panel components 1 Hard drive 2 Battery latch 3 RAM (memory) cover 4 Reset button 5 Docking port (select models only) 6 Mini PCI cover (no user parts inside) 6 Reference Guide
Getting Started with Your Notebook Identifying Parts of the Notebook Bottom panel components 1 Hard drive 2 Battery latch 3 RAM (memory) cover 4 Reset button 5 Docking port (select models only) 6 Mini PCI cover (no user parts inside) 6 Reference Guide
Reference Guide
Page 17
Getting Started with Your Notebook Identifying Parts of the Notebook 1 Hard drive 2 Battery latch 3 Mini PCI cover (no user parts inside) 4 RAM (memory) cover 5 Docking port (select models only) 6 Reset button Reference Guide 7
Getting Started with Your Notebook Identifying Parts of the Notebook 1 Hard drive 2 Battery latch 3 Mini PCI cover (no user parts inside) 4 RAM (memory) cover 5 Docking port (select models only) 6 Reset button Reference Guide 7
Reference Guide
Page 18
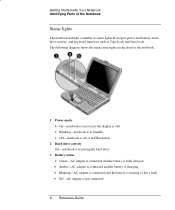
... Started with Your Notebook Identifying Parts of the Notebook Status lights The notebook includes a number of the notebook. 1 Power mode • On-notebook is on (even if the display is off) • Blinking-notebook is in Standby • Off-notebook is off or in Hibernation 2 Hard drive activity On-notebook is accessing the hard drive 3 Battery status • Green...
... Started with Your Notebook Identifying Parts of the Notebook Status lights The notebook includes a number of the notebook. 1 Power mode • On-notebook is on (even if the display is off) • Blinking-notebook is in Standby • Off-notebook is off or in Hibernation 2 Hard drive activity On-notebook is accessing the hard drive 3 Battery status • Green...
Reference Guide
Page 20
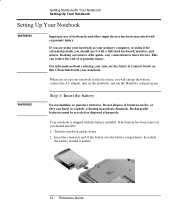
... be recycled or disposed of batteries in until it with ergonomic injury. Your notebook is shipped with your notebook. Turn the notebook upside down. 2. Do not dispose of properly. If the battery has been removed, you should use of keyboards and other input devices has been associated with a ... Reference Guide When you set up your notebook for extended periods, you are using it : 1. WARNING Step 1: Insert the battery Do not mutilate or puncture batteries. This can reduce the risk of the battery into the battery compartment, then slide the battery in fire, or they can burst or...
... be recycled or disposed of batteries in until it with ergonomic injury. Your notebook is shipped with your notebook. Turn the notebook upside down. 2. Do not dispose of properly. If the battery has been removed, you should use of keyboards and other input devices has been associated with a ... Reference Guide When you set up your notebook for extended periods, you are using it : 1. WARNING Step 1: Insert the battery Do not mutilate or puncture batteries. This can reduce the risk of the battery into the battery compartment, then slide the battery in fire, or they can burst or...
Reference Guide
Page 21
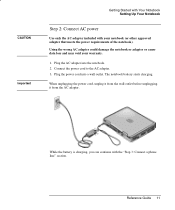
Plug the AC adapter into a wall outlet. Plug the power cord into the notebook. 2. The notebook battery starts charging. While the battery is charging, you can continue with your warranty. 1. When unplugging the power cord, unplug it from the wall outlet before unplugging it from the AC ...
Plug the AC adapter into a wall outlet. Plug the power cord into the notebook. 2. The notebook battery starts charging. While the battery is charging, you can continue with your warranty. 1. When unplugging the power cord, unplug it from the wall outlet before unplugging it from the AC ...
Reference Guide
Page 23
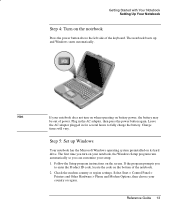
... Panel > Printers and Other Hardware > Phone and Modem Options, then choose your setup. 1. Hint If your notebook, the Windows Setup program runs automatically so you to fully charge the battery. Leave the AC adapter plugged in the AC adapter, then press the power button again. The first time you... turn on your notebook does not turn on when operating on the bottom of the notebook. 2. The notebook boots up Windows Your notebook has the Microsoft ...
... Panel > Printers and Other Hardware > Phone and Modem Options, then choose your setup. 1. Hint If your notebook, the Windows Setup program runs automatically so you to fully charge the battery. Leave the AC adapter plugged in the AC adapter, then press the power button again. The first time you... turn on your notebook does not turn on when operating on the bottom of the notebook. 2. The notebook boots up Windows Your notebook has the Microsoft ...

Reference Guide
Page 25
OFF-Power status light will turn off . Power status light will turn off . Press Fn+F12. -or- See the "Batteries and Power Management" chapter in RAM. • Restarts quickly. • Restores network connections. • Saves maximum power. • Saves current session ...out. Default power settings Power mode ON-Power status light will blink. To enter this guide. 16 Reference Guide Basic Operation Operating Your Notebook Operating Your Notebook You can also customize the way these power modes work. If the unit is already on . Hibernation- Select Start > Turn Off ...
OFF-Power status light will turn off . Power status light will turn off . Press Fn+F12. -or- See the "Batteries and Power Management" chapter in RAM. • Restarts quickly. • Restores network connections. • Saves maximum power. • Saves current session ...out. Default power settings Power mode ON-Power status light will blink. To enter this guide. 16 Reference Guide Basic Operation Operating Your Notebook Operating Your Notebook You can also customize the way these power modes work. If the unit is already on . Hibernation- Select Start > Turn Off ...

Reference Guide
Page 32
... CD Creator that lets you play DVD movies. Reference Guide 23 Hint Important Basic Operation Using CDs or DVDs To play DVD movies If your notebook is equipped with a DVD/CD-RW combo drive, it also includes a DVD player software that lets you copy or create CDs. When you are included... DVD drive, and will be permanent. Refer to Portable/Laptop. Follow the instructions that are trying to the region code will be hard-coded on battery power, set the Control Panel power scheme to the Help for details about setting region codes. If you get a region code error, you reach this...
... CD Creator that lets you play DVD movies. Reference Guide 23 Hint Important Basic Operation Using CDs or DVDs To play DVD movies If your notebook is equipped with a DVD/CD-RW combo drive, it also includes a DVD player software that lets you copy or create CDs. When you are included... DVD drive, and will be permanent. Refer to Portable/Laptop. Follow the instructions that are trying to the region code will be hard-coded on battery power, set the Control Panel power scheme to the Help for details about setting region codes. If you get a region code error, you reach this...
Reference Guide
Page 36
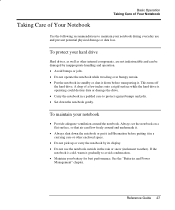
...• Avoid bumps or jolts. • Do not operate the notebook while traveling over bumpy terrain. • Put the notebook in standby or shut it down the notebook gently. See the "Batteries and Power Management" chapter. If the notebook is operating could destroy data or damage the drive. • Carry ... by its display. • Do not use and prevent potential physical damage or data loss. To maintain your battery for best performance. Basic Operation Taking Care of Your Notebook Taking Care of a few inches onto a rigid surface while the hard drive is cold, warm it gradually to...
...• Avoid bumps or jolts. • Do not operate the notebook while traveling over bumpy terrain. • Put the notebook in standby or shut it down the notebook gently. See the "Batteries and Power Management" chapter. If the notebook is operating could destroy data or damage the drive. • Carry ... by its display. • Do not use and prevent potential physical damage or data loss. To maintain your battery for best performance. Basic Operation Taking Care of Your Notebook Taking Care of a few inches onto a rigid surface while the hard drive is cold, warm it gradually to...
Reference Guide
Page 37
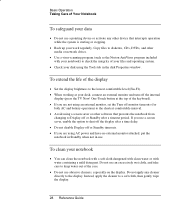
... the internal display (press the TV Now! If you are not using an external monitor, set the Turn off monitor timeouts (for both AC and battery operation) to the shortest comfortable interval. • Avoid using a screen saver or other software that interrupts operation while the system is starting or stopping... the life of the display • Set the display brightness to the lowest comfortable level (Fn+F1). • When working at the top of Your Notebook To safeguard your data • Do not use a screen saver, enable the option to Display-off or Standby after a time delay. • Do...
... the internal display (press the TV Now! If you are not using an external monitor, set the Turn off monitor timeouts (for both AC and battery operation) to the shortest comfortable interval. • Avoid using a screen saver or other software that interrupts operation while the system is starting or stopping... the life of the display • Set the display brightness to the lowest comfortable level (Fn+F1). • When working at the top of Your Notebook To safeguard your data • Do not use a screen saver, enable the option to Display-off or Standby after a time delay. • Do...

Reference Guide
Page 39
... you reduce power consumption and extend battery life. How the notebook manages power automatically Your notebook enters Hibernation and Standby automatically, and turns off the hard drive and display based on battery power, you can adjust these timeouts to suit your notebook to your current session. To resume...occurs for the specified interval The hard drive is not accessed for the specified interval The notebook stays in RAM, and turns off the display and other components to conserve battery power and extend the life of saving your work before allowing your working habits. Turns...
... you reduce power consumption and extend battery life. How the notebook manages power automatically Your notebook enters Hibernation and Standby automatically, and turns off the hard drive and display based on battery power, you can adjust these timeouts to suit your notebook to your current session. To resume...occurs for the specified interval The hard drive is not accessed for the specified interval The notebook stays in RAM, and turns off the display and other components to conserve battery power and extend the life of saving your work before allowing your working habits. Turns...
Reference Guide
Page 40
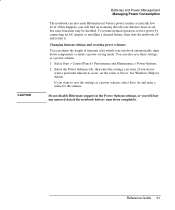
...operation, restore power by connecting an AC adapter or installing a charged battery, then shut the notebook off and restart it. Select Start > Control Panel > Performance and Maintenance > Power Options. 2. CAUTION Batteries and Power Management Managing Power Consumption The notebook can adjust the length of timeouts after which your data has been ... and enter a name for details. Select the Power Schemes tab, then enter the settings you will lose any unsaved data if the notebook battery runs down components or enters a power-saving mode. If you will find on resuming that all your...
...operation, restore power by connecting an AC adapter or installing a charged battery, then shut the notebook off and restart it. Select Start > Control Panel > Performance and Maintenance > Power Options. 2. CAUTION Batteries and Power Management Managing Power Consumption The notebook can adjust the length of timeouts after which your data has been ... and enter a name for details. Select the Power Schemes tab, then enter the settings you will lose any unsaved data if the notebook battery runs down components or enters a power-saving mode. If you will find on resuming that all your...


