Reference Guide
Page 80
... light. • Don't touch the TouchPad while the notebook is set to control Adjust the pointer controls. See "Configuring Your Notebook" in or external devices. If you want to use the TouchPad again, you type. If this setting with the BIOS Setup utility. You can change this happens, try the following: press a key on -off the TouchPad while you must be detected properly. Reference Guide 71 Select Start > Control Panel > Printers and Other Hardware > Mouse. If the TouchPad doesn't work...
... light. • Don't touch the TouchPad while the notebook is set to control Adjust the pointer controls. See "Configuring Your Notebook" in or external devices. If you want to use the TouchPad again, you type. If this setting with the BIOS Setup utility. You can change this happens, try the following: press a key on -off the TouchPad while you must be detected properly. Reference Guide 71 Select Start > Control Panel > Printers and Other Hardware > Mouse. If the TouchPad doesn't work...
Reference Guide
Page 119
..., 98 saving power, 34 status lights, 32 troubleshooting, 77 BIOS password, 24 BIOS Setup utility Boot menu, 87 Exit menu, 87 external display settings, 86 Main menu, 85 Security menu, 86 using, 84 black list (modem), 37 blackout periods, modem, 37 Bluetooth business cards, 46 configuring, 45 sending files, 46 troubleshooting, 82 tuning on, 44 turning off, 45 wireless, 44 boot device order, 17, 87 Boot menu (BIOS), 87 brightness, adjusting, 19 business cards, 46 C Cable lock, 25 Caps Lock, 9 Cardbus cards, 48 cards, PCMCIA, 48 CD-ROM drive creating or copying...
..., 98 saving power, 34 status lights, 32 troubleshooting, 77 BIOS password, 24 BIOS Setup utility Boot menu, 87 Exit menu, 87 external display settings, 86 Main menu, 85 Security menu, 86 using, 84 black list (modem), 37 blackout periods, modem, 37 Bluetooth business cards, 46 configuring, 45 sending files, 46 troubleshooting, 82 tuning on, 44 turning off, 45 wireless, 44 boot device order, 17, 87 Boot menu (BIOS), 87 brightness, adjusting, 19 business cards, 46 C Cable lock, 25 Caps Lock, 9 Cardbus cards, 48 cards, PCMCIA, 48 CD-ROM drive creating or copying...

Maintenance and Service Guide
Page 3
... Operation...1-14 Specifications ...1-18 Internal Design...1-24 Removal and Replacement 2-1 Disassembly Flowchart ...2-3 Removing the Battery ...2-4 Removing an SDRAM Module...2-5 Removing the Wireless LAN Mini PCI Card 2-7 Removing the Hard Disk Drive...2-9 Recovering the Factory Software...2-11 Replacing Small Parts ...2-12 Removing the Keyboard Cover...2-13 Removing the Speaker Assembly ...2-15 Removing the Keyboard ...2-16 Removing the Switchboard PCA ...2-19 Removing the CD/DVD Drive...2-20 Removing the Display Assembly...2-23 Removing the Top Case ...2-26 Removing the Floppy Drive...
... Operation...1-14 Specifications ...1-18 Internal Design...1-24 Removal and Replacement 2-1 Disassembly Flowchart ...2-3 Removing the Battery ...2-4 Removing an SDRAM Module...2-5 Removing the Wireless LAN Mini PCI Card 2-7 Removing the Hard Disk Drive...2-9 Recovering the Factory Software...2-11 Replacing Small Parts ...2-12 Removing the Keyboard Cover...2-13 Removing the Speaker Assembly ...2-15 Removing the Keyboard ...2-16 Removing the Switchboard PCA ...2-19 Removing the CD/DVD Drive...2-20 Removing the Display Assembly...2-23 Removing the Top Case ...2-26 Removing the Floppy Drive...
Maintenance and Service Guide
Page 89
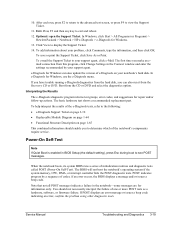
..., use e-DiagTools for Windows. 6. BIOS updates are running. 2. Installation utilities and instructions for all 3 methods. If you might be replaced separately. The BIOS update also resets the configurations in the Connect window to define your connection settings. 7. Undock the notebook if it is docked, and remove any PCMCIA cards from the HP Business Support Web site http://www.hp.com/go/bizsupport. Connect the AC adapter to reset the notebook. When the process completes, press the power button...
..., use e-DiagTools for Windows. 6. BIOS updates are running. 2. Installation utilities and instructions for all 3 methods. If you might be replaced separately. The BIOS update also resets the configurations in the Connect window to define your connection settings. 7. Undock the notebook if it is docked, and remove any PCMCIA cards from the HP Business Support Web site http://www.hp.com/go/bizsupport. Connect the AC adapter to reset the notebook. When the process completes, press the power button...
Maintenance and Service Guide
Page 100
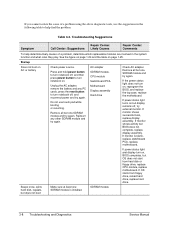
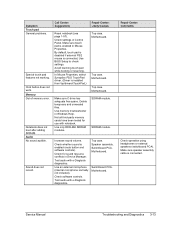
... any PC cards, press the reset button to help determine likely causes of a problem using the above diagnostic tools, use touch pad while booting or resuming. AC adapter SDRAM module. CPU module Switchboard PCA Motherboard Display assembly Hard drive Beeps once, spins hard disk, repeats, but one SDRAM module and try again. Remove all but OS does not start from floppy drive, reload hard drive, replace hard drive. 3-8 Troubleshooting and Diagnostics Service Manual If power status light turns on , BIOS completes, but one SDRAM module is blank, replace...
... any PC cards, press the reset button to help determine likely causes of a problem using the above diagnostic tools, use touch pad while booting or resuming. AC adapter SDRAM module. CPU module Switchboard PCA Motherboard Display assembly Hard drive Beeps once, spins hard disk, repeats, but one SDRAM module and try again. Remove all but OS does not start from floppy drive, reload hard drive, replace hard drive. 3-8 Troubleshooting and Diagnostics Service Manual If power status light turns on , BIOS completes, but one SDRAM module is blank, replace...
Maintenance and Service Guide
Page 103
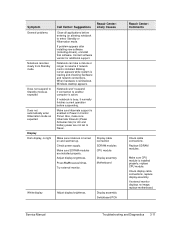
...support is busy, it normally finishes current operation before entering (or allowing notebook to Never. Display cable connection SDRAM modules CPU module Display assembly Motherboard White display Adjust display brightness. Make sure SDRAM modules are not set to enter) Standby or Hibernation mode. Press Fn+F5 several times. If external monitor displays no light Call Center: Suggestions Close all applications before suspending. If notebook is enabled in Power in Control Panel. If problem appears after installing new software (including drivers), uninstall that software...
...support is busy, it normally finishes current operation before entering (or allowing notebook to Never. Display cable connection SDRAM modules CPU module Display assembly Motherboard White display Adjust display brightness. Make sure SDRAM modules are not set to enter) Standby or Hibernation mode. Press Fn+F5 several times. If external monitor displays no light Call Center: Suggestions Close all applications before suspending. If notebook is enabled in Power in Control Panel. If problem appears after installing new software (including drivers), uninstall that software...
Maintenance and Service Guide
Page 107
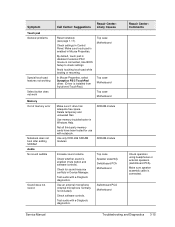
... default, touch pad is disabled if external PS/2 mouse is connected. Check whether sound is installed from \hp\drivers\TouchPad.) Top case Motherboard Top case Motherboard Top case Motherboard Make sure C drive has adequate free space. Make sure touch pad is enabled in Windows Help. SDRAM module SDRAM module Increase sound volume. Use memory troubleshooter in Mouse Properties. Test audio with e-Diagtools diagnostics. Service Manual Troubleshooting and Diagnostics 3-15 Symptom Touch pad General problems Special touch pad features not working Select button does not work...
... default, touch pad is disabled if external PS/2 mouse is connected. Check whether sound is installed from \hp\drivers\TouchPad.) Top case Motherboard Top case Motherboard Top case Motherboard Make sure C drive has adequate free space. Make sure touch pad is enabled in Windows Help. SDRAM module SDRAM module Increase sound volume. Use memory troubleshooter in Mouse Properties. Test audio with e-Diagtools diagnostics. Service Manual Troubleshooting and Diagnostics 3-15 Symptom Touch pad General problems Special touch pad features not working Select button does not work...
Maintenance and Service Guide
Page 115
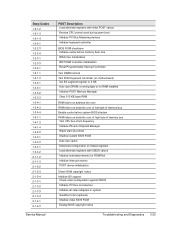
... video configuration against CMOS Initialize PCI bus and devices Initialize all video adapters in system QuietBoot start shut down Shadow system BIOS ROM Auto size cache Advanced configuration of chipset registers Load alternate registers with initial POST values Restore CPU control word during warm boot Initialize PCI Bus Mastering devices Initialize keyboard controller BIOS ROM checksum Initialize cache before memory Auto size 8254 timer initialization 8237 DMA controller initialization Reset Programmable Interrupt Controller...
... video configuration against CMOS Initialize PCI bus and devices Initialize all video adapters in system QuietBoot start shut down Shadow system BIOS ROM Auto size cache Advanced configuration of chipset registers Load alternate registers with initial POST values Restore CPU control word during warm boot Initialize PCI Bus Mastering devices Initialize keyboard controller BIOS ROM checksum Initialize cache before memory Auto size 8254 timer initialization 8237 DMA controller initialization Reset Programmable Interrupt Controller...
Maintenance and Service Guide
Page 122
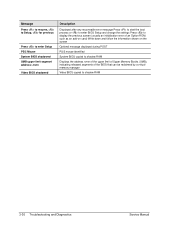
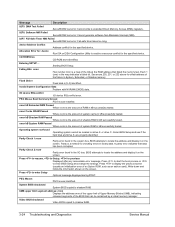
... to start the boot process or to enter BIOS Setup and change the settings Press to display the previous screen (usually an initialization error of an Option ROM, such as an add-on card) Write down and follow the information shown on the screen Optional message displayed during POST PS/2 mouse identified System BIOS copied to shadow RAM Displays the address nnnn of the upper limit of Upper Memory Blocks (UMB), indicating...
... to start the boot process or to enter BIOS Setup and change the settings Press to display the previous screen (usually an initialization error of an Option ROM, such as an add-on card) Write down and follow the information shown on the screen Optional message displayed during POST PS/2 mouse identified System BIOS copied to shadow RAM Displays the address nnnn of the upper limit of Upper Memory Blocks (UMB), indicating...

Service Manual
Page 66
... slots for PC2100 DDR-266 SDRAM modules. Stereo sound via two built-in . 87/88-key touch-type QWERTY keyboard with integrated scroll pad, on-off , 3 hours when system is off button and indicator. External monitors up to 40-GB removable hard drive with model, usage, and power settings). or 32-MB DDR graphics memory, 4x AGP graphics capability. Ethernet 10Base-T (10 Mbps) and 100Base-TX (100 Mbps) support. Hardware 3D acceleration, hardware DVD...
... slots for PC2100 DDR-266 SDRAM modules. Stereo sound via two built-in . 87/88-key touch-type QWERTY keyboard with integrated scroll pad, on-off , 3 hours when system is off button and indicator. External monitors up to 40-GB removable hard drive with model, usage, and power settings). or 32-MB DDR graphics memory, 4x AGP graphics capability. Ethernet 10Base-T (10 Mbps) and 100Base-TX (100 Mbps) support. Hardware 3D acceleration, hardware DVD...
Service Manual
Page 132
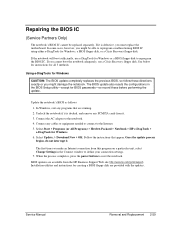
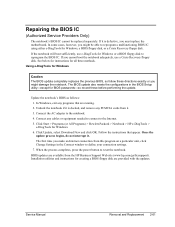
... the power button to define your connection settings. 7. In some cases, however, you make an Internet connection from the HP Business Support Web site (www.hp.com/go/bizsupport). Connect the AC adapter to reprogram the BIOS IC. Undock the notebook if it . 3. Installation utilities and instructions for creating a BIOS floppy disk are available from this program on a particular unit, click Change Settings in the BIOS Setup utility-except for Windows or a BIOS floppy disk to the notebook. 4. Service Manual Removal and Replacement...
... the power button to define your connection settings. 7. In some cases, however, you make an Internet connection from the HP Business Support Web site (www.hp.com/go/bizsupport). Connect the AC adapter to reprogram the BIOS IC. Undock the notebook if it . 3. Installation utilities and instructions for creating a BIOS floppy disk are available from this program on a particular unit, click Change Settings in the BIOS Setup utility-except for Windows or a BIOS floppy disk to the notebook. 4. Service Manual Removal and Replacement...
Service Manual
Page 141
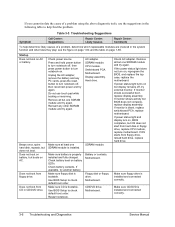
... light and display turn on battery, but one SDRAM module and try external monitor. Use BIOS Setup to check default boot order. AC adapter. CPU module. Does not boot from floppy drive. Motherboard. Unplug the AC adapter, remove the battery and any other SDRAM module and try again. Use BIOS Setup to check default boot order. Hard drive. Does not boot on , reprogram the BIOS, and replace the top case, replace the motherboard. Make sure CD is installed and connected correctly. 3-6 Troubleshooting and Diagnostics Service Manual If OS starts from hard disk...
... light and display turn on battery, but one SDRAM module and try external monitor. Use BIOS Setup to check default boot order. AC adapter. CPU module. Does not boot from floppy drive. Motherboard. Unplug the AC adapter, remove the battery and any other SDRAM module and try again. Use BIOS Setup to check default boot order. Hard drive. Does not boot on , reprogram the BIOS, and replace the top case, replace the motherboard. Make sure CD is installed and connected correctly. 3-6 Troubleshooting and Diagnostics Service Manual If OS starts from hard disk...
Service Manual
Page 145
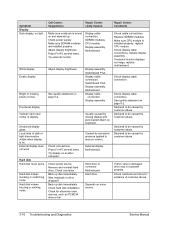
.... Display cable connection. Display assembly. Bright or missing pixels or lines. See quality statement on . Vertical crack near center of customer abuse. 3-10 Troubleshooting and Diagnostics Service Manual Local area of dark or light discoloration visible when display is turned on screen. Hard disk makes clunking or scratching noise. Check connector. External display. See quality statement on another computer. If drive case is installed properly, replace CPU module. SDRAM modules. White display. External display does not work. Remove...
.... Display cable connection. Display assembly. Bright or missing pixels or lines. See quality statement on . Vertical crack near center of customer abuse. 3-10 Troubleshooting and Diagnostics Service Manual Local area of dark or light discoloration visible when display is turned on screen. Hard disk makes clunking or scratching noise. Check connector. External display. See quality statement on another computer. If drive case is installed properly, replace CPU module. SDRAM modules. White display. External display does not work. Remove...
Service Manual
Page 148
... PS/2 TouchPad driver. (Driver is enabled (mute button and software controls). Make sure C drive has adequate free space. Use only DDR-266 SDRAM modules. Increase sound volume. Check software controls. Motherboard. Avoid touching touch pad while booting or resuming. Use memory troubleshooter in Control Panel. Make sure speaker assembly cable is connected, Use BIOS Setup to check settings. Call Center: Suggestions Repair Center: Likely Causes Reset notebook (see page 1-57). SDRAM module. Make sure touch pad is enabled in Device Manager. Motherboard. Sound does not...
... PS/2 TouchPad driver. (Driver is enabled (mute button and software controls). Make sure C drive has adequate free space. Use only DDR-266 SDRAM modules. Increase sound volume. Check software controls. Motherboard. Avoid touching touch pad while booting or resuming. Use memory troubleshooter in Control Panel. Make sure speaker assembly cable is connected, Use BIOS Setup to check settings. Call Center: Suggestions Repair Center: Likely Causes Reset notebook (see page 1-57). SDRAM module. Make sure touch pad is enabled in Device Manager. Motherboard. Sound does not...
Service Manual
Page 154
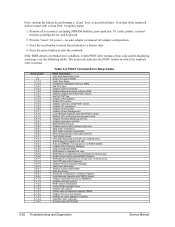
... Self-Test). In Windows, click Start > All Programs (or Programs) > Hewlett-Packard > Notebook > HP e-Diagtools > e-Diagtools for repair and/or follow-up actions. In e-Diagtools for information only. If POST displays an error message or issues a beep code indicating an error, confirm the problem using other diagnostic tools. The BIOS will not boot the notebook's operating system if the system memory, CPU, DMA, or interrupt controller fails the POST...
... Self-Test). In Windows, click Start > All Programs (or Programs) > Hewlett-Packard > Notebook > HP e-Diagtools > e-Diagtools for repair and/or follow-up actions. In e-Diagtools for information only. If POST displays an error message or issues a beep code indicating an error, confirm the problem using other diagnostic tools. The BIOS will not boot the notebook's operating system if the system memory, CPU, DMA, or interrupt controller fails the POST...
Service Manual
Page 155
... video BIOS ROM. 3-20 Troubleshooting and Diagnostics Service Manual Note that if the notebook fails to a known state. 4. Disable shadow and execute code from ROM. Initialize local bus IDE. Initialize keyboard controller. Test 8742 Keyboard Controller (on data bits xxxx of high byte of memory bus. or wrong type or no auto adapter or unusual AC adapter configuration. 3. Warm start (optional). Initialize PCI bus and devices. Press the power button to initial POST values. Restore CPU control...
... video BIOS ROM. 3-20 Troubleshooting and Diagnostics Service Manual Note that if the notebook fails to a known state. 4. Disable shadow and execute code from ROM. Initialize local bus IDE. Initialize keyboard controller. Test 8742 Keyboard Controller (on data bits xxxx of high byte of memory bus. or wrong type or no auto adapter or unusual AC adapter configuration. 3. Warm start (optional). Initialize PCI bus and devices. Press the power button to initial POST values. Restore CPU control...
Service Manual
Page 159
.... Enter BIOS Setup and see if the hard disk and drive A: are properly identified. Video BIOS shadowed Video BIOS copied to resolve a resource conflict for previous Displayed after any recoverable error message. Failing Bits: nnnn Hex number nnnn is a method for offset address of an Option ROM, such as an add-on the screen. Fixed Disk n Fixed disk n (0-3) identified. A parity error indicates that data has been corrupted. Allocation Error for the specified device. PS/2 Mouse...
.... Enter BIOS Setup and see if the hard disk and drive A: are properly identified. Video BIOS shadowed Video BIOS copied to resolve a resource conflict for previous Displayed after any recoverable error message. Failing Bits: nnnn Hex number nnnn is a method for offset address of an Option ROM, such as an add-on the screen. Fixed Disk n Fixed disk n (0-3) identified. A parity error indicates that data has been corrupted. Allocation Error for the specified device. PS/2 Mouse...
HP Pavilion ze4x00, ze5x00 and specific xt notebook series - Startup Guide
Page 36
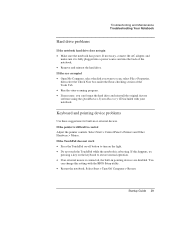
... control Adjust the pointer controls. Keyboard and pointing device problems Use these suggestions for built-in pointing devices are corrupted • Open My Computer, select the disk you can change this happens, try pressing a key on the light. • Do not touch the TouchPad while the notebook is difficult to restore normal operation. • If an external mouse is connected, the built-in or external devices. You can format the hard drive and reinstall the original factory software using...
... control Adjust the pointer controls. Keyboard and pointing device problems Use these suggestions for built-in pointing devices are corrupted • Open My Computer, select the disk you can change this happens, try pressing a key on the light. • Do not touch the TouchPad while the notebook is difficult to restore normal operation. • If an external mouse is connected, the built-in or external devices. You can format the hard drive and reinstall the original factory software using...
HP Pavilion ze4x00, ze5x00 and specific xt notebook series - Startup Guide
Page 37
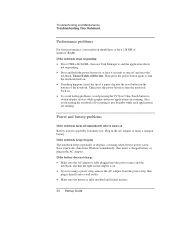
... press the power button again to switch display devices while graphic-intensive applications are running . One-Touch button to turn the notebook back on Battery power is fully installed and locked in place. 30 Startup Guide If the notebook keeps beeping The notebook beeps repeatedly or displays a warning when battery power is not responding. • Press and hold the power button for at least 128 MB of the notebook. Troubleshooting and Maintenance Troubleshooting Your Notebook Performance problems For...
... press the power button again to switch display devices while graphic-intensive applications are running . One-Touch button to turn the notebook back on Battery power is fully installed and locked in place. 30 Startup Guide If the notebook keeps beeping The notebook beeps repeatedly or displays a warning when battery power is not responding. • Press and hold the power button for at least 128 MB of the notebook. Troubleshooting and Maintenance Troubleshooting Your Notebook Performance problems For...
HP Pavilion ze4x00, ze5x00 and specific xt notebook series - Startup Guide
Page 41
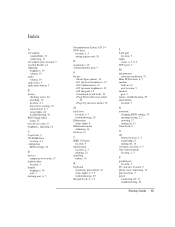
..., 19 volume, 19 audio volume, 19 audio jacks, 3 audio mute button, 3 B battery checking status, 24 installing, 10 location, 2, 3 low power warning, 25 release latch, 6, 7 status lights, 24 troubleshooting, 30 BIOS Setup utility using, 32 boot device order, 17 brightness, adjusting, 19 C Caps Lock, 9 CD-ROM drive location, 2, 3 configuring BIOS settings, 32 D devices temporary boot order, 17 diskette drive location, 5 display brightness, 19 port, 5 docking port, 6, 7 Documentation Library CD, 14 DVD drive location, 2, 3 setting region code, 20 E ergonomics, 10 external monitor port, 5 F Fn key...
..., 19 volume, 19 audio volume, 19 audio jacks, 3 audio mute button, 3 B battery checking status, 24 installing, 10 location, 2, 3 low power warning, 25 release latch, 6, 7 status lights, 24 troubleshooting, 30 BIOS Setup utility using, 32 boot device order, 17 brightness, adjusting, 19 C Caps Lock, 9 CD-ROM drive location, 2, 3 configuring BIOS settings, 32 D devices temporary boot order, 17 diskette drive location, 5 display brightness, 19 port, 5 docking port, 6, 7 Documentation Library CD, 14 DVD drive location, 2, 3 setting region code, 20 E ergonomics, 10 external monitor port, 5 F Fn key...


