Using LightScribe (Select Models Only)
Page 10
When you are satisfied with a progress bar. Click Print, insert the LightScribe disc (label-side down) in the disc tray, ... click the image and then press Delete on your keyboard. 14. Click Add Image and follow the on Your Notebook Using LightScribe 12. You can continue to work on the label. The estimated time to complete the label is ...the computer during the labeling process may affect the quality of your PC while LightScribe is displayed, along with the appearance of the label. 8 Creating Disc Labels on -screen instructions to browse to and select an image file. 13. Click...
When you are satisfied with a progress bar. Click Print, insert the LightScribe disc (label-side down) in the disc tray, ... click the image and then press Delete on your keyboard. 14. Click Add Image and follow the on Your Notebook Using LightScribe 12. You can continue to work on the label. The estimated time to complete the label is ...the computer during the labeling process may affect the quality of your PC while LightScribe is displayed, along with the appearance of the label. 8 Creating Disc Labels on -screen instructions to browse to and select an image file. 13. Click...
Using LightScribe (Select Models Only)
Page 13
...design, insert the LightScribe disc (label-side down) into the disc drive tray and then click Print. 7. Restoring LightScribe software To restore or reinstall LightScribe software on your PC while LightScribe is displayed, along with the appearance of the label. When you are satisfied with ... the labeling process may affect the quality of your notebook, insert the HP DVD Writer disc and follow the instructions on Your Notebook Using LightScribe 6. The estimated time to begin burning the label. Creating Disc Labels on the screen. 11 From the Disc Label menu, select LightScribe ...
...design, insert the LightScribe disc (label-side down) into the disc drive tray and then click Print. 7. Restoring LightScribe software To restore or reinstall LightScribe software on your PC while LightScribe is displayed, along with the appearance of the label. When you are satisfied with ... the labeling process may affect the quality of your notebook, insert the HP DVD Writer disc and follow the instructions on Your Notebook Using LightScribe 6. The estimated time to begin burning the label. Creating Disc Labels on the screen. 11 From the Disc Label menu, select LightScribe ...
HP Pavilion zd8000 Notebook PC - Maintenance and Service Guide
Page 23
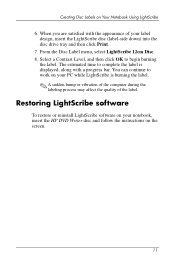
... system is not working or will not load. Any indication of component replacement or printed wiring board modification may void any printed wiring board. Turn on or restart the notebook. All troubleshooting and repair procedures are detailed to any warranty or exchange allowances. 2.1... to allow only subassembly-/module-level repair. 2 Troubleshooting Å WARNING: Only authorized technicians trained by HP should repair this equipment. Because of the complexity of the screen. ❏ To change the language, use the cursor control keys to navigate to the Advanced menu....
... system is not working or will not load. Any indication of component replacement or printed wiring board modification may void any printed wiring board. Turn on or restart the notebook. All troubleshooting and repair procedures are detailed to any warranty or exchange allowances. 2.1... to allow only subassembly-/module-level repair. 2 Troubleshooting Å WARNING: Only authorized technicians trained by HP should repair this equipment. Because of the complexity of the screen. ❏ To change the language, use the cursor control keys to navigate to the Advanced menu....
HP Dual TV Tuner/Digital Video Recorder - Hardware Setup
Page 52
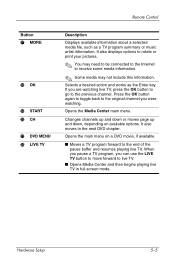
... p CH a DVD MENU s LIVE TV Description Displays available information about a selected media file, such as the Enter key. It also displays options to rotate or print your pictures. ✎ You may not include this information. Opens the Media Center main menu. Changes channels up and down or moves page up and.... If you can use the LIVE TV button to move forward to the end of the pause buffer and resumes playing live TV in full-screen mode. Selects a desired action and works as a TV program summary or music artist information.
... p CH a DVD MENU s LIVE TV Description Displays available information about a selected media file, such as the Enter key. It also displays options to rotate or print your pictures. ✎ You may not include this information. Opens the Media Center main menu. Changes channels up and down or moves page up and.... If you can use the LIVE TV button to move forward to the end of the pause buffer and resumes playing live TV in full-screen mode. Selects a desired action and works as a TV program summary or music artist information.
Hardware Software Guide
Page 35
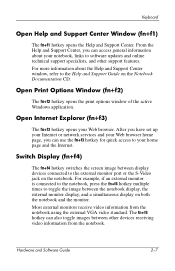
... monitor port or the S-Video jack on the Notebook Documentation CD. Switch Display (fn+f4) The fn+f4 hotkey switches the screen image between the notebook display, the external monitor display, and a simultaneous display on both the notebook and the monitor. Keyboard Open Help and Support ...Center Window (fn+f1) The fn+f1 hotkey opens the Help and Support Center. Open Print Options Window (fn...
... monitor port or the S-Video jack on the Notebook Documentation CD. Switch Display (fn+f4) The fn+f4 hotkey switches the screen image between the notebook display, the external monitor display, and a simultaneous display on both the notebook and the monitor. Keyboard Open Help and Support ...Center Window (fn+f1) The fn+f1 hotkey opens the Help and Support Center. Open Print Options Window (fn...

Hardware Software Guide
Page 187
...standby button changing function 3-13 identifying 1-4, 3-8 power/standby light 1-7, 3-3, 3-8, 3-16 power-on password 5-8, 5-10 Preboot eXecution Environment (PXE) 8-3 print options window hotkey 2-7 product identification label 1-18 Product Key number 1-18 projector connecting 1-8 switching display 2-7 PXE (Preboot eXecution Environment) 8-3 Q Quick Launch... current version 9-3 downloading and installing 9-4 obtaining updates 9-4 RomPaq, downloading 9-4 S Safety and Comfort Guide 1-19 screen brightness 2-9 SD Memory Card 7-16 security cable slot 1-8 Hardware and Software Guide Index-9
...standby button changing function 3-13 identifying 1-4, 3-8 power/standby light 1-7, 3-3, 3-8, 3-16 power-on password 5-8, 5-10 Preboot eXecution Environment (PXE) 8-3 print options window hotkey 2-7 product identification label 1-18 Product Key number 1-18 projector connecting 1-8 switching display 2-7 PXE (Preboot eXecution Environment) 8-3 Q Quick Launch... current version 9-3 downloading and installing 9-4 obtaining updates 9-4 RomPaq, downloading 9-4 S Safety and Comfort Guide 1-19 screen brightness 2-9 SD Memory Card 7-16 security cable slot 1-8 Hardware and Software Guide Index-9


