Getting Started
Page 5
... is out of the surge protection device and then to turn on the computer. Do not place any cable in which you want to hear sound during the initial setup of the computer. 3 Connect power to the computer. 4 Follow the steps on the setup poster to the computer. Use a power ... page 15. Look in the computer box for printed details or updates regarding the computer. If you use it . Your computer may have a graphics card with these signal inputs, as having surge protection, or an uninterruptible power supply (UPS), or similar device. All cabling is preset for the country/region...
... is out of the surge protection device and then to turn on the computer. Do not place any cable in which you want to hear sound during the initial setup of the computer. 3 Connect power to the computer. 4 Follow the steps on the setup poster to the computer. Use a power ... page 15. Look in the computer box for printed details or updates regarding the computer. If you use it . Your computer may have a graphics card with these signal inputs, as having surge protection, or an uninterruptible power supply (UPS), or similar device. All cabling is preset for the country/region...
Getting Started
Page 46
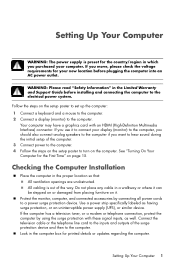
...to the information listed here, also refer to the documentation that there is no check in Windows Vista: 1 Right-click an empty area on the desktop, and then click Personalize. 2 Click Display Settings. 3 Adjust Resolution as necessary, and then click Apply. 42 Getting Started (features vary by ...connector if you ever need to recover the computer operating system by model) This completes the steps to hear sound during the initial setup of the computer. Images on the graphics card (select models only) to connect your display (monitor) to the computer, because the default setting is the...
...to the information listed here, also refer to the documentation that there is no check in Windows Vista: 1 Right-click an empty area on the desktop, and then click Personalize. 2 Click Display Settings. 3 Adjust Resolution as necessary, and then click Apply. 42 Getting Started (features vary by ...connector if you ever need to recover the computer operating system by model) This completes the steps to hear sound during the initial setup of the computer. Images on the graphics card (select models only) to connect your display (monitor) to the computer, because the default setting is the...
Getting Started
Page 51
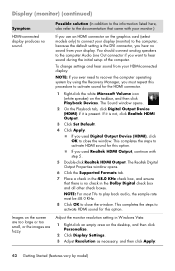
...analog speakers. Use the front panel buttons to connect your software program. To increase the volume, click the Volume icon on the graphics card (select models only) to enter the onscreen display (OSD) and ensure audio is enabled and volume is produced. Check the volume setting... a Line In or headphone connector. Make sure that they are connected to unmute. Refer to the setup poster to "HDMI-connected display produces no sound." Turn off your computer (or speaker system). Press the Mute button on . Or 1 Click the Windows Vista start button, and then click Control...
...analog speakers. Use the front panel buttons to connect your software program. To increase the volume, click the Volume icon on the graphics card (select models only) to enter the onscreen display (OSD) and ensure audio is enabled and volume is produced. Check the volume setting... a Line In or headphone connector. Make sure that they are connected to unmute. Refer to the setup poster to "HDMI-connected display produces no sound." Turn off your computer (or speaker system). Press the Mute button on . Or 1 Click the Windows Vista start button, and then click Control...

Getting Started
Page 74
... Windows Vista 21 minidisc, using 29 modem connection 8 connector 3, 8 monitor connector 4 HDMI-connected, settings to hear sound 42 muvee Reveal, features 33 N network interface adapter 3 Network Interface Card (NIC) 7 P passwords 22 peripheral device landing pad and cable routing 32 peripherals 2 power connector 2 printer connecting 26... up computer 1 shut down the computer 16 Sleep mode 16, 17 software programs CyberLink DVD Suite 33 CyberLink LabelPrint 30 HP Total Care Advisor 34 muvee Reveal 33 reinstall 59 Windows Movie Maker 34 software repairs 57 speakers connecting 6 connector type 4...
... Windows Vista 21 minidisc, using 29 modem connection 8 connector 3, 8 monitor connector 4 HDMI-connected, settings to hear sound 42 muvee Reveal, features 33 N network interface adapter 3 Network Interface Card (NIC) 7 P passwords 22 peripheral device landing pad and cable routing 32 peripherals 2 power connector 2 printer connecting 26... up computer 1 shut down the computer 16 Sleep mode 16, 17 software programs CyberLink DVD Suite 33 CyberLink LabelPrint 30 HP Total Care Advisor 34 muvee Reveal 33 reinstall 59 Windows Movie Maker 34 software repairs 57 speakers connecting 6 connector type 4...

Getting Started Guide
Page 4
... a 2.1 speaker system with headphones 30 Using a 5.1 to 7.1 speaker system with headphones 30 Connecting Speakers Using the Creative Sound Blaster X-Fi Sound Card 31 Connecting the speakers 31 Connecting the FlexiJack connector 32 Getting Help 33 Finding Onscreen Guides 33 Finding Guides on the Web ...33 Using the Onscreen Help and Support Center 34 Using the PC Help & Tools Folder 34 Using the hardware diagnostic tools 34 Using HP...
... a 2.1 speaker system with headphones 30 Using a 5.1 to 7.1 speaker system with headphones 30 Connecting Speakers Using the Creative Sound Blaster X-Fi Sound Card 31 Connecting the speakers 31 Connecting the FlexiJack connector 32 Getting Help 33 Finding Onscreen Guides 33 Finding Guides on the Web ...33 Using the Onscreen Help and Support Center 34 Using the PC Help & Tools Folder 34 Using the hardware diagnostic tools 34 Using HP...
Getting Started Guide
Page 6
... Using the Creative Sound Blaster X-Fi or X-Fi Fatality audio card 70 Configuring the FlexiJack connector 71 Sound Blaster X-Fi configuration modes 71 Configuring speakers with Realtek HD Audio Manager 72 The Realtek HD Audio Manager control screens 73 Configuring sound for recording with...78 Setting up multistreaming audio 78 Selecting recording devices 79 Resolving sound issues 80 Introducing Your Computer Software 81 Learning More About Software 81 Using the Desktop 81 Removing desktop icons 82 Retrieving desktop icons 82 Removing files permanently 82 Using the Windows Start ...
... Using the Creative Sound Blaster X-Fi or X-Fi Fatality audio card 70 Configuring the FlexiJack connector 71 Sound Blaster X-Fi configuration modes 71 Configuring speakers with Realtek HD Audio Manager 72 The Realtek HD Audio Manager control screens 73 Configuring sound for recording with...78 Setting up multistreaming audio 78 Selecting recording devices 79 Resolving sound issues 80 Introducing Your Computer Software 81 Learning More About Software 81 Using the Desktop 81 Removing desktop icons 82 Retrieving desktop icons 82 Removing files permanently 82 Using the Windows Start ...
Getting Started Guide
Page 21
... channels, and it may include a subwoofer. NOTE: Speakers may include one of three analog sound connector types on the HP Support Web site, go to: http://www.hp.com/support For details about connecting stereo speakers to speakers and microphones. Your computer supports only ...Sound Connector Types Your model may be passive (no power button or power cord) or active (power button or power cord). A multichannel audio speaker system is a left -right), a center speaker, and a subwoofer. NOTE: For product information on the back of the computer: Three connectors Six connectors Audio card...
... channels, and it may include a subwoofer. NOTE: Speakers may include one of three analog sound connector types on the HP Support Web site, go to: http://www.hp.com/support For details about connecting stereo speakers to speakers and microphones. Your computer supports only ...Sound Connector Types Your model may be passive (no power button or power cord) or active (power button or power cord). A multichannel audio speaker system is a left -right), a center speaker, and a subwoofer. NOTE: For product information on the back of the computer: Three connectors Six connectors Audio card...

Getting Started Guide
Page 22
... connector type, as shown in the instructions. Type 6 has six connectors. Type S has audio card. You can connect up to a 7.1 audio system to the computer. When installing cables, use the sound connectors that match your computer. Type 3 6 Audio card Your computer may also have a separate Digital Out connector (select models only). Software configuration...
... connector type, as shown in the instructions. Type 6 has six connectors. Type S has audio card. You can connect up to a 7.1 audio system to the computer. When installing cables, use the sound connectors that match your computer. Type 3 6 Audio card Your computer may also have a separate Digital Out connector (select models only). Software configuration...

Getting Started Guide
Page 24
... connector is ready to the front of your computer (select models only), select the working microphone. HP computers support many different audio options, sound connections, and speaker configurations. The FlexiJack supports two functions. Type S has audio card. Some models have the multichannel audio speakers option. To use a microphone connected to use unless you...
... connector is ready to the front of your computer (select models only), select the working microphone. HP computers support many different audio options, sound connections, and speaker configurations. The FlexiJack supports two functions. Type S has audio card. Some models have the multichannel audio speakers option. To use a microphone connected to use unless you...

Getting Started Guide
Page 26
.... A multichannel audio speaker system has a left-right front and left -right), a center speaker, and a subwoofer. ".1" indicates a subwoofer. Type 6 is sound card. 3 Connect the cable to the subwoofer. 4 Connect the left -right, two-channel speaker system. For 2.1 speakers that matches the back of your computer. ...refers to the speaker documentation. 5 Turn on the speaker system. 6 Plug in more advanced systems. A subwoofer provides enhanced bass sounds. An active speaker system must have its own power cord. Refer to an eight-speaker mode and uses two front speakers (left...
.... A multichannel audio speaker system has a left-right front and left -right), a center speaker, and a subwoofer. ".1" indicates a subwoofer. Type 6 is sound card. 3 Connect the cable to the subwoofer. 4 Connect the left -right, two-channel speaker system. For 2.1 speakers that matches the back of your computer. ...refers to the speaker documentation. 5 Turn on the speaker system. 6 Plug in more advanced systems. A subwoofer provides enhanced bass sounds. An active speaker system must have its own power cord. Refer to an eight-speaker mode and uses two front speakers (left...

Getting Started Guide
Page 27
See "Connecting Speakers or Microphone." Type S (audio card): See "Using the Creative Sound Blaster X-Fi or X-Fi Fatality audio card." Type 6: See "Configuring speakers with Realtek HD Audio Manager." Type 3: See "Configuring speakers with Realtek HD Audio Manager." The ...audio speakers To connect two front speakers, two rear speakers, and a subwoofer for your computer model. Connecting Speakers or Microphone 19 Type S is sound card. 3 Connect the rear speaker cable to the lime green Audio Line Out connector that matches the back of your computer. 3 6 S For type...
See "Connecting Speakers or Microphone." Type S (audio card): See "Using the Creative Sound Blaster X-Fi or X-Fi Fatality audio card." Type 6: See "Configuring speakers with Realtek HD Audio Manager." Type 3: See "Configuring speakers with Realtek HD Audio Manager." The ...audio speakers To connect two front speakers, two rear speakers, and a subwoofer for your computer model. Connecting Speakers or Microphone 19 Type S is sound card. 3 Connect the rear speaker cable to the lime green Audio Line Out connector that matches the back of your computer. 3 6 S For type...

Getting Started Guide
Page 28
Type 6 is sound card. 20 Getting Started (features vary by model) NOTE: Always turn on ... (5.1 speaker) output: 1 Turn off the computer. 2 Connect the front speaker cable to the computer, configure the audio software for sound output for your computer. 3 6 S NOTE: Type 3 is three connectors. 4 Connect the cables to the audio system. 5 Connect...computer model. Refer to the subwoofer. See "Configuring Speaker and Sound Options." Type 3: See "Configuring speakers with Realtek HD Audio Manager." Type S (audio card): See "Using the Creative Sound Blaster X-Fi or X-Fi Fatality audio...
Type 6 is sound card. 20 Getting Started (features vary by model) NOTE: Always turn on ... (5.1 speaker) output: 1 Turn off the computer. 2 Connect the front speaker cable to the computer, configure the audio software for sound output for your computer. 3 6 S NOTE: Type 3 is three connectors. 4 Connect the cables to the audio system. 5 Connect...computer model. Refer to the subwoofer. See "Configuring Speaker and Sound Options." Type 3: See "Configuring speakers with Realtek HD Audio Manager." Type S (audio card): See "Using the Creative Sound Blaster X-Fi or X-Fi Fatality audio...

Getting Started Guide
Page 29
...." Type 3: See "Configuring speakers with Realtek HD Audio Manager." Type 6 - Type S (audio card): See "Using the Creative Sound Blaster X-Fi or X-Fi Fatality audio card." Connecting Speakers or Microphone 21 Refer to the speaker documentation. 7 Turn on the speaker system. 10 After ...the speakers are connected to the computer, configure the audio software for sound output for your computer. 3 6 S For type 3-connector systems,...
...." Type 3: See "Configuring speakers with Realtek HD Audio Manager." Type 6 - Type S (audio card): See "Using the Creative Sound Blaster X-Fi or X-Fi Fatality audio card." Connecting Speakers or Microphone 21 Refer to the speaker documentation. 7 Turn on the speaker system. 10 After ...the speakers are connected to the computer, configure the audio software for sound output for your computer. 3 6 S For type 3-connector systems,...

Getting Started Guide
Page 32
... two-channel (2.1 speaker) installation that are long enough to reach from the computer to 2.1 multichannel audio system connection A Computer back-panel connectors (type 3, type 6, or sound card) B Y adapter cables C Receiver/amplifier (audio input jacks) D Subwoofer E Front speakers (left and right input. You also must purchase Y adapter or mini-extension cables. A B C E C DE Computer...
... two-channel (2.1 speaker) installation that are long enough to reach from the computer to 2.1 multichannel audio system connection A Computer back-panel connectors (type 3, type 6, or sound card) B Y adapter cables C Receiver/amplifier (audio input jacks) D Subwoofer E Front speakers (left and right input. You also must purchase Y adapter or mini-extension cables. A B C E C DE Computer...

Getting Started Guide
Page 33
... audio six-channel (6/5.1 speaker) installation that requires multichannel inputs on a receiver/amplifier. A B C F E C D G Computer to 5.1 multichannel audio system connection A Computer back-panel connectors (type 3, type 6, or sound card) B Y adapter cables C Receiver/amplifier (audio input jacks) D Subwoofer E Center speaker F Front speakers (left and right) G Rear speakers (left and right) 5.1 home audio installation procedure To...
... audio six-channel (6/5.1 speaker) installation that requires multichannel inputs on a receiver/amplifier. A B C F E C D G Computer to 5.1 multichannel audio system connection A Computer back-panel connectors (type 3, type 6, or sound card) B Y adapter cables C Receiver/amplifier (audio input jacks) D Subwoofer E Center speaker F Front speakers (left and right) G Rear speakers (left and right) 5.1 home audio installation procedure To...

Getting Started Guide
Page 34
... left and right ends of the Y adapter cable into the center/subwoofer inputs on the computer. 26 Getting Started (features vary by model) Type 6 is sound card. 3 Connect the front stereo mini-jack end of a Y adapter cable into the lime green Audio Line Out connector that matches the back of the receiver...
... left and right ends of the Y adapter cable into the center/subwoofer inputs on the computer. 26 Getting Started (features vary by model) Type 6 is sound card. 3 Connect the front stereo mini-jack end of a Y adapter cable into the lime green Audio Line Out connector that matches the back of the receiver...

Getting Started Guide
Page 39
... Microphone 31 You must select the function in the Creative Console Launcher. NOTE: For additional information on connecting the speakers, refer to the Creative Sound Blaster X-Fi sound card. See "Connecting the FlexiJack connector." Connecting the speakers Connector Description AD-Link for AD_Link X-Fi I/O Console (the X-Fi console is sold separately) Line Out_3...
... Microphone 31 You must select the function in the Creative Console Launcher. NOTE: For additional information on connecting the speakers, refer to the Creative Sound Blaster X-Fi sound card. See "Connecting the FlexiJack connector." Connecting the speakers Connector Description AD-Link for AD_Link X-Fi I/O Console (the X-Fi console is sold separately) Line Out_3...

Getting Started Guide
Page 40
... Digital In connection and you will need a special connector from Creative. 32 Getting Started (features vary by model) To connect the X-Fi sound card to your speakers: 1 Use the audio connection table to connect your audio system to connect digital speakers as your output device, you want... to the sound card. 2 Turn on the computer. 3 Plug in and turn on the speaker system power. After connecting the speaker system to the sound card, follow the steps in "Configuring the FlexiJack connector" to configure the speaker...
... Digital In connection and you will need a special connector from Creative. 32 Getting Started (features vary by model) To connect the X-Fi sound card to your speakers: 1 Use the audio connection table to connect your audio system to connect digital speakers as your output device, you want... to the sound card. 2 Turn on the computer. 3 Plug in and turn on the speaker system power. After connecting the speaker system to the sound card, follow the steps in "Configuring the FlexiJack connector" to configure the speaker...

Getting Started Guide
Page 75
...left -right, two-channel speaker system. Your model may include one of three analog sound connector types on the back of the computer: Three connectors (Realtek Audio) Six connectors (Realtek Audio) Audio sound card (Creative Sound Blaster X-Fi and X-Fi Fatality, or Analog Devices, Inc (ADI)) Your system..., and it may be passive (no power button or power cord) or active (power button or power cord). Configuring Speaker and Sound Options 67 Your computer supports only active (powered) speaker systems; For details about connecting stereo speakers to as described in this section....
...left -right, two-channel speaker system. Your model may include one of three analog sound connector types on the back of the computer: Three connectors (Realtek Audio) Six connectors (Realtek Audio) Audio sound card (Creative Sound Blaster X-Fi and X-Fi Fatality, or Analog Devices, Inc (ADI)) Your system..., and it may be passive (no power button or power cord) or active (power button or power cord). Configuring Speaker and Sound Options 67 Your computer supports only active (powered) speaker systems; For details about connecting stereo speakers to as described in this section....
Getting Started Guide
Page 163
... 58 media control or playback 57 Off, See turning off computer 38 C cable modem, using 8, 42, 85 card reader, memory 109 carpal tunnel syndrome 43 CDs erasing rewritable 130 change the speed of the cursor 64 CompactFlash media 111 troubleshooting ...camera 4 digital video camera 4 headphones 30 peripherals 2 connection modem 12 wired network 9 connector computer 2 country/region codes 125 Creative Sound Blaster X-Fi Sound Card audio modes 71 configuring 70 cursor speed 64 customizing keyboard buttons 58 CyberLink LabelPrint creating a LightScribe label 136 features 92 CyberLink Power2Go ...
... 58 media control or playback 57 Off, See turning off computer 38 C cable modem, using 8, 42, 85 card reader, memory 109 carpal tunnel syndrome 43 CDs erasing rewritable 130 change the speed of the cursor 64 CompactFlash media 111 troubleshooting ...camera 4 digital video camera 4 headphones 30 peripherals 2 connection modem 12 wired network 9 connector computer 2 country/region codes 125 Creative Sound Blaster X-Fi Sound Card audio modes 71 configuring 70 cursor speed 64 customizing keyboard buttons 58 CyberLink LabelPrint creating a LightScribe label 136 features 92 CyberLink Power2Go ...


