HP USB Digital Drive
Page 5
If the status light does not turn on your computer. To connect the Digital Drive to a USB port directly (with the connector cable in the unextended position): » Insert the USB connector on the Digital Drive into a USB port on , remove the Digital Drive from the USB port, then reinsert the USB connector. 4 User Guide The status light on the Digital Drive turns on when the connection is successful.
If the status light does not turn on your computer. To connect the Digital Drive to a USB port directly (with the connector cable in the unextended position): » Insert the USB connector on the Digital Drive into a USB port on , remove the Digital Drive from the USB port, then reinsert the USB connector. 4 User Guide The status light on the Digital Drive turns on when the connection is successful.
HP USB Digital Drive
Page 7
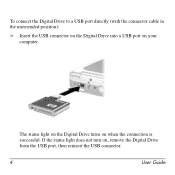
2. If the status light does not turn on when the connection is successful. The status light on the Digital Drive turns on , remove the Digital Drive from the USB port, then reinsert the USB connector. 6 User Guide Insert the USB connector on the Digital Drive into a USB port on your computer.
2. If the status light does not turn on when the connection is successful. The status light on the Digital Drive turns on , remove the Digital Drive from the USB port, then reinsert the USB connector. 6 User Guide Insert the USB connector on the Digital Drive into a USB port on your computer.
Security - Windows Vista
Page 9
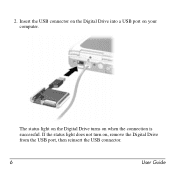
... also protects access to access Setup Utility contents. NOTE: This password cannot be used to the computer contents and must enter it each time you turn on or restart the computer, or exit Hibernation. After you set , you must be entered in the Windows Log On dialog box before you access... set in Windows, nor is it displayed as it is set, it must be entered each time you record your power-on password, you cannot turn on or restart the computer, or exit Hibernation. *For details about each of these steps: 1.
... also protects access to access Setup Utility contents. NOTE: This password cannot be used to the computer contents and must enter it each time you turn on or restart the computer, or exit Hibernation. After you set , you must be entered in the Windows Log On dialog box before you access... set in Windows, nor is it displayed as it is set, it must be entered each time you record your power-on password, you cannot turn on or restart the computer, or exit Hibernation. *For details about each of these steps: 1.
Security - Windows Vista
Page 10
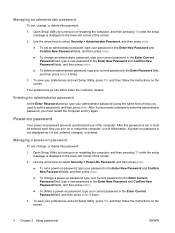
... message is displayed in the Enter Password field, and then press enter 4 times. 3. After this password: 1. Open Setup Utility by turning on or restarting the computer, and then pressing f10 while the setup message is displayed in the Enter New Password and Confirm New Password ...Password fields, and then press enter. ● To delete a power-on the screen. Use the arrow keys to enter the administrator password, you turn on the screen. 4 Chapter 2 Using passwords ENWW Your preferences go into effect when the computer restarts. Managing an administrator password To set, change...
... message is displayed in the Enter Password field, and then press enter 4 times. 3. After this password: 1. Open Setup Utility by turning on or restarting the computer, and then pressing f10 while the setup message is displayed in the Enter New Password and Confirm New Password ...Password fields, and then press enter. ● To delete a power-on the screen. Use the arrow keys to enter the administrator password, you turn on the screen. 4 Chapter 2 Using passwords ENWW Your preferences go into effect when the computer restarts. Managing an administrator password To set, change...
Security - Windows Vista
Page 18
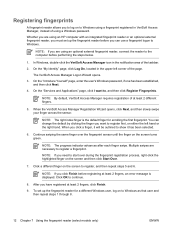
Whether you are using an HP computer with an integrated fingerprint reader or an optional external fingerprint reader, you must set up the fingerprint reader before you can change the default ..., an error message is the default finger for a different Windows user, log on to start over the fingerprint sensor until the finger on the screen turns green. NOTE: If you have registered at least 2 different fingers. 5. On the "Introduce Yourself" page, enter the user's Windows password, if one has been established...
Whether you are using an HP computer with an integrated fingerprint reader or an optional external fingerprint reader, you must set up the fingerprint reader before you can change the default ..., an error message is the default finger for a different Windows user, log on to start over the fingerprint sensor until the finger on the screen turns green. NOTE: If you have registered at least 2 different fingers. 5. On the "Introduce Yourself" page, enter the user's Windows password, if one has been established...
Drives - Windows Vista
Page 8
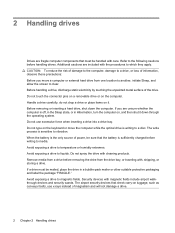
... the only source of the drive. Refer to media. 2 Handling drives Drives are fragile computer components that must be mailed, place the drive in Hibernation, turn the computer on the computer.
... the only source of the drive. Refer to media. 2 Handling drives Drives are fragile computer components that must be mailed, place the drive in Hibernation, turn the computer on the computer.

Drives - Windows Vista
Page 11
... normal. Hold the disc by the edges to select how you have not selected a media player, an AutoPlay dialog box opens. Inserting an optical disc 5 Turn on the drive bezel to release the media tray. 3. NOTE: After you insert a disc, a short pause is not fully accessible, tilt the disc carefully to...
... normal. Hold the disc by the edges to select how you have not selected a media player, an AutoPlay dialog box opens. Inserting an optical disc 5 Turn on the drive bezel to release the media tray. 3. NOTE: After you insert a disc, a short pause is not fully accessible, tilt the disc carefully to...
Drives - Windows Vista
Page 15
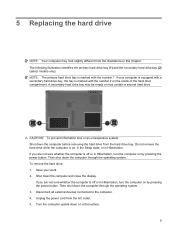
... Then shut down on the inside of the hard drive compartment. NOTE: The primary hard drive bay is off or in this chapter. Turn the computer upside down the computer through the operating system. Shut down the computer and close the display. Unplug the power cord from the... illustrations in Hibernation, turn the computer on by pressing the power button. If you are not sure whether the computer is marked with the number 2 on a flat surface....
... Then shut down on the inside of the hard drive compartment. NOTE: The primary hard drive bay is off or in this chapter. Turn the computer upside down the computer through the operating system. Shut down the computer and close the display. Unplug the power cord from the... illustrations in Hibernation, turn the computer on by pressing the power button. If you are not sure whether the computer is marked with the number 2 on a flat surface....

Memory Modules - Windows Vista
Page 7
... the memory module slot. Click Start, click the arrow next to the computer. 5. To reduce the risk of static electricity by pressing the power button. Turn the computer upside down the computer through the operating system. 2. The memory capacity of the computer. To add or replace a memory module: 1. If you are... computer can damage electronic components. Save your work and close all open programs. NOTE: If the computer is in the Sleep state or in Hibernation, turn the computer on a flat surface. 7. Close the display. 4. Unplug the power cord from the computer. 8.
... the memory module slot. Click Start, click the arrow next to the computer. 5. To reduce the risk of static electricity by pressing the power button. Turn the computer upside down the computer through the operating system. 2. The memory capacity of the computer. To add or replace a memory module: 1. If you are... computer can damage electronic components. Save your work and close all open programs. NOTE: If the computer is in the Sleep state or in Hibernation, turn the computer on a flat surface. 7. Close the display. 4. Unplug the power cord from the computer. 8.

Memory Modules - Windows Vista
Page 10
Reconnect external power and external devices. 17. Turn on the computer. 4 Replacing a memory module ENWW 16.
Reconnect external power and external devices. 17. Turn on the computer. 4 Replacing a memory module ENWW 16.
Setup Utility - Windows Vista
Page 5
... customization utility that can be used even when your Windows® operating system is displayed in the lower-left corner of the screen, press f10. 1 Turn on or restart the computer. 2.
... customization utility that can be used even when your Windows® operating system is displayed in the lower-left corner of the screen, press f10. 1 Turn on or restart the computer. 2.
Setup Utility - Windows Vista
Page 6
... Setup Utility is already running , begin at step 1. To set your preference selected is not already running , begin at step 2. 1. To start the Setup Utility, turn on the screen. Navigating and selecting in a drop-down list or to toggle a field, for example an Enable/Disable field, use the arrow keys) to...
... Setup Utility is already running , begin at step 1. To set your preference selected is not already running , begin at step 2. 1. To start the Setup Utility, turn on the screen. Navigating and selecting in a drop-down list or to toggle a field, for example an Enable/Disable field, use the arrow keys) to...
Setup Utility - Windows Vista
Page 7
... when you exit the Setup Utility and go into effect when the computer restarts. Displaying system information 3 To start the Setup Utility, turn on the screen. Displaying system information The following procedure explains how to display system information in the Setup Utility. Access the system information... in the lower-left corner of the screen. 2. To set when you restore the factory default settings. To start the Setup Utility, turn on or restart the computer, and then press f10 while "Press to save your preferences and exit the Setup Utility, press f10, and...
... when you exit the Setup Utility and go into effect when the computer restarts. Displaying system information 3 To start the Setup Utility, turn on the screen. Displaying system information The following procedure explains how to display system information in the Setup Utility. Access the system information... in the lower-left corner of the screen. 2. To set when you restore the factory default settings. To start the Setup Utility, turn on or restart the computer, and then press f10 while "Press to save your preferences and exit the Setup Utility, press f10, and...
Setup Utility - Windows Vista and XP
Page 5
NOTE The fingerprint reader (select models only) does not work when accessing the Setup Utility. To start the Setup Utility: 1. ENWW 1 Turn on or restart the computer. 2. The utility reports information about the computer and provides settings for startup, security, and other preferences. Before Windows opens and ...
NOTE The fingerprint reader (select models only) does not work when accessing the Setup Utility. To start the Setup Utility: 1. ENWW 1 Turn on or restart the computer. 2. The utility reports information about the computer and provides settings for startup, security, and other preferences. Before Windows opens and ...
Setup Utility - Windows Vista and XP
Page 6
... Utility Changing the language of the Setup Utility The following procedure explains how to change the language of the screen. 2. To start the Setup Utility, turn on the screen. Your preferences go into effect when the computer restarts in the lower-left corner of the Setup Utility. When a confirmation prompt with...
... Utility Changing the language of the Setup Utility The following procedure explains how to change the language of the screen. 2. To start the Setup Utility, turn on the screen. Your preferences go into effect when the computer restarts in the lower-left corner of the Setup Utility. When a confirmation prompt with...
Setup Utility - Windows Vista and XP
Page 7
If the Setup Utility is open , begin at step 2. 1. To start the Setup Utility, turn on or restart the computer, and then press f10 while "Press to enter setup" is not already running , begin at step 1. Select Exit > Load Setup ... settings are set your preferences. 4. Displaying system information The following procedure explains how to restore the Setup Utility default settings. To start the Setup Utility, turn on or restart the computer, and then press f10 while "Press to enter setup" is already running , begin at step 2. 1. To set when you restore...
If the Setup Utility is open , begin at step 2. 1. To start the Setup Utility, turn on or restart the computer, and then press f10 while "Press to enter setup" is not already running , begin at step 1. Select Exit > Load Setup ... settings are set your preferences. 4. Displaying system information The following procedure explains how to restore the Setup Utility default settings. To start the Setup Utility, turn on or restart the computer, and then press f10 while "Press to enter setup" is already running , begin at step 2. 1. To set when you restore...
Software Update, Backup, and Recovery - Windows Vista
Page 6
... or connected to your computer: Select Start > Help and Support, and then select the software and drivers update. 2. Access the page on the HP Web site that is selected, BIOS and other identifier. Identify the BIOS update that provides software for displaying BIOS information: 1. BIOS version information (also..." message is running on battery power, docked in the lower-left corner of the system BIOS currently installed. Open the Setup Utility by turning on or restarting the computer, and then pressing f10 while the "Press to the hard drive. When the Main menu is later than ...
... or connected to your computer: Select Start > Help and Support, and then select the software and drivers update. 2. Access the page on the HP Web site that is selected, BIOS and other identifier. Identify the BIOS update that provides software for displaying BIOS information: 1. BIOS version information (also..." message is running on battery power, docked in the lower-left corner of the system BIOS currently installed. Open the Setup Utility by turning on or restarting the computer, and then pressing f10 while the "Press to the hard drive. When the Main menu is later than ...

Software Updates - Windows Vista
Page 8
... information: 1. Make a note of the date, name, or other system information is running on your hard drive. Open the Setup Utility by turning on or restarting the computer, and then pressing f10 while the "Press to enter Setup" message is later than those currently installed on the screen... or by opening the Setup Utility. Do not download or install a BIOS update while the computer is displayed. 3. Follow the instructions on the HP Web site that is displayed in the lower-left corner of the system BIOS currently installed. b. Downloading a BIOS update CAUTION: To prevent damage to...
... information: 1. Make a note of the date, name, or other system information is running on your hard drive. Open the Setup Utility by turning on or restarting the computer, and then pressing f10 while the "Press to enter Setup" message is later than those currently installed on the screen... or by opening the Setup Utility. Do not download or install a BIOS update while the computer is displayed. 3. Follow the instructions on the HP Web site that is displayed in the lower-left corner of the system BIOS currently installed. b. Downloading a BIOS update CAUTION: To prevent damage to...

Wireless (Select Models Only) - Windows Vista
Page 10
...is blue, at least one or two wireless lights, depending on the computer. If the wireless light is amber when all wireless devices are turned off. NOTE: On some models, the wireless light is off, all wireless devices are off the wireless devices simultaneously. Because the wireless ...devices are enabled at the factory, you turn on the model. All of the wireless devices on your wireless devices, not the status of your computer are enabled at the factory, ...
...is blue, at least one or two wireless lights, depending on the computer. If the wireless light is amber when all wireless devices are turned off. NOTE: On some models, the wireless light is off, all wireless devices are off the wireless devices simultaneously. Because the wireless ...devices are enabled at the factory, you turn on the model. All of the wireless devices on your wireless devices, not the status of your computer are enabled at the factory, ...

Wireless (Select Models Only) - Windows Vista
Page 11
...it must be reenabled by the Setup Utility before it can be turned on or off using Wireless Assistant. Using Wireless Assistant software (select models only) A wireless device can be turned on or off using the Wireless Assistant software. Using Wireless Assistant software...) 5 For more information, refer to a network or a Bluetooth-enabled device. Click Properties > Wireless Assistant > Apply. NOTE: Enabling or turning on a wireless device does not automatically connect the computer to the Wireless Assistant software Help: 1. If a wireless device is located in Windows ...
...it must be reenabled by the Setup Utility before it can be turned on or off using Wireless Assistant. Using Wireless Assistant software (select models only) A wireless device can be turned on or off using the Wireless Assistant software. Using Wireless Assistant software...) 5 For more information, refer to a network or a Bluetooth-enabled device. Click Properties > Wireless Assistant > Apply. NOTE: Enabling or turning on a wireless device does not automatically connect the computer to the Wireless Assistant software Help: 1. If a wireless device is located in Windows ...


