Security - Windows Vista
Page 8
... creating passwords, follow requirements set , depending on how you choose to your computer information. Because most passwords are not displayed as screen-saver passwords, select Start > Help and Support. 2 Chapter 2 Using passwords ENWW You can be any combination of up to 8 letters and numbers and is not case sensitive. ● A password...
... creating passwords, follow requirements set , depending on how you choose to your computer information. Because most passwords are not displayed as screen-saver passwords, select Start > Help and Support. 2 Chapter 2 Using passwords ENWW You can be any combination of up to 8 letters and numbers and is not case sensitive. ● A password...
Security - Windows Vista
Page 12
... system, programs, or utilities, or cause them , and in Help and Support. 6 Chapter 3 Using antivirus software ENWW To view and access Norton Internet Security, select Start > All Programs. For more information about computer viruses, type viruses in the Search field in most viruses, destroy them to date. Instructions for using and...
... system, programs, or utilities, or cause them , and in Help and Support. 6 Chapter 3 Using antivirus software ENWW To view and access Norton Internet Security, select Start > All Programs. For more information about computer viruses, type viruses in the Search field in most viruses, destroy them to date. Instructions for using and...
Security - Windows Vista
Page 14
... in Help and Support. 8 Chapter 5 Installing critical security updates ENWW Additional updates to install the latest software from Microsoft. ● Use the update link at Start > All Programs > Windows Update.
... in Help and Support. 8 Chapter 5 Installing critical security updates ENWW Additional updates to install the latest software from Microsoft. ● Use the update link at Start > All Programs > Windows Update.
Security - Windows Vista
Page 18
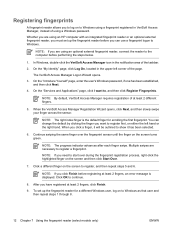
... and Applications" page, click I want to register a fingerprint. NOTE: By default, VeriSoft Access Manager requires registration of using an HP computer with an integrated fingerprint reader or an optional external fingerprint reader, you must set up the fingerprint reader before you can change ... 1. Continue swiping the same finger over during the fingerprint registration process, right-click the highlighted finger on the screen and then click Start Over. 7. NOTE: The right index finger is displayed. Whether you are using a fingerprint registered in the notification area of the ...
... and Applications" page, click I want to register a fingerprint. NOTE: By default, VeriSoft Access Manager requires registration of using an HP computer with an integrated fingerprint reader or an optional external fingerprint reader, you must set up the fingerprint reader before you can change ... 1. Continue swiping the same finger over during the fingerprint registration process, right-click the highlighted finger on the screen and then click Start Over. 7. NOTE: The right index finger is displayed. Whether you are using a fingerprint registered in the notification area of the ...
Backup and Recovery - Windows Vista
Page 7
... software feature). System restore points allow you to reverse undesirable changes to your computer by the operating system and Recovery Manager software are used to start up your information regularly to factory settings in case of recovery discs (Recovery Manager software feature). Recovery Manager works from a dedicated recovery partition on the...
... software feature). System restore points allow you to reverse undesirable changes to your computer by the operating system and Recovery Manager software are used to start up your information regularly to factory settings in case of recovery discs (Recovery Manager software feature). Recovery Manager works from a dedicated recovery partition on the...
Backup and Recovery - Windows Vista
Page 8
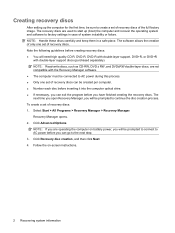
..., such as CD-RW, DVD ± RW, and DVD±RW double-layer discs, are not compatible with double-layer support discs (purchased separately). Select Start > All Programs > Recovery Manager > Recovery Manager. NOTE: If you will need high quality CD-R, DVD-R, DVD-R with double-layer support, DVD+R, or DVD+R... the creation of only one set of recovery discs of the full factory image. The next time you open Recovery Manager, you are used to start up the computer for the first time, be prompted to continue the disc creation process. To create a set of recovery discs: 1. Click Advanced ...
..., such as CD-RW, DVD ± RW, and DVD±RW double-layer discs, are not compatible with double-layer support discs (purchased separately). Select Start > All Programs > Recovery Manager > Recovery Manager. NOTE: If you will need high quality CD-R, DVD-R, DVD-R with double-layer support, DVD+R, or DVD+R... the creation of only one set of recovery discs of the full factory image. The next time you open Recovery Manager, you are used to start up the computer for the first time, be prompted to continue the disc creation process. To create a set of recovery discs: 1. Click Advanced ...
Backup and Recovery - Windows Vista
Page 10
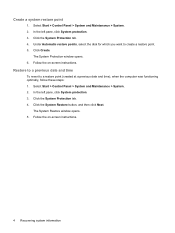
Create a system restore point 1. Select Start > Control Panel > System and Maintenance > System. 2. Restore to a previous date and time To revert to create a restore point. 5. Follow the on -screen instructions. Click the ... the disk for which you want to a restore point (created at a previous date and time), when the computer was functioning optimally, follow these steps: 1. Select Start > Control Panel > System and Maintenance > System. 2. Click the System Restore button, and then click Next. Click Create. In the left pane, click System protection. 3. The...
Create a system restore point 1. Select Start > Control Panel > System and Maintenance > System. 2. Restore to a previous date and time To revert to create a restore point. 5. Follow the on -screen instructions. Click the ... the disk for which you want to a restore point (created at a previous date and time), when the computer was functioning optimally, follow these steps: 1. Select Start > Control Panel > System and Maintenance > System. 2. Click the System Restore button, and then click Next. Click Create. In the left pane, click System protection. 3. The...
Backup and Recovery - Windows Vista
Page 11
...drive from either of the following ways: ● Select Start > All Programs > Recovery Manager > Recovery Manager. -or- ● Restart the computer and press f11 while the "Press for recovery" message is displayed on the screen. HP recommends that you set up . Insert the first recovery disc...driver roll-back capabilities. Click Advanced Options. 3. Back up all personal files. 2. NOTE: Windows has its own built-in either the Start button or f11. Recovery Manager software allows you have not already tried these steps: 1. Software not provided with this computer must be ...
...drive from either of the following ways: ● Select Start > All Programs > Recovery Manager > Recovery Manager. -or- ● Restart the computer and press f11 while the "Press for recovery" message is displayed on the screen. HP recommends that you set up . Insert the first recovery disc...driver roll-back capabilities. Click Advanced Options. 3. Back up all personal files. 2. NOTE: Windows has its own built-in either the Start button or f11. Recovery Manager software allows you have not already tried these steps: 1. Software not provided with this computer must be ...
Drives - Windows Vista
Page 7
1 Identifying installed drives To view the drives installed on the computer, select Start > Computer. NOTE: Windows® includes the User Account Control feature to the system, such as installing applications, running utilities, or changing Windows settings. The next ...
1 Identifying installed drives To view the drives installed on the computer, select Start > Computer. NOTE: Windows® includes the User Account Control feature to the system, such as installing applications, running utilities, or changing Windows settings. The next ...
Drives - Windows Vista
Page 14
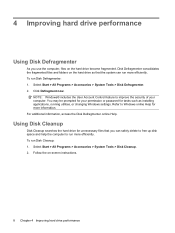
... hard drive performance Follow the on the hard drive become fragmented. 4 Improving hard drive performance Using Disk Defragmenter As you can run more efficiently. Select Start > All Programs > Accessories > System Tools > Disk Defragmenter. 2. NOTE: Windows® includes the User Account Control feature to Windows online Help for unnecessary ... security of your permission or password for your computer. Click Defragment now. For additional information, access the Disk Defragmenter online Help. Select Start > All Programs > Accessories > System Tools > Disk Cleanup. 2.
... hard drive performance Follow the on the hard drive become fragmented. 4 Improving hard drive performance Using Disk Defragmenter As you can run more efficiently. Select Start > All Programs > Accessories > System Tools > Disk Defragmenter. 2. NOTE: Windows® includes the User Account Control feature to Windows online Help for unnecessary ... security of your permission or password for your computer. Click Defragment now. For additional information, access the Disk Defragmenter online Help. Select Start > All Programs > Accessories > System Tools > Disk Cleanup. 2.

Memory Modules - Windows Vista
Page 7
... installing a memory module. Close the display. 4. NOTE: To use a dual-channel configuration when adding a second memory module, be increased by touching a grounded metal object. Click Start, click the arrow next to the computer. 5. To reduce the risk of the computer. To add or replace a memory module: 1. Disconnect all batteries before shutdown...
... installing a memory module. Close the display. 4. NOTE: To use a dual-channel configuration when adding a second memory module, be increased by touching a grounded metal object. Click Start, click the arrow next to the computer. 5. To reduce the risk of the computer. To add or replace a memory module: 1. Disconnect all batteries before shutdown...
Modem and Local Area Network - Windows Vista
Page 8
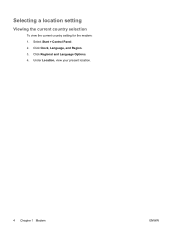
Click Regional and Language Options. 4. Click Clock, Language, and Region. 3. Under Location, view your present location. 4 Chapter 1 Modem ENWW Select Start > Control Panel. 2. Selecting a location setting Viewing the current country selection To view the current country setting for the modem: 1.
Click Regional and Language Options. 4. Click Clock, Language, and Region. 3. Under Location, view your present location. 4 Chapter 1 Modem ENWW Select Start > Control Panel. 2. Selecting a location setting Viewing the current country selection To view the current country setting for the modem: 1.
Modem and Local Area Network - Windows Vista
Page 9
... in the Location list, and then click OK. Enter the area code, a carrier code (if necessary), and the number to Dial using the modem. Select Start > Control Panel > Hardware and Sound > Phone and Modem Options. 2. To enable modem use in other countries. For example, you could add a setting named "Work" that...
... in the Location list, and then click OK. Enter the area code, a carrier code (if necessary), and the number to Dial using the modem. Select Start > Control Panel > Hardware and Sound > Phone and Modem Options. 2. To enable modem use in other countries. For example, you could add a setting named "Work" that...
Modem and Local Area Network - Windows Vista
Page 10
... machine line, modem line, or standard telephone line is usually an analog line. ● Check for clicks (pulses) or tones. Select Start > Control Panel > Hardware and Sound > Phone and Modem Options. Select your current modem location setting: a. If the modem receives a ...for pulse or tone dialing. e. Click the listing for dial tone before dialing: a. e. Clicks indicate that the telephone line supports tone dialing. Select Start > Control Panel > Hardware and Sound > Phone and Modem Options. g. c. c. Click OK twice. 6 Chapter 1 Modem ENWW Click either Tone ...
... machine line, modem line, or standard telephone line is usually an analog line. ● Check for clicks (pulses) or tones. Select Start > Control Panel > Hardware and Sound > Phone and Modem Options. Select your current modem location setting: a. If the modem receives a ...for pulse or tone dialing. e. Click the listing for dial tone before dialing: a. e. Clicks indicate that the telephone line supports tone dialing. Select Start > Control Panel > Hardware and Sound > Phone and Modem Options. g. c. c. Click OK twice. 6 Chapter 1 Modem ENWW Click either Tone ...
Modem and Local Area Network - Windows Vista
Page 11
Select Start > Control Panel > Hardware and Sound > Phone and Modem Options. 2. Select your current modem location setting. 4. If you continue to receive the "No Dial Tone" error ...
Select Start > Control Panel > Hardware and Sound > Phone and Modem Options. 2. Select your current modem location setting. 4. If you continue to receive the "No Dial Tone" error ...

Setup Utility - Windows Vista
Page 3
Table of contents 1 Starting the Setup Utility 2 Using the Setup Utility Changing the language of the Setup Utility 2 Navigating and selecting in the Setup Utility 2 Displaying system information ...3 Restoring default settings in the Setup Utility 3 Using advanced Setup Utility features 4 Closing the Setup Utility ...4 3 Setup Utility menus Main menu ...5 Security menu ...5 System Configuration menu ...6 Diagnostics menu ...6 Index ...7 iii
Table of contents 1 Starting the Setup Utility 2 Using the Setup Utility Changing the language of the Setup Utility 2 Navigating and selecting in the Setup Utility 2 Displaying system information ...3 Restoring default settings in the Setup Utility 3 Using advanced Setup Utility features 4 Closing the Setup Utility ...4 3 Setup Utility menus Main menu ...5 Security menu ...5 System Configuration menu ...6 Diagnostics menu ...6 Index ...7 iii
Setup Utility - Windows Vista
Page 5
... will not load. The utility reports information about the computer and provides settings for startup, security, and other preferences. To start the Setup Utility: 1. Turn on or restart the computer. 2. 1 Starting the Setup Utility The Setup Utility is a ROM-based information and customization utility that can be used even when your Windows...
... will not load. The utility reports information about the computer and provides settings for startup, security, and other preferences. To start the Setup Utility: 1. Turn on or restart the computer. 2. 1 Starting the Setup Utility The Setup Utility is a ROM-based information and customization utility that can be used even when your Windows...
Setup Utility - Windows Vista
Page 6
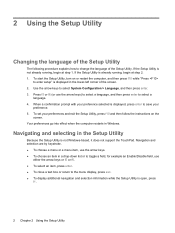
... displayed in the lower-left corner of the Setup Utility. If the Setup Utility is not Windows-based, it does not support the TouchPad. To start the Setup Utility, turn on the screen. To set your preference. 5. Press f5 or f6 (or use either the arrow keys or f5 or f6...
... displayed in the lower-left corner of the Setup Utility. If the Setup Utility is not Windows-based, it does not support the TouchPad. To start the Setup Utility, turn on the screen. To set your preference. 5. Press f5 or f6 (or use either the arrow keys or f5 or f6...
Setup Utility - Windows Vista
Page 7
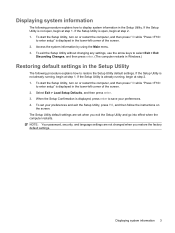
....) Restoring default settings in the lower-left corner of the screen. 2. Select Exit > Load Setup Defaults, and then press enter. 3. To start the Setup Utility, turn on the screen. NOTE: Your password, security, and language settings are set your preferences. 4. Access the system information ... the Setup Utility is not open , begin at step 2. 1. When the Setup Confirmation is not already running , begin at step 2. 1. To start the Setup Utility, turn on or restart the computer, and then press f10 while "Press to enter setup" is open , begin at step 1. ...
....) Restoring default settings in the lower-left corner of the screen. 2. Select Exit > Load Setup Defaults, and then press enter. 3. To start the Setup Utility, turn on the screen. NOTE: Your password, security, and language settings are set your preferences. 4. Access the system information ... the Setup Utility is not open , begin at step 2. 1. When the Setup Confirmation is not already running , begin at step 2. 1. To start the Setup Utility, turn on or restart the computer, and then press f10 while "Press to enter setup" is open , begin at step 1. ...
Setup Utility - Windows Vista
Page 8
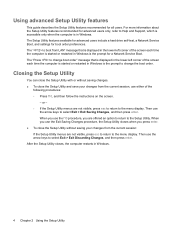
.... The "Press to change boot order" message that is displayed in the lower-left corner of the screen each time the computer is started or restarted in Windows is in Windows is the prompt to change the boot order. For more information about the Setup Utility features recommended ...for a Network Service Boot. Then use either of the screen each time the computer is started or restarted in Windows. Then use the Exit Saving Changes procedure, the Setup Utility closes when you are offered an option to return to ...
.... The "Press to change boot order" message that is displayed in the lower-left corner of the screen each time the computer is started or restarted in Windows is in Windows is the prompt to change the boot order. For more information about the Setup Utility features recommended ...for a Network Service Boot. Then use either of the screen each time the computer is started or restarted in Windows. Then use the Exit Saving Changes procedure, the Setup Utility closes when you are offered an option to return to ...


