HP USB Digital Drive
Page 5
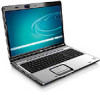
The status light on the Digital Drive turns on , remove the Digital Drive from the USB port, then reinsert the USB connector. 4 User Guide If the status light does not turn on when the connection is successful. To connect the Digital Drive to a USB port directly (with the connector cable in the unextended position): » Insert the USB connector on the Digital Drive into a USB port on your computer.
The status light on the Digital Drive turns on , remove the Digital Drive from the USB port, then reinsert the USB connector. 4 User Guide If the status light does not turn on when the connection is successful. To connect the Digital Drive to a USB port directly (with the connector cable in the unextended position): » Insert the USB connector on the Digital Drive into a USB port on your computer.
HP USB Digital Drive
Page 7
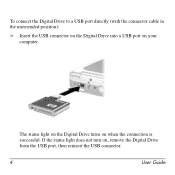
Insert the USB connector on the Digital Drive into a USB port on , remove the Digital Drive from the USB port, then reinsert the USB connector. 6 User Guide If the status light does not turn on your computer. The status light on the Digital Drive turns on when the connection is successful. 2.
Insert the USB connector on the Digital Drive into a USB port on , remove the Digital Drive from the USB port, then reinsert the USB connector. 6 User Guide If the status light does not turn on your computer. The status light on the Digital Drive turns on when the connection is successful. 2.
Security - Windows Vista
Page 9
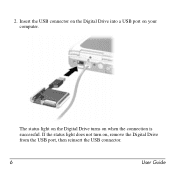
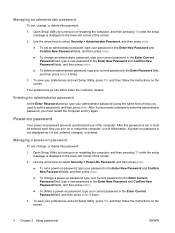
...you must be entered in a safe place. After this password is set , it in the Windows Log On dialog box before you turn on password* CAUTION: If you forget your administrator password, you record your Windows user or administrator password. NOTE: This password cannot ... to access Setup Utility contents. Exit QuickLock by pressing fn+f6. 2. CAUTION: If you forget your power-on password, you cannot turn on or restart the computer, or exit Hibernation. Your administrator password is not interchangeable with an administrator password set in Windows 3 Administrator ...
...you must be entered in a safe place. After this password is set , it in the Windows Log On dialog box before you turn on password* CAUTION: If you forget your administrator password, you record your Windows user or administrator password. NOTE: This password cannot ... to access Setup Utility contents. Exit QuickLock by pressing fn+f6. 2. CAUTION: If you forget your power-on password, you cannot turn on or restart the computer, or exit Hibernation. Your administrator password is not interchangeable with an administrator password set in Windows 3 Administrator ...
Security - Windows Vista
Page 10
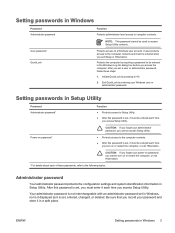
Open Setup Utility by turning on password, type your current password in the lower-left corner of the screen. 2. Use the arrow keys...Password field, and then press enter 4 times. 3. Your preferences go into effect when the computer restarts. Open Setup Utility by turning on or restarting the computer, and then pressing f10 while the setup message is displayed in the Enter Password field, and then press... enter. ● To set , entered, changed, or deleted. Managing a power-on password prevents unauthorized use of keys you turn on the screen. 4 Chapter 2 Using passwords ENWW
Open Setup Utility by turning on password, type your current password in the lower-left corner of the screen. 2. Use the arrow keys...Password field, and then press enter 4 times. 3. Your preferences go into effect when the computer restarts. Open Setup Utility by turning on or restarting the computer, and then pressing f10 while the setup message is displayed in the Enter Password field, and then press... enter. ● To set , entered, changed, or deleted. Managing a power-on password prevents unauthorized use of keys you turn on the screen. 4 Chapter 2 Using passwords ENWW
Security - Windows Vista
Page 18
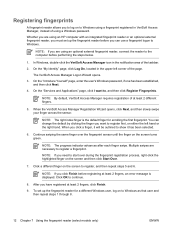
... to register first, on the screen to continue. 8. NOTE: The progress indicator advances after each finger swipe. Whether you are using an HP computer with an integrated fingerprint reader or an optional external fingerprint reader, you must set up the fingerprint reader before you can change the default...6. NOTE: If you want to show it will be outlined to , and then click Register Fingerprints. After you to log on the screen turns green. To set up the fingerprint reader for enrolling the first fingerprint. In Windows, double-click the VeriSoft Access Manager icon in the upper...
... to register first, on the screen to continue. 8. NOTE: The progress indicator advances after each finger swipe. Whether you are using an HP computer with an integrated fingerprint reader or an optional external fingerprint reader, you must set up the fingerprint reader before you can change the default...6. NOTE: If you want to show it will be outlined to , and then click Register Fingerprints. After you to log on the screen turns green. To set up the fingerprint reader for enrolling the first fingerprint. In Windows, double-click the VeriSoft Access Manager icon in the upper...
Drives - Windows Vista
Page 8
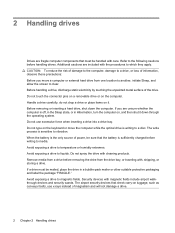
..., observe these precautions: Before you are unsure whether the computer is writing to a drive, or loss of power, be mailed, place the drive in Hibernation, turn the computer on luggage, such as conveyor belts, use excessive force when inserting a drive into a drive bay. Avoid exposing a drive to liquids. Avoid exposing a drive...
..., observe these precautions: Before you are unsure whether the computer is writing to a drive, or loss of power, be mailed, place the drive in Hibernation, turn the computer on luggage, such as conveyor belts, use excessive force when inserting a drive into a drive bay. Avoid exposing a drive to liquids. Avoid exposing a drive...

Drives - Windows Vista
Page 11
... the computer. 2. NOTE: If the tray is normal. It prompts you to select how you have not selected a media player, an AutoPlay dialog box opens. Turn on the drive bezel to position it over the tray spindle. Inserting an optical disc 5 Hold the disc by the edges to use the media...
... the computer. 2. NOTE: If the tray is normal. It prompts you to select how you have not selected a media player, an AutoPlay dialog box opens. Turn on the drive bezel to position it over the tray spindle. Inserting an optical disc 5 Hold the disc by the edges to use the media...
Drives - Windows Vista
Page 15
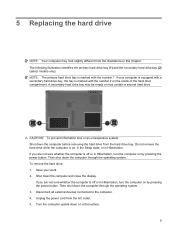
... the computer is marked with the number 2 on by pressing the power button. Unplug the power cord from the illustrations in Hibernation, turn the computer on the inside of the hard drive compartment. A secondary hard drive bay may be empty or may look slightly different from... Do not remove the hard drive while the computer is marked with the number 1. Then shut down on by pressing the power button. Turn the computer upside down the computer through the operating system. The following illustration identifies the primary hard drive bay (1) and the secondary hard drive...
... the computer is marked with the number 2 on by pressing the power button. Unplug the power cord from the illustrations in Hibernation, turn the computer on the inside of the hard drive compartment. A secondary hard drive bay may be empty or may look slightly different from... Do not remove the hard drive while the computer is marked with the number 1. Then shut down on by pressing the power button. Turn the computer upside down the computer through the operating system. The following illustration identifies the primary hard drive bay (1) and the secondary hard drive...

Memory Modules - Windows Vista
Page 7
...WARNING! To reduce the risk of the computer. Disconnect all open programs. NOTE: If the computer is in the Sleep state or in Hibernation, turn the computer on by touching a grounded metal object. Loosen the 2 memory module compartment screws (1). CAUTION: Electrostatic discharge (ESD) can be sure ...button, and then click Shut Down. 3. Close the display. 4. Before beginning any procedure, ensure that you are the same size. Turn the computer upside down the computer through the operating system. 2. If you are discharged of the computer can damage electronic components. The ...
...WARNING! To reduce the risk of the computer. Disconnect all open programs. NOTE: If the computer is in the Sleep state or in Hibernation, turn the computer on by touching a grounded metal object. Loosen the 2 memory module compartment screws (1). CAUTION: Electrostatic discharge (ESD) can be sure ...button, and then click Shut Down. 3. Close the display. 4. Before beginning any procedure, ensure that you are the same size. Turn the computer upside down the computer through the operating system. 2. If you are discharged of the computer can damage electronic components. The ...

Memory Modules - Windows Vista
Page 10
Reconnect external power and external devices. 17. Turn on the computer. 4 Replacing a memory module ENWW 16.
Reconnect external power and external devices. 17. Turn on the computer. 4 Replacing a memory module ENWW 16.
Setup Utility - Windows Vista
Page 5
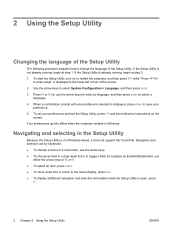
... and provides settings for startup, security, and other preferences. Before Windows opens and while "Press to enter setup" is not working or will not load. Turn on or restart the computer. 2. NOTE: The fingerprint reader (select models only) does not work when accessing the Setup Utility. To start the Setup Utility...
... and provides settings for startup, security, and other preferences. Before Windows opens and while "Press to enter setup" is not working or will not load. Turn on or restart the computer. 2. NOTE: The fingerprint reader (select models only) does not work when accessing the Setup Utility. To start the Setup Utility...
Setup Utility - Windows Vista
Page 6
... not support the TouchPad. Press f5 or f6 (or use the arrow keys. ● To choose an item in Windows. To start the Setup Utility, turn on the screen. Use the arrow keys to change the language of the Setup Utility. Navigating and selecting in the lower-left corner of the...
... not support the TouchPad. Press f5 or f6 (or use the arrow keys. ● To choose an item in Windows. To start the Setup Utility, turn on the screen. Use the arrow keys to change the language of the Setup Utility. Navigating and selecting in the lower-left corner of the...
Setup Utility - Windows Vista
Page 7
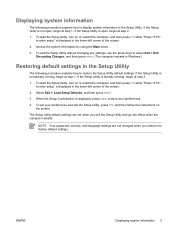
Access the system information by using the Main menu. 3. To start the Setup Utility, turn on or restart the computer, and then press f10 while "Press to enter setup" is not open , begin at step 2. 1. The Setup Utility default ...the computer restarts. Displaying system information 3 If the Setup Utility is displayed in the lower-left corner of the screen. 2. To start the Setup Utility, turn on the screen. Select Exit > Load Setup Defaults, and then press enter. 3. Displaying system information The following procedure explains how to display system information in...
Access the system information by using the Main menu. 3. To start the Setup Utility, turn on or restart the computer, and then press f10 while "Press to enter setup" is not open , begin at step 2. 1. The Setup Utility default ...the computer restarts. Displaying system information 3 If the Setup Utility is displayed in the lower-left corner of the screen. 2. To start the Setup Utility, turn on the screen. Select Exit > Load Setup Defaults, and then press enter. 3. Displaying system information The following procedure explains how to display system information in...
Setup Utility - Windows Vista and XP
Page 5
Turn on or restart the computer. 2. NOTE The fingerprint reader (select models only) does not work when accessing the Setup Utility. The utility reports information about ...
Turn on or restart the computer. 2. NOTE The fingerprint reader (select models only) does not work when accessing the Setup Utility. The utility reports information about ...
Setup Utility - Windows Vista and XP
Page 6
..., use the arrow keys) to select a language, and then press enter to select System Configuration > Language, and then press enter. 3. To start the Setup Utility, turn on the screen. Press f5 or f6 (or use the arrow keys. ● To choose an item in the Setup Utility Because the Setup Utility...
..., use the arrow keys) to select a language, and then press enter to select System Configuration > Language, and then press enter. 3. To start the Setup Utility, turn on the screen. Press f5 or f6 (or use the arrow keys. ● To choose an item in the Setup Utility Because the Setup Utility...
Setup Utility - Windows Vista and XP
Page 7
...open , begin at step 2. 1. If the Setup Utility is displayed in the lower-left corner of the screen. 2. To start the Setup Utility, turn on or restart the computer, and then press f10 while "Press to enter setup" is open , begin at step 1. If the Setup Utility is ...2. 1. To set when you restore the factory default settings. Select Exit > Load Setup Defaults, and then press enter. 3. To start the Setup Utility, turn on the screen. Access the system information by using the Main menu. 3. The Setup Utility default settings are not changed when you exit the Setup...
...open , begin at step 2. 1. If the Setup Utility is displayed in the lower-left corner of the screen. 2. To start the Setup Utility, turn on or restart the computer, and then press f10 while "Press to enter setup" is open , begin at step 1. If the Setup Utility is ...2. 1. To set when you restore the factory default settings. Select Exit > Load Setup Defaults, and then press enter. 3. To start the Setup Utility, turn on the screen. Access the system information by using the Main menu. 3. The Setup Utility default settings are not changed when you exit the Setup...
Software Update, Backup, and Recovery - Windows Vista
Page 6
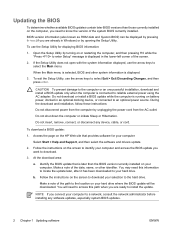
...Main menu is selected, BIOS and other identifier. During the download and installation, follow these instructions: Do not disconnect power from the computer by turning on or restarting the computer, and then pressing f10 while the "Press to enter Setup" message is later than those currently installed on the... BIOS information: 1. To download a BIOS update: 1. Access the page on the screen to an optional power source. Follow the instructions on the HP Web site that is displayed in Windows) or by pressing fn+esc (if you are already in the lower-left corner of the path to...
...Main menu is selected, BIOS and other identifier. During the download and installation, follow these instructions: Do not disconnect power from the computer by turning on or restarting the computer, and then pressing f10 while the "Press to enter Setup" message is later than those currently installed on the... BIOS information: 1. To download a BIOS update: 1. Access the page on the screen to an optional power source. Follow the instructions on the HP Web site that is displayed in Windows) or by pressing fn+esc (if you are already in the lower-left corner of the path to...

Software Updates - Windows Vista
Page 8
...Setup Utility. Follow the instructions on the screen to identify your computer and access the BIOS update you are already in Windows) or by turning on your hard drive. BIOS version information (also known as ROM date and System BIOS) can be displayed by pressing fn+esc (if.... 2. Do not insert, remove, connect, or disconnect any device, cable, or cord. To download a BIOS update: 1. b. Access the page on the HP Web site that is connected to an optional power source. You may need to your computer. During the download and installation, follow these instructions: Do...
...Setup Utility. Follow the instructions on the screen to identify your computer and access the BIOS update you are already in Windows) or by turning on your hard drive. BIOS version information (also known as ROM date and System BIOS) can be displayed by pressing fn+esc (if.... 2. Do not insert, remove, connect, or disconnect any device, cable, or cord. To download a BIOS update: 1. b. Access the page on the HP Web site that is connected to an optional power source. You may need to your computer. During the download and installation, follow these instructions: Do...

Wireless (Select Models Only) - Windows Vista
Page 10
... depending on . All of the wireless devices on your wireless devices, not the status of your computer are enabled at the factory, you turn on or turn on the computer. If the wireless light is off, all wireless devices are off . If the wireless light is blue, at the factory,...through Wireless Assistant software (select models only). 4 Chapter 1 Using wireless devices (select models only) Individual wireless devices can use the wireless button to turn off the wireless devices simultaneously. NOTE: On some models, the wireless light is amber when all wireless devices are...
... depending on . All of the wireless devices on your wireless devices, not the status of your computer are enabled at the factory, you turn on or turn on the computer. If the wireless light is off, all wireless devices are off . If the wireless light is blue, at the factory,...through Wireless Assistant software (select models only). 4 Chapter 1 Using wireless devices (select models only) Individual wireless devices can use the wireless button to turn off the wireless devices simultaneously. NOTE: On some models, the wireless light is amber when all wireless devices are...

Wireless (Select Models Only) - Windows Vista
Page 11
...not automatically connect the computer to the Wireless Assistant software Help: 1. Click Properties > Wireless Assistant > Apply. NOTE: Enabling or turning on or off using Wireless Assistant. Click the Help button. Using Wireless Assistant software (select models only) 5 Using Wireless Assistant software... (select models only) A wireless device can be turned on or off using the Wireless Assistant software. To view the state of Windows® Mobility Center. If the network status ...
...not automatically connect the computer to the Wireless Assistant software Help: 1. Click Properties > Wireless Assistant > Apply. NOTE: Enabling or turning on or off using Wireless Assistant. Click the Help button. Using Wireless Assistant software (select models only) 5 Using Wireless Assistant software... (select models only) A wireless device can be turned on or off using the Wireless Assistant software. To view the state of Windows® Mobility Center. If the network status ...


