Security - Windows Vista
Page 8
.... ● A password must be entered at a Windows prompt. For additional information about Windows passwords, such as they are not displayed as screen-saver passwords, select Start > Help and Support. 2 Chapter 2 Using passwords ENWW CAUTION: To prevent being locked out of the computer, record each password immediately and store it in a secure...
.... ● A password must be entered at a Windows prompt. For additional information about Windows passwords, such as they are not displayed as screen-saver passwords, select Start > Help and Support. 2 Chapter 2 Using passwords ENWW CAUTION: To prevent being locked out of the computer, record each password immediately and store it in a secure...
Security - Windows Vista
Page 12
To view and access Norton Internet Security, select Start > All Programs. For more information about computer viruses, type viruses in the Search field in most viruses, destroy them to function abnormally. Computer viruses can ...
To view and access Norton Internet Security, select Start > All Programs. For more information about computer viruses, type viruses in the Search field in most viruses, destroy them to function abnormally. Computer viruses can ...
Security - Windows Vista
Page 14
Additional updates to the operating system and other Microsoft® programs are released, from Microsoft. ● Use the update link at Start > All Programs > Windows Update. You can obtain updates, as you receive an alert. Updates to install the latest software from the Microsoft Web site and ...
Additional updates to the operating system and other Microsoft® programs are released, from Microsoft. ● Use the update link at Start > All Programs > Windows Update. You can obtain updates, as you receive an alert. Updates to install the latest software from the Microsoft Web site and ...
Security - Windows Vista
Page 18
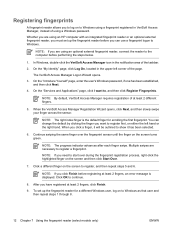
... Windows. Continue swiping the same finger over during the fingerprint registration process, right-click the highlighted finger on the screen and then click Start Over. 7. Click a different finger on either the left corner of the page. Registering fingerprints A fingerprint reader allows you to log ...an optional external fingerprint reader, connect the reader to the computer before performing the steps below. 1. Whether you are using an HP computer with an integrated fingerprint reader or an optional external fingerprint reader, you can change the default by clicking the finger you...
... Windows. Continue swiping the same finger over during the fingerprint registration process, right-click the highlighted finger on the screen and then click Start Over. 7. Click a different finger on either the left corner of the page. Registering fingerprints A fingerprint reader allows you to log ...an optional external fingerprint reader, connect the reader to the computer before performing the steps below. 1. Whether you are using an HP computer with an integrated fingerprint reader or an optional external fingerprint reader, you can change the default by clicking the finger you...
Backup and Recovery - Windows Vista
Page 7
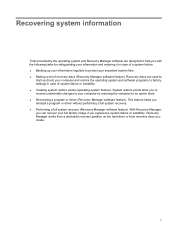
... hard drive or from recovery discs you to reverse undesirable changes to your computer by the operating system and Recovery Manager software are used to start up (boot) your computer and restore the operating system and software programs to factory settings in case of a system failure: ● Backing up your information...
... hard drive or from recovery discs you to reverse undesirable changes to your computer by the operating system and Recovery Manager software are used to start up (boot) your computer and restore the operating system and software programs to factory settings in case of a system failure: ● Backing up your information...
Backup and Recovery - Windows Vista
Page 8
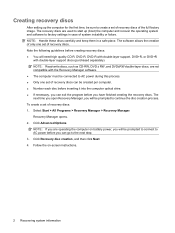
... the next step. 3. Click Advanced Options. The recovery discs are operating the computer on -screen instructions. 2 Recovering system information NOTE: If you are used to start up the computer for the first time, be sure to create a set of recovery discs can be connected to AC power during this process. ●... the operating system and software to factory settings in a safe place. NOTE: Handle these discs carefully and keep them in case of recovery discs. Select Start > All Programs > Recovery Manager > Recovery Manager.
... the next step. 3. Click Advanced Options. The recovery discs are operating the computer on -screen instructions. 2 Recovering system information NOTE: If you are used to start up the computer for the first time, be sure to create a set of recovery discs can be connected to AC power during this process. ●... the operating system and software to factory settings in a safe place. NOTE: Handle these discs carefully and keep them in case of recovery discs. Select Start > All Programs > Recovery Manager > Recovery Manager.
Backup and Recovery - Windows Vista
Page 10
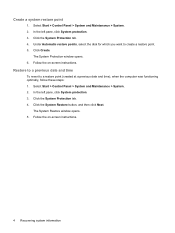
Follow the on -screen instructions. 4 Recovering system information Click the System Protection tab. 4. Follow the on -screen instructions. Click Create. Select Start > Control Panel > System and Maintenance > System. 2. Select Start > Control Panel > System and Maintenance > System. 2. The System Restore window opens. 5. The System Protection window opens. 6. Click the System Protection tab. 4. Create a system...
Follow the on -screen instructions. 4 Recovering system information Click the System Protection tab. 4. Follow the on -screen instructions. Click Create. Select Start > Control Panel > System and Maintenance > System. 2. Select Start > Control Panel > System and Maintenance > System. 2. The System Restore window opens. 5. The System Protection window opens. 6. Click the System Protection tab. 4. Create a system...
Backup and Recovery - Windows Vista
Page 11
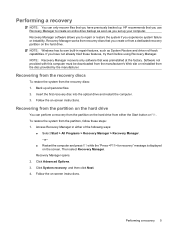
NOTE: Windows has its own built-in either the Start button or f11. Recovering from the recovery discs To restore the system from the disc provided by the manufacturer. Follow the on the hard drive ... as soon as System Restore and driver roll-back capabilities. Performing a recovery NOTE: You can perform a recovery from either of the following ways: ● Select Start > All Programs > Recovery Manager > Recovery Manager. -or- ● Restart the computer and press f11 while the "Press for recovery" message is displayed on the hard...
NOTE: Windows has its own built-in either the Start button or f11. Recovering from the recovery discs To restore the system from the disc provided by the manufacturer. Follow the on the hard drive ... as soon as System Restore and driver roll-back capabilities. Performing a recovery NOTE: You can perform a recovery from either of the following ways: ● Select Start > All Programs > Recovery Manager > Recovery Manager. -or- ● Restart the computer and press f11 while the "Press for recovery" message is displayed on the hard...
Drives - Windows Vista
Page 7
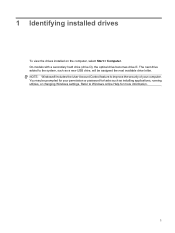
1 Identifying installed drives To view the drives installed on the computer, select Start > Computer. On models with a secondary hard drive (drive D), the optical drive becomes drive E. NOTE: Windows® includes the User Account Control feature to Windows online ...
1 Identifying installed drives To view the drives installed on the computer, select Start > Computer. On models with a secondary hard drive (drive D), the optical drive becomes drive E. NOTE: Windows® includes the User Account Control feature to Windows online ...
Drives - Windows Vista
Page 14
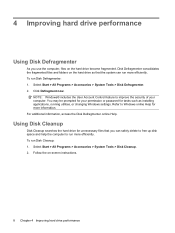
... free up disk space and help the computer to improve the security of your permission or password for more information. To run Disk Defragmenter: 1. Select Start > All Programs > Accessories > System Tools > Disk Defragmenter. 2. Follow the on the hard drive become fragmented. Click Defragment now. Using Disk Cleanup Disk Cleanup searches the...
... free up disk space and help the computer to improve the security of your permission or password for more information. To run Disk Defragmenter: 1. Select Start > All Programs > Accessories > System Tools > Disk Defragmenter. 2. Follow the on the hard drive become fragmented. Click Defragment now. Using Disk Cleanup Disk Cleanup searches the...

Memory Modules - Windows Vista
Page 7
... computer through the operating system. 2. If you are not sure whether the computer is off or in Hibernation, turn the computer on a flat surface. 7. Click Start, click the arrow next to the computer. 5. Disconnect all open programs. NOTE: If the computer is in the Sleep state or in the memory module...
... computer through the operating system. 2. If you are not sure whether the computer is off or in Hibernation, turn the computer on a flat surface. 7. Click Start, click the arrow next to the computer. 5. Disconnect all open programs. NOTE: If the computer is in the Sleep state or in the memory module...
Modem and Local Area Network - Windows Vista
Page 8
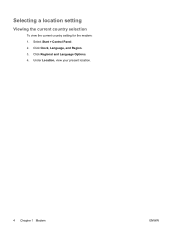
Click Clock, Language, and Region. 3. Under Location, view your present location. 4 Chapter 1 Modem ENWW Click Regional and Language Options. 4. Select Start > Control Panel. 2. Selecting a location setting Viewing the current country selection To view the current country setting for the modem: 1.
Click Clock, Language, and Region. 3. Under Location, view your present location. 4 Chapter 1 Modem ENWW Click Regional and Language Options. 4. Select Start > Control Panel. 2. Selecting a location setting Viewing the current country selection To view the current country setting for the modem: 1.
Modem and Local Area Network - Windows Vista
Page 9
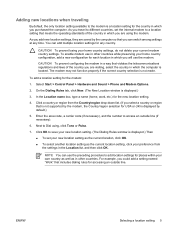
... a country or region that meets the operating standards of the country you are visiting, select the country in which you are saved by default.) 5. Select Start > Control Panel > Hardware and Sound > Phone and Modem Options. 2. On the Dialing Rules tab, click New. (The New Location window is not made. Enter the...
... a country or region that meets the operating standards of the country you are visiting, select the country in which you are saved by default.) 5. Select Start > Control Panel > Hardware and Sound > Phone and Modem Options. 2. On the Dialing Rules tab, click New. (The New Location window is not made. Enter the...
Modem and Local Area Network - Windows Vista
Page 10
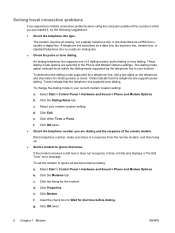
... described as a data line, fax machine line, modem line, or standard telephone line is usually a digital line. d. Select Start > Control Panel > Hardware and Sound > Phone and Modem Options. Click the listing for clicks (pulses) or tones. These dialing... telephone line supports tone dialing. Tones indicate that the telephone line supports pulse dialing. To change the dialing mode in your modem location setting. Select Start > Control Panel > Hardware and Sound > Phone and Modem Options. b. c. Select your current modem location setting: a. Click Edit. e. Click ...
... described as a data line, fax machine line, modem line, or standard telephone line is usually a digital line. d. Select Start > Control Panel > Hardware and Sound > Phone and Modem Options. Click the listing for clicks (pulses) or tones. These dialing... telephone line supports tone dialing. Tones indicate that the telephone line supports pulse dialing. To change the dialing mode in your modem location setting. Select Start > Control Panel > Hardware and Sound > Phone and Modem Options. b. c. Select your current modem location setting: a. Click Edit. e. Click ...
Modem and Local Area Network - Windows Vista
Page 11
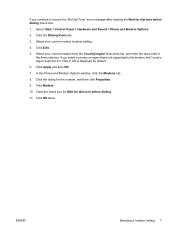
.... 8. Click Modem. 10. Select your current location from the Country/region drop-down list, and enter the area code in the Area code box. Select Start > Control Panel > Hardware and Sound > Phone and Modem Options. 2. Select your current modem location setting. 4. Click OK twice. If you continue to receive the "No...
.... 8. Click Modem. 10. Select your current location from the Country/region drop-down list, and enter the area code in the Area code box. Select Start > Control Panel > Hardware and Sound > Phone and Modem Options. 2. Select your current modem location setting. 4. Click OK twice. If you continue to receive the "No...

Setup Utility - Windows Vista
Page 3
Table of contents 1 Starting the Setup Utility 2 Using the Setup Utility Changing the language of the Setup Utility 2 Navigating and selecting in the Setup Utility 2 Displaying system information ...3 Restoring default settings in the Setup Utility 3 Using advanced Setup Utility features 4 Closing the Setup Utility ...4 3 Setup Utility menus Main menu ...5 Security menu ...5 System Configuration menu ...6 Diagnostics menu ...6 Index ...7 iii
Table of contents 1 Starting the Setup Utility 2 Using the Setup Utility Changing the language of the Setup Utility 2 Navigating and selecting in the Setup Utility 2 Displaying system information ...3 Restoring default settings in the Setup Utility 3 Using advanced Setup Utility features 4 Closing the Setup Utility ...4 3 Setup Utility menus Main menu ...5 Security menu ...5 System Configuration menu ...6 Diagnostics menu ...6 Index ...7 iii
Setup Utility - Windows Vista
Page 5
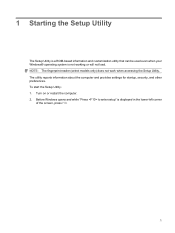
1 Starting the Setup Utility The Setup Utility is a ROM-based information and customization utility that can be used even when your Windows® operating system is ... lower-left corner of the screen, press f10. 1 Before Windows opens and while "Press to enter setup" is not working or will not load. To start the Setup Utility: 1. NOTE: The fingerprint reader (select models only) does not work when accessing the Setup Utility. Turn on or restart the computer. 2. The...
1 Starting the Setup Utility The Setup Utility is a ROM-based information and customization utility that can be used even when your Windows® operating system is ... lower-left corner of the screen, press f10. 1 Before Windows opens and while "Press to enter setup" is not working or will not load. To start the Setup Utility: 1. NOTE: The fingerprint reader (select models only) does not work when accessing the Setup Utility. Turn on or restart the computer. 2. The...
Setup Utility - Windows Vista
Page 6
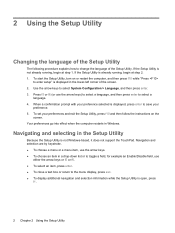
... example an Enable/Disable field, use the arrow keys) to select a language, and then press enter to change the language of the Setup Utility. To start the Setup Utility, turn on the screen. Press f5 or f6 (or use either the arrow keys or f5 or f6. ● To select an...
... example an Enable/Disable field, use the arrow keys) to select a language, and then press enter to change the language of the Setup Utility. To start the Setup Utility, turn on the screen. Press f5 or f6 (or use either the arrow keys or f5 or f6. ● To select an...
Setup Utility - Windows Vista
Page 7
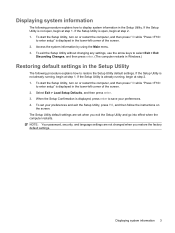
...4. Displaying system information 3 Displaying system information The following procedure explains how to enter setup" is not already running , begin at step 1. To start the Setup Utility, turn on or restart the computer, and then press f10 while "Press to display system information in the Setup Utility. If the... 2. 1. The Setup Utility default settings are not changed when you exit the Setup Utility and go into effect when the computer restarts. To start the Setup Utility, turn on the screen. If the Setup Utility is not open , begin at step 1. To set when you restore the...
...4. Displaying system information 3 Displaying system information The following procedure explains how to enter setup" is not already running , begin at step 1. To start the Setup Utility, turn on or restart the computer, and then press f10 while "Press to display system information in the Setup Utility. If the... 2. 1. The Setup Utility default settings are not changed when you exit the Setup Utility and go into effect when the computer restarts. To start the Setup Utility, turn on the screen. If the Setup Utility is not open , begin at step 1. To set when you restore the...
Setup Utility - Windows Vista
Page 8
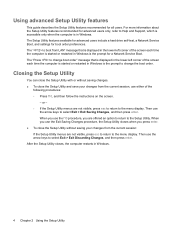
..., use the arrow keys to select Exit > Exit Saving Changes, and then press enter. Then use either of the screen each time the computer is started or restarted in Windows is the prompt to the menu display. When you use the arrow keys to select Exit > Exit Discarding Changes, and then... Setup Utility and save your changes from LAN" message that is displayed in the lower-left corner of the screen each time the computer is started or restarted in the lower-left corner of the following procedures: ◦ Press f10, and then follow the instructions on the screen. -
..., use the arrow keys to select Exit > Exit Saving Changes, and then press enter. Then use either of the screen each time the computer is started or restarted in Windows is the prompt to the menu display. When you use the arrow keys to select Exit > Exit Discarding Changes, and then... Setup Utility and save your changes from LAN" message that is displayed in the lower-left corner of the screen each time the computer is started or restarted in the lower-left corner of the following procedures: ◦ Press f10, and then follow the instructions on the screen. -


