
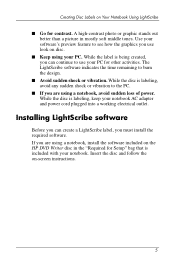
Using LightScribe (Select Models Only)
Page 7
...you can continue to use look on disc. ■ Keep using your PC. A high-contrast photo or graphic stands out better than a picture in the "Required for contrast. While the disc is included with your notebook. Insert the disc and follow the on-screen instructions. 5 The LightScribe ...graphics you must install the required software. If you are using a notebook, install the software included on the HP DVD Writer disc in mostly soft middle tones. While the label is labeling, keep your notebook AC adapter and power cord plugged into a working electrical outlet. While the disc is being...
...you can continue to use look on disc. ■ Keep using your PC. A high-contrast photo or graphic stands out better than a picture in the "Required for contrast. While the disc is included with your notebook. Insert the disc and follow the on-screen instructions. 5 The LightScribe ...graphics you must install the required software. If you are using a notebook, install the software included on the HP DVD Writer disc in mostly soft middle tones. While the label is labeling, keep your notebook AC adapter and power cord plugged into a working electrical outlet. While the disc is being...
Hardware and Software Guide
Page 3
Contents 1 Component ID Top Components 1-2 Keys 1-2 TouchPad 1-3 Power Controls 1-4 DVD Button 1-5 Music Button 1-6 Media Controls-Media Activity Buttons 1-7 Media Controls-Volume, Back and OK Buttons 1-8 Lights 1-9 Wireless Lights and Button (Select Models Only ... Front Components 1-12 Speakers, Jacks Display Release Button and Infrared Lens 1-12 Lights 1-13 Rear Components 1-14 Left-Side Components 1-15 Ports and Jacks 1-15 PC Card Slot and Button 1-16 Vent and Security Cable Slot 1-17 Right-Side Components 1-18 Ports and Jack 1-18 Digital Media Slot Components and Optical...
Contents 1 Component ID Top Components 1-2 Keys 1-2 TouchPad 1-3 Power Controls 1-4 DVD Button 1-5 Music Button 1-6 Media Controls-Media Activity Buttons 1-7 Media Controls-Volume, Back and OK Buttons 1-8 Lights 1-9 Wireless Lights and Button (Select Models Only ... Front Components 1-12 Speakers, Jacks Display Release Button and Infrared Lens 1-12 Lights 1-13 Rear Components 1-14 Left-Side Components 1-15 Ports and Jacks 1-15 PC Card Slot and Button 1-16 Vent and Security Cable Slot 1-17 Right-Side Components 1-18 Ports and Jack 1-18 Digital Media Slot Components and Optical...
Hardware and Software Guide
Page 4
... Finding Media Activity Button Information 2-14 Finding Volume Button Information 2-14 Keypads 2-15 Using the Embedded Numeric Keypad 2-15 Using an External Numeric Keypad 2-17 3 Power Power Sources 3-2 Selecting a Power Source 3-2 Switching Between Battery and External Power. . . . 3-3 Power Control and Light Locations 3-4 iv Hardware and Software Guide
... Finding Media Activity Button Information 2-14 Finding Volume Button Information 2-14 Keypads 2-15 Using the Embedded Numeric Keypad 2-15 Using an External Numeric Keypad 2-17 3 Power Power Sources 3-2 Selecting a Power Source 3-2 Switching Between Battery and External Power. . . . 3-3 Power Control and Light Locations 3-4 iv Hardware and Software Guide
Hardware and Software Guide
Page 5
.... . 3-10 Turning the Notebook On or Off 3-11 Initiating or Resuming from Standby 3-12 Initiating or Restoring from Hibernation 3-13 Using Emergency Turn Off Procedures 3-14 Power Preferences 3-15 Using Power Schemes 3-15 Setting a Standby Password 3-16 Setting Other Power Preferences 3-16 Battery Pack ...3-18 Monitoring the Charge in a Battery Pack 3-19 Managing Low-Battery Conditions 3-21 Calibrating a Battery Pack 3-22 Conserving Battery Pack Power 3-26 Replacing a Battery Pack 3-28 Storing a Battery Pack 3-30 Disposing of a Used Battery Pack 3-30 4 Multimedia Volume Controls ...
.... . 3-10 Turning the Notebook On or Off 3-11 Initiating or Resuming from Standby 3-12 Initiating or Restoring from Hibernation 3-13 Using Emergency Turn Off Procedures 3-14 Power Preferences 3-15 Using Power Schemes 3-15 Setting a Standby Password 3-16 Setting Other Power Preferences 3-16 Battery Pack ...3-18 Monitoring the Charge in a Battery Pack 3-19 Managing Low-Battery Conditions 3-21 Calibrating a Battery Pack 3-22 Conserving Battery Pack Power 3-26 Replacing a Battery Pack 3-28 Storing a Battery Pack 3-30 Disposing of a Used Battery Pack 3-30 4 Multimedia Volume Controls ...

Hardware and Software Guide
Page 6
... Home 5-5 Connecting to a Public WLAN 5-6 Using Wireless Security Features 5-6 Identifying an 802.11 Wireless Device 5-7 Troubleshooting Devices 5-7 Bluetooth Wireless Devices (Select Models Only) . . . . . 5-8 Wireless Device Power States 5-10 Turning On the Devices 5-12 Turning Off and Disabling the Devices 5-13 vi Hardware and Software Guide
... Home 5-5 Connecting to a Public WLAN 5-6 Using Wireless Security Features 5-6 Identifying an 802.11 Wireless Device 5-7 Troubleshooting Devices 5-7 Bluetooth Wireless Devices (Select Models Only) . . . . . 5-8 Wireless Device Power States 5-10 Turning On the Devices 5-12 Turning Off and Disabling the Devices 5-13 vi Hardware and Software Guide
Hardware and Software Guide
Page 7
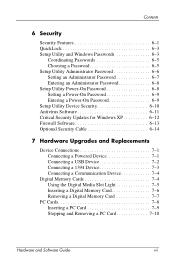
... Administrator Password 6-6 Setting an Administrator Password 6-7 Entering an Administrator Password 6-8 Setup Utility Power-On Password 6-8 Setting a Power-On Password 6-9 Entering a Power-On Password 6-9 Setup Utility Device Security 6-10 Antivirus Software 6-11 Critical Security Updates ...for Windows XP 6-12 Firewall Software 6-13 Optional Security Cable 6-14 7 Hardware Upgrades and Replacements Device Connections 7-1 Connecting a Powered Device 7-1 Connecting a USB Device 7-2 Connecting a 1394 Device 7-3 Connecting a Communication Device 7-4 Digital Memory Cards 7-4 Using...
... Administrator Password 6-6 Setting an Administrator Password 6-7 Entering an Administrator Password 6-8 Setup Utility Power-On Password 6-8 Setting a Power-On Password 6-9 Entering a Power-On Password 6-9 Setup Utility Device Security 6-10 Antivirus Software 6-11 Critical Security Updates ...for Windows XP 6-12 Firewall Software 6-13 Optional Security Cable 6-14 7 Hardware Upgrades and Replacements Device Connections 7-1 Connecting a Powered Device 7-1 Connecting a USB Device 7-2 Connecting a 1394 Device 7-3 Connecting a Communication Device 7-4 Digital Memory Cards 7-4 Using...
Hardware and Software Guide
Page 8
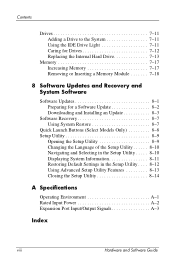
... 8-11 Restoring Default Settings in the Setup Utility . . . . 8-12 Using Advanced Setup Utility Features 8-13 Closing the Setup Utility 8-14 A Specifications Operating Environment A-1 Rated Input Power A-2 Expansion Port Input/Output Signals A-3 Index viii Hardware and Software Guide
... 8-11 Restoring Default Settings in the Setup Utility . . . . 8-12 Using Advanced Setup Utility Features 8-13 Closing the Setup Utility 8-14 A Specifications Operating Environment A-1 Rated Input Power A-2 Expansion Port Input/Output Signals A-3 Index viii Hardware and Software Guide
Hardware and Software Guide
Page 12
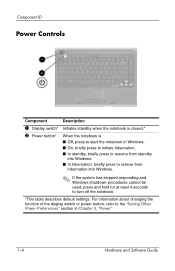
... Component Description 1 Display switch* Initiates standby when the notebook is closed.* 2 Power button* When the notebook is ■ Off, press to start the notebook in Windows. ■ On, briefly press to initiate hibernation. ■ In standby, briefly press to resume from standby ..., press and hold for at least 4 seconds to the "Setting Other Power Preferences" section in Chapter 3, "Power." 1-4 Hardware and Software Guide For information about changing the function of the display switch or power button, refer to turn off the notebook. *This table describes default settings.
... Component Description 1 Display switch* Initiates standby when the notebook is closed.* 2 Power button* When the notebook is ■ Off, press to start the notebook in Windows. ■ On, briefly press to initiate hibernation. ■ In standby, briefly press to resume from standby ..., press and hold for at least 4 seconds to the "Setting Other Power Preferences" section in Chapter 3, "Power." 1-4 Hardware and Software Guide For information about changing the function of the display switch or power button, refer to turn off the notebook. *This table describes default settings.
Hardware and Software Guide
Page 17
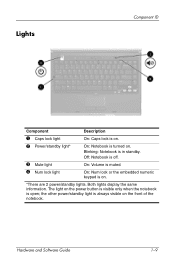
Lights Component ID Component Description 1 Caps lock light On: Caps lock is on. 2 Power/standby light* On: Notebook is open; Both lights display the same information. The light on the power button is visible only when the notebook is turned on. Blinking: Notebook is always visible on . *There are 2 power/standby lights. Hardware and Software Guide 1-9 the other power/standby light is in standby. Off: Notebook is off. 3 Mute light On: Volume is muted. 4 Num lock light On: Num lock or the embedded numeric keypad is on the front of the notebook.
Lights Component ID Component Description 1 Caps lock light On: Caps lock is on. 2 Power/standby light* On: Notebook is open; Both lights display the same information. The light on the power button is visible only when the notebook is turned on. Blinking: Notebook is always visible on . *There are 2 power/standby lights. Hardware and Software Guide 1-9 the other power/standby light is in standby. Off: Notebook is off. 3 Mute light On: Volume is muted. 4 Num lock light On: Num lock or the embedded numeric keypad is on the front of the notebook.

Hardware and Software Guide
Page 19
...the device should be used in such a manner that the potential for human contact during normal operation, including when the notebook display is closed. *The antennae are not visible from obstructions. For optimal transmission, keep the areas immediately around the antennae... free from the outside of this device is minimized. Hardware and Software Guide 1-11 The radiated output power of the notebook. To avoid the possibility of exceeding the FCC radio frequency exposure limits, human proximity to Radio Frequency Radiation. Component ID Wireless...
...the device should be used in such a manner that the potential for human contact during normal operation, including when the notebook display is closed. *The antennae are not visible from obstructions. For optimal transmission, keep the areas immediately around the antennae... free from the outside of this device is minimized. Hardware and Software Guide 1-11 The radiated output power of the notebook. To avoid the possibility of exceeding the FCC radio frequency exposure limits, human proximity to Radio Frequency Radiation. Component ID Wireless...

Hardware and Software Guide
Page 20
Also connect the audio function of an audio/video device such as a television or VCR. 1-12 Hardware and Software Guide Component ID Front Components Speakers, Jacks Display Release Button and Infrared Lens Component 1 Stereo speakers (2) 2 (Consumer) Infrared lens Description Produce stereo sound. Links the notebook to an optional remote control. 3 Display release button Opens the notebook. 4 Audio-in (microphone) jack 5 Audio-out (headphone) jacks (2) Connects an optional monaural (single sound channel) microphone. Connect optional headphones or powered stereo speakers.
Also connect the audio function of an audio/video device such as a television or VCR. 1-12 Hardware and Software Guide Component ID Front Components Speakers, Jacks Display Release Button and Infrared Lens Component 1 Stereo speakers (2) 2 (Consumer) Infrared lens Description Produce stereo sound. Links the notebook to an optional remote control. 3 Display release button Opens the notebook. 4 Audio-in (microphone) jack 5 Audio-out (headphone) jacks (2) Connects an optional monaural (single sound channel) microphone. Connect optional headphones or powered stereo speakers.
Hardware and Software Guide
Page 21
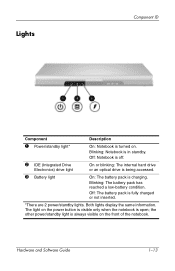
...has reached a low-battery condition. The light on the front of the notebook. the other power/standby light is always visible on the power button is visible only when the notebook is open; Off: Notebook is off. 2 IDE (Integrated Drive Electronics) drive light On or blinking:... battery pack is fully charged or not inserted. *There are 2 power/standby lights. Both lights display the same information. Off: The battery pack is charging. Lights Component ID Component Description 1 Power/standby light* On: Notebook is in standby. Hardware and Software Guide 1-13 Blinking...
...has reached a low-battery condition. The light on the front of the notebook. the other power/standby light is always visible on the power button is visible only when the notebook is open; Off: Notebook is off. 2 IDE (Integrated Drive Electronics) drive light On or blinking:... battery pack is fully charged or not inserted. *There are 2 power/standby lights. Both lights display the same information. Off: The battery pack is charging. Lights Component ID Component Description 1 Power/standby light* On: Notebook is in standby. Hardware and Software Guide 1-13 Blinking...

Hardware and Software Guide
Page 22
... ✎ To establish a wireless connection, a wireless network must already be set up. One vent is turned on the left side of the notebook. 1-14 Hardware and Software Guide For more information, refer to block airflow. the other vents are 2 wireless lights. Connects the AC adapter cable.... *There are visible on the rear of the notebook. Provides airflow to cool internal components. 3 Power connector Ä To prevent overheating, do not obstruct vents. The light on the wireless button is visible only when...
... ✎ To establish a wireless connection, a wireless network must already be set up. One vent is turned on the left side of the notebook. 1-14 Hardware and Software Guide For more information, refer to block airflow. the other vents are 2 wireless lights. Connects the AC adapter cable.... *There are visible on the rear of the notebook. Provides airflow to cool internal components. 3 Power connector Ä To prevent overheating, do not obstruct vents. The light on the wireless button is visible only when...
Hardware and Software Guide
Page 30
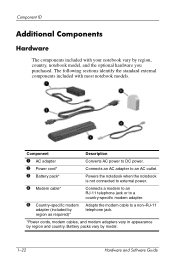
... you purchased. Battery packs vary by region and country. Component Description 1 AC adapter Converts AC power to DC power. 2 Power cord* Connects an AC adapter to an AC outlet. 3 Battery pack* Powers the notebook when the notebook is not connected to external power. 4 Modem cable* Connects a modem to an RJ-11 telephone jack or to a country-specific...
... you purchased. Battery packs vary by region and country. Component Description 1 AC adapter Converts AC power to DC power. 2 Power cord* Connects an AC adapter to an AC outlet. 3 Battery pack* Powers the notebook when the notebook is not connected to external power. 4 Modem cable* Connects a modem to an RJ-11 telephone jack or to a country-specific...
Hardware and Software Guide
Page 38
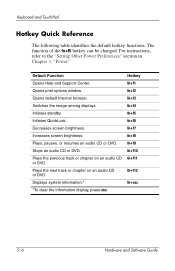
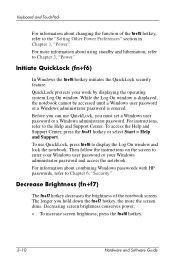
For instructions, refer to the "Setting Other Power Preferences" section in Chapter 3, "Power." Keyboard and TouchPad Hotkey Quick Reference The following table identifies the default hotkey functions. Default Function Hotkey Opens Help and Support Center. fn+f4 Initiates ...
For instructions, refer to the "Setting Other Power Preferences" section in Chapter 3, "Power." Keyboard and TouchPad Hotkey Quick Reference The following table identifies the default hotkey functions. Default Function Hotkey Opens Help and Support Center. fn+f4 Initiates ...
Hardware and Software Guide
Page 41
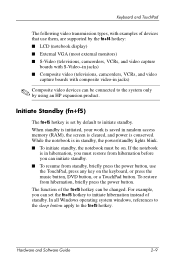
If the notebook is set the fn+f5 hotkey to the system only by using an HP expansion product. Keyboard and TouchPad The following video transmission types, with composite video-in hibernation, you must be changed. Initiate Standby (fn+f5) ... operating system windows, references to the sleep button apply to initiate standby. To restore from standby, briefly press the power button, use them, are supported by the fn+f4 hotkey: ■ LCD (notebook display) ■ External VGA (most external monitors) ■ S-Video (televisions, camcorders, VCRs, and video capture boards with S-...
If the notebook is set the fn+f5 hotkey to the system only by using an HP expansion product. Keyboard and TouchPad The following video transmission types, with composite video-in hibernation, you must be changed. Initiate Standby (fn+f5) ... operating system windows, references to the sleep button apply to initiate standby. To restore from standby, briefly press the power button, use them, are supported by the fn+f4 hotkey: ■ LCD (notebook display) ■ External VGA (most external monitors) ■ S-Video (televisions, camcorders, VCRs, and video capture boards with S-...
Hardware and Software Guide
Page 42
... protects your Windows administrator password and access the notebook. For information about changing the function of the notebook screen. Keyboard and TouchPad For information about combining Windows passwords with HP passwords, refer to Chapter 6, "Security." For more the screen dims. Decreasing screen brightness conserves power. » To increase screen brightness, press the fn+f8...
... protects your Windows administrator password and access the notebook. For information about changing the function of the notebook screen. Keyboard and TouchPad For information about combining Windows passwords with HP passwords, refer to Chapter 6, "Security." For more the screen dims. Decreasing screen brightness conserves power. » To increase screen brightness, press the fn+f8...

Hardware and Software Guide
Page 51
If using QuickPlay (select models only), the functionality of components when used in Microsoft® Windows®. Hardware and Software Guide 3-1 Refer to the HP QuickPlay User Guide for more information. 3 Power ✎ This chapter provides information on the functions and features of some components may differ.
If using QuickPlay (select models only), the functionality of components when used in Microsoft® Windows®. Hardware and Software Guide 3-1 Refer to the HP QuickPlay User Guide for more information. 3 Power ✎ This chapter provides information on the functions and features of some components may differ.
Hardware and Software Guide
Page 52
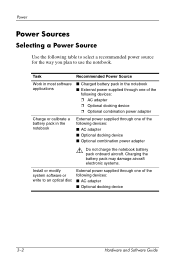
...: ■ AC adapter ■ Optional docking device ■ Optional combination power adapter Å Do not charge the notebook battery pack onboard aircraft. Power Power Sources Selecting a Power Source Use the following devices: ■ AC adapter ■ Optional docking device 3-2 Hardware and Software Guide Task Recommended Power Source Work in most software applications ■ Charged battery pack...
...: ■ AC adapter ■ Optional docking device ■ Optional combination power adapter Å Do not charge the notebook battery pack onboard aircraft. Power Power Sources Selecting a Power Source Use the following devices: ■ AC adapter ■ Optional docking device 3-2 Hardware and Software Guide Task Recommended Power Source Work in most software applications ■ Charged battery pack...
Hardware and Software Guide
Page 53
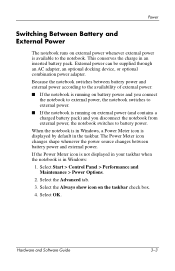
... you connect the notebook to external power, the notebook switches to battery power. Select the Advanced tab. 3. Power Switching Between Battery and External Power The notebook runs on external power whenever external power is in Windows: 1. Select the Always show icon on battery power and you disconnect the notebook from external power, the notebook switches to external power. ■ If the notebook is displayed by...
... you connect the notebook to external power, the notebook switches to battery power. Select the Advanced tab. 3. Power Switching Between Battery and External Power The notebook runs on external power whenever external power is in Windows: 1. Select the Always show icon on battery power and you disconnect the notebook from external power, the notebook switches to external power. ■ If the notebook is displayed by...


