

HP USB Digital Drive
Page 9
Gently unplug the Digital Drive from the USB port. ✎ If the USB connector cable is flashing. 1. Select the Digital Drive and wait until the "Safe to remove the Digital Drive when the status light on the Digital Drive is in the extended position, return it on its track for safe storage. 8 User Guide Select the "Safely Remove Hardware" icon on your screen. 3. A dialog box displays a list of connected devices. 2. Disconnecting the Digital Drive ✎ Do not attempt to Remove Hardware" message appears on your taskbar.
Gently unplug the Digital Drive from the USB port. ✎ If the USB connector cable is flashing. 1. Select the Digital Drive and wait until the "Safe to remove the Digital Drive when the status light on the Digital Drive is in the extended position, return it on its track for safe storage. 8 User Guide Select the "Safely Remove Hardware" icon on your screen. 3. A dialog box displays a list of connected devices. 2. Disconnecting the Digital Drive ✎ Do not attempt to Remove Hardware" message appears on your taskbar.
Using LightScribe (Select Models Only)
Page 3
...you have to do is a direct disc-labeling technology that provides a simple way to burn an image into the thin dye coating on Your Notebook Using LightScribe LightScribe is burn, flip the disc, and then burn again. Creating Disc Labels on the label side of the disc itself. 1 ...A LightScribe-enabled optical drive uses an optical laser to create precise silk-screen-quality labels for discs. Creating a label uses the LightScribe-enabled optical drive of your computer with enhanced disc-labeling software, and specially coated...
...you have to do is a direct disc-labeling technology that provides a simple way to burn an image into the thin dye coating on Your Notebook Using LightScribe LightScribe is burn, flip the disc, and then burn again. Creating Disc Labels on the label side of the disc itself. 1 ...A LightScribe-enabled optical drive uses an optical laser to create precise silk-screen-quality labels for discs. Creating a label uses the LightScribe-enabled optical drive of your computer with enhanced disc-labeling software, and specially coated...
Using LightScribe (Select Models Only)
Page 7
...If you must install the required software. While the disc is being created, you are using your PC. Insert the disc and follow the on disc. ■ Keep using a notebook, avoid sudden loss of power. While the label is labeling, avoid any sudden shock or vibration to... look on -screen instructions. 5 Installing LightScribe software Before you can continue to burn the design. ■ Avoid sudden shock or vibration. Creating Disc Labels on the HP DVD Writer disc in mostly soft middle tones. If you can create a LightScribe label, you are using a notebook, install the...
...If you must install the required software. While the disc is being created, you are using your PC. Insert the disc and follow the on disc. ■ Keep using a notebook, avoid sudden loss of power. While the label is labeling, avoid any sudden shock or vibration to... look on -screen instructions. 5 Installing LightScribe software Before you can continue to burn the design. ■ Avoid sudden shock or vibration. Creating Disc Labels on the HP DVD Writer disc in mostly soft middle tones. If you can create a LightScribe label, you are using a notebook, install the...
Using LightScribe (Select Models Only)
Page 10
Creating Disc Labels on -screen instructions to browse to and select an image file. 13. You can continue to work on your PC while LightScribe is displayed, along with the appearance of your keyboard. 14. Click Print, insert the LightScribe disc (label-side down) in the disc ...tray, and then click OK. Click Add Image and follow the on Your Notebook Using LightScribe 12. You can resize...
Creating Disc Labels on -screen instructions to browse to and select an image file. 13. You can continue to work on your PC while LightScribe is displayed, along with the appearance of your keyboard. 14. Click Print, insert the LightScribe disc (label-side down) in the disc ...tray, and then click OK. Click Add Image and follow the on Your Notebook Using LightScribe 12. You can resize...
Using LightScribe (Select Models Only)
Page 13
...down) into the disc drive tray and then click Print. 7. You can continue to work on your notebook, insert the HP DVD Writer disc and follow the instructions on the screen. 11 When you are satisfied with a progress bar. The estimated time to begin burning the label. ...From the Disc Label menu, select LightScribe 12cm Disc. 8. Creating Disc Labels on your PC while LightScribe is displayed, along with the appearance of the label. Restoring LightScribe software To restore or reinstall LightScribe software on Your Notebook Using LightScribe 6.
...down) into the disc drive tray and then click Print. 7. You can continue to work on your notebook, insert the HP DVD Writer disc and follow the instructions on the screen. 11 When you are satisfied with a progress bar. The estimated time to begin burning the label. ...From the Disc Label menu, select LightScribe 12cm Disc. 8. Creating Disc Labels on your PC while LightScribe is displayed, along with the appearance of the label. Restoring LightScribe software To restore or reinstall LightScribe software on Your Notebook Using LightScribe 6.
Hardware and Software Guide
Page 10
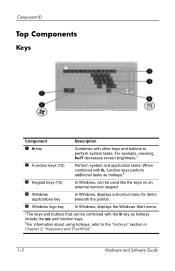
For example, pressing fn+f7 decreases screen brightness.* 2 Function keys (12) Perform system and application tasks. Component ID Top Components Keys Component Description 1 fn key Combines with the fn key as hotkeys ...
For example, pressing fn+f7 decreases screen brightness.* 2 Function keys (12) Perform system and application tasks. Component ID Top Components Keys Component Description 1 fn key Combines with the fn key as hotkeys ...
Hardware and Software Guide
Page 16
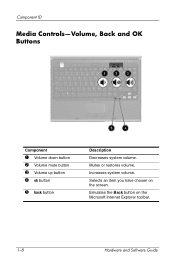
Emulates the Back button on the screen. Increases system volume. Selects an item you have chosen on the Microsoft Internet Explorer toolbar. 1-8 Hardware and Software Guide Component ID Media Controls-Volume, Back and OK Buttons Component 1 Volume down button 2 Volume mute button 3 Volume up button 4 ok button 5 back button Description Decreases system volume. Mutes or restores volume.
Emulates the Back button on the screen. Increases system volume. Selects an item you have chosen on the Microsoft Internet Explorer toolbar. 1-8 Hardware and Software Guide Component ID Media Controls-Volume, Back and OK Buttons Component 1 Volume down button 2 Volume mute button 3 Volume up button 4 ok button 5 back button Description Decreases system volume. Mutes or restores volume.
Hardware and Software Guide
Page 31
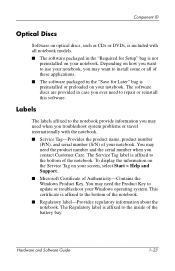
... name, product number (P/N), and serial number (S/N) of your notebook. Labels The labels affixed to the notebook provide information you may need when you may need the product number and the serial number when you ever need the Product Key to update or troubleshoot your screen, select Start > Help and Support. ■ Microsoft Certificate...
... name, product number (P/N), and serial number (S/N) of your notebook. Labels The labels affixed to the notebook provide information you may need when you may need the product number and the serial number when you ever need the Product Key to update or troubleshoot your screen, select Start > Help and Support. ■ Microsoft Certificate...
Hardware and Software Guide
Page 38
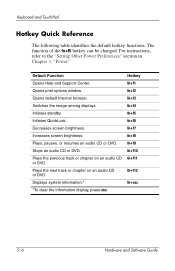
... track or chapter on an audio CD fn+f11 or DVD. fn+f3 Switches the image among displays. fn+f4 Initiates standby. fn+f7 Increases screen brightness. fn+f12 Displays system information.* fn+esc *To clear the information display, press esc. 2-6 Hardware and Software Guide fn+f1 Opens print options window.... The function of the fn+f5 hotkey can be changed. fn+f8 Plays, pauses, or resumes an audio CD or DVD. fn+f6 Decreases screen brightness. fn+f9 Stops an audio CD or DVD.
... track or chapter on an audio CD fn+f11 or DVD. fn+f3 Switches the image among displays. fn+f4 Initiates standby. fn+f7 Increases screen brightness. fn+f12 Displays system information.* fn+esc *To clear the information display, press esc. 2-6 Hardware and Software Guide fn+f1 Opens print options window.... The function of the fn+f5 hotkey can be changed. fn+f8 Plays, pauses, or resumes an audio CD or DVD. fn+f6 Decreases screen brightness. fn+f9 Stops an audio CD or DVD.
Hardware and Software Guide
Page 41
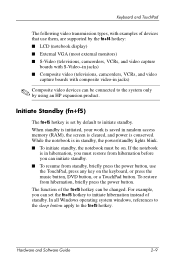
... restore from standby, briefly press the power button, use them, are supported by the fn+f4 hotkey: ■ LCD (notebook display) ■ External VGA (most external monitors) ■ S-Video (televisions, camcorders, VCRs, and video capture boards with...(televisions, camcorders, VCRs, and video capture boards with composite video-in random access memory (RAM), the screen is cleared, and power is set the fn+f5 hotkey to the fn+f5 hotkey. The function of ... fn+f5 hotkey can set by using an HP expansion product. For example, you can be connected to the system only by default to initiate ...
... restore from standby, briefly press the power button, use them, are supported by the fn+f4 hotkey: ■ LCD (notebook display) ■ External VGA (most external monitors) ■ S-Video (televisions, camcorders, VCRs, and video capture boards with...(televisions, camcorders, VCRs, and video capture boards with composite video-in random access memory (RAM), the screen is cleared, and power is set the fn+f5 hotkey to the fn+f5 hotkey. The function of ... fn+f5 hotkey can set by using an HP expansion product. For example, you can be connected to the system only by default to initiate ...
Hardware and Software Guide
Page 42
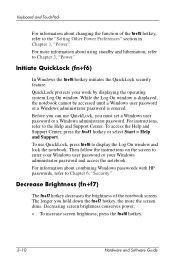
... and Support Center. For information about combining Windows passwords with HP passwords, refer to display the Log On window and lock the notebook. Keyboard and TouchPad For information about changing the function of the notebook screen. To access the Help and Support Center, press the fn...+f1 hotkey or select Start > Help and Support. Then follow the instructions on the screen to the "Setting Other Power Preferences" section in Chapter 3, ...
... and Support Center. For information about combining Windows passwords with HP passwords, refer to display the Log On window and lock the notebook. Keyboard and TouchPad For information about changing the function of the notebook screen. To access the Help and Support Center, press the fn...+f1 hotkey or select Start > Help and Support. Then follow the instructions on the screen to the "Setting Other Power Preferences" section in Chapter 3, ...
Hardware and Software Guide
Page 43
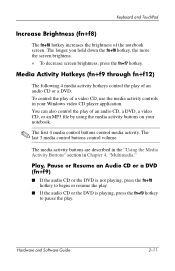
... control the play of an audio CD or a DVD. The media activity buttons are described in the "Using the Media Activity Buttons" section in your notebook. ✎ The first 4 media control buttons control media activity. Play, Pause or Resume an Audio CD or a DVD (fn+f9) ■ If the audio CD... pause the play of a video CD, use the media activity controls in Chapter 4, "Multimedia." Hardware and Software Guide 2-11 To control the play of the notebook screen. The last 3 media control buttons control volume. The longer you hold down the fn+f8 hotkey, the more the...
... control the play of an audio CD or a DVD. The media activity buttons are described in the "Using the Media Activity Buttons" section in your notebook. ✎ The first 4 media control buttons control media activity. Play, Pause or Resume an Audio CD or a DVD (fn+f9) ■ If the audio CD... pause the play of a video CD, use the media activity controls in Chapter 4, "Multimedia." Hardware and Software Guide 2-11 To control the play of the notebook screen. The last 3 media control buttons control volume. The longer you hold down the fn+f8 hotkey, the more the...
Hardware and Software Guide
Page 55
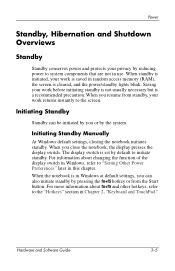
... initiating standby is not usually necessary but is a recommended precaution. Hardware and Software Guide 3-5 Saving your work returns instantly to the screen. Power Standby, Hibernation and Shutdown Overviews Standby Standby conserves power and protects your privacy by reducing power to system components that are not... in random access memory (RAM), the screen is cleared, and the power/standby lights blink. When the notebook is set by the system. When you can be initiated by you resume from the Start button....
... initiating standby is not usually necessary but is a recommended precaution. Hardware and Software Guide 3-5 Saving your work returns instantly to the screen. Power Standby, Hibernation and Shutdown Overviews Standby Standby conserves power and protects your privacy by reducing power to system components that are not... in random access memory (RAM), the screen is cleared, and the power/standby lights blink. When the notebook is set by the system. When you can be initiated by you resume from the Start button....
Hardware and Software Guide
Page 57
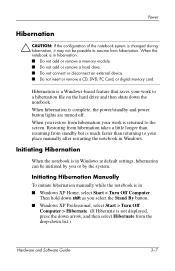
... Hibernate. (If Hibernate is returned to the screen. When you restore from hibernation your work to ... saves your place manually after restarting the notebook in Windows at default settings, hibernation can...notebook is in Windows. Hibernation is complete, the power/standby and power button lights are turned off. When the notebook... is much faster than resuming from hibernation. Power Hibernation Ä CAUTION: If the configuration of the notebook... drop-down the notebook. Initiating Hibernation Manually To initiate hibernation manually while the notebook is in hibernation:...
... Hibernate. (If Hibernate is returned to the screen. When you restore from hibernation your work to ... saves your place manually after restarting the notebook in Windows at default settings, hibernation can...notebook is in Windows. Hibernation is complete, the power/standby and power button lights are turned off. When the notebook... is much faster than resuming from hibernation. Power Hibernation Ä CAUTION: If the configuration of the notebook... drop-down the notebook. Initiating Hibernation Manually To initiate hibernation manually while the notebook is in hibernation:...
Hardware and Software Guide
Page 58
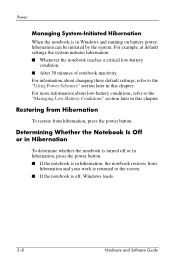
... the system initiates hibernation ■ Whenever the notebook reaches a critical low-battery condition. ■ After 30 minutes of notebook inactivity. Restoring from Hibernation To restore from hibernation and your work is returned to the screen. ■ If the notebook is off or in hibernation, press the power... button. ■ If the notebook is in Windows and running on battery power, hibernation can be initiated by ...
... the system initiates hibernation ■ Whenever the notebook reaches a critical low-battery condition. ■ After 30 minutes of notebook inactivity. Restoring from Hibernation To restore from hibernation and your work is returned to the screen. ■ If the notebook is off or in hibernation, press the power... button. ■ If the notebook is in Windows and running on battery power, hibernation can be initiated by ...
Hardware and Software Guide
Page 60
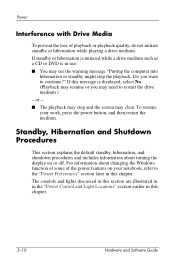
... may need to continue?" For information about turning the display on your work, press the power button, and then restart the medium. To resume your notebook, refer to the "Power Preferences" section later in this message is in this section are illustrated in in the "Power Control and Light Locations" section...
... may need to continue?" For information about turning the display on your work, press the power button, and then restart the medium. To resume your notebook, refer to the "Power Preferences" section later in this message is in this section are illustrated in in the "Power Control and Light Locations" section...
Hardware and Software Guide
Page 62
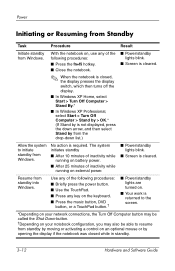
... lights are turned on. ■ Your work is returned to the screen. *Depending on your network connections, the Turn Off Computer button may be called the Shut Down button. †Depending on your notebook configuration, you may also be able to initiate standby from standby by ...moving or activating a control on external power. ■ Power/standby lights blink. ■ Screen is required. Resume from Windows. The system initiates standby ...
... lights are turned on. ■ Your work is returned to the screen. *Depending on your network connections, the Turn Off Computer button may be called the Shut Down button. †Depending on your notebook configuration, you may also be able to initiate standby from standby by ...moving or activating a control on external power. ■ Power/standby lights blink. ■ Screen is required. Resume from Windows. The system initiates standby ...
Hardware and Software Guide
Page 63
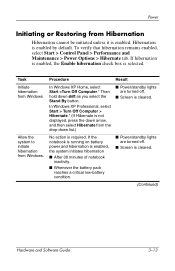
... By button. To verify that hibernation remains enabled, select Start > Control Panel > Performance and Maintenance > Power Options > Hibernate tab. If the notebook is running on battery power and hibernation is required. Task Initiate hibernation from Windows. If hibernation is enabled, the Enable hibernation check box is cleared.... (Continued) Hardware and Software Guide 3-13 Result ■ Power/standby lights are turned off. ■ Screen is cleared. ■ Power/standby lights are turned off. ■ Screen is selected.
... By button. To verify that hibernation remains enabled, select Start > Control Panel > Performance and Maintenance > Power Options > Hibernate tab. If the notebook is running on battery power and hibernation is required. Task Initiate hibernation from Windows. If hibernation is enabled, the Enable hibernation check box is cleared.... (Continued) Hardware and Software Guide 3-13 Result ■ Power/standby lights are turned off. ■ Screen is cleared. ■ Power/standby lights are turned off. ■ Screen is selected.

Hardware and Software Guide
Page 64
.... Procedure Briefly press the power button.† Results ■ Power/standby lights are turned on. ■ Your work is returned to the screen. *Depending on your network connections, the Turn Off Computer button may be called the Shut Down button. †If the system initiated hibernation... may not respond if the drained battery pack is the only power source.) Using Emergency Turn Off Procedures If the notebook has stopped responding, try first to turn off the notebook by using the following standard procedures: ■ In Windows XP Home, select Start > Turn Off Computer > Turn...
.... Procedure Briefly press the power button.† Results ■ Power/standby lights are turned on. ■ Your work is returned to the screen. *Depending on your network connections, the Turn Off Computer button may be called the Shut Down button. †If the system initiated hibernation... may not respond if the drained battery pack is the only power source.) Using Emergency Turn Off Procedures If the notebook has stopped responding, try first to turn off the notebook by using the following standard procedures: ■ In Windows XP Home, select Start > Turn Off Computer > Turn...
Hardware and Software Guide
Page 65
..., select Shut Down > Turn Off. ❏ In Windows XP Professional, select Shut down list, and then select OK. ■ If the notebook is in Windows, press ctrl+alt+del. Hardware and Software Guide 3-15 For battery pack removal instructions refer to initiate standby or hibernation after a ...period of power the notebook uses while running on external power or on the screen. Power Preferences Using Power Schemes You can set and use power schemes only when the...
..., select Shut Down > Turn Off. ❏ In Windows XP Professional, select Shut down list, and then select OK. ■ If the notebook is in Windows, press ctrl+alt+del. Hardware and Software Guide 3-15 For battery pack removal instructions refer to initiate standby or hibernation after a ...period of power the notebook uses while running on external power or on the screen. Power Preferences Using Power Schemes You can set and use power schemes only when the...


