Limited Warranty and Support Guide - Refurbished
Page 4
... (b) with the product; (c) by software, interfacing, parts or supplies not supplied by local law, new HP Hardware Products may repair or replace HP Hardware Products (a) with new or previously used materials equivalent to any component or hardware product that your own installation of purchase or lease from HP, or from defects in the user documentation that shipped with equivalent products to your HP Hardware Product is your proof of...
... (b) with the product; (c) by software, interfacing, parts or supplies not supplied by local law, new HP Hardware Products may repair or replace HP Hardware Products (a) with new or previously used materials equivalent to any component or hardware product that your own installation of purchase or lease from HP, or from defects in the user documentation that shipped with equivalent products to your HP Hardware Product is your proof of...
Limited Warranty and Support Guide - Refurbished
Page 6
... vary with sufficient, free, and safe access to HP. Carry-in Warranty Service (Desktops ONLY) Under the terms of carry-in warranty service. In addition, you for warranty repair. Under the terms of loss during shipping. Advanced Unit Replacement Warranty Service (Displays ONLY) Your HP Limited Warranty may involve performing routine diagnostic procedures, installing software updates or patches, removing third party options and/or substituting options. Under the...
... vary with sufficient, free, and safe access to HP. Carry-in Warranty Service (Desktops ONLY) Under the terms of carry-in warranty service. In addition, you for warranty repair. Under the terms of loss during shipping. Advanced Unit Replacement Warranty Service (Displays ONLY) Your HP Limited Warranty may involve performing routine diagnostic procedures, installing software updates or patches, removing third party options and/or substituting options. Under the...
Safety and Regulatory Information Desktops, Thin Clients, and Personal Workstations
Page 17
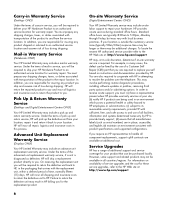
... electrical grounding of the mast and supporting structure, grounding of the lead-in Wire ENWW TV Antenna Connectors Protection 11 Lightning Protection For added protection of time, unplug the product from lightning and power line surges. Table 2-1 Antenna Grounding Reference Grounding Component 1 Electric Service Equipment 2 Power Service Grounding Electrode System (NEC Art 250, Part H) 3 Ground Clamps 4 Grounding Conductors (NEC...
... electrical grounding of the mast and supporting structure, grounding of the lead-in Wire ENWW TV Antenna Connectors Protection 11 Lightning Protection For added protection of time, unplug the product from lightning and power line surges. Table 2-1 Antenna Grounding Reference Grounding Component 1 Electric Service Equipment 2 Power Service Grounding Electrode System (NEC Art 250, Part H) 3 Ground Clamps 4 Grounding Conductors (NEC...
Advanced Setup Guide
Page 21
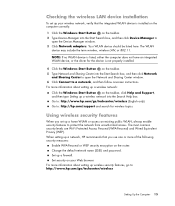
... device is not properly installed. 4 Click the Windows Start Button on the router. Your WLAN device should be listed here. Set security on your wireless network, verify that you set up your Web browser. Go to open the Network and Sharing Center window. 6 Click Connect to protect the network from unauthorized access. Change the default network name (SSID) and password. The WLAN device may include the term wireless, wireless LAN, or 802.11. Checking the wireless LAN device installation To set...
... device is not properly installed. 4 Click the Windows Start Button on the router. Your WLAN device should be listed here. Set security on your wireless network, verify that you set up your Web browser. Go to open the Network and Sharing Center window. 6 Click Connect to protect the network from unauthorized access. Change the default network name (SSID) and password. The WLAN device may include the term wireless, wireless LAN, or 802.11. Checking the wireless LAN device installation To set...
Limited Warranty and Support Guide
Page 4
... THE HARD DRIVE AND THE PROGRAMS RESTORED TO THEIR ORIGINAL STATE. No change to be uninterrupted or error-free. Replacement parts are installed, whichever is made in writing and signed by anyone other external causes; (b) by operation outside the usage parameters stated in the user documentation that shipped with the product; (c) by software, interfacing, parts, or supplies not supplied by HP; (d) by improper site preparation or maintenance; (e) by...
... THE HARD DRIVE AND THE PROGRAMS RESTORED TO THEIR ORIGINAL STATE. No change to be uninterrupted or error-free. Replacement parts are installed, whichever is made in writing and signed by anyone other external causes; (b) by operation outside the usage parameters stated in the user documentation that shipped with the product; (c) by software, interfacing, parts, or supplies not supplied by HP; (d) by improper site preparation or maintenance; (e) by...
Limited Warranty and Support Guide
Page 6
... . Software Technical Support Software technical support for your installation questions (how-to, first steps, and prerequisites). • Setting up and configuring the software (how-to and first steps). • Interpreting system error messages. • Isolating system problems to software usage problems. Software technical support does NOT include assistance with: • Generating or diagnosing user-generated programs or source codes. • Installing of non-HP products. • System optimization and customization. • Network configuration...
... . Software Technical Support Software technical support for your installation questions (how-to, first steps, and prerequisites). • Setting up and configuring the software (how-to and first steps). • Interpreting system error messages. • Isolating system problems to software usage problems. Software technical support does NOT include assistance with: • Generating or diagnosing user-generated programs or source codes. • Installing of non-HP products. • System optimization and customization. • Network configuration...

Getting Started Guide
Page 5
... updates 54 Guidelines for Installing Software and Hardware Devices 54 Transferring Files and Settings from an Old Computer to a New Computer 55 Using the Keyboard 57 Identifying Keyboard Features 57 Alphanumeric keys 57 Function keys 58 Edit keys...58 Arrow keys ...58 Numeric keys 59 Keyboard indicators 59 Special keyboard buttons 60 Identifying Special Keyboard Buttons 60 Customizing the keyboard buttons 62 Keyboard Shortcuts 63 Wireless Mouse and Keyboard Troubleshooting 64 Synchronizing a wireless mouse and keyboard 64 Using the Mouse 67 Using the Mouse Buttons...
... updates 54 Guidelines for Installing Software and Hardware Devices 54 Transferring Files and Settings from an Old Computer to a New Computer 55 Using the Keyboard 57 Identifying Keyboard Features 57 Alphanumeric keys 57 Function keys 58 Edit keys...58 Arrow keys ...58 Numeric keys 59 Keyboard indicators 59 Special keyboard buttons 60 Identifying Special Keyboard Buttons 60 Customizing the keyboard buttons 62 Keyboard Shortcuts 63 Wireless Mouse and Keyboard Troubleshooting 64 Synchronizing a wireless mouse and keyboard 64 Using the Mouse 67 Using the Mouse Buttons...
Getting Started Guide
Page 25
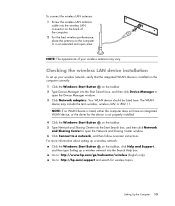
... a wireless network: Click the Windows Start Button on the taskbar. 5 Type Network and Sharing Center into the Start Search box, and then click Network and Sharing Center to open the Device Manager window. 3 Click Network adapters. To connect the wireless LAN antenna: 1 Screw the wireless LAN antenna cable into the wireless LAN connector on the back of your wireless network, verify that the integrated WLAN device is not properly installed. 4 Click the Windows Start Button on the taskbar, click Help and Support, and then type Setting...
... a wireless network: Click the Windows Start Button on the taskbar. 5 Type Network and Sharing Center into the Start Search box, and then click Network and Sharing Center to open the Device Manager window. 3 Click Network adapters. To connect the wireless LAN antenna: 1 Screw the wireless LAN antenna cable into the wireless LAN connector on the back of your wireless network, verify that the integrated WLAN device is not properly installed. 4 Click the Windows Start Button on the taskbar, click Help and Support, and then type Setting...
Getting Started Guide
Page 58
... the Windows Start Button on the desktop, and log in. 4 Open your work habits for computer users. To connect to select an ISP and set it up now by model) Double-click the ISP-provided icon on the taskbar. Or Type http://www.hp.com/ergo into the Web browser address box, and then press Enter on the keyboard. 48 Getting Started (features vary by using...
... the Windows Start Button on the desktop, and log in. 4 Open your work habits for computer users. To connect to select an ISP and set it up now by model) Double-click the ISP-provided icon on the taskbar. Or Type http://www.hp.com/ergo into the Web browser address box, and then press Enter on the keyboard. 48 Getting Started (features vary by using...
Getting Started Guide
Page 59
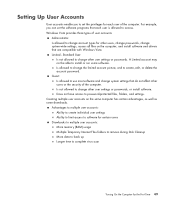
... picture, and to complete virus scan Turning On the Computer for other users, change passwords, change other users or the security of the computer. Advantages to multiple user accounts: Ability to create individual user settings Ability to limit access to software for certain users Drawbacks to multiple user accounts: More memory (RAM) usage Multiple Temporary Internet Files folders to remove during Disk Cleanup More data to back up...
... picture, and to complete virus scan Turning On the Computer for other users, change passwords, change other users or the security of the computer. Advantages to multiple user accounts: Ability to create individual user settings Ability to limit access to software for certain users Drawbacks to multiple user accounts: More memory (RAM) usage Multiple Temporary Internet Files folders to remove during Disk Cleanup More data to back up...
Getting Started Guide
Page 63
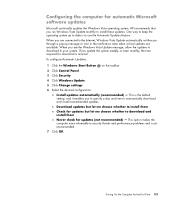
... Updates: 1 Click the Windows Start Button on the taskbar. 2 Click Control Panel. 3 Click Security. 4 Click Windows Update. 5 Click Change settings. 6 Select the desired configuration: Install updates automatically (recommended) - This is the default setting, and it enables you through a pop-up to date is not recommended. 7 Click OK. Configuring the computer for download is minimal. Download updates but let me choose whether to automatically download and install recommended updates. One way to keep the operating...
... Updates: 1 Click the Windows Start Button on the taskbar. 2 Click Control Panel. 3 Click Security. 4 Click Windows Update. 5 Click Change settings. 6 Select the desired configuration: Install updates automatically (recommended) - This is the default setting, and it enables you through a pop-up to date is not recommended. 7 Click OK. Configuring the computer for download is minimal. Download updates but let me choose whether to automatically download and install recommended updates. One way to keep the operating...
Getting Started Guide
Page 95
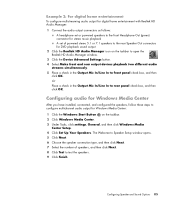
... speaker connection type, and then click Next. 7 Select the number of powered stereo 5.1 or 7.1 speakers to the rear Speaker Out connectors for DVD playback sound output 2 Click the Realtek HD Audio Manager icon on the taskbar. 2 Click Windows Media Center. 3 Under Tasks, click settings, General, and then click Windows Media Center Setup. 4 Click Set Up Your Speakers. Configuring audio for Windows Media Center After you have installed, connected, and configured the speakers, follow these steps to configure multichannel audio output for Windows Media Center: 1 Click the Windows Start Button...
... speaker connection type, and then click Next. 7 Select the number of powered stereo 5.1 or 7.1 speakers to the rear Speaker Out connectors for DVD playback sound output 2 Click the Realtek HD Audio Manager icon on the taskbar. 2 Click Windows Media Center. 3 Under Tasks, click settings, General, and then click Windows Media Center Setup. 4 Click Set Up Your Speakers. Configuring audio for Windows Media Center After you have installed, connected, and configured the speakers, follow these steps to configure multichannel audio output for Windows Media Center: 1 Click the Windows Start Button...

Getting Started Guide
Page 218
... panel 7 Composite Video In 6 computer 2 FM In 6 headphones 4 keyboard 4 Microphone In 4 modem 7 monitor 7 mouse 4 printer 5 S-video In 5 TV/Cable Ant 6 USB 4, 5 country/region codes 149 Creative Sound Blaster X-Fi Sound Card audio modes 77 configuring 76 cursor speed 70 customizing keyboard buttons 62 CyberLink LabelPrint creating a LightScribe label 176 features 104 CyberLink Power2Go copying a disc 174 erasing discs 170 features 104 CyberLink PowerDirector creating video disc 173 D desktop switching from Windows Media Center 164 devices connecting 10 digital camera connecting...
... panel 7 Composite Video In 6 computer 2 FM In 6 headphones 4 keyboard 4 Microphone In 4 modem 7 monitor 7 mouse 4 printer 5 S-video In 5 TV/Cable Ant 6 USB 4, 5 country/region codes 149 Creative Sound Blaster X-Fi Sound Card audio modes 77 configuring 76 cursor speed 70 customizing keyboard buttons 62 CyberLink LabelPrint creating a LightScribe label 176 features 104 CyberLink Power2Go copying a disc 174 erasing discs 170 features 104 CyberLink PowerDirector creating video disc 173 D desktop switching from Windows Media Center 164 devices connecting 10 digital camera connecting...

Getting Started Guide
Page 219
... HP Pocket Media Drive 125 HP Total Care Advisor 41 I IBM Microdrive 122 Internet security 52, 100 K keyboard connector 4 customizing buttons 62 shortcuts 63 types of buttons 57 using 57 L LAN (local area network) 12 antenna 15 checking wireless LAN device 15 connecting Ethernet LAN 5 connecting wireless LAN device 14 setting up 13 using Local Area Network 12 LightScribe, creating a LightScribe disc label 175 local area network (LAN) 12 M magicSpot 198 manuals storing 10 memory card reader 179 card types 119 in-use light 123 troubleshooting 124 using 119 memory card...
... HP Pocket Media Drive 125 HP Total Care Advisor 41 I IBM Microdrive 122 Internet security 52, 100 K keyboard connector 4 customizing buttons 62 shortcuts 63 types of buttons 57 using 57 L LAN (local area network) 12 antenna 15 checking wireless LAN device 15 connecting Ethernet LAN 5 connecting wireless LAN device 14 setting up 13 using Local Area Network 12 LightScribe, creating a LightScribe disc label 175 local area network (LAN) 12 M magicSpot 198 manuals storing 10 memory card reader 179 card types 119 in-use light 123 troubleshooting 124 using 119 memory card...
PC Troubleshooting
Page 3
... Problems 5 Audio ...5 CD and DVD Drives 7 Video...9 Display (Monitor 10 Hard Disk Drive...11 Hardware Installation 11 Internet Access ...13 Keyboard and Mouse 15 Power ...18 Performance ...19 Bluetooth Wireless Devices 20 Miscellaneous ...21 Repairing Software Problems 22 Software Repair Overview 22 Restarting Your Computer 22 Turning Off Your Computer 22 Updating Drivers 22 Microsoft System Restore 23 Software Program and Hardware Driver Reinstallation 23 System Recovery 24 Creating Recovery Discs 24 System Recovery Options 25 Starting system recovery from the hard disk drive...
... Problems 5 Audio ...5 CD and DVD Drives 7 Video...9 Display (Monitor 10 Hard Disk Drive...11 Hardware Installation 11 Internet Access ...13 Keyboard and Mouse 15 Power ...18 Performance ...19 Bluetooth Wireless Devices 20 Miscellaneous ...21 Repairing Software Problems 22 Software Repair Overview 22 Restarting Your Computer 22 Turning Off Your Computer 22 Updating Drivers 22 Microsoft System Restore 23 Software Program and Hardware Driver Reinstallation 23 System Recovery 24 Creating Recovery Discs 24 System Recovery Options 25 Starting system recovery from the hard disk drive...
PC Troubleshooting
Page 6
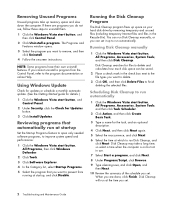
... from running at startup, and click Disable. Disk Cleanup searches for Updates button. 3 Click Install Updates. Scheduling Disk Cleanup to remove, and then click Uninstall. 4 Follow the onscreen instructions. Disk Cleanup will run at which to run at startup Set the Startup Programs feature to open only needed software programs, to improve system speed and performance: 1 Click the Windows Vista start button, All Programs, then click Windows Defender. 2 Click Tools. 3 Click Software Explorer. 4 In the Category list, select Startup...
... from running at startup, and click Disable. Disk Cleanup searches for Updates button. 3 Click Install Updates. Scheduling Disk Cleanup to remove, and then click Uninstall. 4 Follow the onscreen instructions. Disk Cleanup will run at which to run at startup Set the Startup Programs feature to open only needed software programs, to improve system speed and performance: 1 Click the Windows Vista start button, All Programs, then click Windows Defender. 2 Click Tools. 3 Click Software Explorer. 4 In the Category list, select Startup...
PC Troubleshooting
Page 9
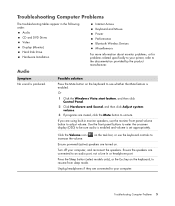
... DVD Drives Video Display (Monitor) Hard Disk Drive Hardware Installation Internet Access Keyboard and Mouse Power Performance Bluetooth Wireless Devices Miscellaneous For more information about monitor problems, or for problems related specifically to your printer, refer to increase the volume. Audio Symptom No sound is set appropriately. If you are connected to resume from sleep mode. Use the front panel buttons to enter the onscreen display (OSD) to adjust volume. Click the Volume icon ( ) on the keyboard, to your computer, and reconnect the speakers...
... DVD Drives Video Display (Monitor) Hard Disk Drive Hardware Installation Internet Access Keyboard and Mouse Power Performance Bluetooth Wireless Devices Miscellaneous For more information about monitor problems, or for problems related specifically to your printer, refer to increase the volume. Audio Symptom No sound is set appropriately. If you are connected to resume from sleep mode. Use the front panel buttons to enter the onscreen display (OSD) to adjust volume. Click the Volume icon ( ) on the keyboard, to your computer, and reconnect the speakers...
PC Troubleshooting
Page 15
button on the keyboard simultaneously. 2 Click the arrow next to contact Support. You may need an updated driver for an update. Contact the device vendor directly for Windows Vista. For HP peripherals, visit the HP Web site. Restart the computer, and follow the instructions for the card, and choose a basic configuration that the pins in the operating system for accepting the changes. Disable the automatic settings in the cable or connector are properly...
button on the keyboard simultaneously. 2 Click the arrow next to contact Support. You may need an updated driver for an update. Contact the device vendor directly for Windows Vista. For HP peripherals, visit the HP Web site. Restart the computer, and follow the instructions for the card, and choose a basic configuration that the pins in the operating system for accepting the changes. Disable the automatic settings in the cable or connector are properly...
PC Troubleshooting
Page 17
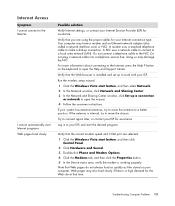
... cable to make a dial-up a connection or network to a better position. Run the wireless setup wizard: 1 Click the Windows Vista start button, and then select Network. 2 In the Network window, click Network and Sharing Center. 3 In the Network and Sharing Center window, click Set up connection. If your computer. button on your system has external antennas, try to move the antenna to open the Help and Support Center. Log in to connect again later, or contact your Internet Service...
... cable to make a dial-up a connection or network to a better position. Run the wireless setup wizard: 1 Click the Windows Vista start button, and then select Network. 2 In the Network window, click Network and Sharing Center. 3 In the Network and Sharing Center window, click Set up connection. If your computer. button on your system has external antennas, try to move the antenna to open the Help and Support Center. Log in to connect again later, or contact your Internet Service...
PC Troubleshooting
Page 31
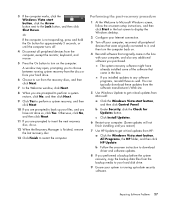
... from HP: a Click the Windows Vista start button, All Programs, the HP folder, and then click HP Update. Repairing Software Problems 27 You can typically download these updates from the software manufacturer's Web site. 5 Use Windows Update to get critical updates from the backup media to it, and then turn on . 4 Reinstall software that came in the last screen to display the Windows desktop. 2 Configure your Internet connection. 3 Turn off . 4 Disconnect all peripheral devices that were originally connected to your hard disk drive. 9 Ensure...
... from HP: a Click the Windows Vista start button, All Programs, the HP folder, and then click HP Update. Repairing Software Problems 27 You can typically download these updates from the software manufacturer's Web site. 5 Use Windows Update to get critical updates from the backup media to it, and then turn on . 4 Reinstall software that came in the last screen to display the Windows desktop. 2 Configure your Internet connection. 3 Turn off . 4 Disconnect all peripheral devices that were originally connected to your hard disk drive. 9 Ensure...


