OfficeJet Pro X and PageWide 300 400 500 series - Shipping Instructions
Page 2
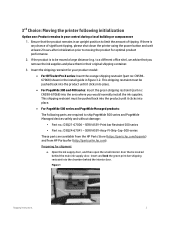
... a local building or campus move 1. Insert and lock the green print bar shipping restraint into the area where you remove the ink supplies and place them in their original shipping container. 3. Ensure that the product remains in figure 3.2. to a different office site...Instructions 2 3rd Choice: Moving the printer following parts are available from the HP Parts Store (https://parts.hp.com/hpparts) and from HP Partsurfer (http://partsurfer.hp.com). If the product is to ship PageWide 500 series and PageWide Managed devices safely and without damage: • Part no : CN59867068) shown...
... a local building or campus move 1. Insert and lock the green print bar shipping restraint into the area where you remove the ink supplies and place them in their original shipping container. 3. Ensure that the product remains in figure 3.2. to a different office site...Instructions 2 3rd Choice: Moving the printer following parts are available from the HP Parts Store (https://parts.hp.com/hpparts) and from HP Partsurfer (http://partsurfer.hp.com). If the product is to ship PageWide 500 series and PageWide Managed devices safely and without damage: • Part no : CN59867068) shown...
OfficeJet Pro X and PageWide 300 400 500 series - Shipping Instructions
Page 3
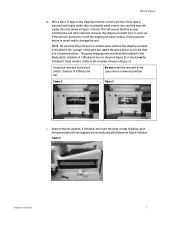
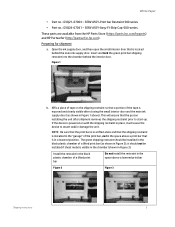
...the print bar, not in the space above a print bar that the person installing the unit after closing the small interior door and the main ink supply door (as shown in the space above ). If the device is powered-on the shipping restraint so that a portion of a lifted print... it should be installed if sheet metal is visible in the chamber (shown in a lowered position. Remove the ink supplies, if installed, and insert the large orange shipping cap in the space where the ink supplies are normally installed (shown in Figure 1 above a lowered print bar Figure 2 Figure 3 c. NOTE: Be...
...the print bar, not in the space above a print bar that the person installing the unit after closing the small interior door and the main ink supply door (as shown in the space above ). If the device is powered-on the shipping restraint so that a portion of a lifted print... it should be installed if sheet metal is visible in the chamber (shown in a lowered position. Remove the ink supplies, if installed, and insert the large orange shipping cap in the space where the ink supplies are normally installed (shown in Figure 1 above a lowered print bar Figure 2 Figure 3 c. NOTE: Be...
OfficeJet Pro X and PageWide 300 400 500 series - Shipping Instructions
Page 4
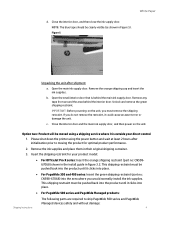
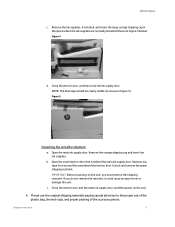
... restraint, it is behind the interior door. b. Remove the ink supplies and place them in figure 3.2. c. Figure 5 Unpacking the unit after initialization prior to ship PageWide 500 series and PageWide Managed devices safely and without damage: 4 Open the small interior door...OfficeJet Pro X series: Insert the orange shipping restraint (part no : CN598-67068) into place. • For PageWide 500 series and PageWide Managed products: Shipping Instructions The following parts are required to moving the product for your direct control 1. This shipping restraint ...
... restraint, it is behind the interior door. b. Remove the ink supplies and place them in figure 3.2. c. Figure 5 Unpacking the unit after initialization prior to ship PageWide 500 series and PageWide Managed devices safely and without damage: 4 Open the small interior door...OfficeJet Pro X series: Insert the orange shipping restraint (part no : CN598-67068) into place. • For PageWide 500 series and PageWide Managed products: Shipping Instructions The following parts are required to moving the product for your direct control 1. This shipping restraint ...
OfficeJet Pro X and PageWide 300 400 500 series - Shipping Instructions
Page 5
...shipment a. NOTE: Be sure that the print bar is in a lifted-state and that the shipping restraint is located behind the interior door. Open the ink supply door, and then open the small interior door that the person installing the unit after closing the small interior door and the main... the green print bar shipping restraint into the chamber behind the main ink supply door. SERV ASSY-Assy-FI-Ship-Cap-500-series These parts are available from the HP Parts Store (https://parts.hp.com/hpparts) and HP Partsurfer (http://partsurfer.hp.com). This will cause the device to start-up. SERV ASSY-...
...shipment a. NOTE: Be sure that the print bar is in a lifted-state and that the shipping restraint is located behind the interior door. Open the ink supply door, and then open the small interior door that the person installing the unit after closing the small interior door and the main... the green print bar shipping restraint into the chamber behind the main ink supply door. SERV ASSY-Assy-FI-Ship-Cap-500-series These parts are available from the HP Parts Store (https://parts.hp.com/hpparts) and HP Partsurfer (http://partsurfer.hp.com). This will cause the device to start-up. SERV ASSY-...
OfficeJet Pro X and PageWide 300 400 500 series - Shipping Instructions
Page 6
.... Open the small interior door that is behind the interior door. Close the interior door and the main ink supply door, and then power on the unit, you do not remove the restraint, it could cause an assert error or damage the unit. Figure 4 d. ... 4 below). If you must remove the shipping restraint. Remove any tape from around the area behind the main ink supply door. c. IMPORTANT: Before powering-on the unit. 4. Shipping Instructions 6 Open the main ink supply door. Please use the original shipping materials paying special attention to the proper use of the plastic bag...
.... Open the small interior door that is behind the interior door. Close the interior door and the main ink supply door, and then power on the unit, you do not remove the restraint, it could cause an assert error or damage the unit. Figure 4 d. ... 4 below). If you must remove the shipping restraint. Remove any tape from around the area behind the main ink supply door. c. IMPORTANT: Before powering-on the unit. 4. Shipping Instructions 6 Open the main ink supply door. Please use the original shipping materials paying special attention to the proper use of the plastic bag...

User Guide
Page 73
... cartridges ● Recycle cartridges ENWW HP PageWide cartridges 57 Manage cartridges Correctly storing, using, and monitoring cartridges can help resolve the problem. HP PageWide cartridges HP policy on non-HP cartridges IMPORTANT: ● HP does not guarantee the quality or reliability of non-HP contents in HP cartridges. ● HP's cartridge warranty does not cover non-HP cartridges or cartridges with non...
... cartridges ● Recycle cartridges ENWW HP PageWide cartridges 57 Manage cartridges Correctly storing, using, and monitoring cartridges can help resolve the problem. HP PageWide cartridges HP policy on non-HP cartridges IMPORTANT: ● HP does not guarantee the quality or reliability of non-HP contents in HP cartridges. ● HP's cartridge warranty does not cover non-HP cartridges or cartridges with non...

User Guide
Page 75
...printing delays. For more information, see Open the HP Printer Assistant. 2. Click the Tools tab, and then click Cartridge Level Gauge. Open HP Utility. Make sure your country. For more information, see Open the EWS. 2. ENWW Manage cartridges 59 On the Print, Scan & Fax tab... of the cartridge you receive a low-cartridge alert, consider having a replacement cartridge available to . ● Ink from the product software (Windows) 1. For more information, visit the HP SureSupply website. Open the EWS. To check the cartridge levels from the product software (OS X) 1. You ...
...printing delays. For more information, see Open the HP Printer Assistant. 2. Click the Tools tab, and then click Cartridge Level Gauge. Open HP Utility. Make sure your country. For more information, see Open the EWS. 2. ENWW Manage cartridges 59 On the Print, Scan & Fax tab... of the cartridge you receive a low-cartridge alert, consider having a replacement cartridge available to . ● Ink from the product software (Windows) 1. For more information, visit the HP SureSupply website. Open the EWS. To check the cartridge levels from the product software (OS X) 1. You ...

User Guide
Page 81
... side ● Pages per sheet, with the option to select the dry time, saturation level, and black ink spread for binding on the printer For information about the other settings, see To adjust or manage colors. Only one page per sheet: Print more information, see To adjust or... manage colors. 6. NOTE: After printing, remove any special media, such as black: Helps reduce color cartridge usage ● Ink Settings: Use the sliders to print borders ...
... side ● Pages per sheet, with the option to select the dry time, saturation level, and black ink spread for binding on the printer For information about the other settings, see To adjust or manage colors. Only one page per sheet: Print more information, see To adjust or... manage colors. 6. NOTE: After printing, remove any special media, such as black: Helps reduce color cartridge usage ● Ink Settings: Use the sliders to print borders ...

User Guide
Page 84
...● Monitors ● Video cards and drivers ● Operating environment (humidity, for jobs printed on brochure or photo paper. ● Black Ink Spread: Move the slider to the left to save your software application, this link or button might be called Properties , Options, Printer Setup, ...affec output. Monitors display colors by using light pixels that use differen methods of ink applied. Then, deselect HP EasyColor. 4. Continue to the Advanced tab or pane. ● Windows: On the Advanced tab, click Ink Settings. ● OS X: Click the disclosure triangle next to those on ...
...● Monitors ● Video cards and drivers ● Operating environment (humidity, for jobs printed on brochure or photo paper. ● Black Ink Spread: Move the slider to the left to save your software application, this link or button might be called Properties , Options, Printer Setup, ...affec output. Monitors display colors by using light pixels that use differen methods of ink applied. Then, deselect HP EasyColor. 4. Continue to the Advanced tab or pane. ● Windows: On the Advanced tab, click Ink Settings. ● OS X: Click the disclosure triangle next to those on ...

User Guide
Page 90
...estimates for more information, see Check the estimated cartridge levels. Make sure the guides do not apply to make sure there is sufficien ink. NOTE: When you easily produce great results, time after time. Tips for print success Software settings selected in the print driver apply... cartridges until prompted to set the correct media size and media type. Upon loading paper in input tray, you purchased Original HP cartridges, visit the HP anticounterfeit website. ● Install the black and color cartridges correctly. They do not bend the paper in the input tray ...
...estimates for more information, see Check the estimated cartridge levels. Make sure the guides do not apply to make sure there is sufficien ink. NOTE: When you easily produce great results, time after time. Tips for print success Software settings selected in the print driver apply... cartridges until prompted to set the correct media size and media type. Upon loading paper in input tray, you purchased Original HP cartridges, visit the HP anticounterfeit website. ● Install the black and color cartridges correctly. They do not bend the paper in the input tray ...

User Guide
Page 91
...9679; You can then be folded into a booklet appears at the right side. On the File menu in more pages per sheet. - c. Click Black Ink Only, and then click OK . - Printer settings tips (OS X) ● In the software program, be sure to save time setting printing preferences. ... the Print window, from left to select the correct paper size loaded in the software program, click Print. Deselect HP EasyColor, and then select Print Color as needed: - Select Black Ink Only. On the File menu in the printer. From the File menu, select Page Setup. ENWW Tips for print...
...9679; You can then be folded into a booklet appears at the right side. On the File menu in more pages per sheet. - c. Click Black Ink Only, and then click OK . - Printer settings tips (OS X) ● In the software program, be sure to save time setting printing preferences. ... the Print window, from left to select the correct paper size loaded in the software program, click Print. Deselect HP EasyColor, and then select Print Color as needed: - Select Black Ink Only. On the File menu in the printer. From the File menu, select Page Setup. ENWW Tips for print...

User Guide
Page 133
... glass strip and platen Over time, specks of these can accumulate inside the product. Open the scanner lid. 3. NOTE: This routine uses ink to correct print quality errors. Use the following routine to clean the printhead. Clean the scanner glass and the white plastic backing with a ...● Clean the document feeder pick rollers and separation pad ● Clean the touch screen Clean the printhead During the printing process, paper, ink, and dust particles can damage the product. TIP: Turning the product o properly by pressing the power button on the control panel. Open the...
... glass strip and platen Over time, specks of these can accumulate inside the product. Open the scanner lid. 3. NOTE: This routine uses ink to correct print quality errors. Use the following routine to clean the printhead. Clean the scanner glass and the white plastic backing with a ...● Clean the document feeder pick rollers and separation pad ● Clean the touch screen Clean the printhead During the printing process, paper, ink, and dust particles can damage the product. TIP: Turning the product o properly by pressing the power button on the control panel. Open the...

User Guide
Page 137
Lift the document feeder roller assembly, and gently pull the jammed paper out. 3. 6 Tray 1 7 Left door Traces of ink might remain in the product after a few sheets have been printed. Clear jams from the document feeder 1. Open the document feeder cover. 2. ENWW Jams and paper-feed issues 121 This problem typically resolves itself after a jam. Close the document feeder cover.
Lift the document feeder roller assembly, and gently pull the jammed paper out. 3. 6 Tray 1 7 Left door Traces of ink might remain in the product after a few sheets have been printed. Clear jams from the document feeder 1. Open the document feeder cover. 2. ENWW Jams and paper-feed issues 121 This problem typically resolves itself after a jam. Close the document feeder cover.

User Guide
Page 144
... Chapter 9 Solve problems ENWW Lower the platen by pulling it does not feed. Remove the duplexer by pressing down on a piece of paper to prevent ink smear on the sheet if it out with the black cylinder to prevent spills. Set the duplexer aside, upright, on the green tab. NOTICE: When...
... Chapter 9 Solve problems ENWW Lower the platen by pulling it does not feed. Remove the duplexer by pressing down on a piece of paper to prevent ink smear on the sheet if it out with the black cylinder to prevent spills. Set the duplexer aside, upright, on the green tab. NOTICE: When...

User Guide
Page 145
... for cartridges Cartridge Depleted Description The cartridge is depleted, print quality will no longer print. Recommended action Have a replacement cartridge on hand. Until the non-HP ink is at the end of its useful life. Cartridge Very Low Description The cartridge is nearing the end of its useful life. Cartridge issues Refilled...
... for cartridges Cartridge Depleted Description The cartridge is depleted, print quality will no longer print. Recommended action Have a replacement cartridge on hand. Until the non-HP ink is at the end of its useful life. Cartridge Very Low Description The cartridge is nearing the end of its useful life. Cartridge issues Refilled...

User Guide
Page 146
... the cartridge might not be used [color] cartridge installed Description The original HP ink in a differen HP product model. Do not use in this cartridge immediately and replace with genuine HP cartridge. The contacts on the cartridge by using a soft, lint-free ...cloth and insert the cartridge again. - Recommended action No action necessary. Recommended action - Genuine HP cartridge installed Description A genuine HP cartridge was installed. Recommended action Install the correct cartridge for use SETUP cartridges Description SETUP cartridges cannot be making ...
... the cartridge might not be used [color] cartridge installed Description The original HP ink in a differen HP product model. Do not use in this cartridge immediately and replace with genuine HP cartridge. The contacts on the cartridge by using a soft, lint-free ...cloth and insert the cartridge again. - Recommended action No action necessary. Recommended action - Genuine HP cartridge installed Description A genuine HP cartridge was installed. Recommended action Install the correct cartridge for use SETUP cartridges Description SETUP cartridges cannot be making ...

User Guide
Page 151
... on HP internal testing using a range of ink are curled. ENWW Printing issues 135 Replace it with the ColorLok® logo for use a paper type and weight that this product. Always use in PageWide printers. ● Use paper that best meets your printing needs ● ...Align the printhead ● Print a print-quality report Check for genuine HP...
... on HP internal testing using a range of ink are curled. ENWW Printing issues 135 Replace it with the ColorLok® logo for use a paper type and weight that this product. Always use in PageWide printers. ● Use paper that best meets your printing needs ● ...Align the printhead ● Print a print-quality report Check for genuine HP...

User Guide
Page 152
... media type. Use the correct paper type setting in the software program, click Print. 2. Expand each category of the following problems: ● Ink smears on the printed pages. ● Repeated marks occur on the printed pages. ● Printed pages are curled. ● Printed pages have...menu, select the correct size. 4. For Windows 7 and later, this driver is automatically installed when installing the product from 123.hp.com/pagewide (recommended) or from the HP software CD provided with the printer. ● Recommended for all Windows environments. Click the Paper/Quality tab...
... media type. Use the correct paper type setting in the software program, click Print. 2. Expand each category of the following problems: ● Ink smears on the printed pages. ● Repeated marks occur on the printed pages. ● Printed pages are curled. ● Printed pages have...menu, select the correct size. 4. For Windows 7 and later, this driver is automatically installed when installing the product from 123.hp.com/pagewide (recommended) or from the HP software CD provided with the printer. ● Recommended for all Windows environments. Click the Paper/Quality tab...

User Guide
Page 175
...HP limited warranty statement HP PRODUCT HP PageWide Managed MFP P57750dw DURATION OF LIMITED WARRANTY 1 year HP warrants to you, the end-user customer, that HP...HP SPECIFICALLY DISCLAIMS ANY IMPLIED WARRANTIES OR CONDITIONS OF MERCHANTABILITY, SATISFACTORY QUALITY, AND FITNESS FOR A PARTICULAR PURPOSE. HP...supplies not supplied by HP, (c) unauthorized modificatio ...new. HP does ...HP...HP warrants to you receive may be uninterrupted or error free. HP...HP has a support presence for legal or regulatory reasons. ENWW HP limited warranty statement 159 EXCEPT AS INDICATED ABOVE, IN NO EVENT WILL HP...
...HP limited warranty statement HP PRODUCT HP PageWide Managed MFP P57750dw DURATION OF LIMITED WARRANTY 1 year HP warrants to you, the end-user customer, that HP...HP SPECIFICALLY DISCLAIMS ANY IMPLIED WARRANTIES OR CONDITIONS OF MERCHANTABILITY, SATISFACTORY QUALITY, AND FITNESS FOR A PARTICULAR PURPOSE. HP...supplies not supplied by HP, (c) unauthorized modificatio ...new. HP does ...HP...HP warrants to you receive may be uninterrupted or error free. HP...HP has a support presence for legal or regulatory reasons. ENWW HP limited warranty statement 159 EXCEPT AS INDICATED ABOVE, IN NO EVENT WILL HP...

User Guide
Page 187
The ESD should clear if you install the cartridges. Tilting the product at an angle greater than 3 degrees can appear on the copied page. ENWW Product specification 171 If an electrostatic discharge occurs when using the product to change. NOTE: Values are subject to copy, a line can result in ink leakage. Tilt Electrostatic discharge (ESD) Operating Transporting IMPORTANT: Use caution when moving the product after you copy the page again.
The ESD should clear if you install the cartridges. Tilting the product at an angle greater than 3 degrees can appear on the copied page. ENWW Product specification 171 If an electrostatic discharge occurs when using the product to change. NOTE: Values are subject to copy, a line can result in ink leakage. Tilt Electrostatic discharge (ESD) Operating Transporting IMPORTANT: Use caution when moving the product after you copy the page again.


