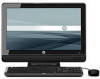
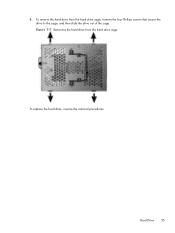
Getting Started Guide
Page 11
... supply. ● Maintenance and Service Guide (English only)-Provides information on parts removal and replacement, troubleshooting, Desktop Management, setup utilities, safety, routine care, connector pin assignments, POST error... 3 for four seconds. To access the publications, select Start > All Programs > HP User Manuals. Refer to the Maintenance and Service Guide (English only) for more information...for upgrading this series of the publications listed are available on the computer hard drive. Before You Call for more information about using the computer immediately without ...
HP ProtectTools Security Software,Version 6.0 User Guide
Page 13
...to control access to data. Module Smart Card Security (part of Security Manager) Embedded Security for HP ProtectTools Device Access Manager for HP ProtectTools Computrace for HP ProtectTools Key features ● Provides a management software interface for specific individuals or groups of users. .... ● Can monitor user activity along with hardware and software changes. ● Remains active even if the hard drive is reformatted or replaced. ● Requires separate purchase of tracking and tracing subscription to activate. The Smart Card can automatically log the user...
HP ProtectTools Security Software,Version 6.0 User Guide
Page 67
... or replaced. Click Start, click All Programs, click HP, and then click HP ProtectTools Security Manager. 3. Enter your contact information along with your user account on the Absolute Software Customer Center website. Click Learn More for more details about Computrace for HP ProtectTools: 1. If configured, Computrace can continue to function even if the hard drive is...
Maintenance and Service Guide: HP Omni Pro 110 All-in-One PC
Page 6
... Requirements 21 Screws ...21 Cables and Connectors 21 Hard Drives ...21 Lithium Coin Cell Battery 22 6 Illustrated parts catalog 23 Computer major components 23 Mass storage devices ...25 Sequential part number listing 26 7 Removal and Replacement Procedures All-in One (AIO) Chassis 28 Preparing... to Disassemble the Computer 28 Small Rear Cover ...29 Stand ...30 Left Rear Cover ...31 Optical Drive ...32 Hard Drive ...34 Right Rear Cover ...36 Memory ...37 Heat Sink...
Maintenance and Service Guide: HP Omni Pro 110 All-in-One PC
Page 14
4. It is complete, you must also install the drivers for the i386 directory, replace the path specification with C:\i386, or use the Browse button in the dialog box to reboot...), enter the model number of the computer, and press Enter. Protecting the Software To protect the software from http://www.hp.com/support. Refer to reboot the machine. Installing or Upgrading Device Drivers (Windows systems) When installing optional hardware devices after... updates and service packs. 5. Obtain the latest support software, including support software for instructions on the hard drive.
Maintenance and Service Guide: HP Omni Pro 110 All-in-One PC
Page 29
..., flexible cables. Service Considerations 21 They may have standard or metric threads and may sometimes be used during the reassembly process. HP strongly recommends that all cases, avoid bending or twisting the cables, and ensure that the cables are routed in their protective packaging...the work area to prevent damage. If an incorrect screw is removed from the computer, it can damage the computer. Hard Drives Handle hard drives as replacement spares. ● If a drive must be handled with bits, PN 161946-001) ● Flat-bladed screwdriver (may be of different lengths. These ...
Maintenance and Service Guide: HP Omni Pro 110 All-in-One PC
Page 30
... the chassis you are inserting or removing a hard drive, turn off the computer. WARNING! This computer contains a lithium battery. Do not attempt to HP, their authorized partners, or their agents. 22 Chapter 5 Identifying the Chassis, Routine Care, and Disassembly Preparation See the appropriate removal and replacement chapter for instructions on or in standby mode...
Maintenance and Service Guide: HP Omni Pro 110 All-in-One PC
Page 32
... (2) Display bezel Memory modules (PC3-10600, 1333-MHz; not illustrated) 2-GB 1-GB (3) Heat sink assembly (thermal module) (includes replacement thermal material) (4) Fan (5) Power button board (6) System board Thermal pads (installed under system board; not illustrated) DIMM thermal pad (20mm ... speaker (11) WLAN antenna cable (12) Inverter cable (13) Optical drive cable (14) LVDS cable (15) Webcam cable (16) Hard drive cable (17) Power button/LED cable Processor (includes replacement thermal material; not illustrated)) Intel Core2 Duo processors ● E8500 (3.16...
Maintenance and Service Guide: HP Omni Pro 110 All-in-One PC
Page 34
..., 3-MB L2 cache, 1066-MHz FSB) 621418-001 Hard drive, 1000 GB 621419-001 Hard drive, 250 GB 621420-001 Hard drive, 320 GB 621421-001 Hard drive, 500 GB 625256-001 Heat sink assembly, UMA graphic interface (thermal module) (includes replacement thermal material) 631758-001 Intel Pentium E6800 processor (3.33-GHz..., 2-MB L2 cache, 1066-MHz FSB) 631759-001 Intel Pentium E5700 processor (3.00-GHz, 2-MB L2 cache, 800-MHz FSB) 632938-001 Hard drive, 750 GB 633219-001 Intel ...
Maintenance and Service Guide: HP Omni Pro 110 All-in-One PC
Page 39
... stand (see Stand on the left and off the computer. Remove the small rear cover (see Preparing to access the optical drive and the hard drive. Figure 7-3 Removing the left rear cover To replace the left rear cover: 1. Slide the cover toward the left , rear of the computer. You must remove it to Disassemble...
Maintenance and Service Guide: HP Omni Pro 110 All-in-One PC
Page 42
... part number 621418-001 632938-001 621421-001 621420-001 621419-001 The hard drive is housed in One (AIO) Chassis To remove the hard drive: 1. Remove the stand (see Preparing to the optical drive. Figure 7-6 Removing the hard drive 34 Chapter 7 Removal and Replacement Procedures All-in a removable cage. Prepare the computer for disassembly (see Stand on...
Maintenance and Service Guide: HP Omni Pro 110 All-in-One PC
Page 43
Hard Drive 35 To remove the hard drive from the hard drive cage To replace the hard drive, reverse the removal procedures. 8. Figure 7-7 Removing the hard drive from the hard drive cage, remove the four Phillips screws that secure the drive to the cage, and then slide the drive out of the cage.
Maintenance and Service Guide: HP Omni Pro 110 All-in-One PC
Page 68
... Cover on page 36). 5. Determine which drive connector you do not have to remove. you need to remove both drive connectors. To remove the drive connectors: 1. Figure 7-29 Removing the drive connectors 60 Chapter 7 Removal and Replacement Procedures All-in One (AIO) Chassis Remove...Remove the heat sink (see Preparing to damage the cable when disconnecting it from the system board (2). The optical drive connector is located above the hard drive connector. 9. This section provides instructions for disassembly (see Heat Sink (Thermal Module) on page 28). 2. Remove ...
Maintenance and Service Guide: HP Omni Pro 110 All-in-One PC
Page 78
... computer. 2. If the computer is within an enclosure, ensure that there is not supported by ROM BIOS. 1. Apply hard drive firmware patch if applicable. (Available at http://www.hp.com/support.) 3. Back up contents and replace hard drive. 1801-Microcode Patch Error Processor is proper intake and exhaust ventilation for the enclosure. 2200-PMM Allocation Error...
Maintenance and Service Guide: HP Omni Pro 110 All-in-One PC
Page 83
...Power on the system board. 2. Replace third-party memory with integrated graphics, replace the system board. Interpreting POST Diagnostic Front Panel LEDs and Audible Codes 75 Continue adding devices one device at a time to ensure all devices are functioning properly. 3. For systems with HP memory. 4. Beeps stop after fifth ... second pause. Pre-video graphics error. Power failure (power supply is causing the problem by removing ALL attached devices (such as hard, diskette, or optical drives, and expansion cards). Check if a device is overloaded). 1.
Maintenance and Service Guide: HP Omni Pro 110 All-in-One PC
Page 85
...power button for less than 4 seconds. If the problem persists, replace the system board. 5. Check that the power button harness is solved. Interpreting POST Diagnostic Front Panel LEDs and Audible Codes 77 If the hard drive LED turns green, the power button is not turned on , ...then replace the power button harness. Check that both power supply cables are not flashing. If it is turned...
Maintenance and Service Guide: HP Omni Pro 110 All-in-One PC
Page 94
... numbers 24 R rear components 4 rear cover removing 47 removal and replacement processor 41 removal and replacement procedures All-in One chassis 28 bezel 61 display panel 64 drive connectors 60 fan 53 front bezel 61 hard drive 34 hard drive connector 60 heat sink 39 inverter board 49 left rear cover 31 ...memory 37 optical drive 32 optical drive connector 60 power button board 51 ...