Omni Pro 110 Hard Drive Replacement - HP
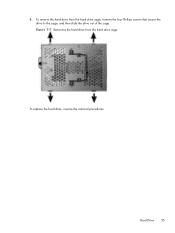
Omni Pro 110 Hard Drive Replacement
Related Manual Pages


Similar Questions

How To Open Computer To Get To Hard Drive
trying to change hard drive but can't figure out how to open the computer
trying to change hard drive but can't figure out how to open the computer
(Posted by sdoucet 3 years ago)


I Have An Hp Pavilion Elite M9350f. Can I Install A Second Hard Drive?
I can only find one Sata connection, and do not know if a second hard drive can be hooked up. I also...
I can only find one Sata connection, and do not know if a second hard drive can be hooked up. I also...
(Posted by Stallywood 13 years ago)