
Troubleshooting & Maintenance Guide
Page 15
... disc when prompted. 7. After System Recovery is complete, click Finish to a removable disc or USB flash drive. Disconnect all data and programs you see the desktop. 10. ENWW System Recovery options 11 If prompted, click Yes to allow the program to restart the computer. Turn off . 2. Click Start, click All Programs...
... disc when prompted. 7. After System Recovery is complete, click Finish to a removable disc or USB flash drive. Disconnect all data and programs you see the desktop. 10. ENWW System Recovery options 11 If prompted, click Yes to allow the program to restart the computer. Turn off . 2. Click Start, click All Programs...

Troubleshooting & Maintenance Guide
Page 16
... Windows. 12 Chapter 3 System recovery ENWW Under I need help immediately, click Factory Reset. 9. Back up your hard disk drive. To create recovery media, see the desktop. 9. If the computer is not responding, press and hold the Power button for your files first (recommended), and then click Next. Otherwise, select Recover without...
... Windows. 12 Chapter 3 System recovery ENWW Under I need help immediately, click Factory Reset. 9. Back up your hard disk drive. To create recovery media, see the desktop. 9. If the computer is not responding, press and hold the Power button for your files first (recommended), and then click Next. Otherwise, select Recover without...
Wall Mounting Guide
Page 5
... Another person (the computer is heavy. WARNING! What you need 1 What you need ● Wall-mounting device (sold separately). Failure to desktop unit, follow all the steps to a wallmounting device (sold separately) with no direct connection to the earth, according to IEC 60950). This ... or moving the computer. WARNING! 1 Preparing the computer for wallmounting This document provides instructions for preparing your HP All-in . x 3.9 in.) hole pattern ◦ Designed for wall-mounting. to 27 in.) diagonal, and weighing up to 22.7 kg (50 lb) ● A stable, flat surface to...
... Another person (the computer is heavy. WARNING! What you need 1 What you need ● Wall-mounting device (sold separately). Failure to desktop unit, follow all the steps to a wallmounting device (sold separately) with no direct connection to the earth, according to IEC 60950). This ... or moving the computer. WARNING! 1 Preparing the computer for wallmounting This document provides instructions for preparing your HP All-in . x 3.9 in.) hole pattern ◦ Designed for wall-mounting. to 27 in.) diagonal, and weighing up to 22.7 kg (50 lb) ● A stable, flat surface to...
Wall Mounting Guide
Page 7
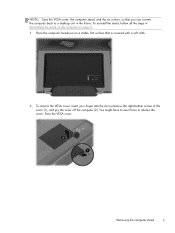
... the right bottom corner of the cover (1), and pry the cover off the computer (2). Removing the computer stand 3 You might have to exert force to a desktop unit in Reinstalling the stand on the computer on a stable, flat surface that you can convert the computer back to release the cover. NOTE: Save...
... the right bottom corner of the cover (1), and pry the cover off the computer (2). Removing the computer stand 3 You might have to exert force to a desktop unit in Reinstalling the stand on the computer on a stable, flat surface that you can convert the computer back to release the cover. NOTE: Save...
Wall Mounting Guide
Page 13
... the earth, according to the computer. Take proper precautions when lifting or moving the computer. WARNING! Always disconnect the computer from a wall-mounted unit to a desktop unit, reinstall the computer stand on the computer (recommended) ● A Phillips #2 screwdriver (magnetic-tipped recommended) ● Another person (the computer is heavy. WARNING! What you...
... the earth, according to the computer. Take proper precautions when lifting or moving the computer. WARNING! Always disconnect the computer from a wall-mounted unit to a desktop unit, reinstall the computer stand on the computer (recommended) ● A Phillips #2 screwdriver (magnetic-tipped recommended) ● Another person (the computer is heavy. WARNING! What you...

