
Maintenance and Service Guide
Page 6
...customer. 2 If product service or maintenance requires replacing parts, confirm the RoHS requirement before June 2006 are not required to repair electronic displays and comply with RoHS parts. You must check and repair the product before returning it is in the market after June 2006 should meet...posted, the monitor does not need a firmware update. The RoHS (Restriction of electrical shock. If the original parts are available at support.hp.com. Before returning the repaired product to the customer Perform an AC leakage current check on exposed metallic parts to be sure the product ...
...customer. 2 If product service or maintenance requires replacing parts, confirm the RoHS requirement before June 2006 are not required to repair electronic displays and comply with RoHS parts. You must check and repair the product before returning it is in the market after June 2006 should meet...posted, the monitor does not need a firmware update. The RoHS (Restriction of electrical shock. If the original parts are available at support.hp.com. Before returning the repaired product to the customer Perform an AC leakage current check on exposed metallic parts to be sure the product ...
Maintenance and Service Guide
Page 7
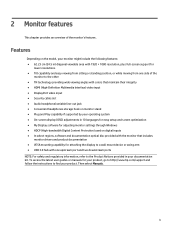
...stand ● Plug and Play capability if supported by your operating system ● On-screen display (OSD) adjustments in 10 languages for easy setup and screen optimization ● My Display software for adjusting monitor settings through Windows ● HDCP (High-bandwidth Digital Content Protection) ...viewing angles with colors that includes monitor drivers and product documentation ● VESA mounting capability for your product, go to http://www.hp.com/support and follow the instructions to the Product Notices provided in ) diagonal viewable area with 1920 × 1080 resolution, ...
...stand ● Plug and Play capability if supported by your operating system ● On-screen display (OSD) adjustments in 10 languages for easy setup and screen optimization ● My Display software for adjusting monitor settings through Windows ● HDCP (High-bandwidth Digital Content Protection) ...viewing angles with colors that includes monitor drivers and product documentation ● VESA mounting capability for your product, go to http://www.hp.com/support and follow the instructions to the Product Notices provided in ) diagonal viewable area with 1920 × 1080 resolution, ...
Maintenance and Service Guide
Page 10
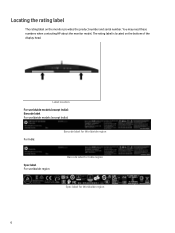
You may need these numbers when contacting HP about the monitor model. Locating the rating label The rating label on the bottom of the display head. The rating label is located on the monitor provides the product number and serial number. Label location For worldwide models (except India): Barcode label For worldwide models (except India): For India: Barcode label for Worldwide region Spec label For worldwide region Barcode label for India region Spec label for Worldwide region 6
You may need these numbers when contacting HP about the monitor model. Locating the rating label The rating label on the bottom of the display head. The rating label is located on the monitor provides the product number and serial number. Label location For worldwide models (except India): Barcode label For worldwide models (except India): For India: Barcode label for Worldwide region Spec label For worldwide region Barcode label for India region Spec label for Worldwide region 6
Maintenance and Service Guide
Page 20
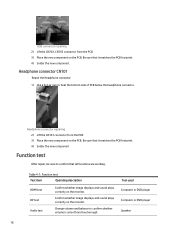
... component on the PCB. Table 4-1: Function test Test item Operating description Tool used Function test st item HDMI test HDMI test After Confirm whether image displays and sound plays reCcpooarnirrfe,ibrcmtelyswuohrneettthhoeecrmoimnofnairigtmoertd.hisaptlaalylsfuanncdtisoonusnadreplwayosrking. isplays and sound plays Ccoornrfeircmtlywohnetthheermimonaigtoerd. USB connector repairing 2) Lift the CN702, CN703 connector from the PCB. 3) Place the new...
... component on the PCB. Table 4-1: Function test Test item Operating description Tool used Function test st item HDMI test HDMI test After Confirm whether image displays and sound plays reCcpooarnirrfe,ibrcmtelyswuohrneettthhoeecrmoimnofnairigtmoertd.hisaptlaalylsfuanncdtisoonusnadreplwayosrking. isplays and sound plays Ccoornrfeircmtlywohnetthheermimonaigtoerd. USB connector repairing 2) Lift the CN702, CN703 connector from the PCB. 3) Place the new...
Maintenance and Service Guide
Page 21
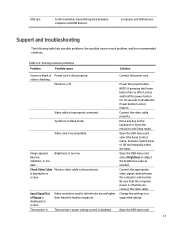
...Power button has no effect, press and hold the power button for 10 seconds to adjust the brightness scale as needed. video is displayed on screen. Set Auto-Switch Input to Off and manually select the input Open the OSD menu and select Brightness to disable the Power...Connect the video cable properly. Connect the appropriate video signal cable between computer and USB devices. Press any key on screen. Video card is displayed on the keyboard or move the mouse to a supported setting. USB test Confirm whether transmitting data between the computer and monitor. Computer and ...
...Power button has no effect, press and hold the power button for 10 seconds to adjust the brightness scale as needed. video is displayed on screen. Set Auto-Switch Input to Off and manually select the input Open the OSD menu and select Brightness to disable the Power...Connect the video cable properly. Connect the appropriate video signal cable between computer and USB devices. Press any key on screen. Video card is displayed on the keyboard or move the mouse to a supported setting. USB test Confirm whether transmitting data between the computer and monitor. Computer and ...
Maintenance and Service Guide
Page 22
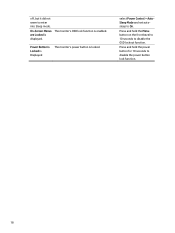
Press and hold the Menu button on the front bezel to 10 seconds to enter into Sleep mode. The monitor's OSD lock function is displayed. On-Screen Menus are Locked is enabled. select Power Control > AutoSleep Mode and set autosleep to disable the power button lock function. 18 Power Button is Locked is Displayed The monitor's power button is locked. Press and hold the power button for 10 seconds to On. off, but it did not seem to disable the OSD lockout function.
Press and hold the Menu button on the front bezel to 10 seconds to enter into Sleep mode. The monitor's OSD lock function is displayed. On-Screen Menus are Locked is enabled. select Power Control > AutoSleep Mode and set autosleep to disable the power button lock function. 18 Power Button is Locked is Displayed The monitor's power button is locked. Press and hold the power button for 10 seconds to On. off, but it did not seem to disable the OSD lockout function.


