Limited Warranty and Technical Support
Page 1
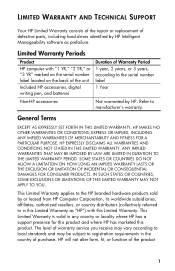
... THIS LIMITED WARRANTY. This Limited Warranty applies to the HP branded hardware products sold by or leased from HP Computer Corporation, its worldwide subsidiaries, affiliates, authorized resellers, or country distributors (collectively referred to registration requirements in the country of defective parts, including hard drives identified by HP. The level of warranty service you receive may...
... THIS LIMITED WARRANTY. This Limited Warranty applies to the HP branded hardware products sold by or leased from HP Computer Corporation, its worldwide subsidiaries, affiliates, authorized resellers, or country distributors (collectively referred to registration requirements in the country of defective parts, including hard drives identified by HP. The level of warranty service you receive may...
Limited Warranty and Technical Support
Page 2
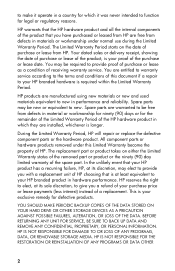
... in performance and reliability. You are entitled to warranty service according to the terms and conditions of HP. YOU SHOULD MAKE PERIODIC BACKUP COPIES OF THE DATA STORED ON YOUR HARD DRIVE OR OTHER STORAGE DEVICES AS A PRECAUTION AGAINST POSSIBLE FAILURES, ALTERATION, OR LOSS OF THE DATA.... All component parts or hardware products removed under normal use during the Limited Warranty Period. HP IS NOT RESPONSIBLE FOR THE RESTORATION OR...
... in performance and reliability. You are entitled to warranty service according to the terms and conditions of HP. YOU SHOULD MAKE PERIODIC BACKUP COPIES OF THE DATA STORED ON YOUR HARD DRIVE OR OTHER STORAGE DEVICES AS A PRECAUTION AGAINST POSSIBLE FAILURES, ALTERATION, OR LOSS OF THE DATA.... All component parts or hardware products removed under normal use during the Limited Warranty Period. HP IS NOT RESPONSIBLE FOR THE RESTORATION OR...
HP Compaq notebook single image white paper
Page 4
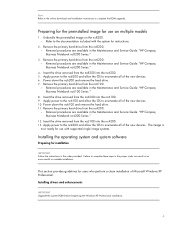
... in the proper order can result in the order provided. Removal procedures are available in the Maintenance and Service Guide: "HP Compaq Business Notebook nc6200 Series." 4. Power down the nc6200 and remove the hard drive. 7. Insert the drive removed from the nc6200 into the nc4200. 13. Failure to the documentation included with supported single image systems. Installing...
... in the proper order can result in the order provided. Removal procedures are available in the Maintenance and Service Guide: "HP Compaq Business Notebook nc6200 Series." 4. Power down the nc6200 and remove the hard drive. 7. Insert the drive removed from the nc6200 into the nc4200. 13. Failure to the documentation included with supported single image systems. Installing...
HP Compaq notebook single image white paper
Page 5
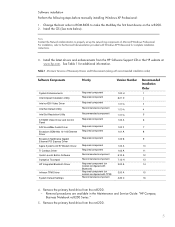
.... Remove the primary hard drive from the HP Software Support CD or the HP website at www.hp.com. See Table 1 for complete installation instructions. 3. Change the boot order in the Maintenance and Service Guide: "HP Compaq Business Notebook nc8200 Series." 5. .... Install the OS (See note below). Software installation Perform the following steps before manually installing Windows XP Professional: 1. Remove the primary hard drive from the nc6200. 5 For installation, refer to the Microsoft documentation provided with TPM) Recommended component Version Number 1.00 H 6.21 D...
.... Remove the primary hard drive from the HP Software Support CD or the HP website at www.hp.com. See Table 1 for complete installation instructions. 3. Change the boot order in the Maintenance and Service Guide: "HP Compaq Business Notebook nc8200 Series." 5. .... Install the OS (See note below). Software installation Perform the following steps before manually installing Windows XP Professional: 1. Remove the primary hard drive from the nc6200. 5 For installation, refer to the Microsoft documentation provided with TPM) Recommended component Version Number 1.00 H 6.21 D...
HP Compaq notebook single image white paper
Page 6
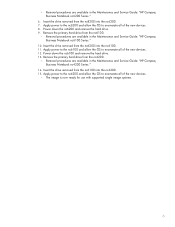
... from the nc6100 into the nc6100. 11. Remove the primary hard drive from the nc6200 into the nc4200. 15. Removal procedures are available in the Maintenance and Service Guide: "HP Compaq Business Notebook nc6100 Series." 10. - Removal procedures are available in the Maintenance and Service Guide: "HP Compaq Business Notebook nc6200 Series." 6. Apply power to the nc4200 and allow the...
... from the nc6100 into the nc6100. 11. Remove the primary hard drive from the nc6200 into the nc4200. 15. Removal procedures are available in the Maintenance and Service Guide: "HP Compaq Business Notebook nc6100 Series." 10. - Removal procedures are available in the Maintenance and Service Guide: "HP Compaq Business Notebook nc6200 Series." 6. Apply power to the nc4200 and allow the...
HP Compaq notebook single image white paper
Page 7
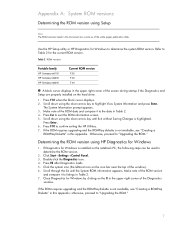
... document are current as of the screen during startup if the Diagnostics and Setup are properly installed on the hard drive. 1. Table 2 ROM versions Portable family HP Compaq nc6100 HP Compaq nc6200 HP Compaq nc8200 Current ROM version F.02 F.03 F.04 „ A block cursor displays in the upper right corner... down arrow key to Table 2 for Windows 1. Otherwise, proceed to determine the system ROM version. Use the HP Setup utility or HP Diagnostics for Windows by clicking on the notebook PC, the following steps can be used to exit the ROM information screen. 5. Scroll down using...
... document are current as of the screen during startup if the Diagnostics and Setup are properly installed on the hard drive. 1. Table 2 ROM versions Portable family HP Compaq nc6100 HP Compaq nc6200 HP Compaq nc8200 Current ROM version F.02 F.03 F.04 „ A block cursor displays in the upper right corner... down arrow key to Table 2 for Windows 1. Otherwise, proceed to determine the system ROM version. Use the HP Setup utility or HP Diagnostics for Windows by clicking on the notebook PC, the following steps can be used to exit the ROM information screen. 5. Scroll down using...
HP ProtectTools: Authentication technologies and suitability to task
Page 4
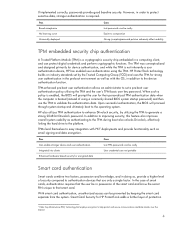
... is a cryptographic security chip embedded in order to help protect and secure communications and data transfer over the Internet. 4 HP also utilizes TPM authentication to validate the authentication data. Pros Can enable stronger device and user authentication Integrated into clients Enhanced ...provide functionality such as authenticating to the TPM during boot also unlocks Drivelock, effectively linking the hard drive to the device authentication function. With smart card authentication, unauthorized access can protect digital credentials and perform cryptographic functions.
... is a cryptographic security chip embedded in order to help protect and secure communications and data transfer over the Internet. 4 HP also utilizes TPM authentication to validate the authentication data. Pros Can enable stronger device and user authentication Integrated into clients Enhanced ...provide functionality such as authenticating to the TPM during boot also unlocks Drivelock, effectively linking the hard drive to the device authentication function. With smart card authentication, unauthorized access can protect digital credentials and perform cryptographic functions.
HP ProtectTools: Authentication technologies and suitability to task
Page 7
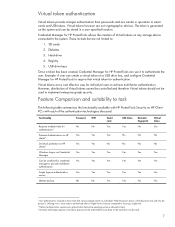
... the person is allowed to load. 6 Drivelock technology requires a hard drive password to achieve multi-factor authentication. Hard drive 4. Registry 5. Example: A user can create a virtual token on a USB drive key, and configure Credential Manager for HP ProtectTools can be read. 7 However, distribution of Virtual tokens cannot...Yes No Yes 4 User authentication is based on three traits that virtual token for HP ProtectTools allows the creation of Virtual tokens on any data on the hard drive can use it to task The following table summarizes the functionality available with each ...
... the person is allowed to load. 6 Drivelock technology requires a hard drive password to achieve multi-factor authentication. Hard drive 4. Registry 5. Example: A user can create a virtual token on a USB drive key, and configure Credential Manager for HP ProtectTools can be read. 7 However, distribution of Virtual tokens cannot...Yes No Yes 4 User authentication is based on three traits that virtual token for HP ProtectTools allows the creation of Virtual tokens on any data on the hard drive can use it to task The following table summarizes the functionality available with each ...

Hardware-Software Guide
Page 5
... 4-6 Connecting a Monitor or Projector 4-7 Multimedia Software 4-8 Observing the Copyright Warning 4-9 Installing Software 4-9 Enabling AutoPlay 4-10 Changing DVD Region Settings 4-11 5 Drives Drive Care 5-2 IDE Drive Light 5-3 Primary Hard Drive 5-3 MultiBay II Hard Drives 5-8 Inserting a Hard Drive Module 5-8 Removing a Hard Drive Module 5-9 Using MultiBay II Optical Drives 5-10 Inserting an Optical Drive 5-10 Removing Optical Drives 5-11 Using Optical Discs 5-12 Hardware and Software Guide v
... 4-6 Connecting a Monitor or Projector 4-7 Multimedia Software 4-8 Observing the Copyright Warning 4-9 Installing Software 4-9 Enabling AutoPlay 4-10 Changing DVD Region Settings 4-11 5 Drives Drive Care 5-2 IDE Drive Light 5-3 Primary Hard Drive 5-3 MultiBay II Hard Drives 5-8 Inserting a Hard Drive Module 5-8 Removing a Hard Drive Module 5-9 Using MultiBay II Optical Drives 5-10 Inserting an Optical Drive 5-10 Removing Optical Drives 5-11 Using Optical Discs 5-12 Hardware and Software Guide v
Hardware-Software Guide
Page 9
... 14-10 Repairing or Reinstalling Applications 14-11 Reinstalling Applications from Your Hard Drive 14-11 Repairing the Operating System 14-12 Reinstalling the Operating System 14-13 Reinstalling Device Drivers and Other Software 14-14 15 Notebook Care Temperature 15-3 Notebook 15-3 Keyboard 15-4 Display 15-5 TouchPad 15-5 Cleaning an External Mouse 15...
... 14-10 Repairing or Reinstalling Applications 14-11 Reinstalling Applications from Your Hard Drive 14-11 Repairing the Operating System 14-12 Reinstalling the Operating System 14-13 Reinstalling Device Drivers and Other Software 14-14 15 Notebook Care Temperature 15-3 Notebook 15-3 Keyboard 15-4 Display 15-5 TouchPad 15-5 Cleaning an External Mouse 15...

Hardware-Software Guide
Page 12
...the light is turned off when all batteries in the hard drive bay or MultiBay II is connected to full charge capacity. Off: If the notebook is being accessed. On: Num lock is turned off . If the notebook is not connected to an external power source, the light... the battery reaches a critical low-battery condition, the battery light begins blinking more quickly. On: A drive in the notebook are fully charged. Component ID Component 3 Battery light 4 Integrated Drive Electronics (IDE) drive light 5 Volume mute light 6 Num lock light 7 Caps lock light Description Amber: A battery pack ...
...the light is turned off when all batteries in the hard drive bay or MultiBay II is connected to full charge capacity. Off: If the notebook is being accessed. On: Num lock is turned off . If the notebook is not connected to an external power source, the light... the battery reaches a critical low-battery condition, the battery light begins blinking more quickly. On: A drive in the notebook are fully charged. Component ID Component 3 Battery light 4 Integrated Drive Electronics (IDE) drive light 5 Volume mute light 6 Num lock light 7 Caps lock light Description Amber: A battery pack ...

Hardware-Software Guide
Page 23
... battery locking latch Secures the primary battery pack into the battery bay. 3 Travel battery connector Connects an optional travel battery. 4 Business card holder Holds a standard size business card. 5 Expansion memory module compartment 6 Hard drive bay Accepts one optional memory module. Component ID Bottom Components The following illustration and table identify and describe the components...
... battery locking latch Secures the primary battery pack into the battery bay. 3 Travel battery connector Connects an optional travel battery. 4 Business card holder Holds a standard size business card. 5 Expansion memory module compartment 6 Hard drive bay Accepts one optional memory module. Component ID Bottom Components The following illustration and table identify and describe the components...

Hardware-Software Guide
Page 33
... your work while power is on or when standby has been initiated. Hardware and Software Guide 2-6 If a power-on the hard drive, and then shuts down the notebook. Select Start > Control Panel > Performance and Maintenance > Power Options > Hibernate tab. 2. Power Hibernation Ä CAUTION: ...If the configuration of the notebook is changed during hibernation, resuming from a docking device. ■ Do not add or remove memory modules. ■ Do not insert or remove any hard drives. ■ Do not connect or disconnect external devices. ■ Do...
... your work while power is on or when standby has been initiated. Hardware and Software Guide 2-6 If a power-on the hard drive, and then shuts down the notebook. Select Start > Control Panel > Performance and Maintenance > Power Options > Hibernate tab. 2. Power Hibernation Ä CAUTION: ...If the configuration of the notebook is changed during hibernation, resuming from a docking device. ■ Do not add or remove memory modules. ■ Do not insert or remove any hard drives. ■ Do not connect or disconnect external devices. ■ Do...
Hardware-Software Guide
Page 34
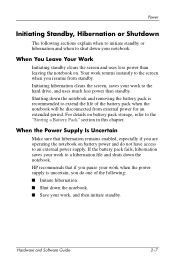
...hibernation file and shuts down the notebook. Shutting down the notebook and removing the battery pack is uncertain, you do not have access to an external power supply. Hardware and Software Guide 2-7 If the battery pack fails, hibernation saves your work, and then initiate standby. HP recommends that hibernation remains enabled,... the life of the following sections explain when to initiate standby or hibernation and when to shut down your work to the hard drive, and uses much less power than leaving the notebook on battery power and do one of the battery pack when the...
...hibernation file and shuts down the notebook. Shutting down the notebook and removing the battery pack is uncertain, you do not have access to an external power supply. Hardware and Software Guide 2-7 If the battery pack fails, hibernation saves your work, and then initiate standby. HP recommends that hibernation remains enabled,... the life of the following sections explain when to initiate standby or hibernation and when to shut down your work to the hard drive, and uses much less power than leaving the notebook on battery power and do one of the battery pack when the...

Hardware-Software Guide
Page 41
Select Apply. To set a power scheme: 1. Select the check box for Prompt for a password when the notebook is running on a battery pack or on external power. Select Apply. Using a Security Password You can add a security feature that you specify. Power ... schemes depending on whether the notebook is turned on or resumes from standby or restores from Standby. 3. Access the Power Options Properties > Power Schemes tab. 2. Hardware and Software Guide 2-14 You can also set a power scheme that initiates standby or turns off the display or hard drive after a time interval that...
Select Apply. To set a power scheme: 1. Select the check box for Prompt for a password when the notebook is running on a battery pack or on external power. Select Apply. Using a Security Password You can add a security feature that you specify. Power ... schemes depending on whether the notebook is turned on or resumes from standby or restores from Standby. 3. Access the Power Options Properties > Power Schemes tab. 2. Hardware and Software Guide 2-14 You can also set a power scheme that initiates standby or turns off the display or hard drive after a time interval that...

Hardware-Software Guide
Page 55
... discharge process: ❏ The monitor will not turn off automatically. ❏ Hard drive speed will not decrease automatically while the notebook is being discharged. Clear the Enable hibernation check box. 3. Select Apply. Power Discharging the Battery Pack Before you use the notebook occasionally during the discharge procedure and have set energy-saving timeouts, expect...
... discharge process: ❏ The monitor will not turn off automatically. ❏ Hard drive speed will not decrease automatically while the notebook is being discharged. Clear the Enable hibernation check box. 3. Select Apply. Power Discharging the Battery Pack Before you use the notebook occasionally during the discharge procedure and have set energy-saving timeouts, expect...

Hardware-Software Guide
Page 96
...not touch the connector pins on the drive or on a conveyor belt, use excessive force when inserting the drive into the hard drive bay. ■ Avoid exposing the drive to temperature extremes. ■ Avoid exposing the drive to liquids. Drives Drive Care Drives are included with the procedures to ... of data loss, initiate standby before you move a computer or external hard drive from fingers or other suitable protective packaging and label the package "FRAGILE." Additional cautions are fragile notebook components that check carry-on luggage, usually while it with magnetic fields ...
...not touch the connector pins on the drive or on a conveyor belt, use excessive force when inserting the drive into the hard drive bay. ■ Avoid exposing the drive to temperature extremes. ■ Avoid exposing the drive to liquids. Drives Drive Care Drives are included with the procedures to ... of data loss, initiate standby before you move a computer or external hard drive from fingers or other suitable protective packaging and label the package "FRAGILE." Additional cautions are fragile notebook components that check carry-on luggage, usually while it with magnetic fields ...

Hardware-Software Guide
Page 97
Primary Hard Drive Ä CAUTION: To prevent system lockup and loss of information: Shut down . Remove it only after the notebook is on when the primary hard drive, or a hard drive or optical drive in the MultiBay II, is the primary hard drive. Hardware and Software Guide 5-3 Drives IDE Drive Light The IDE drive light is turned on , in standby, or in hibernation. The hard drive that is in the hard drive bay is being accessed. Do not remove the hard drive while the notebook is properly shut down the notebook before removing the hard drive from the hard drive bay.
Primary Hard Drive Ä CAUTION: To prevent system lockup and loss of information: Shut down . Remove it only after the notebook is on when the primary hard drive, or a hard drive or optical drive in the MultiBay II, is the primary hard drive. Hardware and Software Guide 5-3 Drives IDE Drive Light The IDE drive light is turned on , in standby, or in hibernation. The hard drive that is in the hard drive bay is being accessed. Do not remove the hard drive while the notebook is properly shut down the notebook before removing the hard drive from the hard drive bay.

Hardware-Software Guide
Page 98
Turn the notebook upside down with the battery facing away from the notebook 2. Lift the hard drive cover away from you are not sure whether the notebook is in hibernation, turn the notebook on by pressing and releasing the power button. Hardware and Software Guide 5-4 Shut down the notebook through the operating system. 2. Then shut down the notebook. Close the display. 3. Loosen the two hard drive cover screws 1. 5. If you . 4. Drives To remove the primary hard drive: 1.
Turn the notebook upside down with the battery facing away from the notebook 2. Lift the hard drive cover away from you are not sure whether the notebook is in hibernation, turn the notebook on by pressing and releasing the power button. Hardware and Software Guide 5-4 Shut down the notebook through the operating system. 2. Then shut down the notebook. Close the display. 3. Loosen the two hard drive cover screws 1. 5. If you . 4. Drives To remove the primary hard drive: 1.

Hardware-Software Guide
Page 99
Loosen the hard drive screw 1. 7. Drives 6. Hardware and Software Guide 5-5 Lift the hard drive 3 from the notebook. Pull the hard drive tab 2 to the left to disconnect the hard drive. 8.
Loosen the hard drive screw 1. 7. Drives 6. Hardware and Software Guide 5-5 Lift the hard drive 3 from the notebook. Pull the hard drive tab 2 to the left to disconnect the hard drive. 8.

