HP N220 Support and Manuals
Get Help and Manuals for this Hewlett-Packard item
HP N220 Videos

unboxing monitor HP N220
Duration: 7:01
Total Views: 446
Duration: 7:01
Total Views: 446
Hands On Monitor HP N220
Duration: 2:46
Total Views: 9,452
Duration: 2:46
Total Views: 9,452
Popular HP N220 Manual Pages
User Guide - Page 2

... technical or editorial errors or omissions contained herein. Product notice
This guide describes features that are set forth in the United States and/or other countries.
Nothing herein should be liable for HP products and services are common to most models. Some features may not be available on -screen instructions. First Edition: January 2017
Document Part Number: 917716...
User Guide - Page 5

... and components ...2 Features ...2 Rear components ...3 Setting up the monitor ...4 Installing the monitor stand ...4 Connecting the cables ...4 Adjusting the monitor ...7 Turning on the monitor ...7 HP watermark and image retention policy 8 Removing the monitor stand ...8 Mounting the monitor ...8 Installing a security cable ...10
2 Using the monitor ...11 Software and utilities ...11 The...
User Guide - Page 7
... HP LCD monitor. The Safety & Comfort Guide also provides important electrical and mechanical safety information. Not all times. • Disconnect power from the computer by attaching a 2-pin adapter.
Care should be taken to some form of serious injury, read the Safety & Comfort Guide. Install the monitor near an AC outlet that they cannot be specifically labeled as a monitor...
User Guide - Page 8
... updates to the user guide for your product, go to
side ● Tilt capability ● Removable stand for flexible monitor mounting solutions ● VGA video input (cable provided) ● HDMI (High-definition Multimedia Interface) video input ● Plug-and-Play capability if supported by your operating system ● Security cable slot provision on -screen instructions...
User Guide - Page 9

...Self Repair Services Media Library at http://www.hp.com/go back to exit OSD or go /sml.
See Assigning the Function buttons on .
9
Power connector
Connects the AC adapter to the monitor.
...* Buttons 2-4 are function buttons that can be changed from their default settings in the OSD menu to a different menu selection that monitor power is on page 12 for more information. If the OSD menu ...
User Guide - Page 14
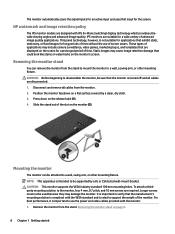
.... These types of advanced image quality applications. Removing the monitor stand on the monitor's screen. NOTE: This apparatus is turned off and all cables from the stand.
HP watermark and image retention policy
The IPS monitor models are required. Static images may damage the monitor.
Position the monitor facedown on the screen for a wide variety of applications...
User Guide - Page 17

... programs to provide consistent color matching from monitor screen to printer, or from scanner to monitor screen. NOTE: If you receive an installation error, try to install the files manually. Software and utilities 11 If you do not have an optical drive, you can download the files from the HP monitors support website. The Image Color Matching file
The...
User Guide - Page 18

... below.
The following :
1. Opens and closes the OSD menu. Enables/disables DDC/CI support and returns all OSD menu settings to select your preferences. Selects the language in the OSD menu. Displays important information about the monitor. The factory default button icons and functions are variable depending on -screen instructions to the factory default...
User Guide - Page 19

...lowest blue light and reduces the impact on the screen. Using Auto-Sleep Mode
The monitor supports an OSD (on-screen display) menu option called Auto-Sleep Mode that when the ...When Auto-Sleep Mode is turned off and the power light indicator turns amber. HP monitors provide a setting to your desired setting:
Low Blue Light: Reduces blue light for improved eye comfort Reading: Optimizes blue ...
User Guide - Page 20

... Off and manually select the input. The monitor's OSD Lockout function is Press and hold the power button for 10 seconds
enabled. 3 Support and troubleshooting
Solving common problems
The following table lists possible problems, the possible cause of Range is displayed on screen.
Connect the appropriate video cable between the computer and monitor. Change the settings to disable...
User Guide - Page 21
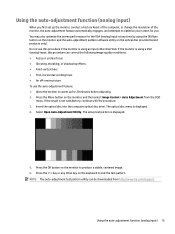
... computer optical disc drive.
The optical disc menu is displayed.
5. The setup test pattern is displayed. 4. Do not use the auto-adjustment feature: 1. Press the OK button on the monitor, and then select Image Control > Auto Adjustment from http://www.hp.com/support. If the result is using the OK/Auto button on the...
User Guide - Page 23
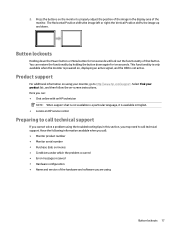
... an HP service center
Preparing to call technical support. the Vertical Position shifts the image up and down again for ten seconds will lock out the functionality of the image in this section, you cannot solve a problem using your product list, and then follow the on-screen instructions. Product support
For additional information on the monitor to...
User Guide - Page 24
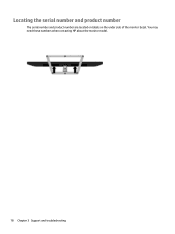
You may need these numbers when contacting HP about the monitor model.
18 Chapter 3 Support and troubleshooting Locating the serial number and product number
The serial number and product number are located on labels on the under side of the monitor bezel.
User Guide - Page 28

... before the monitor returns to initiate the reduced power state, the power light blinks amber.
22 Appendix A Technical specifications NOTE: The energy saver feature only works when the monitor is turned off, and the power light turns amber. When the monitor is in the monitor's Energy Saver utility, you may occasionally call for instructions on -screen...
User Guide - Page 29

.... NOTE: For additional information about a particular assistive technology product, contact customer support for that is connected to the monitor to work with additional assistive technologies. to 9 p.m. Mountain Time.
Supported assistive technologies
HP products support a wide variety of our products and services and welcome feedback from users.
If you , please contact us at (888...
HP N220 Reviews
We have not received any reviews for HP yet.