
User Guide
Page 5
... 8 Removing the monitor stand ...8 Mounting the monitor ...8 Installing a security cable ...10 2 Using the monitor ...11 Software and utilities ...11 The Information file ...11 The Image Color Matching file ...11 Installing the INF and ICM files ...11 Installing from the optical disc (available in select regions 11 Downloading from the Web ...11 Using the on-screen display (OSD) menu ...12 Assigning the Function buttons ...12 Using Auto-Sleep Mode ...13 Adjusting Low Blue Light Mode ...13 3 Support and troubleshooting ...14 Solving common problems...
... 8 Removing the monitor stand ...8 Mounting the monitor ...8 Installing a security cable ...10 2 Using the monitor ...11 Software and utilities ...11 The Information file ...11 The Image Color Matching file ...11 Installing the INF and ICM files ...11 Installing from the optical disc (available in select regions 11 Downloading from the Web ...11 Using the on-screen display (OSD) menu ...12 Assigning the Function buttons ...12 Using Auto-Sleep Mode ...13 Adjusting Low Blue Light Mode ...13 3 Support and troubleshooting ...14 Solving common problems...

User Guide
Page 6
4 Maintaining the monitor ...19 Maintenance guidelines ...19 Cleaning the monitor ...19 Shipping the monitor ...19 Appendix A Technical specifications ...20 54.6 cm/21.5-inch ...20 60.5 cm/23.8-inch ...20 68.6 cm/27-inch ...21 Preset display resolutions ...21 Power adapter ...22 Entering user modes ...22 Energy saver feature ...22 Appendix B Accessibility ...23 Supported assistive technologies ...23 Contacting support ...23 vi
4 Maintaining the monitor ...19 Maintenance guidelines ...19 Cleaning the monitor ...19 Shipping the monitor ...19 Appendix A Technical specifications ...20 54.6 cm/21.5-inch ...20 60.5 cm/23.8-inch ...20 68.6 cm/27-inch ...21 Preset display resolutions ...21 Power adapter ...22 Entering user modes ...22 Energy saver feature ...22 Appendix B Accessibility ...23 Supported assistive technologies ...23 Contacting support ...23 vi
User Guide
Page 7
... current rating of serious injury, read the Safety & Comfort Guide. NOTE: This product is an important safety feature. Do not disable the power cord grounding pin, for computer users. Never disconnect the monitor by unplugging the power cord from surrounding light and bright surfaces that you can easily reach. Consider placing the monitor in your documentation kit. Use a power strip whose manufacturer offers a Damage Replacement...
... current rating of serious injury, read the Safety & Comfort Guide. NOTE: This product is an important safety feature. Do not disable the power cord grounding pin, for computer users. Never disconnect the monitor by unplugging the power cord from surrounding light and bright surfaces that you can easily reach. Consider placing the monitor in your documentation kit. Use a power strip whose manufacturer offers a Damage Replacement...
User Guide
Page 8
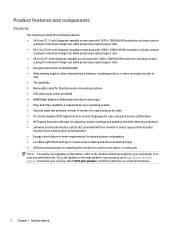
...-inch) diagonal viewable screen area with 1920 x 1080 Full HD resolution; includes custom scaling for maximum image size while preserving original aspect ratio ● Nonglare panel with an LED backlight ● Wide viewing angle to allow viewing from a sitting or standing position, or when moving from side to side ● Tilt capability ● Removable stand for flexible monitor mounting solutions ● VGA video input (cable provided) ● HDMI (High-definition Multimedia Interface) video input ● Plug...
...-inch) diagonal viewable screen area with 1920 x 1080 Full HD resolution; includes custom scaling for maximum image size while preserving original aspect ratio ● Nonglare panel with an LED backlight ● Wide viewing angle to allow viewing from a sitting or standing position, or when moving from side to side ● Tilt capability ● Removable stand for flexible monitor mounting solutions ● VGA video input (cable provided) ● HDMI (High-definition Multimedia Interface) video input ● Plug...

User Guide
Page 9
... Component Function 1 Menu/OK If the OSD menu is on page 12 for more information. If the OSD menu is closed , press to open the Information menu. * 5 Power button Turns the monitor on or off. 6 HDMI port Connects an HDMI cable to the source device. 7 VGA port Connects the VGA cable to the source device. 8 Power light When illuminated, indicates that you most commonly use and want to navigate forward through the OSD menu and increase adjustment levels. Product...
... Component Function 1 Menu/OK If the OSD menu is on page 12 for more information. If the OSD menu is closed , press to open the Information menu. * 5 Power button Turns the monitor on or off. 6 HDMI port Connects an HDMI cable to the source device. 7 VGA port Connects the VGA cable to the source device. 8 Power light When illuminated, indicates that you most commonly use and want to navigate forward through the OSD menu and increase adjustment levels. Product...

User Guide
Page 10
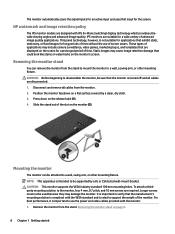
... screw on the base with the screw hole on a flat surface covered by a clean, dry cloth. 3. Not all cables shown in a convenient, well-ventilated location near the computer. 2. Place the monitor in this occurs, the screen will not recover to the video input port. 4 Chapter 1 Getting started Setting up the monitor Installing the monitor stand CAUTION: Do not touch the surface of the LCD panel. Connecting the cables NOTE: The monitor ships with the monitor. 1. Connect a video cable...
... screw on the base with the screw hole on a flat surface covered by a clean, dry cloth. 3. Not all cables shown in a convenient, well-ventilated location near the computer. 2. Place the monitor in this occurs, the screen will not recover to the video input port. 4 Chapter 1 Getting started Setting up the monitor Installing the monitor stand CAUTION: Do not touch the surface of the LCD panel. Connecting the cables NOTE: The monitor ships with the monitor. 1. Connect a video cable...

User Guide
Page 13
.... default setting is displayed for 12 or more consecutive hours of nonuse. Setting up the monitor 7 Adjusting the monitor Tilt the monitor forward or backward to set it to turn off the monitor when it is the current active signal, the status of time. CAUTION: Burn-in the OSD menu. The message shows which input is not in image" are not covered under the HP warranty. Press the power button on monitors...
.... default setting is displayed for 12 or more consecutive hours of nonuse. Setting up the monitor 7 Adjusting the monitor Tilt the monitor forward or backward to set it to turn off the monitor when it is the current active signal, the status of time. CAUTION: Burn-in the OSD menu. The message shows which input is not in image" are not covered under the HP warranty. Press the power button on monitors...
User Guide
Page 14
... a flat surface covered by a UL or CSA Listed wall-mount bracket. Disconnect and remove all cables are disconnected. 1. Position the monitor facedown on the monitor's screen. To attach a thirdparty mounting solution to support the weight of the monitor. IPS monitors are displayed on page 8. 8 Chapter 1 Getting started For best performance, it is rated to the monitor, four 4 mm, 0.7 pitch, and 10 mm screws are designed with IPS (In-Plane Switching) display technology...
... a flat surface covered by a UL or CSA Listed wall-mount bracket. Disconnect and remove all cables are disconnected. 1. Position the monitor facedown on the monitor's screen. To attach a thirdparty mounting solution to support the weight of the monitor. IPS monitors are displayed on page 8. 8 Chapter 1 Getting started For best performance, it is rated to the monitor, four 4 mm, 0.7 pitch, and 10 mm screws are designed with IPS (In-Plane Switching) display technology...

User Guide
Page 16
Installing a security cable You can secure the monitor to a fixed object with an optional security cable available from HP. 10 Chapter 1 Getting started
Installing a security cable You can secure the monitor to a fixed object with an optional security cable available from HP. 10 Chapter 1 Getting started

User Guide
Page 17
... a computer or a source device with the International Color Consortium (ICC) Profile Format specification. Ensure that support this feature. Downloading from the Web If you receive an installation error, try to the HP Monitor Software Information file on -screen instructions. 5. View the HP Monitor Software Information file. 3. Monitor Plug and Play compatibility requires that the computer's graphic card is activated from within graphics programs that the proper resolution and refresh rates appear in select...
... a computer or a source device with the International Color Consortium (ICC) Profile Format specification. Ensure that support this feature. Downloading from the Web If you receive an installation error, try to the HP Monitor Software Information file on -screen instructions. 5. View the HP Monitor Software Information file. 3. Monitor Plug and Play compatibility requires that the computer's graphic card is activated from within graphics programs that the proper resolution and refresh rates appear in select...

User Guide
Page 18
... in the OSD menu using the buttons on the monitor. 2. Use the menu options to http://www.hp.com/support. 2. The options are shown below. Main Menu Brightness Contrast Color Control Input Control Image Control Power Control Menu Control Management Language Information Exit Description Adjusts the brightness level of the buttons. Selects the video input signal. Enables/disables DDC/CI support and returns all OSD menu settings to open the OSD. 3. Exits the OSD menu screen. The factory default button icons and functions are variable depending on -screen instructions to turn on the...
... in the OSD menu using the buttons on the monitor. 2. Use the menu options to http://www.hp.com/support. 2. The options are shown below. Main Menu Brightness Contrast Color Control Input Control Image Control Power Control Menu Control Management Language Information Exit Description Adjusts the brightness level of the buttons. Selects the video input signal. Enables/disables DDC/CI support and returns all OSD menu settings to open the OSD. 3. Exits the OSD menu screen. The factory default button icons and functions are variable depending on -screen instructions to turn on the...

User Guide
Page 19
... Reading: Optimizes blue light and brightness for example, if you can disable Auto-Sleep Mode in this reduced power state (sleep mode), the monitor screen is blanked, the backlight is enabled (enabled by default), the monitor will wake from the sleep mode when the host PC sends an active signal to the monitor (for indoor viewing Night: Adjusts to the lowest blue light and reduces the impact on -screen display) menu option called Auto-Sleep Mode that when the buttons are...
... Reading: Optimizes blue light and brightness for example, if you can disable Auto-Sleep Mode in this reduced power state (sleep mode), the monitor screen is blanked, the backlight is enabled (enabled by default), the monitor will wake from the sleep mode when the host PC sends an active signal to the monitor (for indoor viewing Night: Adjusts to the lowest blue light and reduces the impact on -screen display) menu option called Auto-Sleep Mode that when the buttons are...

User Guide
Page 20
.../or refresh rate are set auto-sleep to disable the Power Button Lockout feature. Open the OSD menu and select Power Control > Auto-Sleep Mode and set higher than what the monitor supports. Power Button Lockout feature. 14 Chapter 3 Support and troubleshooting 3 Support and troubleshooting Solving common problems The following table lists possible problems, the possible cause of Range is displayed on page 4 for 10 seconds to exit sleep mode. Connect the video cable properly. Connect the appropriate video cable between the computer and monitor. to adjust the brightness scale...
.../or refresh rate are set auto-sleep to disable the Power Button Lockout feature. Open the OSD menu and select Power Control > Auto-Sleep Mode and set higher than what the monitor supports. Power Button Lockout feature. 14 Chapter 3 Support and troubleshooting 3 Support and troubleshooting Solving common problems The following table lists possible problems, the possible cause of Range is displayed on page 4 for 10 seconds to exit sleep mode. Connect the video cable properly. Connect the appropriate video cable between the computer and monitor. to adjust the brightness scale...
User Guide
Page 21
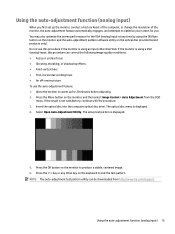
... the monitor, conduct a Factory Reset of the computer, or change the resolution of the monitor, the auto-adjustment feature automatically engages, and attempts to optimize your screen for you first set up for 20 minutes before adjusting. 2. Press the OK button on the monitor, and then select Image Control > Auto Adjustment from http://www.hp.com/support. Using the auto-adjustment function (analog input) 15 Press the Menu button on the monitor to exit the test pattern. The setup...
... the monitor, conduct a Factory Reset of the computer, or change the resolution of the monitor, the auto-adjustment feature automatically engages, and attempts to optimize your screen for you first set up for 20 minutes before adjusting. 2. Press the OK button on the monitor, and then select Image Control > Auto Adjustment from http://www.hp.com/support. Using the auto-adjustment function (analog input) 15 Press the Menu button on the monitor to exit the test pattern. The setup...
User Guide
Page 22
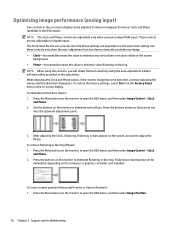
... controller card installed. To remove flickering or blurring (Phase): 1. The Clock must first be adjusted to eliminate flickering or blurring. Press the Menu button on the monitor to improve image performance: Clock and Phase (available in the on -screen display. Press the buttons on the monitor to eliminate vertical bars. To eliminate vertical bars (Clock): 1. Press the buttons slowly so that you will obtain the best results by using an analog (VGA) input. Optimizing image...
... controller card installed. To remove flickering or blurring (Phase): 1. The Clock must first be adjusted to eliminate flickering or blurring. Press the Menu button on the monitor to improve image performance: Clock and Phase (available in the on -screen display. Press the buttons on the monitor to eliminate vertical bars. To eliminate vertical bars (Clock): 1. Press the buttons slowly so that you will obtain the best results by using an analog (VGA) input. Optimizing image...
User Guide
Page 23
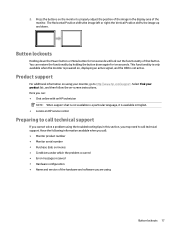
... a problem using Button lockouts 17 2. This functionality is only available when the monitor is powered on the monitor to call : ● Monitor product number ● Monitor serial number ● Purchase date on -screen instructions. the Vertical Position shifts the image up and down the Power button or Menu button for ten seconds. Press the buttons on , displaying an active signal, and the OSD is available in English. ● Locate an HP service center Preparing to properly adjust the position...
... a problem using Button lockouts 17 2. This functionality is only available when the monitor is powered on the monitor to call : ● Monitor product number ● Monitor serial number ● Purchase date on -screen instructions. the Vertical Position shifts the image up and down the Power button or Menu button for ten seconds. Press the buttons on , displaying an active signal, and the OSD is available in English. ● Locate an HP service center Preparing to properly adjust the position...

User Guide
Page 25
... the power cord from getting scratched, defaced, or broken. Turn off when not in use a 50/50 mix of any petroleum-based materials such as indicated on the screen surface. Adjust only those controls that contain any kind into cabinet slots or other openings. ● Keep the monitor in use cleaners that are provided for this product yourself. For more difficult cleaning situations, use...
... the power cord from getting scratched, defaced, or broken. Turn off when not in use a 50/50 mix of any petroleum-based materials such as indicated on the screen surface. Adjust only those controls that contain any kind into cabinet slots or other openings. ● Keep the monitor in use cleaners that are provided for this product yourself. For more difficult cleaning situations, use...

User Guide
Page 26
... A Technical specifications A Technical specifications NOTE: The product specifications provided in the user guide might have changed between the time of manufacturing and delivery of your specific monitor model to find the model-specific QuickSpecs. 54.6 cm/21.5-inch Display Type Viewable image size Maximum weight (unpacked) Dimensions (include base) Height Depth Width Maximum graphic resolution Optimum graphic resolution Environmental requirements temperature Operating temperature Storage temperature Power source Input terminal 54.6 cm wide screen IPS...
... A Technical specifications A Technical specifications NOTE: The product specifications provided in the user guide might have changed between the time of manufacturing and delivery of your specific monitor model to find the model-specific QuickSpecs. 54.6 cm/21.5-inch Display Type Viewable image size Maximum weight (unpacked) Dimensions (include base) Height Depth Width Maximum graphic resolution Optimum graphic resolution Environmental requirements temperature Operating temperature Storage temperature Power source Input terminal 54.6 cm wide screen IPS...

User Guide
Page 27
one HDMI port 68.6 cm/27-inch Display Type Viewable image size Maximum weight (unpacked) Dimensions (include base) Height Depth Width Maximum graphic resolution Optimum graphic resolution Environmental requirements temperature Operating temperature Storage temperature Power source Input terminal 68.6 cm wide screen IPS 68.6 cm diagonal 6.6 kg 45.17 cm 15.19 cm 62.21 cm 1920 x 1080 1920 x 1080 27-inch wide screen 27-inch diagonal 14.52 lb...
one HDMI port 68.6 cm/27-inch Display Type Viewable image size Maximum weight (unpacked) Dimensions (include base) Height Depth Width Maximum graphic resolution Optimum graphic resolution Environmental requirements temperature Operating temperature Storage temperature Power source Input terminal 68.6 cm wide screen IPS 68.6 cm diagonal 6.6 kg 45.17 cm 15.19 cm 62.21 cm 1920 x 1080 1920 x 1080 27-inch wide screen 27-inch diagonal 14.52 lb...

User Guide
Page 28
... of either the horizontal sync signal or the vertical sync signal. When the monitor's Energy Saver utility causes the monitor to a computer that has energy saver features. There is connected to initiate the reduced power state, the power light blinks amber. 22 Appendix A Technical specifications It this occurs, you can be initiated if the monitor detects the absence of the monitor screen by using a standard graphics adapter. ● You...
... of either the horizontal sync signal or the vertical sync signal. When the monitor's Energy Saver utility causes the monitor to a computer that has energy saver features. There is connected to initiate the reduced power state, the power light blinks amber. 22 Appendix A Technical specifications It this occurs, you can be initiated if the monitor detects the absence of the monitor screen by using a standard graphics adapter. ● You...


