
End User License Agreement
Page 1
... you the following rights provided you shall be governed You may accompany the HP Product. You do not have Software Product into Your Computer's AGREE TO ALL TERMS AND temporary memory (RAM) for use the Software Product on those computers. c. Freeware. An amendment or addendum to distribute ...you in its suppliers. BY purposes of Rights. Other software may load the Software ON THE CONDITION THAT YOU Product into the local memory or storage device of the Software Product, provided the copy contains all or any Software Product, installed on more than one computer, you...
... you the following rights provided you shall be governed You may accompany the HP Product. You do not have Software Product into Your Computer's AGREE TO ALL TERMS AND temporary memory (RAM) for use the Software Product on those computers. c. Freeware. An amendment or addendum to distribute ...you in its suppliers. BY purposes of Rights. Other software may load the Software ON THE CONDITION THAT YOU Product into the local memory or storage device of the Software Product, provided the copy contains all or any Software Product, installed on more than one computer, you...
Resolving Start Up and No Boot Problems Checklist
Page 1
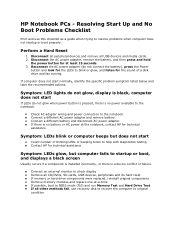
...drive components were replaced, reinstall original components Remove memory modules and replace one-at least 15 seconds. 3. Disconnect the AC power adapter, remove the battery, and then press and hold the power button for the LEDs to the notebook. HP Notebook PCs - Disconnect all peripheral devices and remove all ...and do not connect the battery), press the Power button and look for at -a-time If possible, boot to BIOS mode (f10) and run Memory Test and Hard Drive Test If all USB devices and media cards. 2. Connect a different AC power adapter and remove battery. If there is...
...drive components were replaced, reinstall original components Remove memory modules and replace one-at least 15 seconds. 3. Disconnect the AC power adapter, remove the battery, and then press and hold the power button for the LEDs to the notebook. HP Notebook PCs - Disconnect all peripheral devices and remove all ...and do not connect the battery), press the Power button and look for at -a-time If possible, boot to BIOS mode (f10) and run Memory Test and Hard Drive Test If all USB devices and media cards. 2. Connect a different AC power adapter and remove battery. If there is...
Resolving Start Up and No Boot Problems Checklist
Page 2
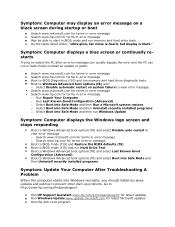
... the error and the PC can run in Safe mode to start in BIOS mode and run memory and hard drive tests. Symptom: Computer may display an error message on system failure to view error message Search www.microsoft.com for terms in error message Search www.hp.com for terms... be able to install an update or patch. Search www.microsoft.com for terms in error message Search www.hp.com for terms in error message Boot to BIOS Diagnostics (f10) and run memory and hard drive diagnostic tests Boot to Windows Advanced boot options (f8) and: o Select Disable automatic restart on...
... the error and the PC can run in Safe mode to start in BIOS mode and run memory and hard drive tests. Symptom: Computer may display an error message on system failure to view error message Search www.microsoft.com for terms in error message Search www.hp.com for terms... be able to install an update or patch. Search www.microsoft.com for terms in error message Search www.hp.com for terms in error message Boot to BIOS Diagnostics (f10) and run memory and hard drive diagnostic tests Boot to Windows Advanced boot options (f8) and: o Select Disable automatic restart on...

Getting Started - Windows 7
Page 6
... Inserting or removing the battery ...27 Replacing or upgrading the hard drive 29 Removing the hard drive ...29 Installing a hard drive ...30 Adding or replacing memory modules 31 Updating programs and drivers ...36 Routine care ...36 Cleaning the display ...36 Cleaning the TouchPad and keyboard 36 7 Backup and recovery Recovery discs...
... Inserting or removing the battery ...27 Replacing or upgrading the hard drive 29 Removing the hard drive ...29 Installing a hard drive ...30 Adding or replacing memory modules 31 Updating programs and drivers ...36 Routine care ...36 Cleaning the display ...36 Cleaning the TouchPad and keyboard 36 7 Backup and recovery Recovery discs...
Getting Started - Windows 7
Page 14
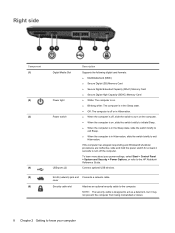
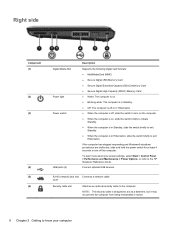
...Panel > System and Security > Power Options, or refer to the computer. cover Security cable slot Attaches an optional security cable to the HP Notebook Reference Guide. Right side Component (1) (2) (3) (4) (5) (6) Digital Media Slot Power light Power switch USB ports (2) Description Supports the... following digital card formats: ● MultiMediaCard (MMC) ● Secure Digital (SD) Memory Card ● Secure Digital Extended Capacity (SDxC) Memory Card ● Secure Digital High Capacity (SDHC) Memory Card ● White: The computer is on , slide the switch briefly to initiate ...
...Panel > System and Security > Power Options, or refer to the computer. cover Security cable slot Attaches an optional security cable to the HP Notebook Reference Guide. Right side Component (1) (2) (3) (4) (5) (6) Digital Media Slot Power light Power switch USB ports (2) Description Supports the... following digital card formats: ● MultiMediaCard (MMC) ● Secure Digital (SD) Memory Card ● Secure Digital Extended Capacity (SDxC) Memory Card ● Secure Digital High Capacity (SDHC) Memory Card ● White: The computer is on , slide the switch briefly to initiate ...
Getting Started - Windows 7
Page 37
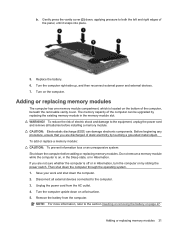
...information loss or an unresponsive system: Shut down on by replacing the existing memory module in Hibernation. Turn the computer upside down the computer before installing a memory module. Adding or replacing memory modules 31 Turn on page 27. Then shut down , applying pressure to... any procedure, ensure that you are discharged of the computer, beneath the removable vanity cover. Adding or replacing memory modules The computer has one memory module compartment, which is on the bottom of static electricity by touching a grounded metal object. Save your work...
...information loss or an unresponsive system: Shut down on by replacing the existing memory module in Hibernation. Turn the computer upside down the computer before installing a memory module. Adding or replacing memory modules 31 Turn on page 27. Then shut down , applying pressure to... any procedure, ensure that you are discharged of the computer, beneath the removable vanity cover. Adding or replacing memory modules The computer has one memory module compartment, which is on the bottom of static electricity by touching a grounded metal object. Save your work...
Getting Started - Windows 7
Page 38
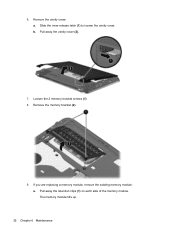
Remove the vanity cover: a. Loosen the 2 memory bracket screws (1). 8. Pull away the vanity cover (2). 7. If you are replacing a memory module, remove the existing memory module: a. Slide the inner release latch (1) to loosen the vanity cover. Pull away the retention clips (1) on each side of the memory module. The memory module tilts up. 32 Chapter 6 Maintenance b. Remove the memory bracket (2). 9. 6.
Remove the vanity cover: a. Loosen the 2 memory bracket screws (1). 8. Pull away the vanity cover (2). 7. If you are replacing a memory module, remove the existing memory module: a. Slide the inner release latch (1) to loosen the vanity cover. Pull away the retention clips (1) on each side of the memory module. The memory module tilts up. 32 Chapter 6 Maintenance b. Remove the memory bracket (2). 9. 6.
Getting Started - Windows 7
Page 39
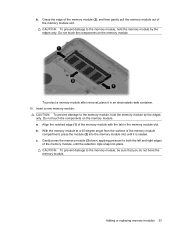
... tab in an electrostatic-safe container. 10. To protect a memory module after removal, place it is seated. Gently press the memory module (3) down, applying pressure to the memory module, hold the memory module by the edges only. CAUTION: To prevent damage to the memory module, hold the memory module by the edges only. a. b. Grasp the edge...
... tab in an electrostatic-safe container. 10. To protect a memory module after removal, place it is seated. Gently press the memory module (3) down, applying pressure to the memory module, hold the memory module by the edges only. CAUTION: To prevent damage to the memory module, hold the memory module by the edges only. a. b. Grasp the edge...

Getting Started - Windows 7
Page 40
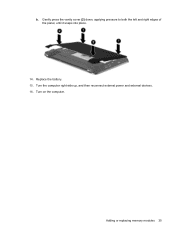
With the battery bay toward you, position the vanity cover at a 45-degree angle from the surface of the computer so that the tabs on the underside of the panel align with the matching slots on the computer (1). 34 Chapter 6 Maintenance Replace the memory bracket (1). 12. Replace the vanity cover: a. 11. Tighten the 2 memory bracket screws (2). 13.
With the battery bay toward you, position the vanity cover at a 45-degree angle from the surface of the computer so that the tabs on the underside of the panel align with the matching slots on the computer (1). 34 Chapter 6 Maintenance Replace the memory bracket (1). 12. Replace the vanity cover: a. 11. Tighten the 2 memory bracket screws (2). 13.
Getting Started - Windows 7
Page 41
b. Turn the computer right-side up, and then reconnect external power and external devices. 16. Gently press the vanity cover (2) down, applying pressure to both the left and right edges of the panel, until it snaps into place. 14. Replace the battery. 15. Turn on the computer. Adding or replacing memory modules 35
b. Turn the computer right-side up, and then reconnect external power and external devices. 16. Gently press the vanity cover (2) down, applying pressure to both the left and right edges of the panel, until it snaps into place. 14. Replace the battery. 15. Turn on the computer. Adding or replacing memory modules 35
Getting Started - Windows 7
Page 50
... Microsoft Certificate of Authenticity 42 regulatory 42 serial number 41 latches, battery release 11 lights AC adapter 9 caps lock 5 drive 9 mute 5 power 8 webcam 10 wireless 5 M memory module inserting 33 removing 32 replacing 31 microphone (audio-in) jack, identifying 9 mouse, external setting preferences 25 mute light, identifying 5 O operating environment 43 44 Index
... Microsoft Certificate of Authenticity 42 regulatory 42 serial number 41 latches, battery release 11 lights AC adapter 9 caps lock 5 drive 9 mute 5 power 8 webcam 10 wireless 5 M memory module inserting 33 removing 32 replacing 31 microphone (audio-in) jack, identifying 9 mouse, external setting preferences 25 mute light, identifying 5 O operating environment 43 44 Index

Getting Started Mini - Windows XP
Page 6
... Inserting or removing the battery ...27 Replacing or upgrading the hard drive 29 Removing the hard drive ...29 Installing a hard drive ...30 Adding or replacing memory modules 31 Updating programs and drivers ...36 Routine care ...36 Cleaning the display ...36 Cleaning the TouchPad and keyboard 36 7 Backup and recovery ...37 Backing...
... Inserting or removing the battery ...27 Replacing or upgrading the hard drive 29 Removing the hard drive ...29 Installing a hard drive ...30 Adding or replacing memory modules 31 Updating programs and drivers ...36 Routine care ...36 Cleaning the display ...36 Cleaning the TouchPad and keyboard 36 7 Backup and recovery ...37 Backing...
Getting Started Mini - Windows XP
Page 14
To learn more about your computer cover Security cable slot Attaches an optional security cable to the HP Notebook Reference Guide. RJ-45 (network) jack and Connects a network cable. NOTE: The security cable is in Hibernation, slide the... ports (2) Description Supports the following digital card formats: ● MultiMediaCard (MMC) ● Secure Digital (SD) Memory Card ● Secure Digital Extended Capacity (SDxC) Memory Card ● Secure Digital High Capacity (SDHC) Memory Card ● White: The computer is on. ● Blinking white: The computer is in Standby. ●...
To learn more about your computer cover Security cable slot Attaches an optional security cable to the HP Notebook Reference Guide. RJ-45 (network) jack and Connects a network cable. NOTE: The security cable is in Hibernation, slide the... ports (2) Description Supports the following digital card formats: ● MultiMediaCard (MMC) ● Secure Digital (SD) Memory Card ● Secure Digital Extended Capacity (SDxC) Memory Card ● Secure Digital High Capacity (SDHC) Memory Card ● White: The computer is on. ● Blinking white: The computer is in Standby. ●...

Getting Started Mini - Windows XP
Page 37
...the computer upside down the computer. 2. CAUTION: Electrostatic discharge (ESD) can be upgraded by replacing the existing memory module in Hibernation. To add or replace a memory module: CAUTION: To prevent information loss or an unresponsive system: Shut down the computer through the operating system.... 1. Remove the battery from the AC outlet. 4. The memory capacity of the computer can damage electronic components. Adding or replacing memory modules 31 Do not remove a memory module while the computer is on the bottom of the panel, until it snaps...
...the computer upside down the computer. 2. CAUTION: Electrostatic discharge (ESD) can be upgraded by replacing the existing memory module in Hibernation. To add or replace a memory module: CAUTION: To prevent information loss or an unresponsive system: Shut down the computer through the operating system.... 1. Remove the battery from the AC outlet. 4. The memory capacity of the computer can damage electronic components. Adding or replacing memory modules 31 Do not remove a memory module while the computer is on the bottom of the panel, until it snaps...

Getting Started Mini - Windows XP
Page 38
Pull away the vanity cover (2). 7. Remove the memory bracket (2). 9. If you are replacing a memory module, remove the existing memory module: a. Slide the inner release latch (1) to loosen the vanity cover. b. The memory module tilts up. 32 Chapter 6 Maintenance 6. Remove the vanity cover: a. Pull away the retention clips (1) on each side of the memory module. Loosen the 2 memory bracket screws (1). 8.
Pull away the vanity cover (2). 7. Remove the memory bracket (2). 9. If you are replacing a memory module, remove the existing memory module: a. Slide the inner release latch (1) to loosen the vanity cover. b. The memory module tilts up. 32 Chapter 6 Maintenance 6. Remove the vanity cover: a. Pull away the retention clips (1) on each side of the memory module. Loosen the 2 memory bracket screws (1). 8.

Getting Started Mini - Windows XP
Page 39
... slot. CAUTION: To prevent damage to the memory module, hold the memory module by the edges only. c. Adding or replacing memory modules 33 To protect a memory module after removal, place it is seated. Gently press the memory module (3) down, applying pressure to the memory module, hold the memory module by the edges only. CAUTION: To prevent damage...
... slot. CAUTION: To prevent damage to the memory module, hold the memory module by the edges only. c. Adding or replacing memory modules 33 To protect a memory module after removal, place it is seated. Gently press the memory module (3) down, applying pressure to the memory module, hold the memory module by the edges only. CAUTION: To prevent damage...

Getting Started Mini - Windows XP
Page 40
Replace the vanity cover: a. Tighten the 2 memory bracket screws (2). 13. 11. With the battery bay toward you, position the vanity cover at a 45-degree angle from the surface of the computer so that the tabs on the underside of the panel align with the matching slots on the computer (1). 34 Chapter 6 Maintenance Replace the memory bracket (1). 12.
Replace the vanity cover: a. Tighten the 2 memory bracket screws (2). 13. 11. With the battery bay toward you, position the vanity cover at a 45-degree angle from the surface of the computer so that the tabs on the underside of the panel align with the matching slots on the computer (1). 34 Chapter 6 Maintenance Replace the memory bracket (1). 12.

Getting Started Mini - Windows XP
Page 41
Turn on the computer. Adding or replacing memory modules 35 Gently press the vanity cover (2) down, applying pressure to both the left and right edges of the panel, until it snaps into place. 14. Replace the battery. 15. b. Turn the computer right-side up, and then reconnect external power and external devices. 16.
Turn on the computer. Adding or replacing memory modules 35 Gently press the vanity cover (2) down, applying pressure to both the left and right edges of the panel, until it snaps into place. 14. Replace the battery. 15. b. Turn the computer right-side up, and then reconnect external power and external devices. 16.
Getting Started Mini - Windows XP
Page 51
... Microsoft Certificate of Authenticity 42 regulatory 42 serial number 41 latches, battery release 11 lights AC adapter 9 caps lock 5 drive 9 mute 5 power 8 webcam 10 wireless 5 M memory module inserting 33 removing 32 replacing 31 microphone (audio-in) jack, identifying 9 mouse, external setting preferences 25 mute light, identifying 5 O operating environment 44 Index 45
... Microsoft Certificate of Authenticity 42 regulatory 42 serial number 41 latches, battery release 11 lights AC adapter 9 caps lock 5 drive 9 mute 5 power 8 webcam 10 wireless 5 M memory module inserting 33 removing 32 replacing 31 microphone (audio-in) jack, identifying 9 mouse, external setting preferences 25 mute light, identifying 5 O operating environment 44 Index 45
HP Mini 110 and Compaq Mini CQ10 - Maintenance and Service Guide
Page 8
... replacement procedures 36 Service tag ...36 Computer feet ...37 Battery ...38 SIM ...39 Service cover ...40 Hard drive ...41 WWAN module ...43 WLAN module ...46 Memory module ...51 RTC battery ...53 Keyboard ...54 Top cover ...57 Speakers ...60 TouchPad ...62 Display assembly ...64 System board ...68 Fan/heat sink assembly 71...
... replacement procedures 36 Service tag ...36 Computer feet ...37 Battery ...38 SIM ...39 Service cover ...40 Hard drive ...41 WWAN module ...43 WLAN module ...46 Memory module ...51 RTC battery ...53 Keyboard ...54 Top cover ...57 Speakers ...60 TouchPad ...62 Display assembly ...64 System board ...68 Fan/heat sink assembly 71...


