Getting Started Guide
Page 10
... the HP Media Drive 195 Recording TV programs to the HP Media Drive 195 Changing the TV recording path to the HP Media Drive 196 Changing the TV recording path to the local hard disk drive 196 Add TV recording folder for Windows Media Center to find 197 Changing disk space for recording TV programs 197 Updating recorded TV list after removing the HP Media Drive 197...
... the HP Media Drive 195 Recording TV programs to the HP Media Drive 195 Changing the TV recording path to the HP Media Drive 196 Changing the TV recording path to the local hard disk drive 196 Add TV recording folder for Windows Media Center to find 197 Changing disk space for recording TV programs 197 Updating recorded TV list after removing the HP Media Drive 197...
Getting Started Guide
Page 72
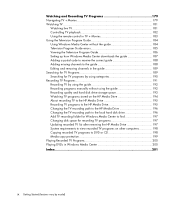
...tab. 3 Click the Tasks & Scans bar. 4 Click Run a Scan. 5 Select Run Full System Scan to configure and register your entire hard disk drives for e-mail, network, or Internet access, you protect the computer against newly discovered viruses, you must keep antivirus software up to obtain updates ...on your computer, this may take several minutes. 6 When the scan is preinstalled on the desktop. Computer viruses can detect most viruses, remove them, and, in most cases, repair any onscreen instructions. Using the Norton Internet Security Antivirus Software When you use the computer for ...
...tab. 3 Click the Tasks & Scans bar. 4 Click Run a Scan. 5 Select Run Full System Scan to configure and register your entire hard disk drives for e-mail, network, or Internet access, you protect the computer against newly discovered viruses, you must keep antivirus software up to obtain updates ...on your computer, this may take several minutes. 6 When the scan is preinstalled on the desktop. Computer viruses can detect most viruses, remove them, and, in most cases, repair any onscreen instructions. Using the Norton Internet Security Antivirus Software When you use the computer for ...

Getting Started Guide
Page 100
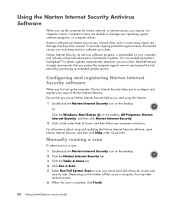
... or when the USB power from the hard disk drive bay without turning off . When the computer is turned on with the drive connected, the drive automatically turns on . Do not force the drive into an active USB port. Connecting the Drive The HP Media Drive is designed to work with most computers ... should slide easily into the bay. 3 Slide the drive all the way into specifically designed HP computers. This can be easily inserted and removed from the computer is firmly connected to the drive by model) In the vertical position, the drive's flat side is down, and the rounded side is...
... or when the USB power from the hard disk drive bay without turning off . When the computer is turned on with the drive connected, the drive automatically turns on . Do not force the drive into an active USB port. Connecting the Drive The HP Media Drive is designed to work with most computers ... should slide easily into the bay. 3 Slide the drive all the way into specifically designed HP computers. This can be easily inserted and removed from the computer is firmly connected to the drive by model) In the vertical position, the drive's flat side is down, and the rounded side is...
Getting Started Guide
Page 102
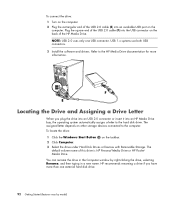
The assigned letter depends on the taskbar. 2 Click Computer. 3 Select the drive under Hard Disk Drives or Devices with Removable Storage. You can rename the drive in the Computer window by model) Refer to the HP Media Drive documentation for more than one USB connector. To locate the drive: 1 Click the Windows Start Button on other storage devices connected to...
The assigned letter depends on the taskbar. 2 Click Computer. 3 Select the drive under Hard Disk Drives or Devices with Removable Storage. You can rename the drive in the Computer window by model) Refer to the HP Media Drive documentation for more than one USB connector. To locate the drive: 1 Click the Windows Start Button on other storage devices connected to...
Getting Started Guide
Page 103
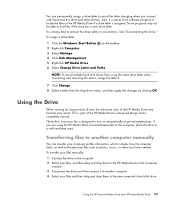
...then drag and drop them to the new computer's hard disk drive. NOTE: To avoid multiple hard disk drives from using the HP Media Drive connected externally to the computer, place the drive in the Computer window. 3 Disconnect the drive and then connect it is easier for long periods of... on the HP Media Drive if a drive letter is always best to remove the drive safely to avoid errors. To assign a drive letter: 1 Click the Windows Start Button on the taskbar. 2 Right-click Computer. 3 Select Manage. 4 Click Disk Management. 5 Right-click HP Media Drive. 6 Select Change Drive Letter and ...
...then drag and drop them to the new computer's hard disk drive. NOTE: To avoid multiple hard disk drives from using the HP Media Drive connected externally to the computer, place the drive in the Computer window. 3 Disconnect the drive and then connect it is easier for long periods of... on the HP Media Drive if a drive letter is always best to remove the drive safely to avoid errors. To assign a drive letter: 1 Click the Windows Start Button on the taskbar. 2 Right-click Computer. 3 Select Manage. 4 Click Disk Management. 5 Right-click HP Media Drive. 6 Select Change Drive Letter and ...
Getting Started Guide
Page 177
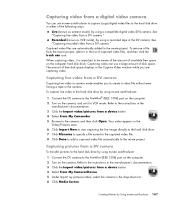
..., select the camera in the Capture Video window while you to start capturing the live video from a DV camera." To remove a file from a DV camera To transfer pictures to the hard disk drive by using muvee autoProducer: 1 Connect the DV camera to the FireWire (IEEE 1394) port on the computer. 2 Turn ...on the camera, and set it is important to be aware of the amount of free disk space displays in the drop-down list. 6 Click Media Screen. The...
..., select the camera in the Capture Video window while you to start capturing the live video from a DV camera." To remove a file from a DV camera To transfer pictures to the hard disk drive by using muvee autoProducer: 1 Connect the DV camera to the FireWire (IEEE 1394) port on the computer. 2 Turn ...on the camera, and set it is important to be aware of the amount of free disk space displays in the drop-down list. 6 Click Media Screen. The...
Getting Started Guide
Page 178
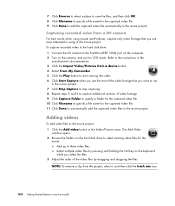
... 11 Click Done to automatically add the captured video files to the movie project. The Add Video window opens. 2 Browse the folders on the hard disk drive to select existing video files for the captured video file. 9 Click Done to add the captured video file automatically to the movie project. Select ...the camera, and set it , and then click the trash can icon. 168 Getting Started (features vary by dragging and dropping the files. NOTE: To remove a clip from a DV camera For best results when using in the Video/Pictures area. Adding videos To add video files to the movie project: 1 ...
... 11 Click Done to automatically add the captured video files to the movie project. The Add Video window opens. 2 Browse the folders on the hard disk drive to select existing video files for the captured video file. 9 Click Done to add the captured video file automatically to the movie project. Select ...the camera, and set it , and then click the trash can icon. 168 Getting Started (features vary by dragging and dropping the files. NOTE: To remove a clip from a DV camera For best results when using in the Video/Pictures area. Adding videos To add video files to the movie project: 1 ...

Getting Started Guide
Page 180
.... d When you select the files. Adding pictures To add still-image picture files to the Video/Pictures area. 3 Adjust the order of motion. NOTE: To remove a picture from the project, select it, and then click the trash can icon. 4 Click the Rotate Image Clockwise button to rotate a picture. 5 You can use... the folders on the keyboard while you are done, click OK. 170 Getting Started (features vary by pressing and holding the Ctrl key on the hard disk drive to select existing still-image files for motion.
.... d When you select the files. Adding pictures To add still-image picture files to the Video/Pictures area. 3 Adjust the order of motion. NOTE: To remove a picture from the project, select it, and then click the trash can icon. 4 Click the Rotate Image Clockwise button to rotate a picture. 5 You can use... the folders on the keyboard while you are done, click OK. 170 Getting Started (features vary by pressing and holding the Ctrl key on the hard disk drive to select existing still-image files for motion.

Getting Started Guide
Page 181
NOTE: To remove music from the video and pictures to fit the total duration of the following settings: Fit to music: The produced version may repeat or trim ... audio and video project settings for the movie: Add up to three music files. Creating Movies by pressing and holding the Ctrl key on the hard disk drive to select existing music files for the movie: 1 Click the Personalize button. The Add Music window opens. 2 Browse the folders on the keyboard while...
NOTE: To remove music from the video and pictures to fit the total duration of the following settings: Fit to music: The produced version may repeat or trim ... audio and video project settings for the movie: Add up to three music files. Creating Movies by pressing and holding the Ctrl key on the hard disk drive to select existing music files for the movie: 1 Click the Personalize button. The Add Music window opens. 2 Browse the folders on the keyboard while...
Getting Started Guide
Page 185
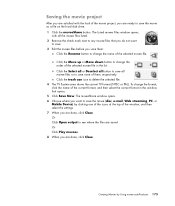
... are satisfied with all muvee files or to save none of the movie project, you are ready to save the movie as a file on the hard disk drive: 1 Click the muveeShare button. Click the Select all or Deselect all button to any muvee files that opens. 5 Click Save Now. Or Click Play... muvees. 8 When you save all the muvee files listed. 2 Remove the check mark next to save them , respectively. To change the format, click the name of the...
... are satisfied with all muvee files or to save none of the movie project, you are ready to save the movie as a file on the hard disk drive: 1 Click the muveeShare button. Click the Select all or Deselect all button to any muvee files that opens. 5 Click Save Now. Or Click Play... muvees. 8 When you save all the muvee files listed. 2 Remove the check mark next to save them , respectively. To change the format, click the name of the...
Getting Started Guide
Page 204
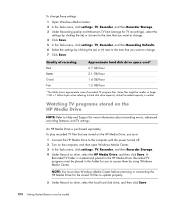
Quality of recording Best Better Good Fair Approximate hard disk drive space used* 2.7 GB/hour 2.1 GB/hour 1.4 GB/hour 1.2 GB/hour *This table shows approximate sizes of recorded TV program files. NOTE: You must close Windows Media Center before removing or connecting the HP Media Drive for the stored TV files to Help and Support for more information about...
Quality of recording Best Better Good Fair Approximate hard disk drive space used* 2.7 GB/hour 2.1 GB/hour 1.4 GB/hour 1.2 GB/hour *This table shows approximate sizes of recorded TV program files. NOTE: You must close Windows Media Center before removing or connecting the HP Media Drive for the stored TV files to Help and Support for more information about...

Getting Started Guide
Page 205
... occur if the drive is recommended that you use Windows Media Center. See "Changing the TV recording path to the HP Media Drive." 2 Open Windows Media Center. 3 Record TV programs. The programs are not updated in Windows Media Center, or you open Windows Media Center. See "Changing disk space for recording TV programs" for more information about changing the hard disk space settings...
... occur if the drive is recommended that you use Windows Media Center. See "Changing the TV recording path to the HP Media Drive." 2 Open Windows Media Center. 3 Record TV programs. The programs are not updated in Windows Media Center, or you open Windows Media Center. See "Changing disk space for recording TV programs" for more information about changing the hard disk space settings...


