
HP Color LaserJet, LaserJet and LaserJet MFP Products - Print Cartridge Price Increase Announcement
Page 1
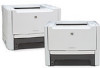
... will continue to its new smart print supplies system, HP is increasing the list prices on all Mono and Color LaserJet Print Cartridges. As part of 156 products. HP LaserJet Print Cartridges August 1, 2008 As of HP LaserJet toner cartridges by five (5%) percent. This price increase will affect a total of HP's normal portfolio management, the company regularly reviews pricing. From...
... will continue to its new smart print supplies system, HP is increasing the list prices on all Mono and Color LaserJet Print Cartridges. As part of 156 products. HP LaserJet Print Cartridges August 1, 2008 As of HP LaserJet toner cartridges by five (5%) percent. This price increase will affect a total of HP's normal portfolio management, the company regularly reviews pricing. From...
HP Printers - Supported Citrix Presentation Server environments
Page 21
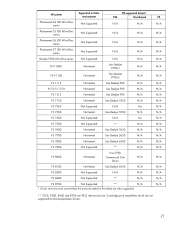
PS N/A N/A N/A N/A N/A N/A N/A N/A N/A N/A N/A N/A N/A N/A N/A N/A N/A N/A N/A N/A N/A N/A N/A N/A ** 7550, 7900, 8400 and 8700 are PCL3 devices but use 3 cartridge print assemblies which are also supported. HP printer Photosmart C4100 All-in-One series Supported in Citrix environment Not Supported HP-supported drivers* PCL Host-based N/A N/A Photosmart C5100 All-in-One series Not Supported N/A N/A Photosmart C6100 All-in-One series Not Supported...
PS N/A N/A N/A N/A N/A N/A N/A N/A N/A N/A N/A N/A N/A N/A N/A N/A N/A N/A N/A N/A N/A N/A N/A N/A ** 7550, 7900, 8400 and 8700 are PCL3 devices but use 3 cartridge print assemblies which are also supported. HP printer Photosmart C4100 All-in-One series Supported in Citrix environment Not Supported HP-supported drivers* PCL Host-based N/A N/A Photosmart C5100 All-in-One series Not Supported N/A N/A Photosmart C6100 All-in-One series Not Supported...
Service Manual
Page 6
... the embedded Web server 24 Information tab ...25 Settings tab ...25 Networking tab ...25 Links ...25 4 Maintenance Replace the print cartridge ...28 Redistribute toner ...30 Clean the printer ...31 Clean the print-cartridge area 31 Clean the printer media path 33 Clean the pickup roller (tray 1) ...34 Replace the pickup roller (tray...
... the embedded Web server 24 Information tab ...25 Settings tab ...25 Networking tab ...25 Links ...25 4 Maintenance Replace the print cartridge ...28 Redistribute toner ...30 Clean the printer ...31 Clean the print-cartridge area 31 Clean the printer media path 33 Clean the pickup roller (tray 1) ...34 Replace the pickup roller (tray...
Service Manual
Page 7
...motor ...108 Pickup and feed assemblies ...110 Transfer roller ...110 Registration assembly ...111 Main gear assembly/tray 2 pickup solenoid 115 Print-cartridge door ...119 7 Problem solving Basic problem solving ...122 Status-light patterns ...124 Primary status-light patterns 124 Fatal error secondary messages... Garbled, incorrect, or incomplete text 137 Missing graphics or text, or blank pages 137 Page format is different than on another HP LaserJet printer 138 Graphics quality ...138 Improve print quality ...139 Light print or faded ...139 Toner specks ...139 Dropouts ...139 Vertical ...
...motor ...108 Pickup and feed assemblies ...110 Transfer roller ...110 Registration assembly ...111 Main gear assembly/tray 2 pickup solenoid 115 Print-cartridge door ...119 7 Problem solving Basic problem solving ...122 Status-light patterns ...124 Primary status-light patterns 124 Fatal error secondary messages... Garbled, incorrect, or incomplete text 137 Missing graphics or text, or blank pages 137 Page format is different than on another HP LaserJet printer 138 Graphics quality ...138 Improve print quality ...139 Light print or faded ...139 Toner specks ...139 Dropouts ...139 Vertical ...
Service Manual
Page 8
...functional check 153 Drum rotation functional check 153 Heating element check ...153 High-voltage contacts check 154 Checking the print cartridge contacts 154 Checking the high-voltage connector assembly 155 Printer software problems ...156 Network-setup problem-solving ...157 Reset the...Web server 225 Supplies and accessories table ...226 10/100 networking print servers ...227 HP print cartridges ...228 HP policy on non-HP print cartridges 228 Storing print cartridges ...228 Print cartridge life expectancy 228 Saving toner ...228 Appendix B Service and support Hewlett-Packard limited ...
...functional check 153 Drum rotation functional check 153 Heating element check ...153 High-voltage contacts check 154 Checking the print cartridge contacts 154 Checking the high-voltage connector assembly 155 Printer software problems ...156 Network-setup problem-solving ...157 Reset the...Web server 225 Supplies and accessories table ...226 10/100 networking print servers ...227 HP print cartridges ...228 HP policy on non-HP print cartridges 228 Storing print cartridges ...228 Print cartridge life expectancy 228 Saving toner ...228 Appendix B Service and support Hewlett-Packard limited ...
Service Manual
Page 9
... ...233 Availability of support and service ...235 HP Care Pack™ Services and Service Agreements 235 Guidelines for repacking the printer 236 Appendix C Printer specifications Physical specifications ...238 Electrical specifications ...238... production ...245 Power consumption ...245 Toner consumption ...245 Paper use ...245 Plastics ...245 HP LaserJet print supplies 245 Return and recycling instructions 246 United States and Puerto Rico 246 Multiple returns (two to eight cartridges 246 Single returns 246 Shipping 246 Non-US returns 246 Paper ...246 Material restrictions ...247...
... ...233 Availability of support and service ...235 HP Care Pack™ Services and Service Agreements 235 Guidelines for repacking the printer 236 Appendix C Printer specifications Physical specifications ...238 Electrical specifications ...238... production ...245 Power consumption ...245 Toner consumption ...245 Paper use ...245 Plastics ...245 HP LaserJet print supplies 245 Return and recycling instructions 246 United States and Puerto Rico 246 Multiple returns (two to eight cartridges 246 Single returns 246 Shipping 246 Non-US returns 246 Paper ...246 Material restrictions ...247...
Service Manual
Page 12
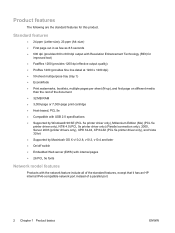
... sheet (N-up), and first page on different media than the rest of the document ● 32 MB RAM ● 3,000-page or 7,000-page print cartridge ● Host-based, PCL 5e ● Compatible with USB 2.0 specifications ● Supported by Windows® 98 SE (PCL 5e printer driver only), Millennium Edition (Me... as 8.5 seconds ● 600 dpi (provides 600 x 600 dpi output with the network feature include all of the standard features, except that it has an HP internal IPv6-compatible network port instead of a parallel port. 2 Chapter 1 Product basics ENWW
... sheet (N-up), and first page on different media than the rest of the document ● 32 MB RAM ● 3,000-page or 7,000-page print cartridge ● Host-based, PCL 5e ● Compatible with USB 2.0 specifications ● Supported by Windows® 98 SE (PCL 5e printer driver only), Millennium Edition (Me... as 8.5 seconds ● 600 dpi (provides 600 x 600 dpi output with the network feature include all of the standard features, except that it has an HP internal IPv6-compatible network port instead of a parallel port. 2 Chapter 1 Product basics ENWW
Service Manual
Page 13
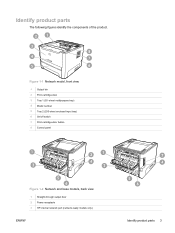
Identify product parts The following figures identify the components of the product. Figure 1-1 Network model, front view 1 Output bin 2 Print-cartridge door 3 Tray 1 (50-sheet multipurpose tray) 4 Model number 5 Tray 2 (250-sheet enclosed input tray) 6 On/off switch 7 Print-cartridge-door button 8 Control panel Figure 1-2 Network and base models, back view 1 Straight-through output door 2 Power receptacle 3 HP internal network port (network-ready models only) ENWW Identify product parts 3
Identify product parts The following figures identify the components of the product. Figure 1-1 Network model, front view 1 Output bin 2 Print-cartridge door 3 Tray 1 (50-sheet multipurpose tray) 4 Model number 5 Tray 2 (250-sheet enclosed input tray) 6 On/off switch 7 Print-cartridge-door button 8 Control panel Figure 1-2 Network and base models, back view 1 Straight-through output door 2 Power receptacle 3 HP internal network port (network-ready models only) ENWW Identify product parts 3
Service Manual
Page 15
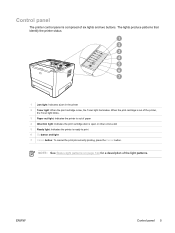
...comprised of the light patterns. NOTE: See Status-light patterns on page 124 for a description of six lights and two buttons. When the print cartridge is out of the printer, the Toner light blinks. 3 Paper out light: Indicates the printer is out of paper 4 Attention light: Indicates the ...print cartridge door is open or other errors exist 5 Ready light: Indicates the printer is low, the Toner light illuminates. ENWW Control panel 5 The lights produce...
...comprised of the light patterns. NOTE: See Status-light patterns on page 124 for a description of six lights and two buttons. When the print cartridge is out of the printer, the Toner light blinks. 3 Paper out light: Indicates the printer is out of paper 4 Attention light: Indicates the ...print cartridge door is open or other errors exist 5 Ready light: Indicates the printer is low, the Toner light illuminates. ENWW Control panel 5 The lights produce...

Service Manual
Page 31
... printer Ready light is on and no other jobs are printing. ● Select it from the Print Information Pages drop-down list on the print cartridge ● The number of pages and print jobs that have been processed ● Ordering and recycling information ENWW Printer information pages 21 The Supplies Status...
... printer Ready light is on and no other jobs are printing. ● Select it from the Print Information Pages drop-down list on the print cartridge ● The number of pages and print jobs that have been processed ● Ordering and recycling information ENWW Printer information pages 21 The Supplies Status...

Service Manual
Page 37
4 Maintenance ● Replace the print cartridge ● Redistribute toner ● Clean the printer ● Clean the pickup roller (tray 1) ● Replace the pickup roller (tray 1) ● Clean the pickup roller (tray 2) ● Replace the pickup roller (tray 2) ● EconoMode ENWW 27
4 Maintenance ● Replace the print cartridge ● Redistribute toner ● Clean the printer ● Clean the pickup roller (tray 1) ● Replace the pickup roller (tray 1) ● Clean the pickup roller (tray 2) ● Replace the pickup roller (tray 2) ● EconoMode ENWW 27
Service Manual
Page 38
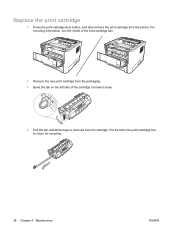
Pull the tab until all the tape is removed from the packaging. 3. Replace the print cartridge 1. Remove the new print cartridge from the cartridge. Put the tab in the print-cartridge box to break it loose. 4. For recycling information, see the inside of the cartridge to return for recycling. 28 Chapter 4 Maintenance ENWW Press the print-cartridge-door button, and then remove the print cartridge from the printer. Bend the tab on the left side of the print-cartridge box. 2.
Pull the tab until all the tape is removed from the packaging. 3. Replace the print cartridge 1. Remove the new print cartridge from the cartridge. Put the tab in the print-cartridge box to break it loose. 4. For recycling information, see the inside of the cartridge to return for recycling. 28 Chapter 4 Maintenance ENWW Press the print-cartridge-door button, and then remove the print cartridge from the printer. Bend the tab on the left side of the print-cartridge box. 2.
Service Manual
Page 39
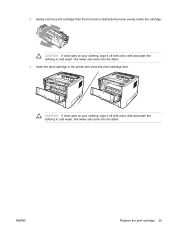
CAUTION: If toner gets on your clothing, wipe it off with a dry cloth and wash the clothing in cold water. CAUTION: If toner gets on your clothing, wipe it off with a dry cloth and wash the clothing in the printer and close the print-cartridge door. Gently rock the print cartridge from front to back to distribute the toner evenly inside the cartridge. Insert the print cartridge in cold water. Hot water sets toner into the fabric. ENWW Replace the print cartridge 29 5. Hot water sets toner into the fabric. 6.
CAUTION: If toner gets on your clothing, wipe it off with a dry cloth and wash the clothing in cold water. CAUTION: If toner gets on your clothing, wipe it off with a dry cloth and wash the clothing in the printer and close the print-cartridge door. Gently rock the print cartridge from front to back to distribute the toner evenly inside the cartridge. Insert the print cartridge in cold water. Hot water sets toner into the fabric. ENWW Replace the print cartridge 29 5. Hot water sets toner into the fabric. 6.
Service Manual
Page 40
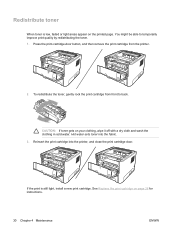
...appear on the printed page. To redistribute the toner, gently rock the print cartridge from the printer. 2. Hot water sets toner into the printer, and close the print cartridge door. See Replace the print cartridge on your clothing, wipe it off with a dry cloth and wash the ...clothing in cold water. Reinsert the print cartridge into the fabric. 3. Redistribute toner When toner is still light, ...
...appear on the printed page. To redistribute the toner, gently rock the print cartridge from the printer. 2. Hot water sets toner into the printer, and close the print cartridge door. See Replace the print cartridge on your clothing, wipe it off with a dry cloth and wash the ...clothing in cold water. Reinsert the print cartridge into the fabric. 3. Redistribute toner When toner is still light, ...
Service Manual
Page 41
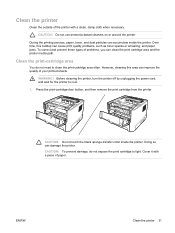
...based cleaners on or around the printer. However, cleaning this buildup can accumulate inside the printer. Press the print-cartridge-door button, and then remove the print cartridge from the printer. ENWW Clean the printer 31 Clean the printer Clean the outside of your printed sheets. Clean the...of paper. Before cleaning the printer, turn the printer off by unplugging the power cord, and wait for the printer to clean the print-cartridge area often. Over time, this area can improve the quality of the printer with a piece of problems, you can damage the printer. ...
...based cleaners on or around the printer. However, cleaning this buildup can accumulate inside the printer. Press the print-cartridge-door button, and then remove the print cartridge from the printer. ENWW Clean the printer 31 Clean the printer Clean the outside of your printed sheets. Clean the...of paper. Before cleaning the printer, turn the printer off by unplugging the power cord, and wait for the printer to clean the print-cartridge area often. Over time, this area can improve the quality of the printer with a piece of problems, you can damage the printer. ...

Service Manual
Page 42
Replace the print cartridge, and close the print-cartridge door. 4. With a dry, lint-free cloth, wipe any residue from the media-path area and the print-cartridge cavity. 3. To print a demo page, press the Go button when the Ready light is on . 5. Verify printer functionality by printing a demo page. Plug the printer in to turn it back on and no other jobs are printing. 32 Chapter 4 Maintenance ENWW 2.
Replace the print cartridge, and close the print-cartridge door. 4. With a dry, lint-free cloth, wipe any residue from the media-path area and the print-cartridge cavity. 3. To print a demo page, press the Go button when the Ready light is on . 5. Verify printer functionality by printing a demo page. Plug the printer in to turn it back on and no other jobs are printing. 32 Chapter 4 Maintenance ENWW 2.
Service Manual
Page 44
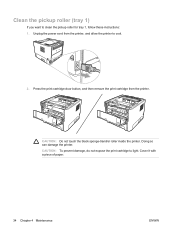
Cover it with a piece of paper. 34 Chapter 4 Maintenance ENWW Clean the pickup roller (tray 1) If you want to light. Unplug the power cord from the printer. Press the print-cartridge-door button, and then remove the print cartridge from the printer, and allow the printer to cool. 2. CAUTION: To prevent damage, do not expose the print cartridge to clean the pickup roller for tray 1, follow these instructions: 1. Doing so can damage the printer. CAUTION: Do not touch the black sponge-transfer roller inside the printer.
Cover it with a piece of paper. 34 Chapter 4 Maintenance ENWW Clean the pickup roller (tray 1) If you want to light. Unplug the power cord from the printer. Press the print-cartridge-door button, and then remove the print cartridge from the printer, and allow the printer to cool. 2. CAUTION: To prevent damage, do not expose the print cartridge to clean the pickup roller for tray 1, follow these instructions: 1. Doing so can damage the printer. CAUTION: Do not touch the black sponge-transfer roller inside the printer.
Service Manual
Page 48
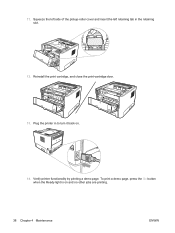
Squeeze the left side of the pickup-roller cover and insert the left retaining tab in to turn it back on and no other jobs are printing. 38 Chapter 4 Maintenance ENWW Reinstall the print cartridge, and close the print-cartridge door. 13. Verify printer functionality by printing a demo page. 11. Plug the printer in the retaining slot. 12. To print a demo page, press the Go button when the Ready light is on . 14.
Squeeze the left side of the pickup-roller cover and insert the left retaining tab in to turn it back on and no other jobs are printing. 38 Chapter 4 Maintenance ENWW Reinstall the print cartridge, and close the print-cartridge door. 13. Verify printer functionality by printing a demo page. 11. Plug the printer in the retaining slot. 12. To print a demo page, press the Go button when the Ready light is on . 14.
Service Manual
Page 49
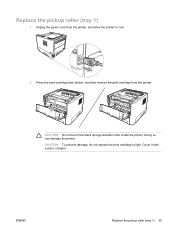
CAUTION: Do not touch the black sponge-transfer roller inside the printer. ENWW Replace the pickup roller (tray 1) 39 Unplug the power cord from the printer. CAUTION: To prevent damage, do not expose the print cartridge to cool. 2. Replace the pickup roller (tray 1) 1. Doing so can damage the printer. Cover it with a piece of paper. Press the print-cartridge-door button, and then remove the print cartridge from the printer, and allow the printer to light.
CAUTION: Do not touch the black sponge-transfer roller inside the printer. ENWW Replace the pickup roller (tray 1) 39 Unplug the power cord from the printer. CAUTION: To prevent damage, do not expose the print cartridge to cool. 2. Replace the pickup roller (tray 1) 1. Doing so can damage the printer. Cover it with a piece of paper. Press the print-cartridge-door button, and then remove the print cartridge from the printer, and allow the printer to light.
Service Manual
Page 53
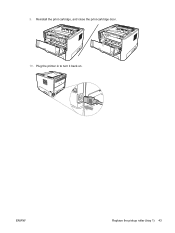
9. ENWW Replace the pickup roller (tray 1) 43 Plug the printer in to turn it back on. Reinstall the print cartridge, and close the print-cartridge door. 10.
9. ENWW Replace the pickup roller (tray 1) 43 Plug the printer in to turn it back on. Reinstall the print cartridge, and close the print-cartridge door. 10.


