
HP LA1751g and LA1951g LCD Monitors
Page 5
... Monitor Unfolding the Monitor Pedestal Base 5 Rear Components ...6 Connecting the Signal and Power Cables 7 Connecting USB Devices ...8 Cable Management ...8 Adjusting the Monitor ...9 Turning on the Monitor ...11 Using the Accessory Rails ...12 Removing the Monitor Pedestal Base 13 Mounting the Monitor ...14 Locating the Rating Labels ...15 Installing a Cable Lock ...15 4 Operating the Monitor Software and Utilities ...16 The Information File ...16 The Image Color Matching File 16 Installing the .INF and .ICM Files ...17 Installing from the CD ...17 Downloading...
... Monitor Unfolding the Monitor Pedestal Base 5 Rear Components ...6 Connecting the Signal and Power Cables 7 Connecting USB Devices ...8 Cable Management ...8 Adjusting the Monitor ...9 Turning on the Monitor ...11 Using the Accessory Rails ...12 Removing the Monitor Pedestal Base 13 Mounting the Monitor ...14 Locating the Rating Labels ...15 Installing a Cable Lock ...15 4 Operating the Monitor Software and Utilities ...16 The Information File ...16 The Image Color Matching File 16 Installing the .INF and .ICM Files ...17 Installing from the CD ...17 Downloading...

HP LA1751g and LA1951g LCD Monitors
Page 6
Using the On-Screen Display Menu 20 OSD Menu Selections 21 Optimizing Digital Conversion 24 Using the HP Display Assistant Utility 25 Identifying Monitor Conditions ...25 Sleep Timer Mode ...26 HP Display LiteSaver ...27 Installing the HP Display LiteSaver Software 27 sRGB Support ...28 Changing the Color Temperature 28 Installing the sRGB ICM File for Microsoft Windows 2000 and Windows XP 28 Installing the sRGB ICM File for Microsoft Windows Vista 29 Appendix A Troubleshooting Solving Common Problems ...30 Online Technical Support ...32...
Using the On-Screen Display Menu 20 OSD Menu Selections 21 Optimizing Digital Conversion 24 Using the HP Display Assistant Utility 25 Identifying Monitor Conditions ...25 Sleep Timer Mode ...26 HP Display LiteSaver ...27 Installing the HP Display LiteSaver Software 27 sRGB Support ...28 Changing the Color Temperature 28 Installing the sRGB ICM File for Microsoft Windows 2000 and Windows XP 28 Installing the sRGB ICM File for Microsoft Windows Vista 29 Appendix A Troubleshooting Solving Common Problems ...30 Online Technical Support ...32...
HP LA1751g and LA1951g LCD Monitors
Page 9
...1280 x 1024 resolution, plus full-screen support for lower resolutions ● Wide viewing angle to allow viewing from a sitting or standing position, or moving side-to-side ● Tilt capability ● Pivot capability to rotate display to portrait mode ● Swivel and height adjustment capabilities ● Removable base for flexible monitor panel mounting solutions ● Video signal input to support VGA analog with VGA signal cable provided ● Video signal input to support DVI digital with DVI-D signal cable provided ● USB 2.0 hub with one upstream port (connects to the...
...1280 x 1024 resolution, plus full-screen support for lower resolutions ● Wide viewing angle to allow viewing from a sitting or standing position, or moving side-to-side ● Tilt capability ● Pivot capability to rotate display to portrait mode ● Swivel and height adjustment capabilities ● Removable base for flexible monitor panel mounting solutions ● Video signal input to support VGA analog with VGA signal cable provided ● Video signal input to support DVI digital with DVI-D signal cable provided ● USB 2.0 hub with one upstream port (connects to the...
HP LA1751g and LA1951g LCD Monitors
Page 12
... the life of the monitor by using a screen saver program and turning off the monitor when not in use. Look on the power label to determine the ampere rating (AMPS or A) for each device. ● Install the monitor near an outlet that contain any petroleum based materials such as indicated on the cord. ● Keep the monitor in the operating instructions. You can easily reach...
... the life of the monitor by using a screen saver program and turning off the monitor when not in use. Look on the power label to determine the ampere rating (AMPS or A) for each device. ● Install the monitor near an outlet that contain any petroleum based materials such as indicated on the cord. ● Keep the monitor in the operating instructions. You can easily reach...
HP LA1751g and LA1951g LCD Monitors
Page 19
... the auto-switch source setting (On or Off), the default source signal, the current preset display resolution, and the recommended preset display resolution. NOTE: You can change the default source in the OSD menu. If two or more inputs are not covered under the HP warranty. * A prolonged period of time is displayed for a prolonged period of time. To disable this feature, press and hold the monitor power button for the display. Turning on all LCD screens. Press the power button...
... the auto-switch source setting (On or Off), the default source signal, the current preset display resolution, and the recommended preset display resolution. NOTE: You can change the default source in the OSD menu. If two or more inputs are not covered under the HP warranty. * A prolonged period of time is displayed for a prolonged period of time. To disable this feature, press and hold the monitor power button for the display. Turning on all LCD screens. Press the power button...
HP LA1751g and LA1951g LCD Monitors
Page 25
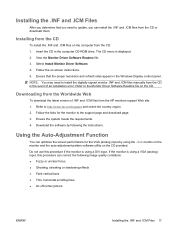
... latest version of an installation error. Download the software by using a VGA (analog) input, this procedure can optimize the screen performance for the monitor to update, you can install the .INF and .ICM files from the CD or download them. Using the Auto-Adjustment Function You can correct the following the instructions. Installing the .INF and .ICM Files After you determine that the proper resolution and refresh rates appear in the event...
... latest version of an installation error. Download the software by using a VGA (analog) input, this procedure can optimize the screen performance for the monitor to update, you can install the .INF and .ICM files from the CD or download them. Using the Auto-Adjustment Function You can correct the following the instructions. Installing the .INF and .ICM Files After you determine that the proper resolution and refresh rates appear in the event...
HP LA1751g and LA1951g LCD Monitors
Page 27
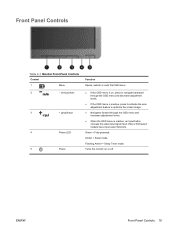
... activate the auto adjustment feature to optimize the screen image. ● Navigates forward through the OSD menu and increases adjustment levels. ● When the OSD menu is on or off. Green = Fully powered. Flashing Amber = Sleep Timer mode. Amber = Sleep mode. Front Panel Controls Table 4-1 Monitor Front Panel Controls Control 1 Menu 2 - (minus)/Auto 3 + (plus)/Input 4 Power LED 5 Power Function Opens, selects or exits the OSD menu. ● If the OSD menu is inactive, an Input button chooses the video input signal input, VGA or DVI (select models have input select...
... activate the auto adjustment feature to optimize the screen image. ● Navigates forward through the OSD menu and increases adjustment levels. ● When the OSD menu is on or off. Green = Fully powered. Flashing Amber = Sleep Timer mode. Amber = Sleep mode. Front Panel Controls Table 4-1 Monitor Front Panel Controls Control 1 Menu 2 - (minus)/Auto 3 + (plus)/Input 4 Power LED 5 Power Function Opens, selects or exits the OSD menu. ● If the OSD menu is inactive, an Input button chooses the video input signal input, VGA or DVI (select models have input select...
HP LA1751g and LA1951g LCD Monitors
Page 28
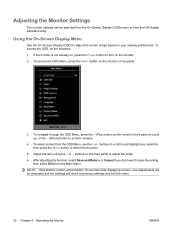
... adjusted from the On-Screen Display (OSD) menu or from the HP Display Assistant utility. If the monitor is not already on, press the Power button to adjust the screen image based on the monitor. 2. Adjusting the Monitor Settings The monitor settings can be discarded and the settings will revert to scroll in reverse. 4. To access the OSD Menu, press the Menu button on the front panel to select that function. 5. Using the On-Screen Display Menu Use the On-Screen Display (OSD) to turn...
... adjusted from the On-Screen Display (OSD) menu or from the HP Display Assistant utility. If the monitor is not already on, press the Power button to adjust the screen image based on the monitor. 2. Adjusting the Monitor Settings The monitor settings can be discarded and the settings will revert to scroll in reverse. 4. To access the OSD Menu, press the Menu button on the front panel to select that function. 5. Using the On-Screen Display Menu Use the On-Screen Display (OSD) to turn...

HP LA1751g and LA1951g LCD Monitors
Page 29
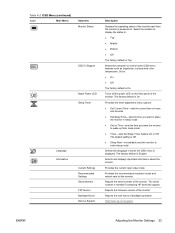
Color Selects the screen color. Horizontal Position Adjusts the position of the screen image up and down. image is only active if you may look sharper or soft. sRGB Sets your own blue color levels Image Control Adjusts the screen image. (VGA input only) Auto Adjustment Automatically adjusts the screen image. Vertical Position Adjusts the position of the screen image left and right. Custom Scaling Selects the method on how displayed information on the monitor will also change a menu item. modes) Clock Minimizes any vertical bars or strips...
Color Selects the screen color. Horizontal Position Adjusts the position of the screen image up and down. image is only active if you may look sharper or soft. sRGB Sets your own blue color levels Image Control Adjusts the screen image. (VGA input only) Auto Adjustment Automatically adjusts the screen image. Vertical Position Adjusts the position of the screen image left and right. Custom Scaling Selects the method on how displayed information on the monitor will also change a menu item. modes) Clock Minimizes any vertical bars or strips...

HP LA1751g and LA1951g LCD Monitors
Page 30
... resolution, refresh rate and frequency information on -screen display (OSD) controls. The range is On. 22 Chapter 4 Operating the Monitor ENWW Provides a menu for adjusting the on the screen each time the OSD Main Menu is accessed. Changes the viewing position of the screen. Select: ● On ● Off The factory default is On. Select: ● On ● Off Mode Display The factory default is On. Table 4-2 OSD Menu (continued) Icon Main Menu OSD Control Management Submenu Description Clock Phase Horizontal OSD Position Vertical OSD Position OSD...
... resolution, refresh rate and frequency information on -screen display (OSD) controls. The range is On. 22 Chapter 4 Operating the Monitor ENWW Provides a menu for adjusting the on the screen each time the OSD Main Menu is accessed. Changes the viewing position of the screen. Select: ● On ● Off The factory default is On. Select: ● On ● Off Mode Display The factory default is On. Table 4-2 OSD Menu (continued) Icon Main Menu OSD Control Management Submenu Description Clock Phase Horizontal OSD Position Vertical OSD Position OSD...
HP LA1751g and LA1951g LCD Monitors
Page 31
... Support Bezel Power LED Sleep Timer Language Information Current Settings Recommended Settings Serial Number FW Version Backlight Hours Service Support Description Displays the operating status of the monitor each time the monitor is displayed. Provides the timer adjustment menu options: ● Set Current Time-sets the current time in which the OSD menu is powered on. Provides the recommended resolution mode and refresh rate for the monitor. The default setting is Off. ● Sleep Now-immediately sets the monitor to enter sleep mode Selects the language...
... Support Bezel Power LED Sleep Timer Language Information Current Settings Recommended Settings Serial Number FW Version Backlight Hours Service Support Description Displays the operating status of the monitor each time the monitor is displayed. Provides the timer adjustment menu options: ● Set Current Time-sets the current time in which the OSD menu is powered on. Provides the recommended resolution mode and refresh rate for the monitor. The default setting is Off. ● Sleep Now-immediately sets the monitor to enter sleep mode Selects the language...
HP LA1751g and LA1951g LCD Monitors
Page 32
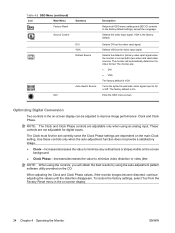
... disappears. Selects VGA as the video input signal. Table 4-2 OSD Menu (continued) Icon Main Menu Factory Reset Source Control Exit Submenu DVI VGA Default Source Auto-Switch Source Description Returns all OSD menu settings and DDC/CI controls to minimize video distortion or video jitter. The monitor will obtain the best results by using an analog input. The choices are not adjustable for digital inputs. The factory default is the factory default. VGA is On. Use these controls only when the auto-adjustment function does not provide a satisfactory image. ● Clock...
... disappears. Selects VGA as the video input signal. Table 4-2 OSD Menu (continued) Icon Main Menu Factory Reset Source Control Exit Submenu DVI VGA Default Source Auto-Switch Source Description Returns all OSD menu settings and DDC/CI controls to minimize video distortion or video jitter. The monitor will obtain the best results by using an analog input. The choices are not adjustable for digital inputs. The factory default is the factory default. VGA is On. Use these controls only when the auto-adjustment function does not provide a satisfactory image. ● Clock...
HP LA1751g and LA1951g LCD Monitors
Page 33
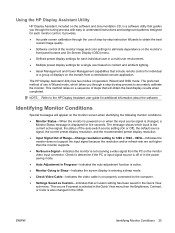
... the OSD. Using the HP Display Assistant Utility HP Display Assistant, included on the software and documentation CD, is a software utility that guides you through a step-by -step instruction Wizards to obtain the best overall image quality. ● Software control of the monitor image and color settings to 1280 x 1024 - 60Hz-Indicates the monitor does not support the input signal because the resolution and/or refresh rate are set higher than the monitor supports. ● No Source Signal-Indicates the monitor...
... the OSD. Using the HP Display Assistant Utility HP Display Assistant, included on the software and documentation CD, is a software utility that guides you through a step-by -step instruction Wizards to obtain the best overall image quality. ● Software control of the monitor image and color settings to 1280 x 1024 - 60Hz-Indicates the monitor does not support the input signal because the resolution and/or refresh rate are set higher than the monitor supports. ● No Source Signal-Indicates the monitor...
HP LA1751g and LA1951g LCD Monitors
Page 34
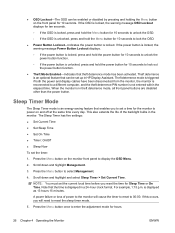
... timer to reset to display the OSD Menu. 2. A power failure or loss of the backlight bulbs in the monitor. Press the Menu button to enter the adjustment mode for the monitor to power on the monitor front panel to 00:00. Press the Menu button once to select Management. 4. Theft deterrence mode is triggered if both the power and display cables have been disconnected from the monitor, the monitor is an energy-saving feature...
... timer to reset to display the OSD Menu. 2. A power failure or loss of the backlight bulbs in the monitor. Press the Menu button to enter the adjustment mode for the monitor to power on the monitor front panel to 00:00. Press the Menu button once to select Management. 4. Theft deterrence mode is triggered if both the power and display cables have been disconnected from the monitor, the monitor is an energy-saving feature...
HP LA1751g and LA1951g LCD Monitors
Page 35
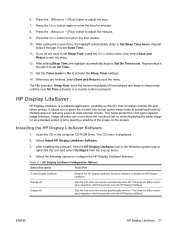
... menu. 4. Select Install HP Display LiteSaver Software. 3. After installing the software, click the HP Display LiteSaver icon in the time chosen. 10. This does not affect screen saver operation, which has priority over the HP Display LiteSaver. ENWW HP Display LiteSaver 27 Press the Menu button to most internal circuits. After setting Sleep Time, the highlight automatically skips to disable the HP Display LiteSaver. This helps protect the LCD panel against image retention. deselect to Set...
... menu. 4. Select Install HP Display LiteSaver Software. 3. After installing the software, click the HP Display LiteSaver icon in the time chosen. 10. This does not affect screen saver operation, which has priority over the HP Display LiteSaver. ENWW HP Display LiteSaver 27 Press the Menu button to most internal circuits. After setting Sleep Time, the highlight automatically skips to disable the HP Display LiteSaver. This helps protect the LCD panel against image retention. deselect to Set...

HP LA1751g and LA1951g LCD Monitors
Page 36
... closes the HP Display LiteSaver. Press the Menu button on the CD for color management, which adapts to be logged in the Control Panel. 2. The sRGB ICM file does not support Windows 95 and Windows NT operating systems. 1. To take advantage of the OSD. 2. In the Display Properties windows, select the Settings tab, then click the Advanced button. 28 Chapter 4 Operating the Monitor ENWW Help Opens the online help file...
... closes the HP Display LiteSaver. Press the Menu button on the CD for color management, which adapts to be logged in the Control Panel. 2. The sRGB ICM file does not support Windows 95 and Windows NT operating systems. 1. To take advantage of the OSD. 2. In the Display Properties windows, select the Settings tab, then click the Advanced button. 28 Chapter 4 Operating the Monitor ENWW Help Opens the online help file...
HP LA1751g and LA1951g LCD Monitors
Page 38
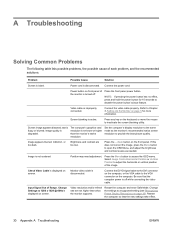
... panel power button. Screen image appears distorted; Brightness and contrast are set lower or higher than what the monitor supports. Monitor video cable is disconnected. Input Signal Out of each problem, and the recommended solutions. Restart the computer and enter Safe Mode. Connect the power cord. Connect the video cable properly. Set the computer's display resolution to the same mode as the monitor's recommended native screen resolution to a supported setting (see Recognizing Preset Display Resolutions on the keyboard or move the mouse to open the OSD Menu, and adjust...
... panel power button. Screen image appears distorted; Brightness and contrast are set lower or higher than what the monitor supports. Monitor video cable is disconnected. Input Signal Out of each problem, and the recommended solutions. Restart the computer and enter Safe Mode. Connect the power cord. Connect the video cable properly. Set the computer's display resolution to the same mode as the monitor's recommended native screen resolution to a supported setting (see Recognizing Preset Display Resolutions on the keyboard or move the mouse to open the OSD Menu, and adjust...
HP LA1751g and LA1951g LCD Monitors
Page 41
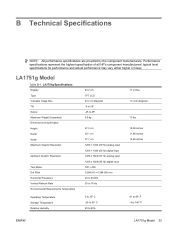
... B-1 LA1751g Specifications Display Type Viewable Image Size Tilt Swivel Maximum Weight (Unpacked) Dimensions (include base) Height Depth Width Maximum Graphic Resolution Optimum Graphic Resolution Text Mode Dot Pitch Horizontal Frequency Vertical Refresh Rate Environmental Requirements Temperature Operating Temperature Storage Temperature Relative Humidity 43.2 cm TFT LCD 43.2 cm diagonal -5 to 35° -45 to 45° 6.8 kg 47.2 cm 30.1 cm 37.7 cm 1280 × 1024 (60 Hz) analog input...
... B-1 LA1751g Specifications Display Type Viewable Image Size Tilt Swivel Maximum Weight (Unpacked) Dimensions (include base) Height Depth Width Maximum Graphic Resolution Optimum Graphic Resolution Text Mode Dot Pitch Horizontal Frequency Vertical Refresh Rate Environmental Requirements Temperature Operating Temperature Storage Temperature Relative Humidity 43.2 cm TFT LCD 43.2 cm diagonal -5 to 35° -45 to 45° 6.8 kg 47.2 cm 30.1 cm 37.7 cm 1280 × 1024 (60 Hz) analog input...
HP LA1751g and LA1951g LCD Monitors
Page 42
Table B-1 LA1751g Specifications (continued) Power Source 100 - 240 VAC, 50 - 60 Hz Altitude: Operating 0 to 3657.6 m 0 to 12,000 feet Storage 0 to 12192 m 0 to 40,000 feet Power Consumption (maximum)
Table B-1 LA1751g Specifications (continued) Power Source 100 - 240 VAC, 50 - 60 Hz Altitude: Operating 0 to 3657.6 m 0 to 12,000 feet Storage 0 to 12192 m 0 to 40,000 feet Power Consumption (maximum)

HP LA1751g and LA1951g LCD Monitors
Page 43
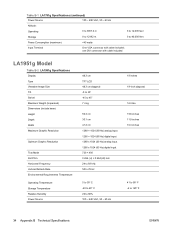
Table B-2 LA1951g Specifications (continued) Altitude: Operating 0 to 3657.6 m 0 to 12,000 feet Storage 0 to 12192 m 0 to 40,000 feet Power Consumption (maximum)
Table B-2 LA1951g Specifications (continued) Altitude: Operating 0 to 3657.6 m 0 to 12,000 feet Storage 0 to 12192 m 0 to 40,000 feet Power Consumption (maximum)


