Software Update - Windows Vista
Page 9
...a software update link in an optional docking device, or connected to an optional power source. Double-click the file that you check the HP Web site periodically for your hard drive. 3. Complete the installation by selecting Start > Computer. 2. Do not insert, remove, connect, ...a network, consult the network administrator before installing any software updates, especially system BIOS updates. Open Windows Explorer by following the instructions on battery power, docked in Help and Support. - At the download area, perform these steps: 1. The hard drive designation is running on ...
...a software update link in an optional docking device, or connected to an optional power source. Double-click the file that you check the HP Web site periodically for your hard drive. 3. Complete the installation by selecting Start > Computer. 2. Do not insert, remove, connect, ...a network, consult the network administrator before installing any software updates, especially system BIOS updates. Open Windows Explorer by following the instructions on battery power, docked in Help and Support. - At the download area, perform these steps: 1. The hard drive designation is running on ...
Software Updates - Windows XP
Page 9
...The BIOS installation begins. 5. Do not insert, remove, connect, or disconnect any software updates, especially system BIOS updates. Access the page on battery power, docked in Help and Support. - Follow the instructions on the screen after it has been downloaded to your selection to the hard .... 1. It is complete. b. Updating the BIOS 3 NOTE: If you connect your computer and access the BIOS update you check the HP Web site periodically for example, filename.exe). Do not shut down the computer or initiate Standby or Hibernation. Double-click the file that ...
...The BIOS installation begins. 5. Do not insert, remove, connect, or disconnect any software updates, especially system BIOS updates. Access the page on battery power, docked in Help and Support. - Follow the instructions on the screen after it has been downloaded to your selection to the hard .... 1. It is complete. b. Updating the BIOS 3 NOTE: If you connect your computer and access the BIOS update you check the HP Web site periodically for example, filename.exe). Do not shut down the computer or initiate Standby or Hibernation. Double-click the file that ...
Installing Windows 2000 on the HP Compaq Business Notebooks
Page 5
...Button is designed for use with AMT models. Systems Affected: HP Compaq 2510p, 6910p, 8510p/w, 8710p/w Notebook PC models Operating ...hard drives. It is depressed, nothing happens. Systems Affected: HP Compaq 2510p, 6910p, 8510p/w, 8710p/w Notebook PC models Operating Systems ...Management Technology is not supported under Windows 2000. Systems Affected: HP Compaq 2510p, 6910p, 8510p/w, 8710p/w Notebook PC models Operating Systems...Systems Affected: HP Compaq 2510p, 6910p, 8510p/w, 8710p/w Notebook PC models Operating Systems Affected: Windows 2000 Resolution: The HP Info Center...
...Button is designed for use with AMT models. Systems Affected: HP Compaq 2510p, 6910p, 8510p/w, 8710p/w Notebook PC models Operating ...hard drives. It is depressed, nothing happens. Systems Affected: HP Compaq 2510p, 6910p, 8510p/w, 8710p/w Notebook PC models Operating Systems ...Management Technology is not supported under Windows 2000. Systems Affected: HP Compaq 2510p, 6910p, 8510p/w, 8710p/w Notebook PC models Operating Systems...Systems Affected: HP Compaq 2510p, 6910p, 8510p/w, 8710p/w Notebook PC models Operating Systems Affected: Windows 2000 Resolution: The HP Info Center...

Installing Windows XP Professional x64 on the HP Compaq 8510w and 8710w Mobile Workstation
Page 5
... under Windows XP Professional x64 do not enable hibernation when the battery reaches a critical state. Appendix A: Known anomalies Power management Anomaly: System will not enter hibernation. Systems Affected: HP 8510w and 8710w Notebook PC models Resolution: Go to Control Panel>Power... to adjust the power management settings prior to installation. Systems Affected: HP 8510w and 8710w Notebook PC models Resolution: None. Systems Affected: HP 8510w and 8710w Notebook PC models Resolution: This will automatically disable hibernation. Power management Anomaly...
... under Windows XP Professional x64 do not enable hibernation when the battery reaches a critical state. Appendix A: Known anomalies Power management Anomaly: System will not enter hibernation. Systems Affected: HP 8510w and 8710w Notebook PC models Resolution: Go to Control Panel>Power... to adjust the power management settings prior to installation. Systems Affected: HP 8510w and 8710w Notebook PC models Resolution: None. Systems Affected: HP 8510w and 8710w Notebook PC models Resolution: This will automatically disable hibernation. Power management Anomaly...
Computer Setup - Windows XP and Windows Vista
Page 10
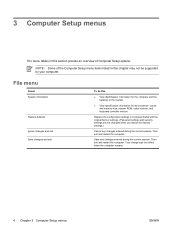
... size, system ROM, video revision, and keyboard controller version. Replace the configuration settings in the system. ● View specification information for the computer and the batteries in Computer Setup with the original factory settings. (Password settings and security settings are not changed when you restore the factory settings.) Cancel any changes...
... size, system ROM, video revision, and keyboard controller version. Replace the configuration settings in the system. ● View specification information for the computer and the batteries in Computer Setup with the original factory settings. (Password settings and security settings are not changed when you restore the factory settings.) Cancel any changes...
Computer Setup - Windows XP and Windows Vista
Page 13
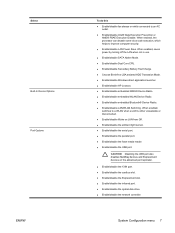
... in use. ● Enable/disable SATA Native Mode. ● Enable/disable Dual Core CPU. ● Enable/disable Secondary Battery Fast Charge. ● Choose Bit-shift or LBA assisted HDD Translation Mode. ● Enable/disable Windows direct application launcher. ● Enable/disable... HP Lockout. ● Enable/disable embedded WWAN Device Radio. ● Enable/disable embedded WLAN Device Radio. ● Enable/disable embedded Bluetooth®...
... in use. ● Enable/disable SATA Native Mode. ● Enable/disable Dual Core CPU. ● Enable/disable Secondary Battery Fast Charge. ● Choose Bit-shift or LBA assisted HDD Translation Mode. ● Enable/disable Windows direct application launcher. ● Enable/disable... HP Lockout. ● Enable/disable embedded WWAN Device Radio. ● Enable/disable embedded WLAN Device Radio. ● Enable/disable embedded Bluetooth®...
Drives - Windows Vista
Page 5
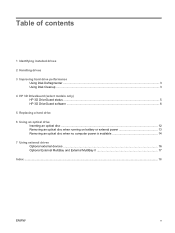
... 3 Improving hard drive performance Using Disk Defragmenter ...3 Using Disk Cleanup ...3 4 HP 3D DriveGuard (select models only) HP 3D DriveGuard status ...5 HP 3D DriveGuard software ...6 5 Replacing a hard drive 6 Using an optical drive Inserting an optical disc ...12 Removing an optical disc when running on battery or external power 13 Removing an optical disc when no...
... 3 Improving hard drive performance Using Disk Defragmenter ...3 Using Disk Cleanup ...3 4 HP 3D DriveGuard (select models only) HP 3D DriveGuard status ...5 HP 3D DriveGuard software ...6 5 Replacing a hard drive 6 Using an optical drive Inserting an optical disc ...12 Removing an optical disc when running on battery or external power 13 Removing an optical disc when no...
Drives - Windows Vista
Page 8
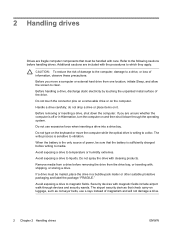
... drive or place items on and then shut it . If you move the computer while the optical drive is sensitive to vibration. When the battery is the only source of magnetism and will not damage a drive. 2 Chapter 2 Handling drives ENWW Avoid exposing a drive to magnetic fields. ...Do not spray the drive with , shipping, or storing a drive. The airport security devices that the battery is off or in a bubble-pack mailer or other suitable protective packaging and label the package "FRAGILE." Before handling a drive, discharge static electricity ...
... drive or place items on and then shut it . If you move the computer while the optical drive is sensitive to vibration. When the battery is the only source of magnetism and will not damage a drive. 2 Chapter 2 Handling drives ENWW Avoid exposing a drive to magnetic fields. ...Do not spray the drive with , shipping, or storing a drive. The airport security devices that the battery is off or in a bubble-pack mailer or other suitable protective packaging and label the package "FRAGILE." Before handling a drive, discharge static electricity ...
Drives - Windows Vista
Page 10
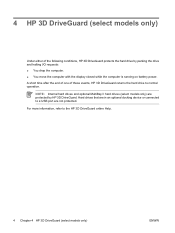
..., HP 3D DriveGuard protects the hard drive by HP 3D DriveGuard. 4 HP 3D DriveGuard (select models only) Under either of these events, HP 3D... DriveGuard returns the hard drive to normal operation. NOTE: Internal hard drives and optional MultiBay II hard drives (select models only) are in an optional docking device or connected to the HP... 3D DriveGuard online Help. 4 Chapter 4 HP 3D DriveGuard (select models only) ENWW Hard drives ...
..., HP 3D DriveGuard protects the hard drive by HP 3D DriveGuard. 4 HP 3D DriveGuard (select models only) Under either of these events, HP 3D... DriveGuard returns the hard drive to normal operation. NOTE: Internal hard drives and optional MultiBay II hard drives (select models only) are in an optional docking device or connected to the HP... 3D DriveGuard online Help. 4 Chapter 4 HP 3D DriveGuard (select models only) ENWW Hard drives ...

Drives - Windows Vista
Page 11
... that the drive is parked. To determine whether drives are parked, a yellow moon is running on battery power and reaches a critical battery level, HP 3D DriveGuard allows the computer to initiate Hibernation. ● The computer will not shut down or initiate Sleep or Hibernation.... NOTE: If the computer is superimposed over the hard drive icon. ● If the drives are currently protected or whether a drive is parked, use Mobility ...
... that the drive is parked. To determine whether drives are parked, a yellow moon is running on battery power and reaches a critical battery level, HP 3D DriveGuard allows the computer to initiate Hibernation. ● The computer will not shut down or initiate Sleep or Hibernation.... NOTE: If the computer is superimposed over the hard drive icon. ● If the drives are currently protected or whether a drive is parked, use Mobility ...

Drives - Windows Vista
Page 13
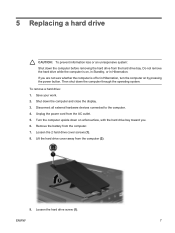
... computer and close the display. 3. Save your work. 2. Turn the computer upside down the computer before removing the hard drive from the computer (2). 9. Remove the battery from the AC outlet. 5. Lift the hard drive cover away from the hard drive bay. Do not remove the hard drive while the computer is...
... computer and close the display. 3. Save your work. 2. Turn the computer upside down the computer before removing the hard drive from the computer (2). 9. Remove the battery from the AC outlet. 5. Lift the hard drive cover away from the hard drive bay. Do not remove the hard drive while the computer is...

Drives - Windows Vista
Page 19
.... NOTE: If the tray is not fully accessible, tilt the disc carefully as you remove it stops. 2. ENWW Removing an optical disc when running on battery or external power 13 Remove the disc (3) from the tray by the edges and avoid touching the flat surfaces. Removing an optical disc when running... on battery or external power 1. Hold the disc by gently pressing down on the drive bezel to release the media tray, and then gently pull out the...
.... NOTE: If the tray is not fully accessible, tilt the disc carefully as you remove it stops. 2. ENWW Removing an optical disc when running on battery or external power 13 Remove the disc (3) from the tray by the edges and avoid touching the flat surfaces. Removing an optical disc when running... on battery or external power 1. Hold the disc by gently pressing down on the drive bezel to release the media tray, and then gently pull out the...
Drives - Windows XP
Page 5
... 3 Improving hard drive performance Using Disk Defragmenter ...3 Using Disk Cleanup ...3 4 HP 3D DriveGuard (select models only) HP 3D DriveGuard status ...5 HP 3D DriveGuard software ...6 5 Replacing a hard drive 6 Using an optical drive Inserting an optical disc ...11 Removing an optical disc when running on battery or external power 12 Removing an optical disc when no...
... 3 Improving hard drive performance Using Disk Defragmenter ...3 Using Disk Cleanup ...3 4 HP 3D DriveGuard (select models only) HP 3D DriveGuard status ...5 HP 3D DriveGuard software ...6 5 Replacing a hard drive 6 Using an optical drive Inserting an optical disc ...11 Removing an optical disc when running on battery or external power 12 Removing an optical disc when no...
Drives - Windows XP
Page 8
...hard drive from the drive bay, or traveling with, shipping, or storing a drive. 2 Handling drives Drives are fragile computer components that the battery is sufficiently charged before writing to media. If you move the computer while the optical drive is sensitive to vibration. Avoid exposing a drive ...electricity by touching the unpainted metal surface of power, be sure that must be handled with the procedures to magnetic fields. When the battery is off or in a bubble-pack mailer or other suitable protective packaging and label the package "FRAGILE." Do not spray the drive...
...hard drive from the drive bay, or traveling with, shipping, or storing a drive. 2 Handling drives Drives are fragile computer components that the battery is sufficiently charged before writing to media. If you move the computer while the optical drive is sensitive to vibration. Avoid exposing a drive ...electricity by touching the unpainted metal surface of power, be sure that must be handled with the procedures to magnetic fields. When the battery is off or in a bubble-pack mailer or other suitable protective packaging and label the package "FRAGILE." Do not spray the drive...

Drives - Windows XP
Page 10
... MultiBay II hard drives (select models only) are protected by parking the drive and halting I/O requests under either of these events, HP 3D DriveGuard returns the hard drive to a USB port are in an optional docking device or connected to normal operation. Hard drives ...computer. ● You move the computer with the display closed while the computer is running on battery power. For more information, refer to the HP 3D DriveGuard online Help. 4 Chapter 4 HP 3D DriveGuard (select models only) ENWW 4 HP 3D DriveGuard (select models only) HP 3D DriveGuard protects the hard drive by...
... MultiBay II hard drives (select models only) are protected by parking the drive and halting I/O requests under either of these events, HP 3D DriveGuard returns the hard drive to a USB port are in an optional docking device or connected to normal operation. Hard drives ...computer. ● You move the computer with the display closed while the computer is running on battery power. For more information, refer to the HP 3D DriveGuard online Help. 4 Chapter 4 HP 3D DriveGuard (select models only) ENWW 4 HP 3D DriveGuard (select models only) HP 3D DriveGuard protects the hard drive by...

Drives - Windows XP
Page 11
.... ● If the drives are parked, a yellow moon is running on battery power and reaches a critical battery level, HP 3D DriveGuard allows the computer to initiate Hibernation. ● The computer will not activate battery alarms set on the computer changes to an amber color to show that you ...move the computer, HP recommends that the drive is parked. ENWW HP 3D DriveGuard status 5 Before you either shut it down . ●...
.... ● If the drives are parked, a yellow moon is running on battery power and reaches a critical battery level, HP 3D DriveGuard allows the computer to initiate Hibernation. ● The computer will not activate battery alarms set on the computer changes to an amber color to show that you ...move the computer, HP recommends that the drive is parked. ENWW HP 3D DriveGuard status 5 Before you either shut it down . ●...
Drives - Windows XP
Page 13
... hard drive screw (1). Lift the hard drive cover away from the computer. 7. Shut down the computer and close the display. 3. ENWW 7 If you . 6. Remove the battery from the computer (2). 9.
... hard drive screw (1). Lift the hard drive cover away from the computer. 7. Shut down the computer and close the display. 3. ENWW 7 If you . 6. Remove the battery from the computer (2). 9.

Drives - Windows XP
Page 18
Hold the disc by gently pressing down on the spindle while lifting the outer edges of the disc. NOTE: If the tray is not fully accessible, tilt the disc carefully as you remove it stops. 2. Press the release button (1) on battery or external power 1. Close the media tray and place the disc in a protective case. 12 Chapter 6 Using an optical drive ENWW Remove the disc (3) from the tray by the edges and avoid touching the flat surfaces. Removing an optical disc when running on the drive bezel to release the media tray, and then gently pull out the tray (2) until it . 3.
Hold the disc by gently pressing down on the spindle while lifting the outer edges of the disc. NOTE: If the tray is not fully accessible, tilt the disc carefully as you remove it stops. 2. Press the release button (1) on battery or external power 1. Close the media tray and place the disc in a protective case. 12 Chapter 6 Using an optical drive ENWW Remove the disc (3) from the tray by the edges and avoid touching the flat surfaces. Removing an optical disc when running on the drive bezel to release the media tray, and then gently pull out the tray (2) until it . 3.
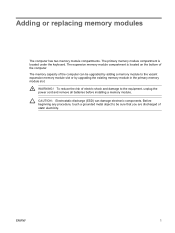
Memory Modules - Windows Vista
Page 7
... memory capacity of the computer. ENWW 1 WARNING! Before beginning any procedure, touch a grounded metal object to the equipment, unplug the power cord and remove all batteries before installing a memory module. The primary memory module compartment is located on the bottom of the computer can damage electronic components. Adding or replacing memory...
... memory capacity of the computer. ENWW 1 WARNING! Before beginning any procedure, touch a grounded metal object to the equipment, unplug the power cord and remove all batteries before installing a memory module. The primary memory module compartment is located on the bottom of the computer can damage electronic components. Adding or replacing memory...
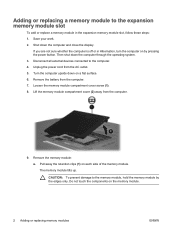
Memory Modules - Windows Vista
Page 8
... memory module, hold the memory module by pressing the power button. Save your work. 2. Then shut down the computer and close the display. Remove the battery from the AC outlet. 5. The memory module tilts up. Do not touch the components on by the edges only. Unplug the power cord from the...
... memory module, hold the memory module by pressing the power button. Save your work. 2. Then shut down the computer and close the display. Remove the battery from the AC outlet. 5. The memory module tilts up. Do not touch the components on by the edges only. Unplug the power cord from the...


