HP FS7600 - Compaq Monitor Research
Related Manual Pages


Similar Questions

How Can I Reset A Compaq Presario Fs7600 Monitor
(Posted by supabill 9 years ago)

My Hp 7540 Monitor Is Connected To A Dell Cpu. The Menu Box Icons Keep Popping U
The monitor hp 7540 has the menu flickering or popping up. I have tried to unplug and hold the power...
The monitor hp 7540 has the menu flickering or popping up. I have tried to unplug and hold the power...
(Posted by ebuchisa 10 years ago)

How To Load L 1810 Lcd Monitor Drivers Without In Built Hp Hard Disk
(Posted by Anonymous-112312 10 years ago)

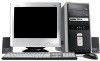
Garage Sale-complete Presario Fs7600 System
I am hoping to sell a complete Compaq Presario FS7600 system in a garage sale. Will include monitor,...
I am hoping to sell a complete Compaq Presario FS7600 system in a garage sale. Will include monitor,...
(Posted by dbpowell 11 years ago)

How To Update Hp L1810 Lcd Monitor Drivers
(Posted by RAVI 12 years ago)