Safety and Regulatory Information Desktops, Thin Clients, and Personal Workstations
Page 17
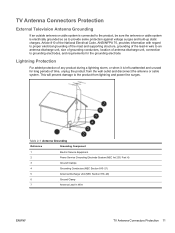
...supporting structure, grounding of the lead-in Wire ENWW TV Antenna Connectors Protection 11 This will prevent damage to the product from the wall outlet and disconnect the antenna or cable system. Lightning Protection For added protection of time, unplug the product from lightning and power line surges. Table 2-1 Antenna Grounding Reference Grounding Component 1 Electric Service Equipment 2 Power Service... Antenna Connectors Protection External Television Antenna Grounding If an outside antenna or cable system is connected to the product, be sure the antenna or cable system ...
...supporting structure, grounding of the lead-in Wire ENWW TV Antenna Connectors Protection 11 This will prevent damage to the product from the wall outlet and disconnect the antenna or cable system. Lightning Protection For added protection of time, unplug the product from lightning and power line surges. Table 2-1 Antenna Grounding Reference Grounding Component 1 Electric Service Equipment 2 Power Service... Antenna Connectors Protection External Television Antenna Grounding If an outside antenna or cable system is connected to the product, be sure the antenna or cable system ...
Advanced Setup Guide
Page 21
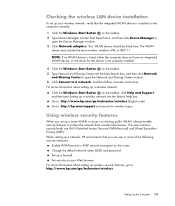
... a network, HP recommends that the integrated WLAN device is not properly installed. 4 Click the Windows Start Button on the taskbar, click Help and Support, and then type Setting up a firewall. For more information about setting up a wireless network: Click the Windows Start Button on the taskbar. 5 Type Network and Sharing Center into the Start Search box, and then click Network and Sharing Center to open the Device Manager window. 3 Click Network adapters. Change the default network name (SSID) and password. Your WLAN device...
... a network, HP recommends that the integrated WLAN device is not properly installed. 4 Click the Windows Start Button on the taskbar, click Help and Support, and then type Setting up a firewall. For more information about setting up a wireless network: Click the Windows Start Button on the taskbar. 5 Type Network and Sharing Center into the Start Search box, and then click Network and Sharing Center to open the Device Manager window. 3 Click Network adapters. Change the default network name (SSID) and password. Your WLAN device...
Getting Started Guide
Page 20
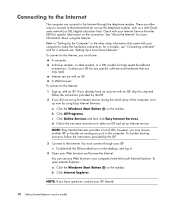
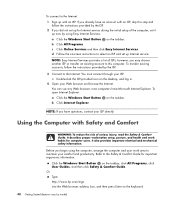
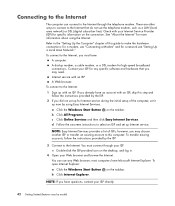
... select an ISP and set up with your Internet Service Provider (ISP) for high-speed broadband connections. To connect to the Internet. If you did not set it up for a network see "Connecting a Modem" and for Internet service during the initial setup of ISPs; To open Internet Explorer: a Click the Windows Start Button on the taskbar. Refer to the Internet that do not use any specific software and hardware that came with an...
... select an ISP and set up with your Internet Service Provider (ISP) for high-speed broadband connections. To connect to the Internet. If you did not set it up for a network see "Connecting a Modem" and for Internet service during the initial setup of ISPs; To open Internet Explorer: a Click the Windows Start Button on the taskbar. Refer to the Internet that do not use any specific software and hardware that came with an...
Getting Started Guide
Page 23
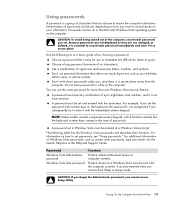
... the keyboard number keys, except in the Help and Support Center. It must be entered when you want to control access to your birthday, child's name, or phone number. Several types of up to eight letters and numbers, and it is not recognized if you subsequently try to enter it in a secure place. CAUTION: If you forget the Administrator password, you cannot access Setup Utility. Use a combination...
... the keyboard number keys, except in the Help and Support Center. It must be entered when you want to control access to your birthday, child's name, or phone number. Several types of up to eight letters and numbers, and it is not recognized if you subsequently try to enter it in a secure place. CAUTION: If you forget the Administrator password, you cannot access Setup Utility. Use a combination...

Getting Started Guide
Page 57
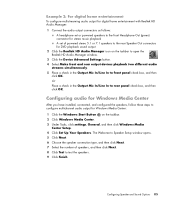
... DVD playback sound output 2 Click the Realtek HD Audio Manager icon on the taskbar. 2 Click Windows Media Center. 3 Under Tasks, click settings, General, and then click Windows Media Center Setup. 4 Click Set Up Your Speakers. The Welcome to Speaker Setup window opens. 5 Click Next. 6 Choose the speaker connection type, and then click Next. 7 Select the number of powered stereo 5.1 or 7.1 speakers to the rear Speaker Out connectors for Windows Media Center: 1 Click the Windows Start Button on the taskbar to open the Realtek HD Audio Manager window...
... DVD playback sound output 2 Click the Realtek HD Audio Manager icon on the taskbar. 2 Click Windows Media Center. 3 Under Tasks, click settings, General, and then click Windows Media Center Setup. 4 Click Set Up Your Speakers. The Welcome to Speaker Setup window opens. 5 Click Next. 6 Choose the speaker connection type, and then click Next. 7 Select the number of powered stereo 5.1 or 7.1 speakers to the rear Speaker Out connectors for Windows Media Center: 1 Click the Windows Start Button on the taskbar to open the Realtek HD Audio Manager window...
Limited Warranty and Support Guide
Page 14
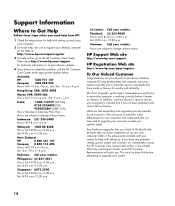
... Support Guide, and a HP Customer Representative will assist you have not solved the problem, call the HP Customer Care Center at http://www.hp.com/support for technical information or to purchase a desktop computer! We know that you have placed a security seal on , immediately contact the HP Customer Care Center listed earlier in this a key differentiator for all customers. If you may wish to upgrade...
... Support Guide, and a HP Customer Representative will assist you have not solved the problem, call the HP Customer Care Center at http://www.hp.com/support for technical information or to purchase a desktop computer! We know that you have placed a security seal on , immediately contact the HP Customer Care Center listed earlier in this a key differentiator for all customers. If you may wish to upgrade...
Getting Started
Page 58
... you did not set it up for computer users. Or Type http://www.hp.com/ergo into the Web browser address box, and then press Enter on the desktop, and log in. 4 Open your ISP. You must connect through your Web browser and browse the Internet. b Click All Programs. c Click Online Services and then click Easy Internet Services. a Click the Windows Start Button on the...
... you did not set it up for computer users. Or Type http://www.hp.com/ergo into the Web browser address box, and then press Enter on the desktop, and log in. 4 Open your ISP. You must connect through your Web browser and browse the Internet. b Click All Programs. c Click Online Services and then click Easy Internet Services. a Click the Windows Start Button on the...

Getting Started
Page 95
... to Speaker Setup window opens. 5 Click Next. 6 Choose the speaker connection type, and then click Next. 7 Select the number of powered stereo 5.1 or 7.1 speakers to the rear Speaker Out connectors for DVD playback sound output 2 Click the Realtek HD Audio Manager icon on the taskbar. 2 Click Windows Media Center. 3 Under Tasks, click settings, General, and then click Windows Media Center Setup. 4 Click Set Up Your Speakers. Configuring Speaker and Sound Options 85 Example 2: For digital home entertainment To configure multistreaming audio output for...
... to Speaker Setup window opens. 5 Click Next. 6 Choose the speaker connection type, and then click Next. 7 Select the number of powered stereo 5.1 or 7.1 speakers to the rear Speaker Out connectors for DVD playback sound output 2 Click the Realtek HD Audio Manager icon on the taskbar. 2 Click Windows Media Center. 3 Under Tasks, click settings, General, and then click Windows Media Center Setup. 4 Click Set Up Your Speakers. Configuring Speaker and Sound Options 85 Example 2: For digital home entertainment To configure multistreaming audio output for...

Getting Started Guide
Page 58
... open Internet Explorer: a Click the Windows Start Button on the keyboard. 48 Getting Started (features vary by the ISP. 3 Connect to the Safety & Comfort Guide for important ergonomic information: Click the Windows Start Button on the taskbar, click All Programs, click User Guides, and then click Safety & Comfort Guide. It describes proper workstation setup, posture, and health and work area to the Internet: 1 Sign up Internet service. NOTE: Easy Internet Services provides a list...
... open Internet Explorer: a Click the Windows Start Button on the keyboard. 48 Getting Started (features vary by the ISP. 3 Connect to the Safety & Comfort Guide for important ergonomic information: Click the Windows Start Button on the taskbar, click All Programs, click User Guides, and then click Safety & Comfort Guide. It describes proper workstation setup, posture, and health and work area to the Internet: 1 Sign up Internet service. NOTE: Easy Internet Services provides a list...
Getting Started Guide
Page 60
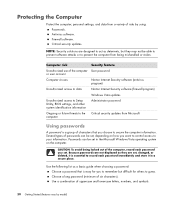
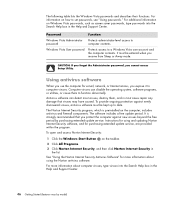
... computer. Computer risk Security feature Unauthorized use of the computer User password or user account Computer viruses Norton Internet Security software (antivirus program) Unauthorized access to data Norton Internet Security software (firewall program) Windows Vista updates Unauthorized access to Setup Utility, BIOS settings, and other system identification information Administrator password Ongoing or future threats to the computer Critical security updates from a variety of risks by model) Several types of six characters).
... computer. Computer risk Security feature Unauthorized use of the computer User password or user account Computer viruses Norton Internet Security software (antivirus program) Unauthorized access to data Norton Internet Security software (firewall program) Windows Vista updates Unauthorized access to Setup Utility, BIOS settings, and other system identification information Administrator password Ongoing or future threats to the computer Critical security updates from a variety of risks by model) Several types of six characters).
Getting Started Guide
Page 95
... In to front panel check box, and then click OK. Configuring Speaker and Sound Options 85 The Welcome to Speaker Setup window opens. 5 Click Next. 6 Choose the speaker connection type, and then click Next. 7 Select the number of powered stereo 5.1 or 7.1 speakers to the rear Speaker Out connectors for Windows Media Center: 1 Click the Windows Start Button on the taskbar to open the Realtek HD Audio Manager window. 3 Click the Device Advanced Settings button. 4 Select Make front and rear output devices playback two different...
... In to front panel check box, and then click OK. Configuring Speaker and Sound Options 85 The Welcome to Speaker Setup window opens. 5 Click Next. 6 Choose the speaker connection type, and then click Next. 7 Select the number of powered stereo 5.1 or 7.1 speakers to the rear Speaker Out connectors for Windows Media Center: 1 Click the Windows Start Button on the taskbar to open the Realtek HD Audio Manager window. 3 Click the Device Advanced Settings button. 4 Select Make front and rear output devices playback two different...
Getting Started Guide
Page 50
... computer. Connecting to the Internet The computer can use any specific software and hardware that do not use the telephone modem, such as a LAN (local area network) or DSL (digital subscriber line). a Click the Windows Start Button on the taskbar. NOTE: Easy Internet Services provides a list of the computer, set up now by the ISP. 2 If you already have Microsoft Internet Explorer. To open Internet Explorer: a Click the Windows Start Button on...
... computer. Connecting to the Internet The computer can use any specific software and hardware that do not use the telephone modem, such as a LAN (local area network) or DSL (digital subscriber line). a Click the Windows Start Button on the taskbar. NOTE: Easy Internet Services provides a list of the computer, set up now by the ISP. 2 If you already have Microsoft Internet Explorer. To open Internet Explorer: a Click the Windows Start Button on...
Getting Started Guide
Page 54
... disable the operating system, software programs, or utilities, or cause them , and in the Help and Support Center. The software includes a free update period. Password Function Windows Vista Administrator password Protects administrator-level access to set passwords, see "Using passwords." It must be entered when you resume from Sleep or Away mode. For more information about computer viruses, type viruses into the Search Help box in most cases repair any damage that you cannot access Setup Utility. Using...
... disable the operating system, software programs, or utilities, or cause them , and in the Help and Support Center. The software includes a free update period. Password Function Windows Vista Administrator password Protects administrator-level access to set passwords, see "Using passwords." It must be entered when you resume from Sleep or Away mode. For more information about computer viruses, type viruses into the Search Help box in most cases repair any damage that you cannot access Setup Utility. Using...
Getting Started Guide
Page 56
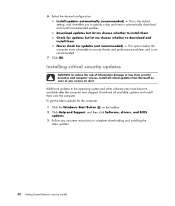
... the Windows Start Button on the taskbar. 2 Click Help and Support, and then click Software, drivers, and BIOS updates. 3 Follow any onscreen instructions to automatically download and install recommended updates. This is not recommended. 7 Click OK. Additional updates to download and install them onto the computer. This option makes the computer more vulnerable to security threats and performance problems and is the default setting, and it enables you receive an alert. Download updates...
... the Windows Start Button on the taskbar. 2 Click Help and Support, and then click Software, drivers, and BIOS updates. 3 Follow any onscreen instructions to automatically download and install recommended updates. This is not recommended. 7 Click OK. Additional updates to download and install them onto the computer. This option makes the computer more vulnerable to security threats and performance problems and is the default setting, and it enables you receive an alert. Download updates...

Limited Warranty and Support Guide
Page 14
... operate with or connected to external software that all times. Storage of this modem to check the telephone numbers stored in your modem immediately after programming. The number you enter to dial may be a remote risk of electric shock from lightning. • Do not use this product to report a gas leak in the vicinity of electrical shock. There may optionally...
... operate with or connected to external software that all times. Storage of this modem to check the telephone numbers stored in your modem immediately after programming. The number you enter to dial may be a remote risk of electric shock from lightning. • Do not use this product to report a gas leak in the vicinity of electrical shock. There may optionally...
Limited Warranty and Support Guide
Page 14
... you have any problems setting up your system and turning it ! 14 Support Information Where to Get Help Follow these steps when you need help from HP: 1 Check the setup poster for help with setting up and using your computer. 2 For faster help, be done after you have completely set up your new computer. New Zealand: HP 0 800 441 147 Compaq 0 800 113 694...
... you have any problems setting up your system and turning it ! 14 Support Information Where to Get Help Follow these steps when you need help from HP: 1 Check the setup poster for help with setting up and using your computer. 2 For faster help, be done after you have completely set up your new computer. New Zealand: HP 0 800 441 147 Compaq 0 800 113 694...
Upgrading and Servicing Guide
Page 12
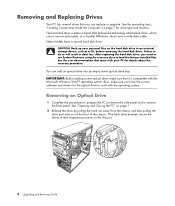
... positions in data loss. IMPORTANT: Before adding a new optical drive, make sure you need to run System Recovery using the recovery discs to do so will result in the chassis.) 8 Upgrading and Servicing Guide Failure to load the factory-installed files. Also, make sure that you can add an optical drive into an empty lower optical drive bay. The hard disk drive is compatible with the Microsoft Windows Vista™ operating system. Removing an Optical Drive 1 Complete the procedures to prepare the...
... positions in data loss. IMPORTANT: Before adding a new optical drive, make sure you need to run System Recovery using the recovery discs to do so will result in the chassis.) 8 Upgrading and Servicing Guide Failure to load the factory-installed files. Also, make sure that you can add an optical drive into an empty lower optical drive bay. The hard disk drive is compatible with the Microsoft Windows Vista™ operating system. Removing an Optical Drive 1 Complete the procedures to prepare the...
Upgrading and Servicing Guide
Page 28
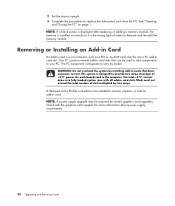
... card slots filled) must not exceed the total number of slots multiplied by two amps. Check with all add-in card. NOTE: If a blank screen is displayed after replacing or adding a memory module, the memory is installed incorrectly or it is a circuit board, such as a PCI or an AGP card, that fits into a PC add-in cards that can be required for more information about power supply requirements. 24 Upgrading and Servicing Guide...
... card slots filled) must not exceed the total number of slots multiplied by two amps. Check with all add-in card. NOTE: If a blank screen is displayed after replacing or adding a memory module, the memory is installed incorrectly or it is a circuit board, such as a PCI or an AGP card, that fits into a PC add-in cards that can be required for more information about power supply requirements. 24 Upgrading and Servicing Guide...
Upgrading and Servicing Guide
Page 30
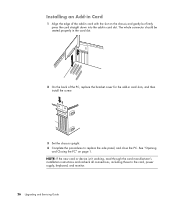
... the new card or device isn't working, read through the card manufacturer's installation instructions and recheck all connections, including those to replace the side panel, and close the PC. Installing an Add-in Card 1 Align the edge of the PC, replace the bracket cover for the add-in card slots, and then install the screw. 3 Set the chassis upright. 4 Complete the procedures to the card, power supply, keyboard, and monitor. 26 Upgrading and Servicing Guide See "Opening and Closing...
... the new card or device isn't working, read through the card manufacturer's installation instructions and recheck all connections, including those to replace the side panel, and close the PC. Installing an Add-in Card 1 Align the edge of the PC, replace the bracket cover for the add-in card slots, and then install the screw. 3 Set the chassis upright. 4 Complete the procedures to the card, power supply, keyboard, and monitor. 26 Upgrading and Servicing Guide See "Opening and Closing...
Upgrading and Servicing Guide
Page 31
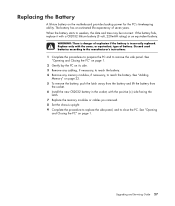
When the battery starts to remove the side panel. WARNING: There is incorrectly replaced. Upgrading and Servicing Guide 27 Replacing the Battery A lithium battery on page 1. The battery has an estimated life expectancy of explosion if the battery is danger of seven years. See "Opening and Closing the PC" on the motherboard provides backup power for the PC's timekeeping ability. Discard used batteries according to the manufacturer's instructions. 1 Complete the...
When the battery starts to remove the side panel. WARNING: There is incorrectly replaced. Upgrading and Servicing Guide 27 Replacing the Battery A lithium battery on page 1. The battery has an estimated life expectancy of explosion if the battery is danger of seven years. See "Opening and Closing the PC" on the motherboard provides backup power for the PC's timekeeping ability. Discard used batteries according to the manufacturer's instructions. 1 Complete the...


