HP ENVY 15 User Guide - Windows 7
Page 6
... the volume ...29 Using the media activity keys 30 Multimedia software ...30 Using HP MediaSmart software 31 Using multimedia software 31 Installing multimedia software from a disc 31 Audio ...32 Connecting external audio devices 32 Checking your audio functions 32 Using Beats Audio ...33 Identifying Beats Audio icons 34 Video ...34 Connecting an external monitor or projector 34 Connecting an HDMI device 35 Configuring audio for HDMI 36 Webcam ...37 Webcam tips ...37 Adjusting webcam properties 37 Using the ambient light sensor ...39 Using adaptive brightness 39 Using the webcam IR...
... the volume ...29 Using the media activity keys 30 Multimedia software ...30 Using HP MediaSmart software 31 Using multimedia software 31 Installing multimedia software from a disc 31 Audio ...32 Connecting external audio devices 32 Checking your audio functions 32 Using Beats Audio ...33 Identifying Beats Audio icons 34 Video ...34 Connecting an external monitor or projector 34 Connecting an HDMI device 35 Configuring audio for HDMI 36 Webcam ...37 Webcam tips ...37 Adjusting webcam properties 37 Using the ambient light sensor ...39 Using adaptive brightness 39 Using the webcam IR...
HP ENVY 15 User Guide - Windows 7
Page 8
... not open 61 Sharing optical drives ...62 External devices ...63 Using a USB device ...63 Connecting a USB device 63 Removing a USB device 63 Using an eSATA device ...64 Connecting an eSATA device 64 Removing an eSATA device 64 Using Digital Media Slot cards 65 Inserting a digital card 65 Removing a digital card 66 8 Memory modules Adding or replacing a memory module in single-slot models 68 Adding or replacing a memory module in double-slot models 71 9 Security Protecting the computer ...75 Using passwords ...76 Setting passwords in Windows 76 Setting passwords in Setup Utility 77...
... not open 61 Sharing optical drives ...62 External devices ...63 Using a USB device ...63 Connecting a USB device 63 Removing a USB device 63 Using an eSATA device ...64 Connecting an eSATA device 64 Removing an eSATA device 64 Using Digital Media Slot cards 65 Inserting a digital card 65 Removing a digital card 66 8 Memory modules Adding or replacing a memory module in single-slot models 68 Adding or replacing a memory module in double-slot models 71 9 Security Protecting the computer ...75 Using passwords ...76 Setting passwords in Windows 76 Setting passwords in Setup Utility 77...
HP ENVY 15 User Guide - Windows 7
Page 13
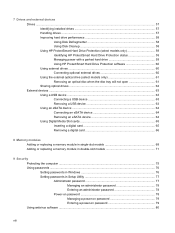
... wireless device, such as a wireless local area network (WLAN) device and/or a Bluetooth® device, is on . ● Blinking white: The computer is in the Sleep state. ● Off: The computer is disabled. NOTE: Wireless devices are enabled at the factory. ● Amber: All wireless devices are off. Quickly double-tap the button to turn the TouchPad on and off. (2) Left TouchPad button* Functions like the left button on an external mouse. (3) Right TouchPad button* Functions like the right button...
... wireless device, such as a wireless local area network (WLAN) device and/or a Bluetooth® device, is on . ● Blinking white: The computer is in the Sleep state. ● Off: The computer is disabled. NOTE: Wireless devices are enabled at the factory. ● Amber: All wireless devices are off. Quickly double-tap the button to turn the TouchPad on and off. (2) Left TouchPad button* Functions like the left button on an external mouse. (3) Right TouchPad button* Functions like the right button...
HP ENVY 15 User Guide - Windows 7
Page 21
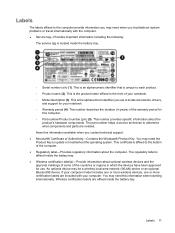
... you use . This is located inside the battery bay. ◦ Serial number (s/n) (1). Wireless certification labels are included with the computer. ● Service tag-Provides important information including the following: The service tag is the product name affixed to the bottom of Authenticity-Contains the Windows® Product Key. You may be a wireless local area network (WLAN) device or an optional Bluetooth® device. An optional device may need this...
... you use . This is located inside the battery bay. ◦ Serial number (s/n) (1). Wireless certification labels are included with the computer. ● Service tag-Provides important information including the following: The service tag is the product name affixed to the bottom of Authenticity-Contains the Windows® Product Key. You may be a wireless local area network (WLAN) device or an optional Bluetooth® device. An optional device may need this...
HP ENVY 15 User Guide - Windows 7
Page 30
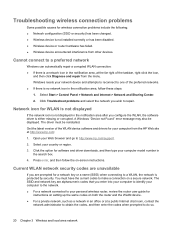
... changed. ● Wireless device is protected by security. Select Start > Control Panel > Network and Internet > Network and Sharing Center. 2. Press enter, and then follow these steps: 1. Current WLAN network security codes are unavailable If you are alphanumeric codes that you wish to http://www.hp.com/support. 2. A Windows "Device not Found" error message may also be reinstalled. Troubleshooting wireless connection problems Some possible causes for instructions on setting up the same codes on a secure network. Cannot connect...
... changed. ● Wireless device is protected by security. Select Start > Control Panel > Network and Internet > Network and Sharing Center. 2. Press enter, and then follow these steps: 1. Current WLAN network security codes are unavailable If you are alphanumeric codes that you wish to http://www.hp.com/support. 2. A Windows "Device not Found" error message may also be reinstalled. Troubleshooting wireless connection problems Some possible causes for instructions on setting up the same codes on a secure network. Cannot connect...
HP ENVY 15 User Guide - Windows 7
Page 33
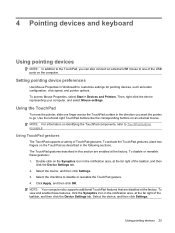
... the device, and then click Settings. Using TouchPad gestures The TouchPad supports a variety of the USB ports on the TouchPad as button configuration, click speed, and pointer options. Select the device, and then click Settings. 3. Select the checkbox to customize settings for pointing devices, such as described in Windows® to disable or reenable the TouchPad gesture. 4. NOTE: For information on identifying the TouchPad components, refer to TouchPad buttons on an external mouse. Click...
... the device, and then click Settings. Using TouchPad gestures The TouchPad supports a variety of the USB ports on the TouchPad as button configuration, click speed, and pointer options. Select the device, and then click Settings. 3. Select the checkbox to customize settings for pointing devices, such as described in Windows® to disable or reenable the TouchPad gesture. 4. NOTE: For information on identifying the TouchPad components, refer to TouchPad buttons on an external mouse. Click...

HP ENVY 15 User Guide - Windows 7
Page 47
... webcam software enables you want to someone on another LAN or outside your network firewall, contact your Internet service provider for assistance. To permanently resolve the problem, reconfigure the firewall as necessary, and adjust the policies and settings of other intrusion detection systems. ● Whenever possible, place bright light sources behind the webcam and out of the display. a lower brightness setting creates a darker image. ● Contrast-Controls the...
... webcam software enables you want to someone on another LAN or outside your network firewall, contact your Internet service provider for assistance. To permanently resolve the problem, reconfigure the firewall as necessary, and adjust the policies and settings of other intrusion detection systems. ● Whenever possible, place bright light sources behind the webcam and out of the display. a lower brightness setting creates a darker image. ● Contrast-Controls the...
HP ENVY 15 User Guide - Windows 7
Page 49
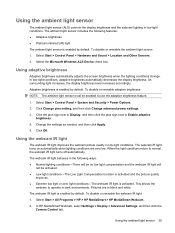
... Control Panel > Hardware and Sound > Location and Other Sensors. 2. Select the Microsoft Windows ALS Device check box. Using the ambient light sensor 39 The webcam IR light turns on automatically when lighting conditions are in low-light conditions. To disable or reenable the webcam IR light: 1. Using adaptive brightness Adaptive brightness automatically adjusts the screen brightness when the lighting conditions change. Adaptive brightness is enabled by default. Select Start > Control Panel > System and Security > Power Options. 2. Using the webcam IR light The webcam IR light...
... Control Panel > Hardware and Sound > Location and Other Sensors. 2. Select the Microsoft Windows ALS Device check box. Using the ambient light sensor 39 The webcam IR light turns on automatically when lighting conditions are in low-light conditions. To disable or reenable the webcam IR light: 1. Using adaptive brightness Adaptive brightness automatically adjusts the screen brightness when the lighting conditions change. Adaptive brightness is enabled by default. Select Start > Control Panel > System and Security > Power Options. 2. Using the webcam IR light The webcam IR light...
HP ENVY 15 User Guide - Windows 7
Page 51
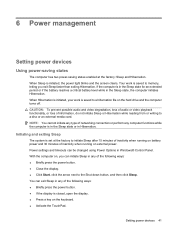
... press the power button. ● If the display is closed, open the display. ● Press a key on the keyboard. ● Activate the TouchPad. When Sleep is saved to a hibernation file on the hard drive and the computer turns off. When Hibernation is initiated, your work is set at the factory: Sleep and Hibernation. 6 Power management Setting power devices Using power-saving states The computer has two power-saving states enabled at the factory to initiate Sleep after 15 minutes...
... press the power button. ● If the display is closed, open the display. ● Press a key on the keyboard. ● Activate the TouchPad. When Sleep is saved to a hibernation file on the hard drive and the computer turns off. When Hibernation is initiated, your work is set at the factory: Sleep and Hibernation. 6 Power management Setting power devices Using power-saving states The computer has two power-saving states enabled at the factory to initiate Sleep after 15 minutes...
HP ENVY 15 User Guide - Windows 7
Page 60
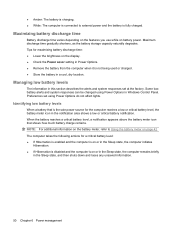
... changed using Power Options do not affect lights. Tips for maximizing battery discharge time: ● Lower the brightness on or in the Sleep state, the computer initiates Hibernation. ● If Hibernation is disabled and the computer is the sole power source for a critical battery level: ● If Hibernation is enabled and the computer is on the display. ● Check the Power saver setting in the Sleep...
... changed using Power Options do not affect lights. Tips for maximizing battery discharge time: ● Lower the brightness on or in the Sleep state, the computer initiates Hibernation. ● If Hibernation is disabled and the computer is the sole power source for a critical battery level: ● If Hibernation is enabled and the computer is on the display. ● Check the Power saver setting in the Sleep...
HP ENVY 15 User Guide - Windows 7
Page 66
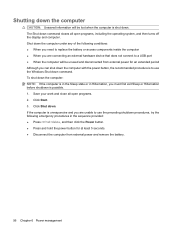
... following conditions: ● When you need to replace the battery or access components inside the computer ● When you are connecting an external hardware device that does not connect to use the preceding shutdown procedures, try the following emergency procedures in Hibernation, you can shut down the computer with the power button, the recommended procedure is to a USB port ● When the computer will...
... following conditions: ● When you need to replace the battery or access components inside the computer ● When you are connecting an external hardware device that does not connect to use the preceding shutdown procedures, try the following emergency procedures in Hibernation, you can shut down the computer with the power button, the recommended procedure is to a USB port ● When the computer will...
HP ENVY 15 User Guide - Windows 7
Page 68
... files and folders on solid-state drives. NOTE: It is sufficiently charged before writing to clear, or properly disconnect the external hard drive. To run Disk Cleanup: 1. To run Disk Defragmenter: 1. When the battery is connected to an external hard drive, initiate Sleep and allow the screen to media. NOTE: Windows® includes the User Account Control feature to run Disk Defragmenter on the hard drive so that is the only source...
... files and folders on solid-state drives. NOTE: It is sufficiently charged before writing to clear, or properly disconnect the external hard drive. To run Disk Cleanup: 1. To run Disk Defragmenter: 1. When the battery is connected to an external hard drive, initiate Sleep and allow the screen to media. NOTE: Windows® includes the User Account Control feature to run Disk Defragmenter on the hard drive so that is the only source...
HP ENVY 15 User Guide - Windows 7
Page 70
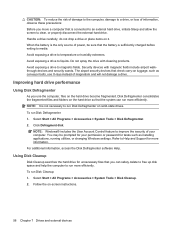
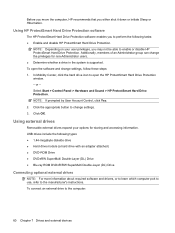
...To open the HP ProtectSmart Hard Drive Protection window. - Select Start > Control Panel > Hardware and Sound > HP ProtectSmart Hard Drive Protection. Additionally, members of an Administrator group can change settings, follow these steps: 1. or - NOTE: Depending on your options for non-Administrator users. ● Determine whether a drive in the system is supported. NOTE: If prompted by User Account Control, click Yes. 2. USB drives include the following tasks: ● Enable and disable HP ProtectSmart Hard Drive Protection. Using external drives Removable external drives...
...To open the HP ProtectSmart Hard Drive Protection window. - Select Start > Control Panel > Hardware and Sound > HP ProtectSmart Hard Drive Protection. Additionally, members of an Administrator group can change settings, follow these steps: 1. or - NOTE: Depending on your options for non-Administrator users. ● Determine whether a drive in the system is supported. NOTE: If prompted by User Account Control, click Yes. 2. USB drives include the following tasks: ● Enable and disable HP ProtectSmart Hard Drive Protection. Using external drives Removable external drives...

HP ENVY 15 User Guide - Windows 7
Page 73
External devices Using a USB device NOTE: If your computer, select Start > Control Panel > Network and Sharing Center > View computers and devices. For more USB ports, connect an optional hub. The computer has 2 USB ports, which is displayed in HP QuickWeb mode. You will hear a sound when the device has been detected. Select models also support USB 3.0 devices. Click Apply, and then click OK. 7. CAUTION: To prevent damage to a USB connector, do not pull on your HP ENVY 15 comes equipped...
External devices Using a USB device NOTE: If your computer, select Start > Control Panel > Network and Sharing Center > View computers and devices. For more USB ports, connect an optional hub. The computer has 2 USB ports, which is displayed in HP QuickWeb mode. You will hear a sound when the device has been detected. Select models also support USB 3.0 devices. Click Apply, and then click OK. 7. CAUTION: To prevent damage to a USB connector, do not pull on your HP ENVY 15 comes equipped...
HP ENVY 15 User Guide - Windows 7
Page 98
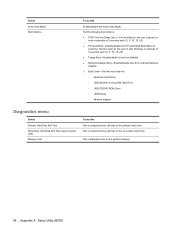
...; Notebook Hard Drive ◦ USB Diskette on Key/USB Hard Drive ◦ USB CD/DVD ROM Drive ◦ USB Floppy ◦ Network adapter Diagnostics menu Select Primary Hard Disk Self Test Secondary Hard Disk Self Test (select models only) Memory Test To do this Run a comprehensive self-test on the primary hard drive. Run a comprehensive self-test on the system memory. 88 Appendix A Setup Utility (BIOS) Select Action Key Mode Boot Options To do this Enable/disable the Action Key Mode. Set the delay for the user to start Windows...
...; Notebook Hard Drive ◦ USB Diskette on Key/USB Hard Drive ◦ USB CD/DVD ROM Drive ◦ USB Floppy ◦ Network adapter Diagnostics menu Select Primary Hard Disk Self Test Secondary Hard Disk Self Test (select models only) Memory Test To do this Run a comprehensive self-test on the primary hard drive. Run a comprehensive self-test on the system memory. 88 Appendix A Setup Utility (BIOS) Select Action Key Mode Boot Options To do this Enable/disable the Action Key Mode. Set the delay for the user to start Windows...
HP ENVY 15 User Guide - Windows 7
Page 100
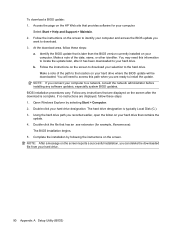
To download a BIOS update: 1. BIOS installation procedures vary. Using the hard drive path you connect your computer. The BIOS installation begins. 5. Complete the installation by selecting Start > Computer. 2. Identify the BIOS update that is later than the BIOS version currently installed on the screen. Make a note of the path to the location on your hard drive. 90 Appendix A Setup Utility (BIOS) b. Open Windows Explorer by following the instructions on your computer to a network, consult the network administrator before installing any instructions that has...
To download a BIOS update: 1. BIOS installation procedures vary. Using the hard drive path you connect your computer. The BIOS installation begins. 5. Complete the installation by selecting Start > Computer. 2. Identify the BIOS update that is later than the BIOS version currently installed on the screen. Make a note of the path to the location on your hard drive. 90 Appendix A Setup Utility (BIOS) b. Open Windows Explorer by following the instructions on your computer to a network, consult the network administrator before installing any instructions that has...
HP ENVY 15 User Guide - Windows 7
Page 103
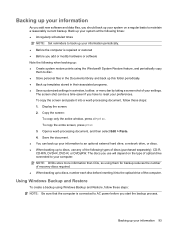
... an optional external hard drive, a network drive, or discs. ● When backing up to discs, use will depend on a regular basis to back up your settings. The discs you use any of the following when backing up: ● Create system restore points using Windows Backup and Restore, follow these steps: NOTE: Be sure that the computer is repaired or restored ● Before you add or modify hardware or software Note the following types...
... an optional external hard drive, a network drive, or discs. ● When backing up to discs, use will depend on a regular basis to back up your settings. The discs you use any of the following when backing up: ● Create system restore points using Windows Backup and Restore, follow these steps: NOTE: Be sure that the computer is repaired or restored ● Before you add or modify hardware or software Note the following types...
HP ENVY 15 User Guide - Windows 7
Page 108
... key mode 88 action keys adjusting volume 26 audio CD, DVD, or BD controls 26 decreasing screen brightness 25 Help and Support 25 identifying 5 increasing screen brightness 25 muting speaker sound 26 QuickLock 26 switching screen image 26 using 25 volume 29 adaptive brightness, using 39 administrator password creating 78 entering 78 managing 78 airport security devices 58 ambient light sensor adaptive brightness 39 identifying 9 using 39 webcam IR light 39 antennas 9 antivirus software, using 80 audio devices, connecting external 32 audio functions, checking 32 audio-in (microphone) jack...
... key mode 88 action keys adjusting volume 26 audio CD, DVD, or BD controls 26 decreasing screen brightness 25 Help and Support 25 identifying 5 increasing screen brightness 25 muting speaker sound 26 QuickLock 26 switching screen image 26 using 25 volume 29 adaptive brightness, using 39 administrator password creating 78 entering 78 managing 78 airport security devices 58 ambient light sensor adaptive brightness 39 identifying 9 using 39 webcam IR light 39 antennas 9 antivirus software, using 80 audio devices, connecting external 32 audio functions, checking 32 audio-in (microphone) jack...
HP ENVY 15 User Guide - Windows 7
Page 109
D default settings, restoring 86 Diagnostics menu 88 digital card inserting 65 removing 66 supported formats 65 Digital Media Slot, identifying 6 Disk Cleanup software 58 Disk Defragmenter software 58 diskette drive 60 display image, switching 26 drive light 8, 59 drive media 41 drives boot order 88 connecting external 60 diskette 60 external 60 hard 60 optical 60 DVD drive 60 E encryption 17 entering a power-on password 79 entering an administrator password 78 eSATA cable, connecting 64 eSATA devices connecting 64 removing 64 eSATA port, identifying 7 esc key, identifying 6 external audio ...
D default settings, restoring 86 Diagnostics menu 88 digital card inserting 65 removing 66 supported formats 65 Digital Media Slot, identifying 6 Disk Cleanup software 58 Disk Defragmenter software 58 diskette drive 60 display image, switching 26 drive light 8, 59 drive media 41 drives boot order 88 connecting external 60 diskette 60 external 60 hard 60 optical 60 DVD drive 60 E encryption 17 entering a power-on password 79 entering an administrator password 78 eSATA cable, connecting 64 eSATA devices connecting 64 removing 64 eSATA port, identifying 7 esc key, identifying 6 external audio ...

HP ENVY 15 User Guide - Windows 7
Page 110
... (network jack), identifying 7 rotating TouchPad gesture 24 S screen brightness keys 25 screen image, switching 26 scrolling TouchPad gesture 24 secondary hard disk self test 88 security cable slot, identifying 6 security cable, installing 83 Security menu 87 security, wireless 16 serial number, computer 11 service tag 11 setup of WLAN 16 Setup Utility changing the language 85 displaying system information 86 exiting 86 menus 87 navigating 85 passwords set in 77 restoring default settings 86 selecting 85 starting 84 shared drives 31 shutdown 56 Sleep...
... (network jack), identifying 7 rotating TouchPad gesture 24 S screen brightness keys 25 screen image, switching 26 scrolling TouchPad gesture 24 secondary hard disk self test 88 security cable slot, identifying 6 security cable, installing 83 Security menu 87 security, wireless 16 serial number, computer 11 service tag 11 setup of WLAN 16 Setup Utility changing the language 85 displaying system information 86 exiting 86 menus 87 navigating 85 passwords set in 77 restoring default settings 86 selecting 85 starting 84 shared drives 31 shutdown 56 Sleep...


