HP ENVY 15 - Maintenance and Service Guide
Page 82
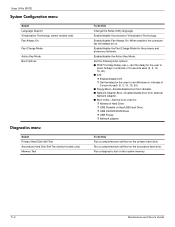
...; Floppy Boot-Enable/disable boot from diskette. ■ Network Adapter Boot-Enable/disable boot from external Network Adapter. ■ Boot Order-Set the boot order for the primary and accessory batteries. Enable/disable the Fast Charge Mode for : ❐ Notebook Hard Drive ❐ USB Diskette on Key/USB Hard Drive ❐ USB CD/DVD ROM Drive ❐ USB Floppy ❐ Network adapter To do this Run a comprehensive self-test on . When enabled, the computer fan will always be on the primary hard drive. Setup Utility (BIOS) System Configuration menu Select Language Support...
...; Floppy Boot-Enable/disable boot from diskette. ■ Network Adapter Boot-Enable/disable boot from external Network Adapter. ■ Boot Order-Set the boot order for the primary and accessory batteries. Enable/disable the Fast Charge Mode for : ❐ Notebook Hard Drive ❐ USB Diskette on Key/USB Hard Drive ❐ USB CD/DVD ROM Drive ❐ USB Floppy ❐ Network adapter To do this Run a comprehensive self-test on . When enabled, the computer fan will always be on the primary hard drive. Setup Utility (BIOS) System Configuration menu Select Language Support...
HP ENVY 15 - Maintenance and Service Guide
Page 84
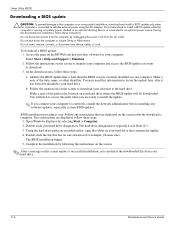
... the screen reports a successful installation, you are displayed on the screen after it has been downloaded to your hard drive where the BIOS update will need this path when you can delete the downloaded file from your hard drive. 5-6 Maintenance and Service Guide Do not download or install a BIOS update while the computer is connected to reliable external power using the AC adapter. To download a BIOS update: 1. Do not shut down the computer or initiate Sleep or Hibernation. Setup Utility (BIOS) Downloading a BIOS update Ä...
... the screen reports a successful installation, you are displayed on the screen after it has been downloaded to your hard drive where the BIOS update will need this path when you can delete the downloaded file from your hard drive. 5-6 Maintenance and Service Guide Do not download or install a BIOS update while the computer is connected to reliable external power using the AC adapter. To download a BIOS update: 1. Do not shut down the computer or initiate Sleep or Hibernation. Setup Utility (BIOS) Downloading a BIOS update Ä...

HP ENVY 15 - Maintenance and Service Guide
Page 127
... an update 5-6 updating 5-5 Bluetooth module removal 4-35 spare part number 3-10, 3-14, 4-35 Bluetooth module cable removal 4-39 spare part number 3-10, 3-17, 4-39 Maintenance and Service Guide Index Blu-ray ROM DVD±R/RW SuperMulti Double-Layer Drive precautions 4-2 spare part number 3-12, 3-16, 3-17 specifications 6-5 Boot Options 5-4 bottom components 2-10 button components 2-3 buttons power 2-3 TouchPad 2-7 TouchPad on/off 2-7 C cables, service considerations 4-1 calculator key 2-4 caps lock light 2-5 chipset, product description 1-1 components bottom 2-10 button 2-3 display 2-2 front...
... an update 5-6 updating 5-5 Bluetooth module removal 4-35 spare part number 3-10, 3-14, 4-35 Bluetooth module cable removal 4-39 spare part number 3-10, 3-17, 4-39 Maintenance and Service Guide Index Blu-ray ROM DVD±R/RW SuperMulti Double-Layer Drive precautions 4-2 spare part number 3-12, 3-16, 3-17 specifications 6-5 Boot Options 5-4 bottom components 2-10 button components 2-3 buttons power 2-3 TouchPad 2-7 TouchPad on/off 2-7 C cables, service considerations 4-1 calculator key 2-4 caps lock light 2-5 chipset, product description 1-1 components bottom 2-10 button 2-3 display 2-2 front...
HP ENVY 15 - Maintenance and Service Guide
Page 129
... 9-1 location 2-9 model description 3-2, 4-5 mute light 2-5 N network jack connector pinout 9-3 location 2-9 O operating system, product description 1-4 optical drive precautions 4-2 product description 1-2 Maintenance and Service Guide Index spare part numbers 3-12, 3-16, 3-17 specifications 6-5, 6-6 P packing guidelines 4-3 part number description 3-2, 4-5 plastic parts 4-1 Plastics Kit, spare part number 3-8, 3-17 pointing device, product description 1-4 ports eSATA/USB 2-9 HDMI 2-9 product description 1-4 Universal Serial Bus (USB) 2-9 power button 2-3 power button board and cable removal...
... 9-1 location 2-9 model description 3-2, 4-5 mute light 2-5 N network jack connector pinout 9-3 location 2-9 O operating system, product description 1-4 optical drive precautions 4-2 product description 1-2 Maintenance and Service Guide Index spare part numbers 3-12, 3-16, 3-17 specifications 6-5, 6-6 P packing guidelines 4-3 part number description 3-2, 4-5 plastic parts 4-1 Plastics Kit, spare part number 3-8, 3-17 pointing device, product description 1-4 ports eSATA/USB 2-9 HDMI 2-9 product description 1-4 Universal Serial Bus (USB) 2-9 power button 2-3 power button board and cable removal...

HP ENVY 15 - Maintenance and Service Guide
Page 130
... Hard Disk Self Test 5-4 security cable slot 2-9 Security menu 5-3 security, product description 1-4 serial number 3-2, 4-5 service considerations 4-1 service tag 3-1, 4-5 serviceability, product description 1-4 Setup Utility changing the lanuage 5-1 Diagnostics menu 5-4 displaying system information 5-2 exiting 5-3 Main menu 5-3 menus 5-3 navigating 5-2 restoring default settings 5-2 Security menu 5-3 selecting 5-2 starting 5-1 System Configuration menu 5-4 using 5-1 speaker assembly removal 4-14 spare part number 3-7, 3-17, 4-14 speaker, location 2-8, 2-9 specifications Blu-ray ROM DVD...
... Hard Disk Self Test 5-4 security cable slot 2-9 Security menu 5-3 security, product description 1-4 serial number 3-2, 4-5 service considerations 4-1 service tag 3-1, 4-5 serviceability, product description 1-4 Setup Utility changing the lanuage 5-1 Diagnostics menu 5-4 displaying system information 5-2 exiting 5-3 Main menu 5-3 menus 5-3 navigating 5-2 restoring default settings 5-2 Security menu 5-3 selecting 5-2 starting 5-1 System Configuration menu 5-4 using 5-1 speaker assembly removal 4-14 spare part number 3-7, 3-17, 4-14 speaker, location 2-8, 2-9 specifications Blu-ray ROM DVD...

HP Envy 15 User Guide - Windows 7
Page 6
... volume ...30 Using the media activity keys 31 Multimedia software ...32 Using HP MediaSmart software 32 Using multimedia software 32 Installing multimedia software from a disc 33 Audio ...34 Connecting external audio devices 34 Checking your audio functions 34 Using Beats Audio ...35 Video ...36 Connecting an external monitor or projector 36 Connecting an HDMI device 37 Configuring audio for HDMI 38 Webcam ...39 Webcam tips ...39 Adjusting webcam properties 39 Using the ambient light sensor ...41 Using adaptive brightness 41 Using the webcam IR light 41 6 Power management Setting...
... volume ...30 Using the media activity keys 31 Multimedia software ...32 Using HP MediaSmart software 32 Using multimedia software 32 Installing multimedia software from a disc 33 Audio ...34 Connecting external audio devices 34 Checking your audio functions 34 Using Beats Audio ...35 Video ...36 Connecting an external monitor or projector 36 Connecting an HDMI device 37 Configuring audio for HDMI 38 Webcam ...39 Webcam tips ...39 Adjusting webcam properties 39 Using the ambient light sensor ...41 Using adaptive brightness 41 Using the webcam IR light 41 6 Power management Setting...
HP Envy 15 User Guide - Windows 7
Page 7
...59 Handling drives ...59 Improving hard drive performance 60 Using Disk Defragmenter 60 Using Disk Cleanup 60 Using HP ProtectSmart Hard Drive Protection (select models only 61 Identifying HP ProtectSmart Hard Drive Protection status 61 Managing power with a parked hard drive 61 Using HP ProtectSmart Hard Drive Protection software 62 Using external drives ...62 Connecting optional external drives 62 Using the external optical drive (select models only 63 Removing an optical disc when the disc tray will not open 63 Sharing optical drives ...64 External devices ...66 Using a USB device...
...59 Handling drives ...59 Improving hard drive performance 60 Using Disk Defragmenter 60 Using Disk Cleanup 60 Using HP ProtectSmart Hard Drive Protection (select models only 61 Identifying HP ProtectSmart Hard Drive Protection status 61 Managing power with a parked hard drive 61 Using HP ProtectSmart Hard Drive Protection software 62 Using external drives ...62 Connecting optional external drives 62 Using the external optical drive (select models only 63 Removing an optical disc when the disc tray will not open 63 Sharing optical drives ...64 External devices ...66 Using a USB device...

HP Envy 15 User Guide - Windows 7
Page 13
...light (2) Caps lock light (3) Power light (4) Mute light (5) Wireless light Description ● Amber: The TouchPad is off . NOTE: Wireless devices are enabled at the factory. ● Amber: All wireless devices are off . (2) Left TouchPad button* Functions like the left button on an external mouse. (3) Right TouchPad button* Functions like the right button on and off . Lightly press the button and hold for two seconds to turn the TouchPad on an external mouse. *This table describes factory settings. To view and change pointing device preferences, select Start > Devices...
...light (2) Caps lock light (3) Power light (4) Mute light (5) Wireless light Description ● Amber: The TouchPad is off . NOTE: Wireless devices are enabled at the factory. ● Amber: All wireless devices are off . (2) Left TouchPad button* Functions like the left button on an external mouse. (3) Right TouchPad button* Functions like the right button on and off . Lightly press the button and hold for two seconds to turn the TouchPad on an external mouse. *This table describes factory settings. To view and change pointing device preferences, select Start > Devices...
HP Envy 15 User Guide - Windows 7
Page 30
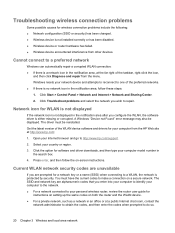
... network Click Start > Control Panel > Network and Internet > Network and Sharing Center. 2. The driver must have the current codes to http://www.hp.com/support. 2. Open your Internet browser and go to make a connection on a secure network. You must be displayed. A Windows "Device not Found" error message may also be reinstalled. Troubleshooting wireless connection problems Some possible causes for your computer from the HP Web site at http://www.hp.com: 1. Network icon for software and driver downloads, and then type...
... network Click Start > Control Panel > Network and Internet > Network and Sharing Center. 2. The driver must have the current codes to http://www.hp.com/support. 2. Open your Internet browser and go to make a connection on a secure network. You must be displayed. A Windows "Device not Found" error message may also be reinstalled. Troubleshooting wireless connection problems Some possible causes for your computer from the HP Web site at http://www.hp.com: 1. Network icon for software and driver downloads, and then type...

HP Envy 15 User Guide - Windows 7
Page 33
... button configuration, click speed, and pointer options. Double-click on page 2. NOTE: Your computer also supports additional TouchPad features that are enabled at the far right of the taskbar, and then click the Device Settings tab. 2. Then, right-click the device representing your computer, and select Mouse settings. Using the TouchPad To move the pointer, touch and slide one finger across the TouchPad surface in Windows...
... button configuration, click speed, and pointer options. Double-click on page 2. NOTE: Your computer also supports additional TouchPad features that are enabled at the far right of the taskbar, and then click the Device Settings tab. 2. Then, right-click the device representing your computer, and select Mouse settings. Using the TouchPad To move the pointer, touch and slide one finger across the TouchPad surface in Windows...

HP Envy 15 User Guide - Windows 7
Page 51
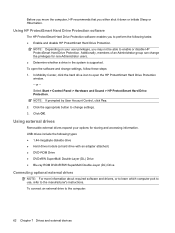
... Start > Control Panel > Hardware and Sound > Location and Other Sensors. 2. Select Start > Control Panel > System and Security > Power Options. 2. Click Change plan setting, and then click Change advanced power settings. 3. Using the webcam IR light The webcam IR light improves the webcam picture quality in low-light conditions. To disable or reenable the webcam IR light: 1. In HP MediaSmart Webcam, select Settings > Display > Advanced Settings, and then click the Camera Control tab. To disable or reenable adaptive brightness: NOTE: The ambient light sensor must be activated...
... Start > Control Panel > Hardware and Sound > Location and Other Sensors. 2. Select Start > Control Panel > System and Security > Power Options. 2. Click Change plan setting, and then click Change advanced power settings. 3. Using the webcam IR light The webcam IR light improves the webcam picture quality in low-light conditions. To disable or reenable the webcam IR light: 1. In HP MediaSmart Webcam, select Settings > Display > Advanced Settings, and then click the Camera Control tab. To disable or reenable adaptive brightness: NOTE: The ambient light sensor must be activated...

HP Envy 15 User Guide - Windows 7
Page 53
... power button. ● Close the display. ● Click Start, click the arrow next to memory, letting you can be changed using Power Options in Windows® Control Panel. Power settings and timeouts can initiate Sleep in the Sleep state, the computer initiates Hibernation. 6 Power management Setting power devices Using power-saving states The computer has two power-saving states enabled at the factory to initiate Sleep after 15 minutes of inactivity when running on the keyboard. ● Activate the TouchPad. Your work...
... power button. ● Close the display. ● Click Start, click the arrow next to memory, letting you can be changed using Power Options in Windows® Control Panel. Power settings and timeouts can initiate Sleep in the Sleep state, the computer initiates Hibernation. 6 Power management Setting power devices Using power-saving states The computer has two power-saving states enabled at the factory to initiate Sleep after 15 minutes of inactivity when running on the keyboard. ● Activate the TouchPad. Your work...

HP Envy 15 User Guide - Windows 7
Page 62
.... Managing low battery levels The information in a cool, dry location. Tips for a critical battery level: ● If Hibernation is enabled and the computer is on the display. ● Check the Power saver setting in Power Options. ● Remove the battery from the computer when it is fully charged. NOTE: For additional information on the battery meter, refer to external power and the battery is not being used or charged...
.... Managing low battery levels The information in a cool, dry location. Tips for a critical battery level: ● If Hibernation is enabled and the computer is on the display. ● Check the Power saver setting in Power Options. ● Remove the battery from the computer when it is fully charged. NOTE: For additional information on the battery meter, refer to external power and the battery is not being used or charged...

HP Envy 15 User Guide - Windows 7
Page 70
...-state drives. To run Disk Cleanup: 1. Improving hard drive performance Using Disk Defragmenter As you use X-rays instead of information, observe these precautions: Before you can run Disk Defragmenter on -screen instructions. 60 Chapter 7 Drives and external devices Select Start > All Programs > Accessories > System Tools > Disk Defragmenter. 2. When the battery is sufficiently charged before writing to Help and Support for your computer. Refer to media. do not drop a drive or...
...-state drives. To run Disk Cleanup: 1. Improving hard drive performance Using Disk Defragmenter As you use X-rays instead of information, observe these precautions: Before you can run Disk Defragmenter on -screen instructions. 60 Chapter 7 Drives and external devices Select Start > All Programs > Accessories > System Tools > Disk Defragmenter. 2. When the battery is sufficiently charged before writing to Help and Support for your computer. Refer to media. do not drop a drive or...
HP Envy 15 User Guide - Windows 7
Page 72
... external devices To open the HP ProtectSmart Hard Drive Protection window. - USB drives include the following tasks: ● Enable and disable HP ProtectSmart Hard Drive Protection. Click the appropriate button to change settings, follow these steps: 1. NOTE: If prompted by User Account Control, click Yes. 2. Using HP ProtectSmart Hard Drive Protection software The HP ProtectSmart Hard Drive Protection software enables you to perform the following types: ● 1.44-megabyte diskette drive ● Hard drive module (a hard drive with an adapter attached) ● DVD-ROM...
... external devices To open the HP ProtectSmart Hard Drive Protection window. - USB drives include the following tasks: ● Enable and disable HP ProtectSmart Hard Drive Protection. Click the appropriate button to change settings, follow these steps: 1. NOTE: If prompted by User Account Control, click Yes. 2. Using HP ProtectSmart Hard Drive Protection software The HP ProtectSmart Hard Drive Protection software enables you to perform the following types: ● 1.44-megabyte diskette drive ● Hard drive module (a hard drive with an adapter attached) ● DVD-ROM...
HP Envy 15 User Guide - Windows 7
Page 97
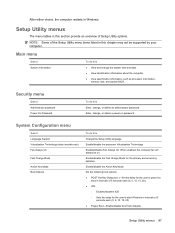
..., memory size, and system BIOS. System Configuration menu Select Language Support Virtualization Technology (select models only) Fan Always On Fast Charge Mode Action Key Mode Boot Options To do this Change the Setup Utility language. NOTE: Some of 5 seconds each (0, 5, 10, 15, 20) ● Floppy Boot―Enable/disable boot from diskette. Enabled/disable Fan Always On. Security menu Select Administrator password Power-On Password To do this Enter, change, or delete an administrator password. Enable/disable the Fast Charge Mode for the user to start Windows in Windows...
..., memory size, and system BIOS. System Configuration menu Select Language Support Virtualization Technology (select models only) Fan Always On Fast Charge Mode Action Key Mode Boot Options To do this Change the Setup Utility language. NOTE: Some of 5 seconds each (0, 5, 10, 15, 20) ● Floppy Boot―Enable/disable boot from diskette. Enabled/disable Fan Always On. Security menu Select Administrator password Power-On Password To do this Enter, change, or delete an administrator password. Enable/disable the Fast Charge Mode for the user to start Windows in Windows...
HP Envy 15 User Guide - Windows 7
Page 100
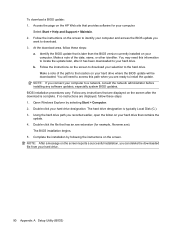
... locate the update later, after the download is typically Local Disk (C:). 3. Double-click your computer to a network, consult the network administrator before installing any instructions that provides software for example, filename.exe). At the download area, follow these steps: a. b. The BIOS installation begins. 5. Access the page on the screen. BIOS installation procedures vary. Using the hard drive path you connect your hard drive designation. Make a note of the path to your hard drive. 90 Appendix A Setup Utility (BIOS...
... locate the update later, after the download is typically Local Disk (C:). 3. Double-click your computer to a network, consult the network administrator before installing any instructions that provides software for example, filename.exe). At the download area, follow these steps: a. b. The BIOS installation begins. 5. Access the page on the screen. BIOS installation procedures vary. Using the hard drive path you connect your hard drive designation. Make a note of the path to your hard drive. 90 Appendix A Setup Utility (BIOS...

HP Envy 15 User Guide - Windows 7
Page 108
...54 action key mode 87 action keys adjusting volume 26 audio CD, DVD, or BD controls 26 decrease screen brightness 26 Help and Support 26 identifying 5 increase screen brightness 26 muting speaker sound 27 QuickLock 27 switching screen image 26 using 26 volume 30 adaptive brightness, using 41 administrator password creating 78 entering 78 managing 78 airport security devices 60 ambient light sensor adaptive brightness 41 identifying 9 using 41 webcam IR light 41 antennas 9 antivirus software, using 80 audio devices, connecting external 34 audio functions, checking 34 audio-in (microphone) jack...
...54 action key mode 87 action keys adjusting volume 26 audio CD, DVD, or BD controls 26 decrease screen brightness 26 Help and Support 26 identifying 5 increase screen brightness 26 muting speaker sound 27 QuickLock 27 switching screen image 26 using 26 volume 30 adaptive brightness, using 41 administrator password creating 78 entering 78 managing 78 airport security devices 60 ambient light sensor adaptive brightness 41 identifying 9 using 41 webcam IR light 41 antennas 9 antivirus software, using 80 audio devices, connecting external 34 audio functions, checking 34 audio-in (microphone) jack...

HP Envy 15 User Guide - Windows 7
Page 109
... security updates, installing 82 D default settings, restoring 86 Diagnostics menu 88 digital card inserting 68 removing 69 supported formats 68 Digital Media Slot, identifying 6 Disk Cleanup software 60 Disk Defragmenter software 60 diskette drive 62 display image, switching 26 drive light 8, 61 drive media 43 drives boot order 87 connecting external 62 diskette 62 external 62 hard 62 optical 62 DVD drive 62 E encryption 17 entering a power-on password 79 entering an administrator password 78 eSATA cable, connecting 67 eSATA devices connecting 67 removing 67 eSATA port identifying 7 esc key...
... security updates, installing 82 D default settings, restoring 86 Diagnostics menu 88 digital card inserting 68 removing 69 supported formats 68 Digital Media Slot, identifying 6 Disk Cleanup software 60 Disk Defragmenter software 60 diskette drive 62 display image, switching 26 drive light 8, 61 drive media 43 drives boot order 87 connecting external 62 diskette 62 external 62 hard 62 optical 62 DVD drive 62 E encryption 17 entering a power-on password 79 entering an administrator password 78 eSATA cable, connecting 67 eSATA devices connecting 67 removing 67 eSATA port identifying 7 esc key...
HP Envy 15 User Guide - Windows 7
Page 110
... (network jack), identifying 7 rotating TouchPad gesture 24 S screen brightness keys 26 screen image, switching 26 scrolling TouchPad gesture 24 secondary hard disk self test 88 security cable slot, identifying 6 security cable, installing 83 Security menu 87 security, wireless 16 serial number, computer 11 service tag 11 setup of WLAN 16 Setup Utility changing the language 85 displaying system information 86 exiting 86 menus 87 navigating 85 passwords set in 77 restoring default settings 86 selecting 85 starting 84 shared drives 64 shutdown 58 Sleep...
... (network jack), identifying 7 rotating TouchPad gesture 24 S screen brightness keys 26 screen image, switching 26 scrolling TouchPad gesture 24 secondary hard disk self test 88 security cable slot, identifying 6 security cable, installing 83 Security menu 87 security, wireless 16 serial number, computer 11 service tag 11 setup of WLAN 16 Setup Utility changing the language 85 displaying system information 86 exiting 86 menus 87 navigating 85 passwords set in 77 restoring default settings 86 selecting 85 starting 84 shared drives 64 shutdown 58 Sleep...


