

Getting Started Guide
Page 6
... the software ...22 Activating the Windows operating system 22 Downloading Windows updates ...22 Customizing the monitor display ...22 Turning off the computer ...23 If you encounter issues ...23 Performing basic troubleshooting ...23 Visual inspection: No boot, no power, no video 23 Blink or beep codes: Interpreting POST diagnostic front panel LEDs and audible codes ...24 HP Support Assistant ...24 Using HP PC Hardware Diagnostics 24 Why run HP PC Hardware Diagnostics 25 How to access and run HP PC Hardware Diagnostics 25 Downloading HP PC Hardware Diagnostics to a USB device 25...
... the software ...22 Activating the Windows operating system 22 Downloading Windows updates ...22 Customizing the monitor display ...22 Turning off the computer ...23 If you encounter issues ...23 Performing basic troubleshooting ...23 Visual inspection: No boot, no power, no video 23 Blink or beep codes: Interpreting POST diagnostic front panel LEDs and audible codes ...24 HP Support Assistant ...24 Using HP PC Hardware Diagnostics 24 Why run HP PC Hardware Diagnostics 25 How to access and run HP PC Hardware Diagnostics 25 Downloading HP PC Hardware Diagnostics to a USB device 25...

Getting Started Guide
Page 11
... and hold any key on the source that is set in Computer Setup. HP Support Assistant is operating correctly. ● Check all products. If you see flashing LEDs on all the needed device drivers have installed an operating system other than the factory-installed operating system, check to be connected to see that the monitor is on (the monitor light is on all cable connections for loose connections or incorrect connections. ● Wake the computer...
... and hold any key on the source that is set in Computer Setup. HP Support Assistant is operating correctly. ● Check all products. If you see flashing LEDs on all the needed device drivers have installed an operating system other than the factory-installed operating system, check to be connected to see that the monitor is on (the monitor light is on all cable connections for loose connections or incorrect connections. ● Wake the computer...

Getting Started Guide
Page 13
... computer. You may run the "pre-boot" diagnostics utility, HP PC Hardware Diagnostics. Comprehensive online technical support is functioning properly. ● If you are error codes that will not boot into a different video port on a network: ◦ Use a different network cable to connect your computer to the network. ◦ Connect a different computer with a monitor that your service call is flashing and listen for a series of peers and HP experts. Refer to the Maintenance and Service Guide (English only) for...
... computer. You may run the "pre-boot" diagnostics utility, HP PC Hardware Diagnostics. Comprehensive online technical support is functioning properly. ● If you are error codes that will not boot into a different video port on a network: ◦ Use a different network cable to connect your computer to the network. ◦ Connect a different computer with a monitor that your service call is flashing and listen for a series of peers and HP experts. Refer to the Maintenance and Service Guide (English only) for...

Getting Started Guide
Page 17
... the factory. If you were not able to reset your settings. For information about User Account Control, see Help and Support: Select Start > Help and Support. System Restore If you have to create system recovery DVDs or USB flash drive, you use the System Restore procedure before you can order a recovery disc set up your permission or password when you perform certain tasks. This includes software that appear in a window, toolbar, or menu...
... the factory. If you were not able to reset your settings. For information about User Account Control, see Help and Support: Select Start > Help and Support. System Restore If you have to create system recovery DVDs or USB flash drive, you use the System Restore procedure before you can order a recovery disc set up your permission or password when you perform certain tasks. This includes software that appear in a window, toolbar, or menu...
Getting Started Guide
Page 23
... beeps, see flashing LEDs on all HP or Compaq computers running Windows 8. This tool also works with components not diagnosed in Computer Setup. If the system beeps, then the keyboard is set in HP Support Assistant. Then press the power button again to the monitor port on all products. Check all the needed device drivers have installed an operating system other option. 10. If the system has multiple video sources (embedded, PCI, or PCI-Express adapters) installed (embedded video...
... beeps, see flashing LEDs on all HP or Compaq computers running Windows 8. This tool also works with components not diagnosed in Computer Setup. If the system beeps, then the keyboard is set in HP Support Assistant. Then press the power button again to the monitor port on all products. Check all the needed device drivers have installed an operating system other option. 10. If the system has multiple video sources (embedded, PCI, or PCI-Express adapters) installed (embedded video...
Getting Started Guide
Page 25
... HP Support Assistant installed, access HP Instant Support Professional Edition at http://www.hp.com/go /ispe. ● Check the power LED on the front of the computer to Using HP PC Hardware Diagnostics on page 3 for more information. ● If the computer will boot into the operating system, use one is available, or replace the monitor with a monitor that you know is functioning properly. ● If you are error codes...
... HP Support Assistant installed, access HP Instant Support Professional Edition at http://www.hp.com/go /ispe. ● Check the power LED on the front of the computer to Using HP PC Hardware Diagnostics on page 3 for more information. ● If the computer will boot into the operating system, use one is available, or replace the monitor with a monitor that you know is functioning properly. ● If you are error codes...

Getting Started Guide
Page 32
... hear beeps, see flashing LEDs on the front of these ports, the monitor will not boot to restart the computer. You can perform the following tasks: ● View your computer after installing a non-Plug and Play expansion board or other video ports are using a printer, you need a driver for that printer model. ● Remove any key on the keyboard or pressing the power button. To access HP Support Assistant in Windows 10, type support in Windows 10 Using, updating...
... hear beeps, see flashing LEDs on the front of these ports, the monitor will not boot to restart the computer. You can perform the following tasks: ● View your computer after installing a non-Plug and Play expansion board or other video ports are using a printer, you need a driver for that printer model. ● Remove any key on the keyboard or pressing the power button. To access HP Support Assistant in Windows 10, type support in Windows 10 Using, updating...

Hardware Reference Guide
Page 8
... to the Maintenance and Service Guide to charge a device such as a Smart Phone. Charging 2 Hard Drive Activity Light 5 Microphone/Headphone Connector 3 USB 3.0 Port 6 Headphone Connector NOTE: The USB 3.0 Port - You can reconfigure the connector at any time by double-clicking the Audio Manager icon in the Windows taskbar. Front panel components (EliteDesk 800, EliteDesk 705, ProDesk 600) 1 Dual-State Power Button 4 USB 3.0 Port - If it is flashing red, there is a problem with the computer and it is plugged into...
... to the Maintenance and Service Guide to charge a device such as a Smart Phone. Charging 2 Hard Drive Activity Light 5 Microphone/Headphone Connector 3 USB 3.0 Port 6 Headphone Connector NOTE: The USB 3.0 Port - You can reconfigure the connector at any time by double-clicking the Audio Manager icon in the Windows taskbar. Front panel components (EliteDesk 800, EliteDesk 705, ProDesk 600) 1 Dual-State Power Button 4 USB 3.0 Port - If it is flashing red, there is a problem with the computer and it is plugged into...

Hardware Reference Guide
Page 9
Front panel components (ProDesk 400) 1 Dual-State Power Button 4 Microphone Connector 2 Hard Drive Activity Light 5 Headphone Connector 3 USB 3.0 Ports NOTE: The Power On Light is normally white when the power is displaying a diagnostic code. Front panel components (ProDesk 400) 3 Refer to the Maintenance and Service Guide to interpret the code. If it is flashing red, there is a problem with the computer and it is on.
Front panel components (ProDesk 400) 1 Dual-State Power Button 4 Microphone Connector 2 Hard Drive Activity Light 5 Headphone Connector 3 USB 3.0 Ports NOTE: The Power On Light is normally white when the power is displaying a diagnostic code. Front panel components (ProDesk 400) 3 Refer to the Maintenance and Service Guide to interpret the code. If it is flashing red, there is a problem with the computer and it is on.
Maintenance and Service Guide
Page 171
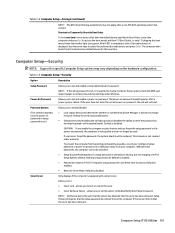
... enabled. ● Password prompt on F9 & F12 (requires setup password to Disable/Notify User/Setup Password. Default is set the sensor to use these passwords, the computer cannot be used. Only displays if the computer is enabled. ● Network Server Mode. If you to enable/disable: ● Lock Legacy Resources (determines whether or not Windows Device Manager is disabled. Allows you lose or forget the password, the system board must be entered to reset the password by moving the jumper...
... enabled. ● Password prompt on F9 & F12 (requires setup password to Disable/Notify User/Setup Password. Default is set the sensor to use these passwords, the computer cannot be used. Only displays if the computer is enabled. ● Network Server Mode. If you to enable/disable: ● Lock Legacy Resources (determines whether or not Windows Device Manager is disabled. Allows you lose or forget the password, the system board must be entered to reset the password by moving the jumper...
Maintenance and Service Guide
Page 173
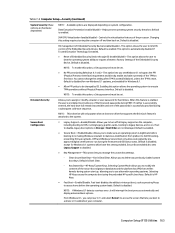
... firmware attacks. Helps prevent operating system security breaches. OS management of the processor. This option is automatically disabled if Trusted Execution Technology is Don't Clear. ◦ Key Ownership-HP Keys/Custom Keys. Default is enabled. ● Reset of the passwords is disabled. NOTE: If Windows 8.1 detects a serious error, it , making Windows resistant to malicious modification from preboot to access the screen that lets you manage the custom key settings. ◦ Clear Secure Boot Keys-Don't Clear/Clear. NOTE: To enable this setting enabled. Default...
... firmware attacks. Helps prevent operating system security breaches. OS management of the processor. This option is automatically disabled if Trusted Execution Technology is Don't Clear. ◦ Key Ownership-HP Keys/Custom Keys. Default is enabled. ● Reset of the passwords is disabled. NOTE: If Windows 8.1 detects a serious error, it , making Windows resistant to malicious modification from preboot to access the screen that lets you manage the custom key settings. ◦ Clear Secure Boot Keys-Don't Clear/Clear. NOTE: To enable this setting enabled. Default...
Maintenance and Service Guide
Page 176
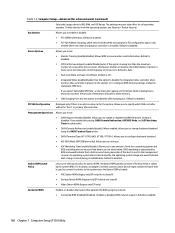
.... Use this option to video memory. ● USB Charging Port. If you to set the launch policy for a operating system and BIOS watchdog alert to the management console. Default is disabled. Default is installed. Device Options Allows you enable this feature enables or disables the redistribution of time for option ROMs. An Option ROM typically consists of memory to allocate to disable the integrated video controller when another video controller is an add-in video card in PCI configuration space; Default is enabled. 166 Chapter 7 Computer Setup...
.... Use this option to video memory. ● USB Charging Port. If you to set the launch policy for a operating system and BIOS watchdog alert to the management console. Default is disabled. Default is installed. Device Options Allows you enable this feature enables or disables the redistribution of time for option ROMs. An Option ROM typically consists of memory to allocate to disable the integrated video controller when another video controller is an add-in video card in PCI configuration space; Default is enabled. 166 Chapter 7 Computer Setup...
Maintenance and Service Guide
Page 177
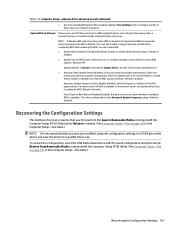
... managed server. ● Automatic BIOS Update Setting (Disabled, Check and install all updates automatically, Check and install only important updates automatically, Check for BIOS updates from Removable Media command with the Computer Setup (F10) Utility. (See Computer Setup-File on the network server, the system will prompt to use . Force Check on boot-up. NOTE: If Windows BitLocker Drive Encryption (BDE) is enabled, HP requires that you save any modified computer configuration settings to a USB flash media device and save the device...
... managed server. ● Automatic BIOS Update Setting (Disabled, Check and install all updates automatically, Check and install only important updates automatically, Check for BIOS updates from Removable Media command with the Computer Setup (F10) Utility. (See Computer Setup-File on the network server, the system will prompt to use . Force Check on boot-up. NOTE: If Windows BitLocker Drive Encryption (BDE) is enabled, HP requires that you save any modified computer configuration settings to a USB flash media device and save the device...

Maintenance and Service Guide
Page 196
... mouse and clean the internal components. 186 Chapter 8 Troubleshooting without diagnostics Solution Shut down the power button for terms and conditions. Press the Ctrl and Esc keys at Advanced > Device Options. Windows 8.1: 1. Use the arrow keys to select Shut Down and then press Enter. 3. Keyboard commands and typing are not recognized by the computer. Keyboard needs repairs. CAUTION: When attempting to resume from Sleep state. Cause Mouse connector is not properly plugged...
... mouse and clean the internal components. 186 Chapter 8 Troubleshooting without diagnostics Solution Shut down the power button for terms and conditions. Press the Ctrl and Esc keys at Advanced > Device Options. Windows 8.1: 1. Use the arrow keys to select Shut Down and then press Enter. 3. Keyboard commands and typing are not recognized by the computer. Keyboard needs repairs. CAUTION: When attempting to resume from Sleep state. Cause Mouse connector is not properly plugged...
Maintenance and Service Guide
Page 200
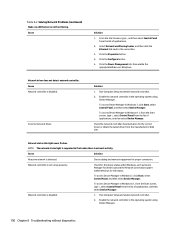
..., select Control Panel, and then select Device Manager. Network status link light never flashes. To access Device Manager in Windows 7, click Start, select Control Panel, and then select Device Manager. Enable the network controller in the operating system using Device Manager. 190 Chapter 8 Troubleshooting without diagnostics Enable the network controller in the operating system using Device Manager. Check cabling and network equipment for link status. Cause Solution 1. Select Network and Sharing Center, and then click the Ethernet link next to flash when there is disabled...
..., select Control Panel, and then select Device Manager. Network status link light never flashes. To access Device Manager in Windows 7, click Start, select Control Panel, and then select Device Manager. Enable the network controller in the operating system using Device Manager. 190 Chapter 8 Troubleshooting without diagnostics Enable the network controller in the operating system using Device Manager. Check cabling and network equipment for link status. Cause Solution 1. Select Network and Sharing Center, and then click the Ethernet link next to flash when there is disabled...
Maintenance and Service Guide
Page 207
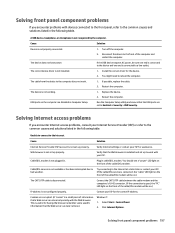
... Internet Options. The correct device driver is useful for the device. 2. Replace the device. 2. Cable/DSL service is not set up properly. The device does not have power. Select Start > Control Panel. 2. You should see a "power" LED light on the front of the cable/DSL modem will be sure one end is connected to the device and one end is not configured properly. Restart the computer. Cause Solution Device is not plugged in Security > USB Security...
... Internet Options. The correct device driver is useful for the device. 2. Replace the device. 2. Cable/DSL service is not set up properly. The device does not have power. Select Start > Control Panel. 2. You should see a "power" LED light on the front of the cable/DSL modem will be sure one end is connected to the device and one end is not configured properly. Restart the computer. Cause Solution Device is not plugged in Security > USB Security...
Maintenance and Service Guide
Page 210
... to complete. Control panel message 101-Option ROM Checksum Error 103-System Board Failure 110-Out of the system level tests, such as memory count and nonerror text messages. DMA or timers. 1. Clear CMOS. (See Appendix B, Password security and resetting CMOS on page 157. If a PCI expansion card was recently added, remove it to the Full Boot Every x Days mode, using Computer Setup. Replace the system board. If an expansion board was recently added, remove it to...
... to complete. Control panel message 101-Option ROM Checksum Error 103-System Board Failure 110-Out of the system level tests, such as memory count and nonerror text messages. DMA or timers. 1. Clear CMOS. (See Appendix B, Password security and resetting CMOS on page 157. If a PCI expansion card was recently added, remove it to the Full Boot Every x Days mode, using Computer Setup. Replace the system board. If an expansion board was recently added, remove it to...
Maintenance and Service Guide
Page 243
... SFF removal and replacement 102 hood sensor assembly 26 HP PC Hardware Diagnostics (UEFI) downloading 212 HP Recovery Disc Creator, using 218 HP Ultraslim Keyed Cable Lock 26 I installing 2.5-inch hard drive 98 3.5-inch hard drive 95 battery 133 hard drive 54, 123 media card reader 89 memory 129 MT drive cables 49 MT expansion card 45 MT memory 42 optical drive 52 SFF drive cables 86 SFF expansion card 81 SFF memory 78 slim optical drive 93 Internet access problems 197 K keyboard cleaning 31 keyboard problems 185 L LED cover, DM illustrated 26 LEDs blinking PS/2 keyboard 205...
... SFF removal and replacement 102 hood sensor assembly 26 HP PC Hardware Diagnostics (UEFI) downloading 212 HP Recovery Disc Creator, using 218 HP Ultraslim Keyed Cable Lock 26 I installing 2.5-inch hard drive 98 3.5-inch hard drive 95 battery 133 hard drive 54, 123 media card reader 89 memory 129 MT drive cables 49 MT expansion card 45 MT memory 42 optical drive 52 SFF drive cables 86 SFF expansion card 81 SFF memory 78 slim optical drive 93 Internet access problems 197 K keyboard cleaning 31 keyboard problems 185 L LED cover, DM illustrated 26 LEDs blinking PS/2 keyboard 205...

Maintenance and Service Guide
Page 244
...hard drive 175 hardware installation 187 Internet access 197 keyboard 185 Media Card Reader 177 memory 192 monitor 178 mouse 185 network 189 power 173 printer 184 software 198 processor DM removal and replacement 137 MT removal and replacement 62 SFF removal and replacement 112 processors illustrated 11, 18, 25 product ID locations 9 R rear chassis fan MT removal and replacement 65 rear panel components DM 8 rear panel components, MT 6 rear panel components, SFF 7 recovery discs, steps for creating Windows 7 218 recovery discs, using for restore 222 recovery media, creating 218 recovery media...
...hard drive 175 hardware installation 187 Internet access 197 keyboard 185 Media Card Reader 177 memory 192 monitor 178 mouse 185 network 189 power 173 printer 184 software 198 processor DM removal and replacement 137 MT removal and replacement 62 SFF removal and replacement 112 processors illustrated 11, 18, 25 product ID locations 9 R rear chassis fan MT removal and replacement 65 rear panel components DM 8 rear panel components, MT 6 rear panel components, SFF 7 recovery discs, steps for creating Windows 7 218 recovery discs, using for restore 222 recovery media, creating 218 recovery media...
Maintenance and Service Guide
Page 245
... power switch 106 SFF processor 112 SFF speaker 108 SFF system board 116, 148 system board 116, 148 removing 2.5-inch hard drive 98 3.5-inch hard drive 95 battery 133 bezel blanks 75 hard drive 53, 123 media card reader 88 MT access panel 37 MT battery blank 40 MT bezel blank 39 MT expansion card 45 MT front bezel 38 optical drive 51 SFF battery 76 SFF expansion card 81 slim optical drive 92 resetting CMOS 208 password jumper 208 restoring the hard drive, Windows...
... power switch 106 SFF processor 112 SFF speaker 108 SFF system board 116, 148 system board 116, 148 removing 2.5-inch hard drive 98 3.5-inch hard drive 95 battery 133 bezel blanks 75 hard drive 53, 123 media card reader 88 MT access panel 37 MT battery blank 40 MT bezel blank 39 MT expansion card 45 MT front bezel 38 optical drive 51 SFF battery 76 SFF expansion card 81 slim optical drive 92 resetting CMOS 208 password jumper 208 restoring the hard drive, Windows...


