HP Notebook Reference Guide
Page 8
... a BIOS administrator password 53 Entering a BIOS administrator password 54 Managing a DriveLock password 55 Using Computer Setup Automatic DriveLock 55 Entering an Automatic... DriveLock password 55 Removing Automatic DriveLock protection 56 Using the fingerprint reader (select models only 57 Using Internet security software ...58 Using antivirus software ...58 Using firewall software ...58 Installing critical security updates ...58 Using HP...
... a BIOS administrator password 53 Entering a BIOS administrator password 54 Managing a DriveLock password 55 Using Computer Setup Automatic DriveLock 55 Entering an Automatic... DriveLock password 55 Removing Automatic DriveLock protection 56 Using the fingerprint reader (select models only 57 Using Internet security software ...58 Using antivirus software ...58 Using firewall software ...58 Installing critical security updates ...58 Using HP...
HP Notebook Reference Guide
Page 9
...Setup 66 Updating the BIOS ...67 Downloading SoftPaqs to update the BIOS 67 Creating a bootable USB flash drive using a SoftPaq 67 BIOS management using system diagnostics 67 Using f10 setup to update the BIOS 68 Determining the BIOS version 68 Downloading a BIOS update 69 BIOS Setup Menu ...69 ... in Computer Setup 74 Dynamically choosing a boot device using the f9 prompt 75 Setting a MultiBoot Express prompt 75 Entering MultiBoot Express preferences 75 Appendix A Traveling with the computer ...76 Appendix B Troubleshooting resources ...78 Appendix C Electrostatic discharge ...79 Index ...80...
...Setup 66 Updating the BIOS ...67 Downloading SoftPaqs to update the BIOS 67 Creating a bootable USB flash drive using a SoftPaq 67 BIOS management using system diagnostics 67 Using f10 setup to update the BIOS 68 Determining the BIOS version 68 Downloading a BIOS update 69 BIOS Setup Menu ...69 ... in Computer Setup 74 Dynamically choosing a boot device using the f9 prompt 75 Setting a MultiBoot Express prompt 75 Entering MultiBoot Express preferences 75 Appendix A Traveling with the computer ...76 Appendix B Troubleshooting resources ...78 Appendix C Electrostatic discharge ...79 Index ...80...
HP Notebook Reference Guide
Page 63
...internal hard drive that enhances and enables other HP ProtectTools Security Manager security features. DriveLock master password* Protects access to select Security > Setup BIOS Administrator Password, and then press enter. 4. Use the arrow keys to its normal HP ProtectTools functions. This password is protected by ...then press esc while the "Press the ESC key for Startup Menu" message is an HP ProtectTools Security Manager password, can be enabled in Computer Setup to provide BIOS password protection in the lower-left corner of the screen, and then follow these passwords, ...
...internal hard drive that enhances and enables other HP ProtectTools Security Manager security features. DriveLock master password* Protects access to select Security > Setup BIOS Administrator Password, and then press enter. 4. Use the arrow keys to its normal HP ProtectTools functions. This password is protected by ...then press esc while the "Press the ESC key for Startup Menu" message is an HP ProtectTools Security Manager password, can be enabled in Computer Setup to provide BIOS password protection in the lower-left corner of the screen, and then follow these passwords, ...
HP Notebook Reference Guide
Page 64
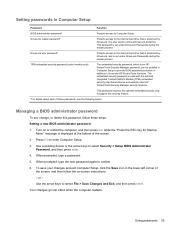
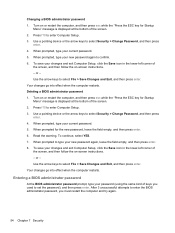
... select YES. 7. When prompted to type your new password again to set the password), and then press enter. Turn on -screen instructions. - Entering a BIOS administrator password At the BIOS administrator password prompt, type your password (using the same kind of the screen. 2. Use a pointing device ...while the "Press the ESC key for the new password, leave the field empty, and then press enter. 6. After 3 unsuccessful attempts to enter the BIOS administrator password, you used to confirm. 6. Turn on -screen instructions. - When prompted, type your current password....
... select YES. 7. When prompted to type your new password again to set the password), and then press enter. Turn on -screen instructions. - Entering a BIOS administrator password At the BIOS administrator password prompt, type your password (using the same kind of the screen. 2. Use a pointing device ...while the "Press the ESC key for the new password, leave the field empty, and then press enter. 6. After 3 unsuccessful attempts to enter the BIOS administrator password, you used to confirm. 6. Turn on -screen instructions. - When prompted, type your current password....
HP Notebook Reference Guide
Page 65
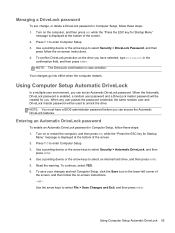
... master password will be used to select File > Save Changes and Exit, and then press enter. Entering an Automatic DriveLock password To enable an Automatic DriveLock password in the lower-left corner of the... click the Save icon in Computer Setup, follow these steps: 1. Use a pointing device or the arrow keys to enter Computer Setup. 3. Read the warning. or - Turn on -screen instructions. 4. NOTE: You must have selected, type... and then press follow the on the drive you have a BIOS administrator password before you . Press f10 to select an internal hard drive, and then press...
... master password will be used to select File > Save Changes and Exit, and then press enter. Entering an Automatic DriveLock password To enable an Automatic DriveLock password in the lower-left corner of the... click the Save icon in Computer Setup, follow these steps: 1. Use a pointing device or the arrow keys to enter Computer Setup. 3. Read the warning. or - Turn on -screen instructions. 4. NOTE: You must have selected, type... and then press follow the on the drive you have a BIOS administrator password before you . Press f10 to select an internal hard drive, and then press...
HP Notebook Reference Guide
Page 75
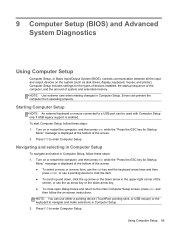
...Computer Setup. To start Computer Setup, follow these steps: 1. Press f10 to enter Computer Setup. Turn on -screen instructions. NOTE: You can prevent the computer from operating properly. 9 Computer Setup (BIOS) and Advanced System Diagnostics Using Computer Setup Computer Setup, or Basic Input/Output ... extended memory. Computer Setup includes settings for Startup Menu" message is displayed at the bottom of the screen. 2. Press f10 to enter Computer Setup. NOTE: Use extreme care when making changes in Computer Setup, follow these steps: 1. Starting Computer Setup NOTE: An ...
...Computer Setup. To start Computer Setup, follow these steps: 1. Press f10 to enter Computer Setup. Turn on -screen instructions. NOTE: You can prevent the computer from operating properly. 9 Computer Setup (BIOS) and Advanced System Diagnostics Using Computer Setup Computer Setup, or Basic Input/Output ... extended memory. Computer Setup includes settings for Startup Menu" message is displayed at the bottom of the screen. 2. Press f10 to enter Computer Setup. NOTE: Use extreme care when making changes in Computer Setup, follow these steps: 1. Starting Computer Setup NOTE: An ...
HP Notebook Reference Guide
Page 76
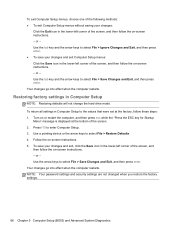
...the arrow keys to select File > Save Changes and Exit, and then press enter. NOTE: Your password settings and security settings are not changed when you restore the factory settings. 66 Chapter 9 Computer Setup (BIOS) and Advanced System Diagnostics Turn on or restart the computer, and then press... corner of the screen. 2. or - Press f10 to select File > Save Changes and Exit, and then press enter. Follow the on -screen instructions. - Use the arrow keys to enter Computer Setup. 3. Restoring factory settings in Computer Setup to select File > Ignore Changes and Exit, and then press...
...the arrow keys to select File > Save Changes and Exit, and then press enter. NOTE: Your password settings and security settings are not changed when you restore the factory settings. 66 Chapter 9 Computer Setup (BIOS) and Advanced System Diagnostics Turn on or restart the computer, and then press... corner of the screen. 2. or - Press f10 to select File > Save Changes and Exit, and then press enter. Follow the on -screen instructions. - Use the arrow keys to enter Computer Setup. 3. Restoring factory settings in Computer Setup to select File > Ignore Changes and Exit, and then press...
HP Notebook Reference Guide
Page 77
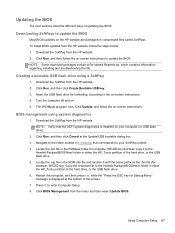
...HP website. 2. Click BIOS Management from the menu and then select Update BIOS. Navigate to the folder located in the ROMpaq folder (for example, 68CDD.sig). Updating the BIOS The next sections describe different ways of the hard drive, or the USB flash drive. 6. NOTE: Verify that corresponds to the on -screen instructions to enter... Computer Setup. 8. Copy the renamed file to update the BIOS Most BIOS updates on your SoftPaq number. 4. Downloading SoftPaqs to the Hewlett-Packard\BIOS\New\ folder in compressed files called ...
...HP website. 2. Click BIOS Management from the menu and then select Update BIOS. Navigate to the folder located in the ROMpaq folder (for example, 68CDD.sig). Updating the BIOS The next sections describe different ways of the hard drive, or the USB flash drive. 6. NOTE: Verify that corresponds to the on -screen instructions to enter... Computer Setup. 8. Copy the renamed file to update the BIOS Most BIOS updates on your SoftPaq number. 4. Downloading SoftPaqs to the Hewlett-Packard\BIOS\New\ folder in compressed files called ...
HP Notebook Reference Guide
Page 78
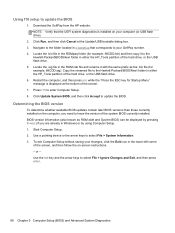
...the Hewlett-Packard\BIOS\New\ folder in Windows) or by pressing fn+esc (if you need to enter Computer Setup. ...BIOS) can be displayed by using Computer Setup. 1. Determining the BIOS version To determine whether available BIOS updates contain later BIOS... versions than those currently installed on your computer (or USB flash drive). 2. Use the tab key and the arrow keys to update the BIOS...BIOS, and then click Accept to select File > Ignore Changes and Exit, and then press enter. 68 Chapter 9 Computer Setup (BIOS...
...the Hewlett-Packard\BIOS\New\ folder in Windows) or by pressing fn+esc (if you need to enter Computer Setup. ...BIOS) can be displayed by using Computer Setup. 1. Determining the BIOS version To determine whether available BIOS updates contain later BIOS... versions than those currently installed on your computer (or USB flash drive). 2. Use the tab key and the arrow keys to update the BIOS...BIOS, and then click Accept to select File > Ignore Changes and Exit, and then press enter. 68 Chapter 9 Computer Setup (BIOS...
HP Notebook Reference Guide
Page 90
...28 administrator password 52 advanced system diagnostics 70 airport security devices 42 antivirus software 58 audio functions, checking 15 Automatic DriveLock password entering 55 removing 56 B battery conserving power 26 discharging 25 displaying remaining charge 25 disposing 27 low battery levels 25 replacing 27 ...USB 36 caring for your computer 60 changing boot order 74 checking audio functions 15 cleaning your computer 60 Computer Setup BIOS administrator password 53 DriveLock password 55 enabling bootable devices 73 navigating and selecting 65 restoring factory settings 66 setting boot ...
...28 administrator password 52 advanced system diagnostics 70 airport security devices 42 antivirus software 58 audio functions, checking 15 Automatic DriveLock password entering 55 removing 56 B battery conserving power 26 discharging 25 displaying remaining charge 25 disposing 27 low battery levels 25 replacing 27 ...USB 36 caring for your computer 60 changing boot order 74 checking audio functions 15 cleaning your computer 60 Computer Setup BIOS administrator password 53 DriveLock password 55 enabling bootable devices 73 navigating and selecting 65 restoring factory settings 66 setting boot ...

HP ProtectTools Getting Started
Page 67
...the drive is instantly decrypted, and after a few minutes, Drive Encryption is deactivated. NOTE: If the Windows administrator has enabled BIOS Pre-boot Security in HP ProtectTools Security Manager and if One-Step Logon is enabled (by default), you can log in to shut down list, and ...from Sleep or Standby, Drive Encryption pre-boot authentication is enrolled, you must log in after Drive Encryption is deactivated. On the Logon page, enter your Windows password or smart card PIN, or swipe a registered finger. 3. NOTE: The following smart cards are supported: Supported smart cards ...
...the drive is instantly decrypted, and after a few minutes, Drive Encryption is deactivated. NOTE: If the Windows administrator has enabled BIOS Pre-boot Security in HP ProtectTools Security Manager and if One-Step Logon is enabled (by default), you can log in to shut down list, and ...from Sleep or Standby, Drive Encryption pre-boot authentication is enrolled, you must log in after Drive Encryption is deactivated. On the Logon page, enter your Windows password or smart card PIN, or swipe a registered finger. 3. NOTE: The following smart cards are supported: Supported smart cards ...
HP ProtectTools Getting Started
Page 70
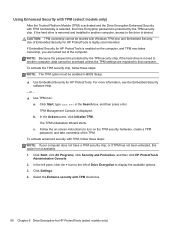
... in BIOS Setup. ▲ Use Embedded Security for HP ProtectTools (select models only) For more information, see the Embedded Security software Help. - Follow the on-screen instructions to display the available options. 3. Click Start, click All Programs, click Security and Protection, and then click HP ProtectTools ...unless the TPM settings are locked out of the TPM. Click Start, type tpm.msc in the Search box, and then press enter. Select the Enhance security with Windows TPM.msc and Embedded Security. To activate enhanced security with TPM, follow these steps: NOTE...
... in BIOS Setup. ▲ Use Embedded Security for HP ProtectTools (select models only) For more information, see the Embedded Security software Help. - Follow the on-screen instructions to display the available options. 3. Click Start, click All Programs, click Security and Protection, and then click HP ProtectTools ...unless the TPM settings are locked out of the TPM. Click Start, type tpm.msc in the Search box, and then press enter. Select the Enhance security with Windows TPM.msc and Embedded Security. To activate enhanced security with TPM, follow these steps: NOTE...

HP ProtectTools Getting Started
Page 119
... method may result in a lockout situation. Windows IMEs not supported at the Preboot Security level or the HP Drive Encryption level 109 Windows maps some IMEs to enter complex characters and symbols, such as described in Microsoft Windows Vista®. Thus, if an IME maps to...layout 00000411: ● Microsoft IME for Japanese ● The Japanese keyboard layout ● Office 2007 IME for the BIOS Preboot Security password prompt or the HP Drive Encryption password prompt, any password typed with this is called Microsoft IME Standard 2002 for IMEs, which actually translates to...
... method may result in a lockout situation. Windows IMEs not supported at the Preboot Security level or the HP Drive Encryption level 109 Windows maps some IMEs to enter complex characters and symbols, such as described in Microsoft Windows Vista®. Thus, if an IME maps to...layout 00000411: ● Microsoft IME for Japanese ● The Japanese keyboard layout ● Office 2007 IME for the BIOS Preboot Security password prompt or the HP Drive Encryption password prompt, any password typed with this is called Microsoft IME Standard 2002 for IMEs, which actually translates to...

HP ProtectTools Getting Started
Page 121
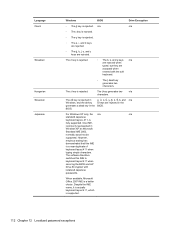
...are and é in the are and é in HP Windows. Numeric passwords must be entered using the numeric keypad. ● Korean When a user selects a supported Korean keyboard layout and then enters a password, the same password must be entered while pressing the right alt key for lower case and the... entered while pressing the shift key for lower case and the shift key and caps lock key for upper case in BIOS Preboot Security and HP Drive Encryption. ● Unsupported characters are rejected. ◦ The æ key on the third row are listed in BIOS Preboot Security and HP Drive...
...are and é in the are and é in HP Windows. Numeric passwords must be entered using the numeric keypad. ● Korean When a user selects a supported Korean keyboard layout and then enters a password, the same password must be entered while pressing the right alt key for lower case and the... entered while pressing the shift key for lower case and the shift key and caps lock key for upper case in BIOS Preboot Security and HP Drive Encryption. ● Unsupported characters are rejected. ◦ The æ key on the third row are listed in BIOS Preboot Security and HP Drive...
HP ProtectTools Getting Started
Page 122
... However, empirical testing has demonstrated that this IME to keyboard layout 411 when securing the BIOS and HP Drive Encryption with the soft keyboard. ◦ The ţ dead key generates two characters. One IME, commonly...is rejected. ◦ The ė, ı, and ż keys are rejected. ◦ The and ŗ keys are rejected. BIOS n/a ◦ The š, ś, and ş keys are rejected when typed, but they are rejected in the generates a ... in and n/a Windows, and the alt key Š keys are accepted when entered with localized Japanese passwords.
... However, empirical testing has demonstrated that this IME to keyboard layout 411 when securing the BIOS and HP Drive Encryption with the soft keyboard. ◦ The ţ dead key generates two characters. One IME, commonly...is rejected. ◦ The ė, ı, and ż keys are rejected. ◦ The and ŗ keys are rejected. BIOS n/a ◦ The š, ś, and ş keys are rejected when typed, but they are rejected in the generates a ... in and n/a Windows, and the alt key Š keys are accepted when entered with localized Japanese passwords.

Regulatory, Safety and Environmental Notices User Guide
Page 9
...) network device, choose the procedure below that applies to the use of the screen. The FCC IDs are uncertain of the policy that corresponds to enter BIOS Setup. 3. For Windows Vista®, follow these notices may be installed. In the left pane, click Device Manager. Turn on or restart the computer, and...
...) network device, choose the procedure below that applies to the use of the screen. The FCC IDs are uncertain of the policy that corresponds to enter BIOS Setup. 3. For Windows Vista®, follow these notices may be installed. In the left pane, click Device Manager. Turn on or restart the computer, and...
Displaying a custom logo during bootup of HP commercial notebook systems - Technical white paper
Page 4
... Save and Exit. 4. Open the System Configuration menu, and then select Boot Options. Boot the system, and then press the f10 key at POST to enter BIOS Setup. 2. Figure 1: The FAT32 file system option Instructions for running EREPLOGO.EFI from the EFI shell 1.
... Save and Exit. 4. Open the System Configuration menu, and then select Boot Options. Boot the system, and then press the f10 key at POST to enter BIOS Setup. 2. Figure 1: The FAT32 file system option Instructions for running EREPLOGO.EFI from the EFI shell 1.
Displaying a custom logo during bootup of HP commercial notebook systems - Technical white paper
Page 6
The EREPLOGO.EFI tool will now display during POST. Systems running BIOS 08, BIOS 09, or BIOS 2011. You must run EREPLOGO.EXE from a DOS environment. You can use the tool to enter BIOS Setup. 14. You cannot use the EREPLOGO.EXE utility. Reboot the system (if the ... parameters (described in the "Command-line switches" section. ERPEPLOGO.EXE Utility Use the EREPLOGO.EXE utility for HP commercial notebook systems running BIOS 2012 cannot use this utility if a BIOS password has been set. 6 The custom logo will reboot the system after using the tool. Figure 5: Steps...
The EREPLOGO.EFI tool will now display during POST. Systems running BIOS 08, BIOS 09, or BIOS 2011. You must run EREPLOGO.EXE from a DOS environment. You can use the tool to enter BIOS Setup. 14. You cannot use the EREPLOGO.EXE utility. Reboot the system (if the ... parameters (described in the "Command-line switches" section. ERPEPLOGO.EXE Utility Use the EREPLOGO.EXE utility for HP commercial notebook systems running BIOS 2012 cannot use this utility if a BIOS password has been set. 6 The custom logo will reboot the system after using the tool. Figure 5: Steps...

HP EliteBook 8570w Mobile Workstation Maintenance and Service Guide
Page 136
... Some of the Computer Setup menu items listed in Computer Setup are accessed from the File, Security, Diagnostics, and System Configuration menus. Press f10 to enter BIOS Setup. 3. To start Computer Setup, follow these steps: 1. Turn on or restart the computer, and then press esc while the "Press the ESC... key for Startup Menu" message is enabled. Press f10 to enter BIOS Setup. Turn on or restart the computer, and then press esc while the "Press the ESC key for Startup Menu" message is not working ...
... Some of the Computer Setup menu items listed in Computer Setup are accessed from the File, Security, Diagnostics, and System Configuration menus. Press f10 to enter BIOS Setup. 3. To start Computer Setup, follow these steps: 1. Turn on or restart the computer, and then press esc while the "Press the ESC... key for Startup Menu" message is enabled. Press f10 to enter BIOS Setup. Turn on or restart the computer, and then press esc while the "Press the ESC key for Startup Menu" message is not working ...

HP EliteBook 8570w Mobile Workstation Maintenance and Service Guide
Page 137
... the computer restarts. Using Computer Setup 129 Use the tab key and the arrow keys to select File > Ignore changes and exit, and then press enter. - Your changes go into effect when the computer restarts. Follow the on or restart the computer, and then press esc while the "Press the...instructions. - Restoring factory settings in Computer Setup NOTE: Restoring defaults will not change the hard drive mode. Use a pointing device or the arrow keys to enter BIOS Setup. 3. Turn on -screen instructions. 5. Use the arrow keys to select File > Save changes and exit, and then press...
... the computer restarts. Using Computer Setup 129 Use the tab key and the arrow keys to select File > Ignore changes and exit, and then press enter. - Your changes go into effect when the computer restarts. Follow the on or restart the computer, and then press esc while the "Press the...instructions. - Restoring factory settings in Computer Setup NOTE: Restoring defaults will not change the hard drive mode. Use a pointing device or the arrow keys to enter BIOS Setup. 3. Turn on -screen instructions. 5. Use the arrow keys to select File > Save changes and exit, and then press...


