
User Guide - Windows 8.1
Page 5
... your hardware and software information 5 Locating hardware ...5 Locating software ...5 Right side ...6 Left side ...7 Display ...9 Top ...10 TouchPad ...10 Lights ...11 Buttons, speakers, and fingerprint reader (select models only 12 Keys ...13 Bottom ...14 Labels ...15 3 Connecting to a network ...16 Connecting to a wireless network ...16 Using the wireless controls 16 Using the wireless button 16 Using operating system controls 17 Sharing data and drives and accessing software 17 Using a WLAN ...17 Using an Internet service provider 18 Setting up a WLAN 18 Configuring a wireless...
... your hardware and software information 5 Locating hardware ...5 Locating software ...5 Right side ...6 Left side ...7 Display ...9 Top ...10 TouchPad ...10 Lights ...11 Buttons, speakers, and fingerprint reader (select models only 12 Keys ...13 Bottom ...14 Labels ...15 3 Connecting to a network ...16 Connecting to a wireless network ...16 Using the wireless controls 16 Using the wireless button 16 Using operating system controls 17 Sharing data and drives and accessing software 17 Using a WLAN ...17 Using an Internet service provider 18 Setting up a WLAN 18 Configuring a wireless...
User Guide - Windows 8.1
Page 8
...updates 67 Installing HP and third-party software updates 67 Securing your wireless network ...68 Backing up your software applications and information 68 Using an optional security cable lock 68 9 Using Setup Utility (BIOS) and HP PC Hardware Diagnostics (UEFI 69 Starting Setup Utility (BIOS) ...69 Updating the BIOS ...69 Determining the BIOS version 69 Downloading a BIOS update 70 Using HP PC Hardware Diagnostics (UEFI 71 Downloading HP PC Hardware Diagnostics (UEFI) to a USB device 71 10 Backing up, restoring, and recovering ...72 Creating recovery media and backups 72 Creating HP...
...updates 67 Installing HP and third-party software updates 67 Securing your wireless network ...68 Backing up your software applications and information 68 Using an optional security cable lock 68 9 Using Setup Utility (BIOS) and HP PC Hardware Diagnostics (UEFI 69 Starting Setup Utility (BIOS) ...69 Updating the BIOS ...69 Determining the BIOS version 69 Downloading a BIOS update 70 Using HP PC Hardware Diagnostics (UEFI 71 Downloading HP PC Hardware Diagnostics (UEFI) to a USB device 71 10 Backing up, restoring, and recovering ...72 Creating recovery media and backups 72 Creating HP...
User Guide - Windows 8.1
Page 13
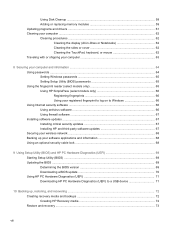
Go to information and troubleshooting tips To access Help and Support, from the Start screen, type help, and then from http://www.hp.com/go to http://welcome.hp.com/country/us/en/ wwcontact_us.html. From the Start screen, type support, and then select the HP Support Assistant app. 2. Resource Contents Setup Instructions ● Overview of computer setup and features Windows Basics guide Help and Support ● Overview of using Windows® ●...
Go to information and troubleshooting tips To access Help and Support, from the Start screen, type help, and then from http://www.hp.com/go to http://welcome.hp.com/country/us/en/ wwcontact_us.html. From the Start screen, type support, and then select the HP Support Assistant app. 2. Resource Contents Setup Instructions ● Overview of computer setup and features Windows Basics guide Help and Support ● Overview of using Windows® ●...

User Guide - Windows 8.1
Page 27
... a wireless access point. To share drives on -screen instructions. Select Change advanced sharing settings to set up a connection or network, connect to a network, and diagnose and repair network problems. To use the WLAN device in the File Sharing box, and then click Add. 4. Select Network and Internet, and then select Network and Sharing Center. From This PC, click a folder with each other. From the Start screen, type control panel, and then select Control Panel. 2. NOTE: When a disc like a DVD...
... a wireless access point. To share drives on -screen instructions. Select Change advanced sharing settings to set up a connection or network, connect to a network, and diagnose and repair network problems. To use the WLAN device in the File Sharing box, and then click Add. 4. Select Network and Internet, and then select Network and Sharing Center. From This PC, click a folder with each other. From the Start screen, type control panel, and then select Control Panel. 2. NOTE: When a disc like a DVD...
User Guide - Windows 8.1
Page 30
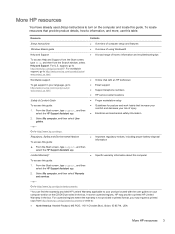
... network jack (1) on the computer. 2. Connecting to a network Plug the network cable into a network wall jack (2) or router. NOTE: If the network cable contains noise suppression circuitry (3), which prevents interference from TV and radio reception, orient the circuitry end of Bluetooth devices. Using Bluetooth wireless devices (select models only) A Bluetooth device provides short-range wireless communications that replace the physical cable connections that traditionally link electronic devices such as the following: ● Computers (desktop, notebook...
... network jack (1) on the computer. 2. Connecting to a network Plug the network cable into a network wall jack (2) or router. NOTE: If the network cable contains noise suppression circuitry (3), which prevents interference from TV and radio reception, orient the circuitry end of Bluetooth devices. Using Bluetooth wireless devices (select models only) A Bluetooth device provides short-range wireless communications that replace the physical cable connections that traditionally link electronic devices such as the following: ● Computers (desktop, notebook...
User Guide - Windows 8.1
Page 57
... power lights turn on wakeup To set a password to be required on wakeup, you must enter your work will return to the screen. From the Start screen, type power options, then select Power options. 2. In the left pane, click Choose what the power button does. 3. Manually initiating and exiting Sleep You can enable user-initiated Hibernation and change other power settings and timeouts using Power Options. 1. When the computer exits Sleep, the power lights turn on -screen instructions. In the When I press the power button...
... power lights turn on wakeup To set a password to be required on wakeup, you must enter your work will return to the screen. From the Start screen, type power options, then select Power options. 2. In the left pane, click Choose what the power button does. 3. Manually initiating and exiting Sleep You can enable user-initiated Hibernation and change other power settings and timeouts using Power Options. 1. When the computer exits Sleep, the power lights turn on -screen instructions. In the When I press the power button...
User Guide - Windows 8.1
Page 59
... an external power source, such as an external hard drive connected to a USB port. ● Stop, disable, or remove any unsaved information. ● If Hibernation is enabled and the computer is on page 48. NOTE: For additional information about battery types, specifications, life cycles, and capacity Conserving battery power Tips for conserving battery power and maximizing battery life: ● Lower the brightness on the display. ● Select the Power saver setting in Power Options. ● Remove a user-replaceable battery...
... an external power source, such as an external hard drive connected to a USB port. ● Stop, disable, or remove any unsaved information. ● If Hibernation is enabled and the computer is on page 48. NOTE: For additional information about battery types, specifications, life cycles, and capacity Conserving battery power Tips for conserving battery power and maximizing battery life: ● Lower the brightness on the display. ● Select the Power saver setting in Power Options. ● Remove a user-replaceable battery...
User Guide - Windows 8.1
Page 62
... enable this feature or manually adjust the settings, from external power. ● On models with a user-replaceable battery, remove the battery. 52 Chapter 6 Managing power When the computer exits Sleep, you must first exit Sleep or Hibernation before shutting down the computer. Right-click the Start button in the lower-left corner of the screen to exit Sleep. The Shut down command closes all open programs, including the operating system, and then turns...
... enable this feature or manually adjust the settings, from external power. ● On models with a user-replaceable battery, remove the battery. 52 Chapter 6 Managing power When the computer exits Sleep, you must first exit Sleep or Hibernation before shutting down the computer. Right-click the Start button in the lower-left corner of the screen to exit Sleep. The Shut down command closes all open programs, including the operating system, and then turns...
User Guide - Windows 8.1
Page 80
... connected to your hard drive. 70 Chapter 9 Using Setup Utility (BIOS) and HP PC Hardware Diagnostics (UEFI) Follow the on the screen reports a successful installation, you are revealed, follow these steps: a. From the Start screen, type file, and then select File Explorer. 2. During the download and installation, follow these steps: 1. Identify the most recent BIOS update and compare it has been downloaded to reliable external power using the AC adapter. You may need to access...
... connected to your hard drive. 70 Chapter 9 Using Setup Utility (BIOS) and HP PC Hardware Diagnostics (UEFI) Follow the on the screen reports a successful installation, you are revealed, follow these steps: a. From the Start screen, type file, and then select File Explorer. 2. During the download and installation, follow these steps: 1. Identify the most recent BIOS update and compare it has been downloaded to reliable external power using the AC adapter. You may need to access...
User Guide - Windows 8.1
Page 84
...; If the HP Recovery media does not work, you can obtain recovery media for recovery discs or a recovery USB flash drive. Go to the replacement drive. Using the HP Recovery partition (select models only) The HP Recovery partition (select models only) allows you to perform a system recovery or minimized image recovery without the need to reclaim hard drive space, HP Recovery Manager offers the Remove Recovery Partition option. For more information, see Creating HP Recovery media on page 72. ● To use the Factory Reset option, you must either download the software from the...
...; If the HP Recovery media does not work, you can obtain recovery media for recovery discs or a recovery USB flash drive. Go to the replacement drive. Using the HP Recovery partition (select models only) The HP Recovery partition (select models only) allows you to perform a system recovery or minimized image recovery without the need to reclaim hard drive space, HP Recovery Manager offers the Remove Recovery Partition option. For more information, see Creating HP Recovery media on page 72. ● To use the Factory Reset option, you must either download the software from the...

User Guide - Windows 8.1
Page 85
... an HP Recovery partition or if the hard drive is the order of devices listed in BIOS where the computer looks for startup information. Using HP Recovery media to recover You can no longer use HP Recovery media to recover the original system. You can change the computer boot order. Insert the HP Recovery media you press the power button. 2. Select the optical drive or USB flash drive you want to boot from the boot options menu. 4. Select Recovery Manager, and then follow the on -screen instructions. Changing the computer boot order If...
... an HP Recovery partition or if the hard drive is the order of devices listed in BIOS where the computer looks for startup information. Using HP Recovery media to recover You can no longer use HP Recovery media to recover the original system. You can change the computer boot order. Insert the HP Recovery media you press the power button. 2. Select the optical drive or USB flash drive you want to boot from the boot options menu. 4. Select Recovery Manager, and then follow the on -screen instructions. Changing the computer boot order If...
User Guide - Windows 8.1
Page 88
... battery temperature 50 Beats Audio 23 Beats Audio Control Panel 23 Beats Audio hot key 23 BIOS determining version 69 downloading an update 70 updating 69 Bluetooth device 16, 20 Bluetooth label 15 boot order, changing HP Recovery Manager 75 bottom 15 buttons left TouchPad 10 power 12 right TouchPad 10 C caps lock light, identifying 11 caring for your computer 62 cleaning your computer 62 components bottom 14 display 9 left side 7 right side 6 top 10 computer, traveling 50 connecting...
... battery temperature 50 Beats Audio 23 Beats Audio Control Panel 23 Beats Audio hot key 23 BIOS determining version 69 downloading an update 70 updating 69 Bluetooth device 16, 20 Bluetooth label 15 boot order, changing HP Recovery Manager 75 bottom 15 buttons left TouchPad 10 power 12 right TouchPad 10 C caps lock light, identifying 11 caring for your computer 62 cleaning your computer 62 components bottom 14 display 9 left side 7 right side 6 top 10 computer, traveling 50 connecting...
User Guide - Windows 8.1
Page 89
...hard drive 7 mute 11 power 8, 11 RJ-45 (network) status 6 wireless 11 low battery level 49 M maintenance Disk Cleanup 58 Disk Defragmenter 58 memory card reader, identifying 7 memory card, identifying 7 memory module identifying 14 inserting 60 removing 59 replacing 59 memory module service door, removing 59 minimized image creating 74 recovery 74 Miracast 25 mouse, external setting preferences 26 mute light, identifying 11 N network jack, identifying 6 num lock key, identifying 45 O operating environment 76 original system recovery 74 P passwords Setup Utility (BIOS) 65 Windows 65 ports HDMI...
...hard drive 7 mute 11 power 8, 11 RJ-45 (network) status 6 wireless 11 low battery level 49 M maintenance Disk Cleanup 58 Disk Defragmenter 58 memory card reader, identifying 7 memory card, identifying 7 memory module identifying 14 inserting 60 removing 59 replacing 59 memory module service door, removing 59 minimized image creating 74 recovery 74 Miracast 25 mouse, external setting preferences 26 mute light, identifying 11 N network jack, identifying 6 num lock key, identifying 45 O operating environment 76 original system recovery 74 P passwords Setup Utility (BIOS) 65 Windows 65 ports HDMI...
HP ENVY m6 Notebook PC HP ENVY Notebook PC Maintenance and Service Guide
Page 45
... complete and current information on -screen instructions. Component replacement procedures 37 See Service tag on the service tag at the bottom of each screw size and location during removal and replacement. NOTE: Details about your warranty to access and replace Customer SelfRepair parts successfully. There are on page 16 for Customer Self-Repair parts. Check your computer, including model, serial number, product key, and length of warranty...
... complete and current information on -screen instructions. Component replacement procedures 37 See Service tag on the service tag at the bottom of each screw size and location during removal and replacement. NOTE: Details about your warranty to access and replace Customer SelfRepair parts successfully. There are on page 16 for Customer Self-Repair parts. Check your computer, including model, serial number, product key, and length of warranty...
HP ENVY m6 Notebook PC HP ENVY Notebook PC Maintenance and Service Guide
Page 53
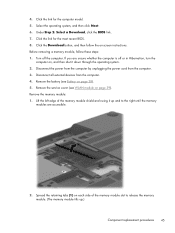
... Next. 6. Click the Download button, and then follow these steps: 1. Disconnect all external devices from the computer. 3. Remove the memory module: 1. Spread the retaining tabs (1) on -screen instructions. Under Step 2: Select a Download, click the BIOS link. 7. Before removing a memory module, follow the on each side of the memory module shield and swing it down through the operating system. 2. If you are accessible. 2. Disconnect the power from the computer by...
... Next. 6. Click the Download button, and then follow these steps: 1. Disconnect all external devices from the computer. 3. Remove the memory module: 1. Spread the retaining tabs (1) on -screen instructions. Under Step 2: Select a Download, click the BIOS link. 7. Before removing a memory module, follow the on each side of the memory module shield and swing it down through the operating system. 2. If you are accessible. 2. Disconnect the power from the computer by...
HP ENVY m6 Notebook PC HP ENVY Notebook PC Maintenance and Service Guide
Page 55
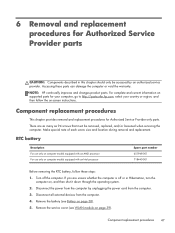
... unplugging the power cord from the computer. 3. Remove the battery (see WLAN module on -screen instructions. 6 Removal and replacement procedures for Authorized Service Provider parts CAUTION: Components described in Hibernation, turn the computer on, and then shut it down through the operating system. 2. Remove the service cover (see Battery on computer models equipped with an Intel processor Spare part number 651948-001 718440-001 Before removing the RTC battery, follow the...
... unplugging the power cord from the computer. 3. Remove the battery (see WLAN module on -screen instructions. 6 Removal and replacement procedures for Authorized Service Provider parts CAUTION: Components described in Hibernation, turn the computer on, and then shut it down through the operating system. 2. Remove the service cover (see Battery on computer models equipped with an Intel processor Spare part number 651948-001 718440-001 Before removing the RTC battery, follow the...
HP ENVY m6 Notebook PC HP ENVY Notebook PC Maintenance and Service Guide
Page 93
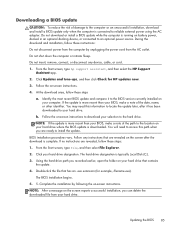
... your BIOS, make a note of the date, name, or other identifier. Follow any device, cable, or cord. 1. Follow the on your hard drive designation. Click your hard drive that has an .exe extension (for HP updates now. 3. The hard drive designation is connected to install the update. Using the hard drive path you are revealed, follow these instructions: Do not disconnect power from the computer by following the on battery power, docked...
... your BIOS, make a note of the date, name, or other identifier. Follow any device, cable, or cord. 1. Follow the on your hard drive designation. Click your hard drive that has an .exe extension (for HP updates now. 3. The hard drive designation is connected to install the update. Using the hard drive path you are revealed, follow these instructions: Do not disconnect power from the computer by following the on battery power, docked...
HP ENVY m6 Notebook PC HP ENVY Notebook PC Maintenance and Service Guide
Page 98
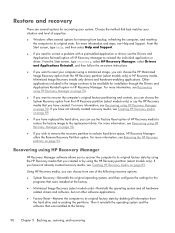
...-creating the partitions. If you have replaced the hard drive, you can choose from one of HP Recovery media to restore the factory image to the replacement drive. Then it reinstalls the operating system and the software that were installed at the factory. 90 Chapter 9 Backing up, restoring, and recovering From the Start screen, type help, and then select Help and Support. ● If you need to correct a problem with a preinstalled application or driver, use the Drivers...
...-creating the partitions. If you have replaced the hard drive, you can choose from one of HP Recovery media to restore the factory image to the replacement drive. Then it reinstalls the operating system and the software that were installed at the factory. 90 Chapter 9 Backing up, restoring, and recovering From the Start screen, type help, and then select Help and Support. ● If you need to correct a problem with a preinstalled application or driver, use the Drivers...

HP ENVY m6 Notebook PC HP ENVY Notebook PC Maintenance and Service Guide
Page 105
...wireless 10 M mass storage device illustrated 24 precautions 33 spare part numbers 24 memory card eader 12 memory module product description 2 removal 44 spare part numbers 20, 26, 44 microphone location 7 product description 3 microphone jack 14 model name 1 mute light 10 N network jack 14 num lk key 9 O operating system, product description 5 optical drive precautions 33 spare part number 24, 28 P packaging guidelines 35 plastic parts, service considerations 32 pointing device, product description 5 ports HDMI 12 product description 4 USB 3.0 12, 14 power button 8 power button board removal...
...wireless 10 M mass storage device illustrated 24 precautions 33 spare part numbers 24 memory card eader 12 memory module product description 2 removal 44 spare part numbers 20, 26, 44 microphone location 7 product description 3 microphone jack 14 model name 1 mute light 10 N network jack 14 num lk key 9 O operating system, product description 5 optical drive precautions 33 spare part number 24, 28 P packaging guidelines 35 plastic parts, service considerations 32 pointing device, product description 5 ports HDMI 12 product description 4 USB 3.0 12, 14 power button 8 power button board removal...

HP ENVY m6 Notebook PC HP ENVY Notebook PC Maintenance and Service Guide
Page 106
... board removal 61 spare part numbers 30, 31, 61 19, 29, T tools required 32 top cover, spare part numbers 18, 29, 30 TouchPad assembly removal 77 spare part number 19, 29, 77 TouchPad button 11 TouchPad components 11 TouchPad control zone 11 TouchPad zone 11 transporting guidelines 35 U USB 3.0 port 12, 14 V vent 12, 15 video, product description 3 W webcam 7 webcam light 7 webcam/microphone module removal 59 spare part number 22, 26, 59 Windows key 9 wireless antenna locations 7 removal 59 spare part number 23, 26, 60 wireless light 10 wireless...
... board removal 61 spare part numbers 30, 31, 61 19, 29, T tools required 32 top cover, spare part numbers 18, 29, 30 TouchPad assembly removal 77 spare part number 19, 29, 77 TouchPad button 11 TouchPad components 11 TouchPad control zone 11 TouchPad zone 11 transporting guidelines 35 U USB 3.0 port 12, 14 V vent 12, 15 video, product description 3 W webcam 7 webcam light 7 webcam/microphone module removal 59 spare part number 22, 26, 59 Windows key 9 wireless antenna locations 7 removal 59 spare part number 23, 26, 60 wireless light 10 wireless...


